

Your sailing multihull DESIGN-INFO site for…
Small trimaran information, small multihull design, design issues, construction methods, comparisons of designs, speed, stability, and much more….

W17 Main Page
—Chris, Queensland
—Andrew, Philippines
—Jonathan, Michigan
—JR, first W17 kit owner
—Alan, St-Jean-de-Luz, France
—Louis & Luigi, Philippines
—David, Philippines
…I'm very impressed with the seaworthiness of this little boat. I have been in places I clearly should not have been, and in some very bad weather too…
—Andrew, Philippines
Read more sailors' comments…
…was immediately struck that Mike's design goals closely matched my own. Really liked the look of the curved akas and plans for a wing mast are a big plus.
—Gary, Virginia
Read more builders' comments…
This boat…has such style and lines that she'd look totally in place as a sporty tender or toy on the deck of a fine Italian mega yacht. Very nice indeed!
—Marshall, Florida
—Don, Alberta
" ... the W17 feels like it's flying through the water and air, unlike any other sailboat I've ever been on .... as it slips over the water with such agility and efficiency
—Bill, W.Virginia
‘The Waters Edge’
W22 main page.

Fram's Building and Sailing Pages
Introduction.
Hello and thank you for showing interest in the building story of Fram, my F-39 trimaran.
Using the “Next” button at the bottom of this page will guide you trough the whole construction process. But be warned, there is a lot of information and thousands of pictures, so it can take some time for the interested reader.

Initially, the choice for my new to build boat fell on the high-tech F-36 trimaran, a design by the famous New Zealander Ian Farrier ( † RIP Dec.8, 2017).
In those days the F-39 did not exist yet. Although the F-36 missed my preferred folding option, the design nevertheless meets most of my wishes. According to Farrier, there was simply not enough demand for a folding option for such a large trimaran. And is it not true that a boat is always a compromise ?
Actually, the determining factor to go on with this Farrier (F-boat) design was the superbly detailed building plans and the building method. The more I studied the plans, the more I realized that this boat is an engineering marvel and accompanied by an building method that I could manage. So all necessary attributes for an high quality yacht!
However, somewhere in my head I still felt the obligation to find out whether it was not better to outsource the construction to a suitable yard. Though, I had already realized that this would be far above my budget, which was indeed proven by offers from various yacht builders at home and abroad.
“The desire to build a boat ... begins as a little cloud on a serene horizon. It ends by covering the whole sky so that you can think of nothing else.“ quote Arthur Ransome
I can not deny that this state of mind led to the purchase of the building plans. A stack of paper from which a boat has to be built. This is the beginning of an almost incalculable adventure.
I bought the original F-36 plans in the spring of 2000 and planned the start of the construction process by the end of that year. But it worked out differently.
And I want some new furnishings too ................
And the kids want a bigger rabbit hutch..............
By finishing this and carry out your promises I will be ready for the project.
Of course she was right !
Update to the F-39

Autumn 2001 everything was done. In the meantime I have been searching for materials and suppliers, and have negotiated for prices and specifications. As still being a greenhorn in composites, I tried to get familiar with all these composite materials and worked on another F-36 (thanks Gary Mulder) to go through the laminating process of the main hull.
And just before I ordered the materials for the first float there was a very welcome note from Ian Farrier that he decided to upgrade the F-36 to an F-39. The new design is not only larger but also includes a number of improvements, the latest design insights, rotating mast and last but not least the folding option.
So this delay wasn't too bad at all and now I could update without any trouble and not having done the wrong things. Spring 2002 I ordered the updated plans. Not all drawings were ready yet but there was enough to make a start.
In the spring of 2003 the form frames for the first float are upright.
Vacuum Resin Infusion.
In the year 2000 when I started to study the possibilities for a DIY boat building project, I was a total composite greenhorn, but I already had learned that a vacuum treatment was desirable to get the lightweight multihull quality I was looking for. However, it was hard to find any information about how to get a vacuum densified laminate within my range of possibilities.
I learned to understand the vacuum bagging technique but the implementation looks to be very challenging. At least to me. The fact that this technique should start with old-fashioned hand lay-up and then to be completed within the time constraints of the resin clock currently looks very discouraging to me. And for laminating and subsequent vacuum bagging the hulls are many helpers needed for which I do not have enough space in my humble workshop.

An article in our local ″ Zeilen ″ magazine put me on the trail of the vacuum infusion technique. This has given me a whole new perspective on the matter. Although, there was almost no information available, except that it was some kind of black magic, operated behind closed doors by some very professional boat building plants.
A breakthrough was made possible through the purchase of knowledge at Polyworx in the person of Mr. Arjen Korevaar.
With almost no previous composite experience, I suddenly saw the possibilities to make my boat building project possible and still be assured of the best possible quality. After all, vacuum infusion is a defined process that not depends of my initially lack on knowledge and experience and skills for laminating big boat hulls. It gave a boost to the preparations.
Earlier in the eighties I have built an epoxy/wooden boat, somewhere in a remote barn. From that I learned that I will never build a boat again in a different location than at home.
In the past I did a rebuilding of the garage of our modest house with the intention to enlarge the living room with the aft part of the (former) garage. But I had also a hidden motive to built a new boat, so the actual joining with the living room had still to wait some time ....
Building at home is essential for me. Despite the small room for this project, it is much more efficient than a workshop somewhere else. It's save, I can leave the things behind me and every single moment of the day, or when I feel like to do something, the project is just a few steps away. But the most important advantage is the fact I can stay at home and near my family, a great benefit to family- and social live.
With extension the working area is about 13 x 3,7 m², but the height is not enough to join the two main hull halves together. So I have to do this somewhere else.

Since there is only just enough room for the main hull (or halves), I made an attic floor for workbench and vacuum table. In fact, the whole floor is a 3,5 x 3,7 m² bench and a standing room is 0,9m. lower in front of this (removable). With the main hull in place, I don't need this lower floor anymore as working at the bench is possible while standing on the F-39 cabin roof.
However, I still need to learn to have the discipline to be very organized and clear, to be able to manage this job in this limited space. Anyway, I don't have a choice. I would never attempt such a project in another location than at home.
As I am going to build with epoxy, there is no inconvenience with bad smell because epoxy is almost odorless. Which is not the case with the two part painting products. These have an awful smell and for this reason I installed a big ventilation unit capable to maintain a low pressure in the workshop. With this the painting fumes flow outside instead of causing troubles with the family.
Workshop extension
There was still one difficulty to overcome: the garage is 2m. too short so I had to enlarge the garage a bit. This turned out to be a big problem in our highly civilized and urbanized small country! July 2001 the plans for a temporary extension were sent to the officials of the my hometown.
By the end of August they decided to turn my request down...............
As I've said before, home building is essential. No permit is no project, but this is something the Jacks-in-office didn't want to know and certainly would never understand. (and here they are right, it's nuts probably ;-)
Wow, I never expected this. The extension is simply, small and temporal while I knew (almost) for sure the Dutch building laws must allow this! So next step was to raise an objection to this decision and for this we have a special committee of independent wise men. They decided that the refusal was taken on wrong arguments and advised the officials to think about other arguments for a refusal (no sailors neither)!
Now it became a bad joke. Better arguments were hard to find, but they found them, legal ones against a temporary extension, but, as I found out, nothing against a permanent extension...........
All parties were agreed that this enlargement is not an embellishment for the house, so the legal permanent option is the worst solution. This strange situation came to an climax by a special permission by the Lord Mayor himself, which allowed me to build the temporary (and inexpensive) option. I received this long awaited document in the summer of 2002.
After one year of struggle, the actual building of the workshop extension was finished in just 3 weekends. Even the neighbors like the result and are getting curious about my activities (which are quite abstract for non-yachties).
I started the building of the F-39 in the Spring of 2003 at home. By the end of 2009 I have build and finished both floats as well as the starboard half of the main hull together with some interior parts as settee and galley. Roughly a little less than half of the entire construction job, although it has taken much too long.
But then that once-in-a-lifetime opportunity came along ....
2010 Changes, another workshop
While sitting in the sunny garden in summer 2009 and looking at the successful work we did with once more an alteration of the house (expanding the attic into a fully-fledged living floor), we thought we had made a good descision to cross out the idea of once moving to our ″Dreamhouse″ and instead making our house more comfortable. That dream was living near the water with the boat along the garden jetty. This kind of villa's are always far above our budget.
However, it is a buyers market nowadays and while having peace with the decision to give up this apparently not realistic dream, a once in a lifetime opportunity came along. A radical turnover lead to buying a house with a private harbor on the South side of the IJsselmeer, without any bridges or locks to pass and with plenty of room (33'x40') for the unfolded F-39, very rare in our little country.
When I had known this just a few months earlier, we would not have start the extension of the roof. Now it is not finished yet and we are moving to another house. Challenging times so to speak !
So, the Fram project had to move to a new workshop, which I found quite nearby and not coincidentally being our company workshop.

Much more room, but also not at home, which was a major condition to undertake this huge building project. Much less privacy too. This of course is a temporal solution with the necessity of getting in a hurry. This means from now on I will focus on finishing the F-39 on the outside and get her in the water to tie her up along the jetty of our new home. Further work on interior, hardware and rigging will be delayed till she is at home again.
What is my schedule ? This seems to be the most important question, not anymore for me but apparently for others who have asked me that already 1000 times. My answer has always been simple, next year! And that is the most accurate answer I can give as that planning turns out to be correct every year.
It is a part-time project, besides a day-job that requires a lot of time and attention, and I work in spurts and bursts, not steadily. And always on my own without any outsourcing. One needs an optimistic mindset because everything takes three times longer than previously thought. I now know why many of these kinds of projects are stranded halfway.
I once met a German catamaran builder and asked him how many years it has taken him to finish his beautifull catamaran .... 14 Years ! was his answer. I complimented him with the great result and shake hands, meanwhile thinking ″that man must be bloody crazy, not my piece of cake ...″
There are only a few F-39's sailing in the world nowadays. Almost all have been built commercially. A sign on the wall? I know of some half build project, resting in parts in a remote barn somewhere, waiting for that enthusiastic builder who will take up the challenge again. But I also know of some almost completed projects that are not far from launching.
It's time for more F-39's in the water.
My schedule:

Please be warned! If anything on this web site appears to be a recommendation on how to build a boat it is an error of writing or editing. This site is my builder's documentation to chronicle the adventure I had in building Fram.
The Internet is such a lovely open source. Remember this when you see something in this website what you think is yours. If I didn’t ask you before then there was no copyright and I borrowed it. If you think I made a mistake in this, I will give it back to you. If you think I forgot to mention my sources, please let me know. However, everything on this site is mine and no part of this may be reproduced in any form without permission in writing by me. As you may have noticed, this site is a labor of love with lots of free information that has been assembled for your entertainment. Please respect the spirit of this site and don't engage in behavior that I consider hostile.
All information is composed with care and consideration using my background and personal experiences. You may disagree with my opinions or, better, let them support you in your own dreams. You are free to do the same things or to use the procedures, practices or methods as described in this site, but you should always use your own common sense when applying this information to your personal projects and you do this on your own risk for which I am not responsible. I do not warrant or make any representations regarding the use or the results of the materials, practices or methods on this site or linked sites in terms of their correctness, accuracy, reliability, or otherwise. The only thing I can promise you is that I have or will have enough confidence in the info supplied that I already have or will use it in my own project.
While you and I might consider some of the images on this site quite pretty, please respect copyright and do not enhance your site by hotlinking to images on mine. Hotlinking does not only violate my copyright, it also makes me pay for the delivery.
If anything I do or say happens to offend you, that is unfortunate, you are free to go elsewhere.
I explicitly disclaim any responsibility for the accuracy, content, or availability of information found on this site and sites that link to or from this site or that this site or sites that link to or from this site are free of viruses or other harmful components.
I am not affiliated with the manufacturers or resellers of products featured on this site in any other way than perhaps being a customer. Furthermore, since I'm not charging you anything for the use of this site, you're going to be the one assuming the risk of anything and everything you do as a result of reading content here.
Believe it or not, I do get a lot of mail. It may take a few days or longer to answer, as time allows. However, I do attempt to answer all e-mails.
24 Foot Sailing Trimaran

Introduction: 24 Foot Sailing Trimaran

Indonesian style, built out of recycled stuff. Here we are busting out through the surf in 30mph winds at Stinson Beach California on the maiden voyage. The boat works great! There are no swimmers or surfers out because of the rough conditions. The kids are on the beach making forts out of their boogieboards instead of surfing. Specifications: Hull Length 24 ft at deck Hull 22" wide amidships at deck, 18" wide inside hull (there's a wide lip at deck) Hull 24" deep amidsnips. The hull round bottom is a semicircular arc of 8.25" radius. Hull rocker is about 4" measured from points 16' apart. Outrigger crossbeams are 14' 7" long 3.5"x2.5" fir beams tapering to 3x2.25" at ends The outrigger floats are 4.5" diameter, 19 feet long with foam plugs in ends. ~134lbs buoyant. The plugs in the front of the floats are shaped into a nose that protrudes 6.5" more. 1.5" diameter stainless steel tubing connects the crossbeams and floats. The Sail is an 8 sq. meter crabclaw / leg-o-mutton sail on 14ft. windsurfer masts. The mast is supported by three stainless steel cable stays. Total cost of materials was $200 or less. The outrigger floats are fiberglass chemical pipes full of empty plastic soda bottles. The main hull is made from a pair of old 16' catamaran hulls cutoff and glassed end-to-end. Junked catamaran hulls are easy to get. If you can't find a free hull, build a hull like the Kenya Canoe but bigger. Use scavenged plywood from crates if you want it free. The wood for the crossbeams came from a big pallet, with the nails and crossboards pulled off. Then I scarfed them together for extra length. The sail is blue tarp on windsurfer mast spars. Great action photos by kenny
Step 1: Beaching After the Maiden Voyage

Star , Damon and myself rode the boat in on the back of a big wave, just like the Malibu Outrigger manual recommends. Then we carry the boat up the beach. The sail helps us and we scamper up the beach and get clear of the break zone before the next wave hits. What a great boat. Unlike trials of previous boats in Mexico and Kenya which got badly damaged by surf landings, this boat is fine. It helps that there's a lot of wind and the boat is faster than the waves.
Step 2: Cartopping

Here it is on top of the ugly truckling. It assembles quickly without tools. The main hull is the heaviest part, about 90 lbs. It takes two people to lift it onto the roof rack because it's so big. The other parts are a lot lighter and one person can handle them. 4 or 5 people can ride in the cab of my truck. The boat could carry that many also, so it's a good match. We could only get three people to volunteer for the maiden voyage because the conditions were so rough, but there was room for more.
Step 3: Or on a Trailer

To launch it from a trailer, you drive to the boat ramp, assemble the boat while still on the trailer, then launch and land it in the usual way.
Step 4: Inspiration

I once tried to sail to Cuba in an outrigger canoe. There were some problems. When I was almost to Havana my rudder broke so I couldn't sail, the current carried me away, I was caught in a storm, etc. etc. I spent a lot of time trying to not to die and hallucinating from exhaustion. I also spent a lot of time thinking about the perfect hull shape for a sailing canoe. In the following year I traveled to Indonesia and Papua. I learned a lot by gaping at and measuring sailing canoes there. Here are some Makassarese (Sulawesi) canoes I saw in Jayapura Harbor, Papua. In severely technical terms, here's what I was looking for in a hull: 1) High prismatic coefficient (fat ends) 2) Round bottom 3) Straight sides in the middle 4) Just the right amount of rocker. Curved like a banana. 5) A beam to length ratio of around 12:1
Step 5: Cut and Paste Catamaran Hulls Together End-to-end

I found a pair of 16' catamaran hulls for sale on craigslist that were exactly what I was looking for. By no coincidence, they were designed and built by Karl Westbroek, an engineer from Malang, Java, Indonesia. They were a nice bright yellow that emphasized their banana-like shape. Hence Karl's original name for his catamaran, "Bananas". I wanted my hull to be pointy at both ends. These hulls had square transoms at the stern. So I had to cut off the sterns and butt up the pointy ends to make my hull. To figure out the right place to cut them I slid a piece of paper over the hulls to find a special transverse curve called the "Geodesic". That's the shortest path between two points on opposite sides of the hull. I cut the hulls, butted them up, and checked to make sure the keel and sides met at a reasonably fair curve.
Step 6: Thinning the Edge

Before we can start glassing, we need to grind down the existing fiberglass so it's a smooth transition. Michael Kearney helps me out by grinding the edge thin on the inside of the joint.
Step 7: Jigging It Up

Next we clamped and screwed a bunch of sticks to the outside of the hulls to hold them in alignment. Jrlee checks that the decks are parallel.
Step 8: Glassing

Jrlee mixes some epoxy. We cut and lay out strips of fiberglass cloth on a piece of plastic on the deck. We soak the cloth with epoxy. We layup the glass into the hull, squeegeeing and painting the epoxy so the cloth is fully saturated. The wider strips of cloth go over the narrow strips, so the rough edges of the cloth aren't exposed.
Step 9: Rough Fairing

I mix some glass microballoons with epoxy and slather that all over the outside of the hull. When it sets up I grind it flat with a sanding disk. While I'm doing that Danny comes and suggests a better way.
Step 10: Rapid Fairing

He's glued a board to a sanding pad and glued a full sheet of 80 grit sandpaper to that. He creates an artificial snowstorm while sanding the hull, and in a few seconds it's smooth and faired. Wow.
Step 11: Glazing and Finish Sanding

Next I squeegee some body putty over the nicks and imperfections. When that's dry I wet-sand it with a sanding block.
Step 12: High Build Sanding Primer

Next come a couple of coats of fast-dry high build sanding primer, then some wet-sanding with a sanding block, and finally a coat of yellow paint. The hull is all one hull now.
Step 13: Outrigger Floats

A friend gave me some fiberglass chemical pipes. They are 19 feet long and 4.5" in diameter. I would have been worried about the chemicals but the pipes were brand new. Actually they might be intended as covers for glass pipes. I tied strings to the necks of some 2 liter soda bottles and shoved them into the pipes. The string is to keep the bottles from floating away in case of a disaster. I carved some minicel closed cell foam to make plugs for the pipes. I shaped the front plugs into the noses seen here. The flat front feature is like the "manu" on the front of a Hawaiian canoe. As it plows into a wave, it sprays the water away forming a giant air bubble around the float. The bubble rises through the wave, pulling the float up with it. It works really well.
Step 14: Float Blocks

The outrigger floats are 4.5" diameter fiberglass chemical pipes. I made some wooden blocks to rest on them. They will be the "feet" of some short legs made of stainless steel tubing. Those in turn get connected to the crossbeams. Just like Ezekiel, the foot bone's connected to the leg bone, the leg bone's connected to the thigh bone. Here I am testing the first block I made to see if it fits the pipe right.
Step 15: Cutting Curved Grooves With a Tablesaw

I setup my ghetto tablesaw, which is a circlesaw screwed to a board. Yes, it's very dangerous. Don't do it. I set up the fence at an angle to the blade. I made a lot of cuts of increasing depth in a block of wood until I had a nice round trough cut in the bottom of the block.
Step 16: Wooden Shoes

Then I repeated the process on some narrower blocks, cut holes the right size all the way through with a hole saw.
Step 17: More Wooden Shoe Cobbling

I glued a wooden disk in the bottom of the hole so the tubing leg wouldn't touch the float directly. I heated up the block to cure the epoxy quicker. Don't breathe those buttery fumes! When the epoxy was set up I shaved the protruding plugs off with the tablesaw. I drilled some lashing holes in the sides of the blocks and cut the corners off the ends so they would enter the water better. Jumping ahead, let's go sailing and I'll show you how this stuff turned out.
Step 18: Hot Spring Break

Star organized a trip to a hotspring on the coast that's only exposed at the lowest tide of the month. We camped nearby on friday night, woke up at 5 am to hike down. It's pretty amazing. There's a main pool and also a cave full of hot water that goes back into the cliff face. We relaxed in the hot spring until the tide rose and waves of cold water started washing into the spring. Then we hiked back up to the truck and it was time to put the yellow canoe in the water. So we drove to Stinson Beach and parked as close to the beach as we could. We unloaded the canoe parts onto the grass in the park there.
Step 19: Lashing It All Together

We swarmed over the canoe, lashing all the arms and legs to it with bicycle innertubes. The front beam takes most of the load, so it has a double tube 'H' shaped stainless tubing leg that connects the beam to the float. The foot of the 'H' rests in sockets in a wooden block. The bottom of the wooden block is carved to fit the top of the float tube. The float is lashed to the block with spectra string and innertube. That part stays lashed permanently.
Step 20: Carry It to the Beach

We had plenty of help from relaxed sleep-deprived pals from the hotspring trip. When it was all tied together we picked it up and carried it to the water.
Step 21: Please Return!

In case something went wrong and we lost the paddles we wrote plaintive messages on them in hopes that someone would return them. These are instant paddles made in a few minutes from a hockeystick, a board and some string, but they're so nice it would be a shame to lose them.
Step 22: Farewell Hugs

The wind had increased to a gale. The sea was rough. Time for farewell hugs!
Step 23: Raising the Sail

We hoisted the sail and watched the waves. The surfers were all on shore so we couldn't use them to judge the size of the waves. But at least we didn't have to worry about hitting them.
Step 24: Launching!

Star , Damon, and I carried the boat to the water just as a big wave washed ashore. We jumped on, sheeted in the sail, and started paddling at the breakers.
Step 25: So Far So Good

The boat took off like a racehorse. It's easy to steer with a paddle. It goes to windward just fine. We sped toward the outer break. Wait a minute. That's a big wave coming!
Step 26: What's Going to Happen?
We hit the wave and there was whitewater everywhere. We kept going through it, and when we could see again we were still moving fast and there was hardly any water in the hull. The boat works in surf!
Step 27: Sailing and Landing

We sailed around until one of the lashing buttons broke, then decided to head back in. We surfed in on a wave, outran it, and executed a perfect landing on the back of a wave. Jubilation! The boat could have handled more passengers and rougher conditions.
Participated in the Earthjustice United States of Efficiency Contest
Recommendations

Green Future Student Design Challenge

Fix It Contest

All Things Pi Contest

- GRAINGER DESIGNS
Raku Sailing Catamarans

From 32' to 66' LOA . We've designed these elegant high performance cruising cats for fast efficient construction from Panel Kits. More details here:

At 78' LOA with luxury accommodation for 12 guests in 6 cabins with en-suites, this is the premier model in the Sensori Power Cat Range.

Above; 42' custom trimaran "Venom" See the Trimaran Pages here
Join the Newsletter

- Scroll to top
Yachting Monthly
- Digital edition

Wow, that was fast! Why trimarans are SO much fun to sail – and how to do it
- Theo Stocker
- February 13, 2024
For their size, trimarans can punch well above their weight in speed, cruising potential and fun. Monohull sailor Theo Stocker gets to grips with how to handle one
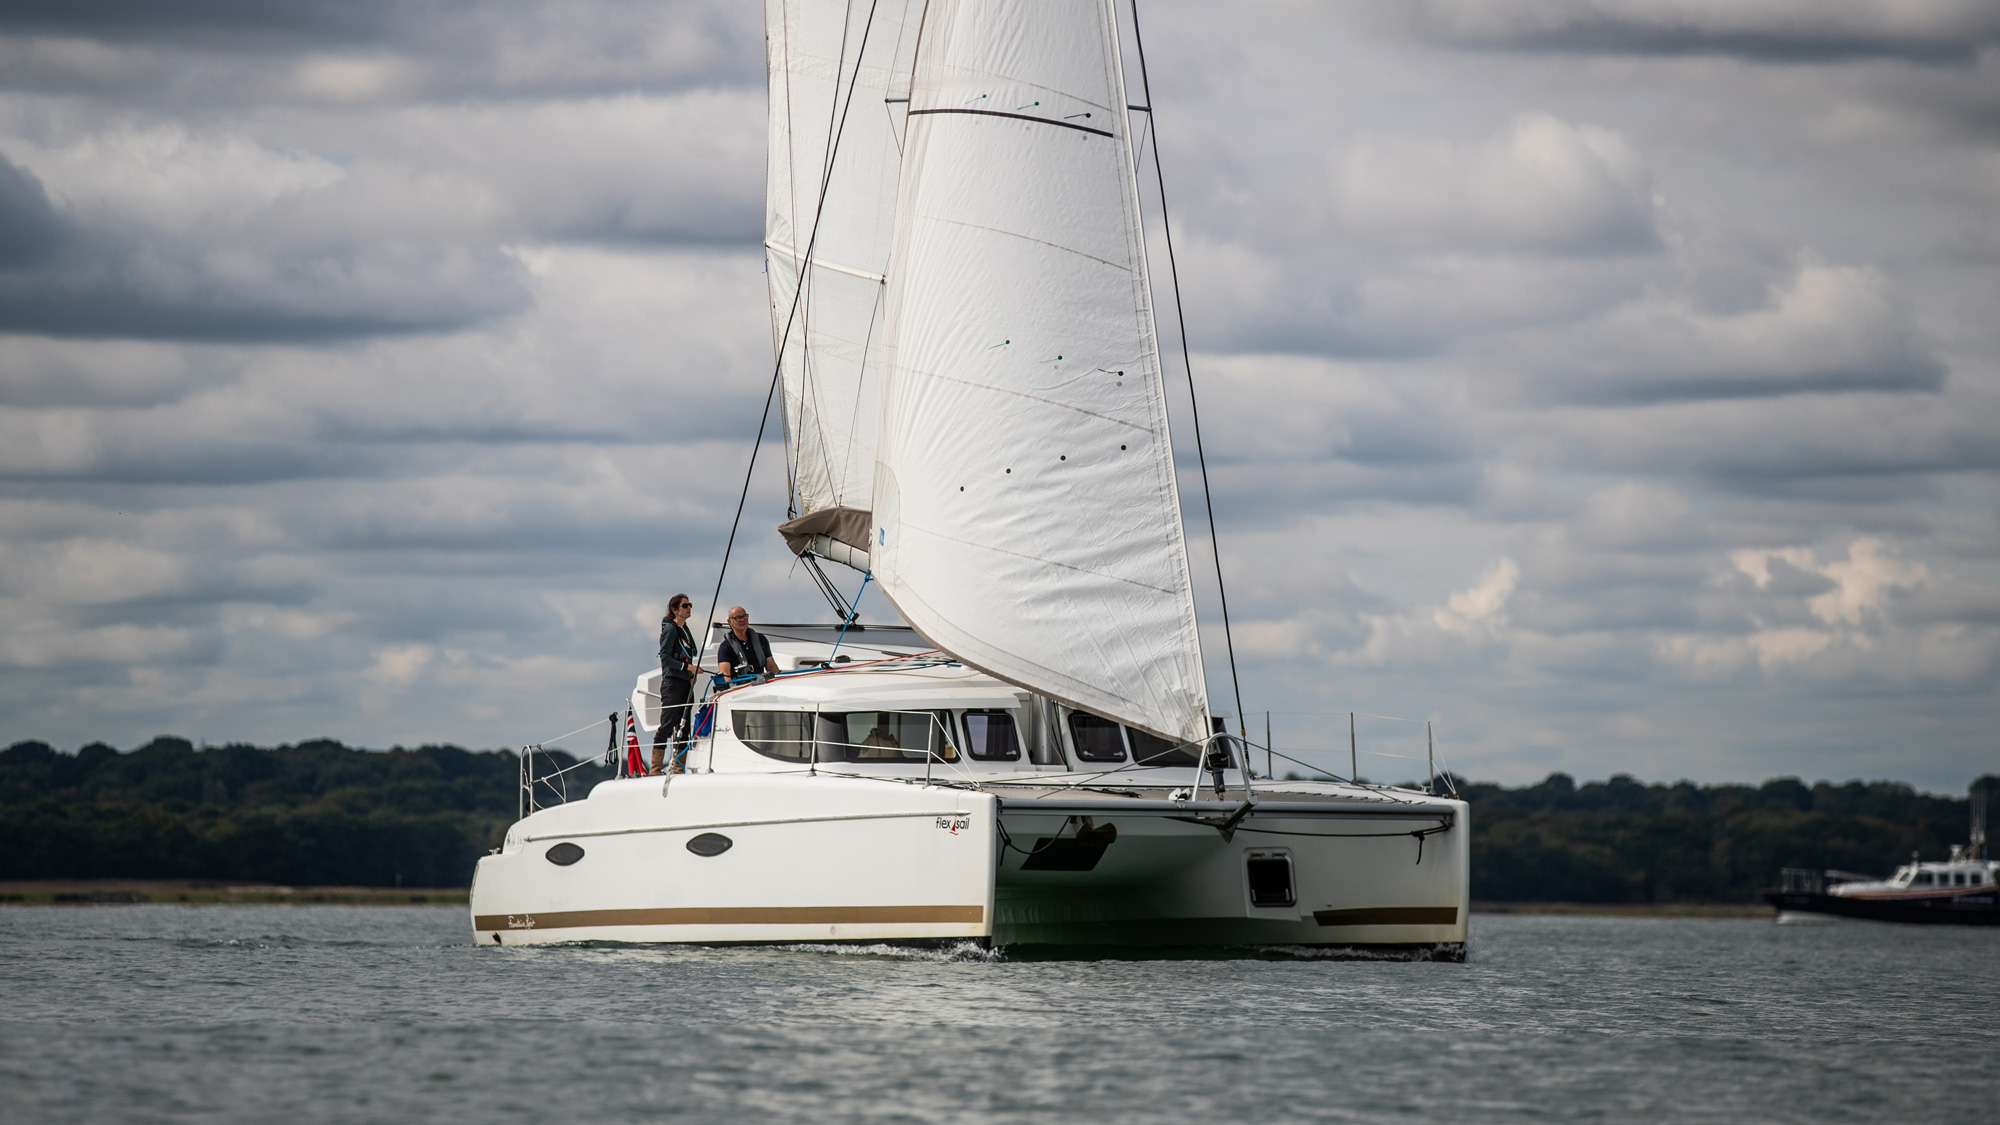
Humans tend to gravitate into tribes of like-minded enthusiasts, enjoying the encouragement, support and sense of identity, while often looking askance at others; sailors at motorboaters, cruising sailors at racers, monohull sailors at raft, I mean, multihull sailors, and everyone looks askance at jet-skiers.
Large cruising catamarans (40ft now counts as a small one) are a world apart from monohull sailing, but there’s a sub-tribe of sailors dedicated to life on three hulls and builders such as Dragonfly, Corsair, Farrier, and Astus give them plenty of choice.
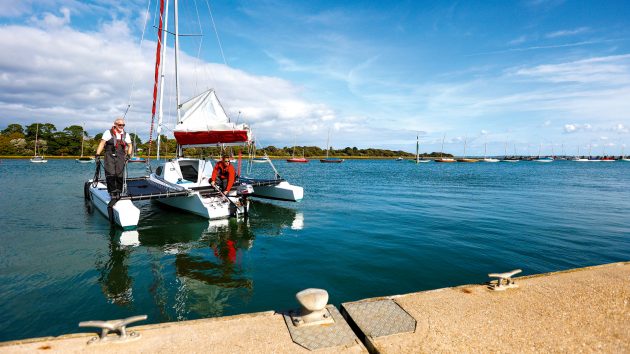
I’ve been sailing a 22ft (7m) Astus 22.5 this season, with just enough space for a family of four and a minimum of creature comforts. Thanks to her VPLP-designed hulls and 650kg all-up weight, we can sail upwind at 7-plus knots and downwind at over 10 knots with ease, all on a roughly even keel, while the kids play Duplo down below. It can also be beached and is towable behind a car.
Having, it seems, caught the trimaran bug, I wanted to get better at sailing and handling the boat, but my monohull sailing experience and habits were proving something of a hindrance, so we sought advice from some existing trimaran owners, and well as the UK’s top multihull sailors.
Much of the advice will apply to all multihulls , whether two or three-hulled, while other parts are just for small trimarans. I also found that brushing-up some of my rusty dinghy sailing skills helped get my head around what we were trying to do.
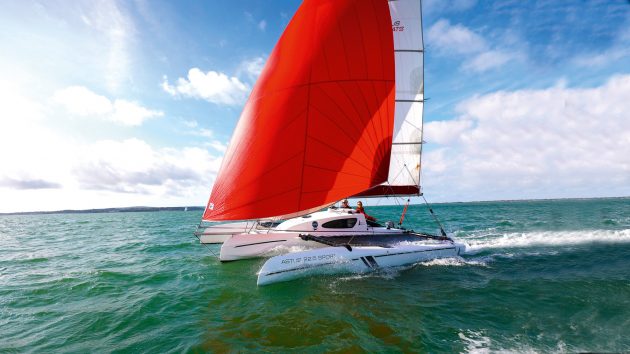
To try out our expert tips we went out sailing to see what difference they made. On the day, we got a solid Force 4-5 southwesterly, averaging 16 knots, but fluctuating between 12 and 20 knots true.
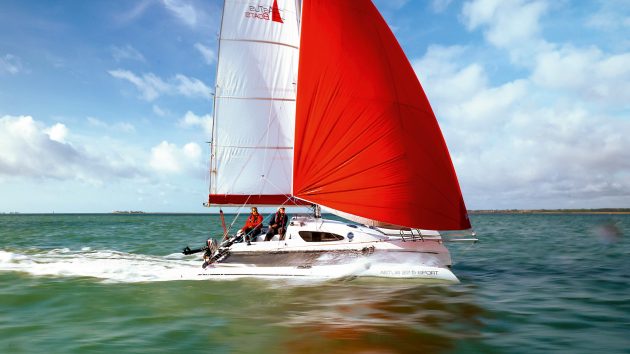
Blasting about on a sporty trimaran is a whole world of fun, but is much calmer than it looks
Trimaran sail trim
One of the biggest differences between a cruising monohull and a multihull is how the mainsail is trimmed. Leech tension on a yacht is often largely controlled by the kicker and the backstay, while the mainsheet sheets the mainsail in and out, predominantly controlling the angle of the boom to the centreline, and there may be a short traveller.
On a mulithull, however, there’s more than enough space for a good, wide traveller. Those who sail on performance monohulls will also be used to this. The sail shape is mainly controlled by the mainsheet, and the traveller then moves the boom towards or away from the centreline.
This is exaggerated on a multihull which has wide shrouds, swept well aft with no backstay, making space for a powerful square-top mainsail with full-length battens. There’s no backstay to bend the mast and flatten what is anyway a pretty rigid mainsail.
The mainsheet purchase creates enough power to control the leech of the square-top mainsail
Depowering a trimaran
Sailing on a monohull, heel and weatherhelm and eventually a broach give loads of warning that you’re pushing too hard. With straight hulls and little heel, those warning signs don’t really apply to multihulls.
In reality, however, there are a host of warning signals that it’s time to back-off; they’re just a bit different. Even then, there’s still a large safety margin before you get close to danger.
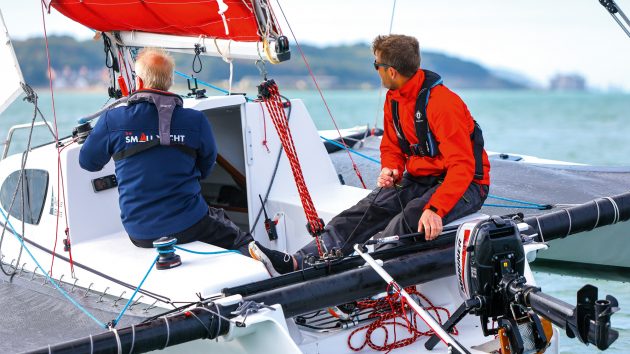
By way of reassurance, with the boat powered up on a beat, Hein, from Boats on Wheels, the boat’s owner, stood on the leeward hull and lent on the shrouds. Even as his feet got wet and the wind gusted at the top of Force 4, the boat didn’t bat an eyelid, thanks to the huge buoyancy of the floats.
Even with a person on the leeward float the boat was extremely stable
On the water – sail trim
My first inclination was to point the boat as high upwind as possible, pin the sails in and go for height. Doing that resulted in a not-terrible boat speed of 5-6 knots and a good pointing angle.
Free off by a handful of degrees however, and ease the sails just a smidge, and the speed leapt up to 8-9 knots – over 50% more; a huge increase. So, don’t pinch. If you had a decent chartplotter on board, you could find your optimum speed to angle using velocity made good (VMG).
I was also tempted to pinch in the gusts, but it’s better to hold your course and let the speed increase until the main needs easing.
On the wind, it’s time to get the boat fully powered up
If that’s the case, drop the main down the traveller an inch or two or ease some twist into the mainsail and it makes all the difference in the world, but not so far that the top battens fall away and invert – that really isn’t fast. Push too hard and the boat will slow down, largely from the drag of submerging the leeward float and crossbeams. If you’re still overpowered and the main is luffing, it’s time to reef. Downwind is different, but we’ll get onto that later.
After we put a reef in the main, our boat speeds upwind remained largely the same, and the boat was much happier. I came away feeling reassured that even a little trimaran like this would be pretty difficult to capsize, and there were always plenty of warning signs telling me to take my foot off the pedal a little.
Article continues below…
Catamaran sailing skills: Mooring and anchoring a multihull
How do you make an average passage speed of 7 knots, fit in three double cabins and a huge saloon…

Monohull or multihull: which is best for blue water?
As former editor of Yachting World, David Glenn has plenty of experience of both monohull and multihull cruising. Here he…
Tacking and gybing a trimaran
Everyone knows that multihulls don’t tack as well as monohulls. Straight hulls and wide beam don’t lend themselves to turning, especially when coupled with the displacement and fixed keels of big cats. Trimarans are a little easier, with a single central daggerboard to act as a pivot, and one or other of the floats will generally be clear of the water. On the downside, light displacement means that there isn’t much momentum to keep you going through the turn and plenty of windage to stop you.

On a trimaran the central daggerboard helps the boat to turn by providing a central pivot point that catamarans lack
Speed is your friend. Build speed up before the tack to give you as much momentum as possible. The helm needs to steer positively into and through the turn, and if necessary, keep the jib backed on the new windward side to help the bow through the wind. Don’t worry about scrubbing speed off, but you don’t want to get stuck in irons.
When it comes to gybing, speed is again key. The turning bit isn’t going to be an issue as you’ll be scooting along, but the faster you’re going, the less load there will be on the sails. The more you slow down, the more the true wind will pile up.
Trimaran sailing skills
Tacks took a bit of practice. It felt plain wrong to jab the tiller across the boat, slamming a big break on in the water but I ended up putting us through the tacks far too slowly, losing a lot of speed. A more aggressive approach worked better. On the Astus, the traveller was between me and the tiller, so the tiller extension needed to be swung around the stern behind the mainsheet onto the new side.
Similarly, old habits of controlling a gybe needed to be modified. With the asymmetric set, we were planing at well over 10 knots, and the ideal is to stay on the plane. Heading dead downwind and centring the main lead to a more violent manoeuvre than flying into the gybe as fast as possible and, as the boom was never that far out thanks to the apparent wind angle, it didn’t need much extra controlling.
Coming up onto the wind after the gybe helped the asymmetric around the front of the jib and to fill on the new side. Stay too deep and it’ll get blanketed by the main. Once we had built up some apparent wind, we could bear away again.
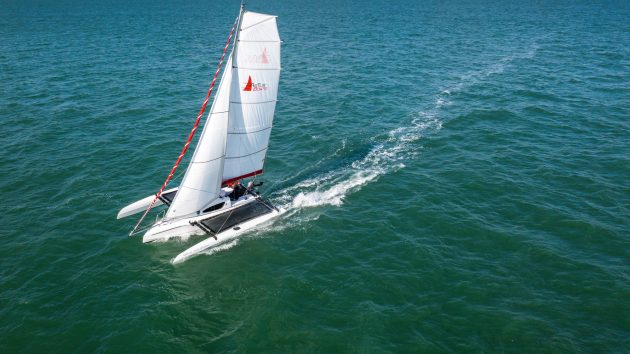
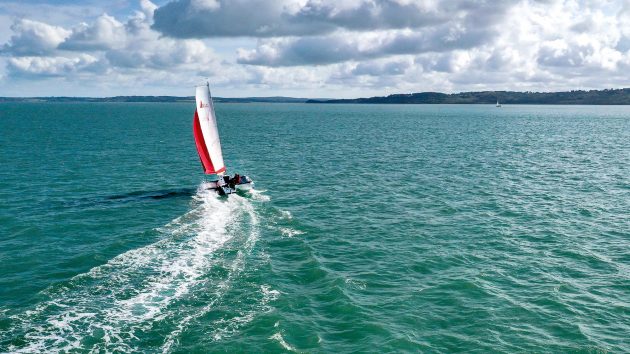
You’ll be on a course deep downwind before you know it, hitting speeds in the double digits
Downwind in a trimaran
Upwind cruising may be fun in a multihull, but bearing away and going with the wind is what it’s all about. Easily-driven hulls, a generous sailplan and light weight mean you can be up and planing, leaving displacement boats wallowing in your wake.
The big difference comes from apparent wind. If you’re in a boat that can do 15 knots downwind in 20 knots of true wind, the resulting wind angles can really mess with your head.
To get going then, says Brian Thompson, ‘Use those leech tell-tales again when sailing downwind and reaching to set the correct twist through the mainsheet, and use the traveller to set the correct angle of the whole sail to the wind.’
As the wind and your speed builds, bear away and trim the main accordingly.
In theory, you shouldn’t need to ease the traveller at all, but you may need to if you want to sail deep downwind. As the gust fades, you’ll find the boat slows down, so you can come back up towards the wind a little to pick up some more breeze, and then bear away as you accelerate again.
Bear away as the boat accelerates. Your course will be something of a slalom as you look to keep a consistent wind angle
This results in something of a ‘slalom’ course, and will also be accentuated if you’re sailing down waves, but that’s all quite normal for apparent wind sailing. Ultimately, you’re looking for a consistent apparent wind angle, even if the resulting wake isn’t straight.
It’s worth remembering that apparent wind reduces the felt effect of the wind, so you need a sailplan to suit the true, not apparent wind speed.
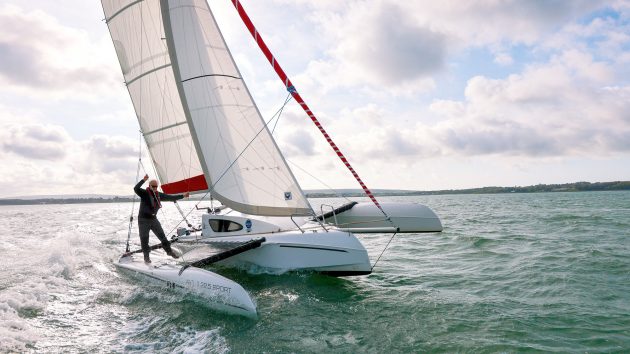
I found that the boat was more sensitive to having a balanced sailplan and trim downwind than upwind, largely because you’ve got almost double the canvas up, with the bowsprit as an extra lever. When weather helm built, I needed to ease the mainsheet to increase twist to depower so that I could bear away. I must admit, getting the boat balanced, sailing fast and light on the helm at 15 knots was something I came away feeling I needed more practice at.
Reviewing the images, I suspect the asymmetric was sheeted in too hard, with too much twist in the main.
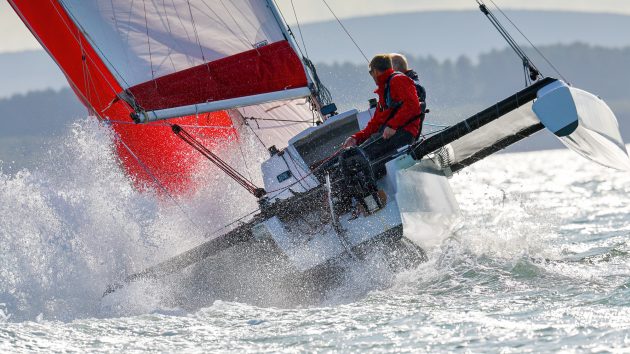
Getting a float fully submerged is when it’s time to back off
On the water
Unfurling the gennaker worked best on a beam reach, giving plenty of airflow over the sail to help it fully unfurl. This was also roughly the fastest point of sail, ideal for getting up some speed for apparent wind sailing. We mostly had the sails set for a close reach, even when we were beyond 120º off the true wind on a broad reach.
It was possible to soak deeper downwind, but lose the apparent wind benefit downwind and our speed dropped off dramatically, prompting us to point a bit higher to find some more speed.
As the boat powered up, it paid to hold a slightly higher angle than I would have done in a monohull for the boat to properly take off and get up into double digit speeds – topping out at 15 knots. Lymington to Cowes would have taken us just half an hour at that speed. It’s easy to give yourself a heck of a beat back!
We were sailing on a pretty flat day, so didn’t have to contend with any waves to speak of. On the recent RTI this is what caused the capsizes of at least two multis, a sobering reminder that you need to sail much more conservatively in lumpier conditions.
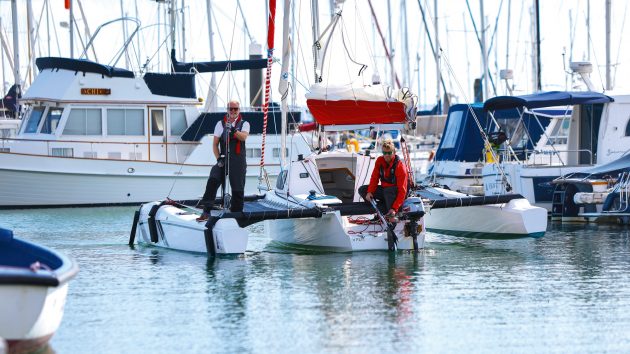
The bows want to point downwind, so a stern-first approach works with rather than against the boat
Coming alongside
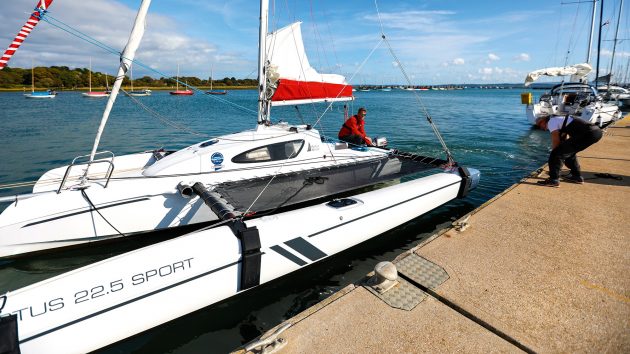
A 650kg boat with no draught and plenty of windage feels dreadfully skittish when manoeuvring in confined spaces. Straight hulls with no forgiving curves and fragile-looking sharp bows make berthing tricky. You’ve got a couple of advantages on your side, however. In the Astus, the floats are at pontoon height making stepping off easy.
Whether you have an engine in each hull of a cat, or one in the central hull of a tri, there’s also a lot more leverage to play with to turn the boat and drive her on or off the pontoon. A steerable outboard gives you even more options.
If the boat has a lifting keel or daggerboards, put them down if there’s enough depth to give you a pivot and to resist drifting. Think about getting corners onto the pontoon, rather than putting the boat alongside. On tris, you won’t be able to get to the bow to fend off as it’s too narrow. You can rig a fender up forwards on a line, and two fenders are enough on the flat sides.
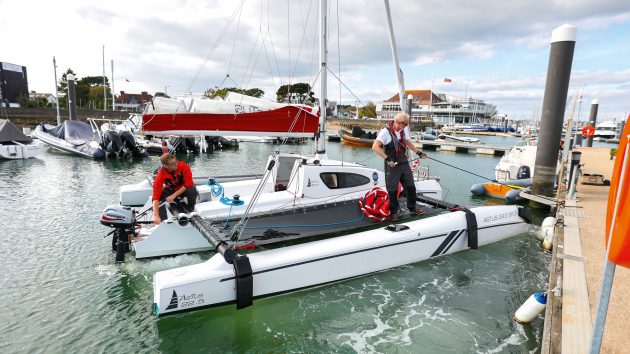
Steering with the outboard towards the pontoon will drive the stern in more; steer away to drive the bow in more
Offshore wind
Coming onto the pontoon with wind blowing off, it worked well coming in stern first. If there’s a tide running, you’ll want to be heading into the tide, so find a spot down wind and down tide to start your approach so you come in at an angle.
On our first attempt we had a bit of tide under us to start with so we came in at a much steeper angle, almost 90º, although this worked out OK in the end.
The crew could then step ashore, taking a line from the stern quarter round a cleat.
Drive forwards against the line and the bow will obediently drive up towards the pontoon, bringing you flat alongside. Getting off was simple, releasing the bowline, and allowing the bow to swing out the before slipping the stern line.
Coming in astern and stopping upwind of the berth meant the bows blew towards the pontoon far to quickly
Onshore wind
Getting onto and off a pontoon with onshore wind proved rather trickier. On our first attempt we came in stern first. The issue was that once we were just upwind of our desired berth and stopped, we lost steerage and the bow immediately blew off with alarming speed towards the pontoon.
Going ahead would only increase the force of the impact, while going astern only increased the bow’s sideways drift. I managed to back out without smashing the bow, but only just, and ended up awkwardly stern to the wind with the bows pointing at the pontoon.
On our second attempt we came in bows first but having aimed at the berth, I had to motor the stern to leeward to stop the bow hitting, making for a rather forceful coming alongside.
On take three, I came in forwards and began ferry gliding towards the berth early, keeping the bows to windward of the stern. Being able to steer with the outboard meant I could go ahead to keep the bow up, and go astern with the engine pulling the stern down toward the pontoon. In this way, it was possible to come in pretty well controlled and parallel to the berth.
To get out, motoring astern against a bow line pulled the entire boat clear before slipping the line
Leaving was a different proposition all together, as I didn’t want to drag the bow along the pontoon, or to drive hard onto it to spring off. Instead, we rigged a slip-line from the forward cross beam. Going astern against this, and then turning the engine towards the wind, I could pull the stern, and the rest of the boat, out and away from the pontoon.
Keeping power on astern, once we’d reached a decent angle, we slipped the line and went astern, finding steerage way almost at once, with the bow following obediently in our wake with more control than I had anticipated.
Whether the wind is blowing onto, or off the pontoon, you want the engine to be driving or pulling the boat off the pontoon with a line on the corner you are going away from. That way you avoid point-loading fine ends where it’s hard to fender.
You’ll want a bridle to reduce swinging, but keep the pick up lines on the bow as backup
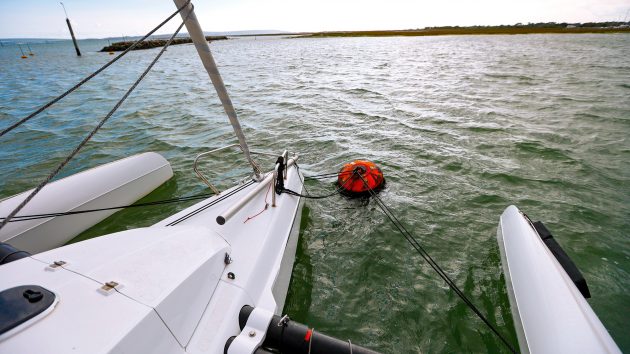
Anchoring and mooring a trimaran
While mooring a catamaran is complicated by the lack of a central bow, things should be simpler on a trimaran, and they are, mostly. Picking up a mooring buoy from the main hull bow with a low freeboard and dropping the pick-up line onto a cleat is easier even than a monohull.
The bow may be narrow, but for any lines that pass through a ring on the buoy, you still need to take it back to the same cleat to avoid chafe. That should be it, but windage from the two extra bows and the lack of keel mean the boat can dance merrily around the mooring buoy in a breeze.
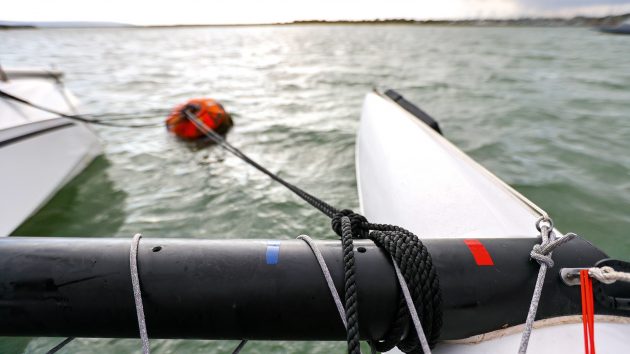
Rig the bridle so the buoy sits to one side to stabilise the boat
In practice, we found that a trimaran benefits from a mooring bridle in the same way that a catamaran does. It can’t be rigged from the floats’ bows, as there are no mooring cleats, so a line passed around the outboard ends of the forward beams gave a pretty good angle, again with long lines passed through the mooring and back to the same side. The main pick-up lines stay as a safety backup.
The other trick is to rig the bridle asymmetrically so that the buoy sits to one side or the other, just enough to not be dead head to wind, making it much more stable in the wind.
On the plus side, the lack of draught or keel means that you’ll nearly always be lying head to wind, so the cockpit remains nice and sheltered whatever the tide’s doing.
We ran out of time on the day to try anchoring, but rigging a bridle, effectively a long snubber to a point on the anchor chain in a similar way wouldn’t be tricky.
If you needed not to swing, or to behave more like deeper boats nearby, hanging a bucket over the stern can help, or there’s always anchoring with a kedge, either out ahead in a V, or in line astern.
Enjoyed reading this?
A subscription to Yachting Monthly magazine costs around 40% less than the cover price .
Print and digital editions are available through Magazines Direct – where you can also find the latest deals .
YM is packed with information to help you get the most from your time on the water.
- Take your seamanship to the next level with tips, advice and skills from our experts
- Impartial in-depth reviews of the latest yachts and equipment
- Cruising guides to help you reach those dream destinations
Follow us on Facebook , Twitter and Instagram.
- --> Login or Sign Up
- Login or Sign Up -->
- B&B Annual Messabout
- Capsize Camp
- All Kayaks and Canoes
- Diva 15'8" Kayak
- Grand Diva 17'6" Kayak
- Moccasin 12' Canoe
- Flyfisher 13' Canoe
- Moccasin 14' Canoe
- Moccasin Double 15'6" Canoe
- Birder Decked Canoe 13' and 15'8
- Expedition Sailing Canoe
- All Dinghies and Tenders
- Catspaw Pram
- Spindrift Dinghy
- All Sailboats
- Core Sound 15
- Core Sound 17
- Core Sound 17 Mark 3
- Core Sound 20
- Core Sound 20 Mark 3
- Bay River Skiff 17
- Belhaven 19
Mini Trimaran
- Class Globe 5.80 Kit
- Princess Sharpie 22'
- Princess Sharpie 26'
- All Powerboats
- All Jessy Skiffs 12-17'
- Jessy 12'
- Jessy 15'
- Jessy 17'
- All Outer Banks Cruisers
- Outer Banks 20
- Outer Banks 24
- Outer Banks 26
- All Ocracoke Center Consoles
- Ocracoke 20
- Ocracoke 20-B
- Ocracoke 24
- Ocracoke 256
- Cape Lookout 28
- All Other Kits and Plans
- Wing Foiling
- "Tractor" Canoe Seat
- Mast Head Floats
- Windvane Self Steering
- All Building Supplies and Tools
- Marine Plywood
- All B&B Epoxy
- Temperature Control for Epoxy
- Epoxy Additives
- All Hardware and Rigging
- All Rigging
- Eyestraps and Fairleads
- Shackles, Hooks and Pins
- All Rudder Hardware
- Pintles and Gudgeons
- Tillers and Accessories
- Hardware kits
- All Masts, Track and More
- 6061-T6 Aluminum Tubing
- Sailtrack and Accessories
- Starboard Mast Plugs
- Wind indicators
- All Electrical
- Battery Monitors
- Solar Power System
- Boarding Ladders
- Beach Rollers
- All Apparel
- B&B Approved Products and Tools
Shop by Brand
- B&B Yacht Designs
- Amarine Made
- View all Brands
Shop by Category
- Rudder Hardware
The new "Mini Trimaran" as it is being called (for now) is an evolution of our work in small multihulls over the years. It combines elements of the successful Expedition Sailing Canoe and the " kayak trimaran " named 'Spongebob' into a new vessel. Hull #1 was cut out as a CNC kit in July 2020 and is now in the process of going through sea trials. Click here for Construction Photos of hull #1 You can get a sneak peak of the builders guide here .
Features of hull #1 included a roller furling mainsail and headsail for easy reefing and a boom for superior sail control. For Hull #2 we went back to a non rotating mast with slab reefing and single line reefing instead. The amas retract into the center crossbeams to reduce the overall beam for trailering without having to demount the amas. A stern cockpit with a large kayak style cockpit coaming can be used with a spray skirt. Steering is accomplished with foot pedal controls or a tiller. The boat can also be sailed from the center cockpit and there is optional space to install a hobie mirage drive in the center cockpit. Ample storage for a full expedition load. The center cockpit is flanked by a pair of "wing decks" which are large enough for sleeping aboard with a bivy or cockpit tent. A leeboard is controlled with lines running to the aft cockpit. The hull incorporates an integral spray chine above the water line to increase cockpit comfort while maintaining a narrow waterline beam of 19 1/2"
Length: 18’ 6” Sailing Beam: 11’ Trailering Beam: 6’ 8-3/4” Working Sail: 100 sqft Optional Spinnaker: 80 sqft Empty weight: ~290lbs Gear/water capacity: 150lbs Full Load Displacement: 620lbs (solo) PPI: 117lbs (pounds per 1” immersion Ama buoyancy: 275lbs

Above: Hull #1 freshly painted. April 2021
Latest News: Plans and a CNC kit for this design are coming soon. Hull #1 and 2 are currently in testing and prototyping phases and we look forward to improving the design of the rigging and kit for future builders.
Video from first Sea Trials in Jan. 2021. We were very pleased with the performance and look forward to further testing the rigging and design in preparation for releasing plans and kits for this design. You can note in the video that the boat is being sailed totally empty so the bow rides a bit high.
Hull #1 made the trip to the 2021 B&B Messabout and we had a chance to test here out.
Hull #2 was completed and launched in January 2022. Changes to the design include adding some legroom to the aft cabin, and including space for a hobie mirage drive well in the center cockpit. Hull #2 does not have a roller furling mainsail but instead more traditional slab reefing. A Core Sound 17 mainsail is now the primary working sail and a furling code zero is again used for light air and an off the wind boost.

There are no products listed under this category.
- AROUND THE SAILING WORLD
- BOAT OF THE YEAR
- Email Newsletters
- Best Marine Electronics & Technology
- America’s Cup
- St. Petersburg
- Caribbean Championship
- Boating Safety
2024 Boat of the Year Best Trimaran: Dragonfly 40 Ultimate
- By Dave Reed
- December 20, 2023

“Classy.” That was the first word that came to mind for Boat of the Year judge Mike Ingham when he stepped aboard the formidable 40-foot trimaran from Dragonfly, an unexpected and welcome late entry to the competition in Annapolis. “It almost feels as if the boat is intentionally understated but overdelivered because once you start looking closer at the details and craftsmanship, it just keeps getting more impressive.”
Builder and company owner Jens Quorning, whose family has been building trimarans in southern Denmark since 1967, says the Dragonfly 40 is the biggest boat they now build and a worthy holder of the flagship title. “Building a boat of this scale is complicated,” he says of the folding trimaran. “It takes three years to develop a new design, and this is for owners looking for a bigger boat, with better performance, capable of more long-distance sailing.”
The result is a powerful trimaran aimed at experienced owners who appreciate the sheer pleasure of racing and cruising on three hulls. This is not your average production multihull. It is a powerful and luxurious sailing machine capable of knocking off fast miles in comfort. Slip down below and you’re immediately immersed in a master class of woodwork and joinery. There are berths for four, including a giant master under the cockpit, plenty of standing headroom, and a comfortable salon and galley arrangement that’s monohull-cozy. “We do not offer a big house on the water,” Quorning tells the judges. “But if you really want a fine and elegant yacht with double-digit sailing, this is what we do.”
For our tests, Dragonfly presented its Ultimate edition, the midrange version. An upscaled Performance model is an all-carbon version with a taller mast. And in the lightest wind of the week, sub-10 knots, the trimaran teased the judges with its potential. Still, in the light stuff, the boat delivered a winning experience.

“It was a dream to sail upwind and downwind, almost effortlessly,” Ingham says. “With the gennaker up, at about 100 degrees true, we were going faster than the wind, and with winch pods on each side of the steering wheel, everything was as ergonomic as you could possibly imagine. The electric winches made it a cinch to furl and unfurl the headsails through the tacks and jibes, and the sails trimmed in perfectly every time.”
The feather-light feel of the helm, Ingham adds, was as smooth as a balanced dinghy. “With tiny movements on the wheel, the boat would immediately respond, but I could also walk away from the helm for a few minutes and the boat would stay right on track. Crazy—I think it steered itself better than I did.”
That’s the trait of a good trimaran, Greg Stewart says. The Dragonfly 40 has a lot of buoyancy in the bows, and while the center hull is substantial, the tall trussed rig and square top mainsail provide plenty of power. “The biggest thing that struck me is how easily accessible everything is,” Stewart says. “Clearly, every detail is painstakingly thought out, and I can’t believe how beautifully built the interior is. It’s top-notch, from the glasswork to the paintwork inside and out. Down below, we were all blown away by the finish.”
There’s no denying the boat is expensive at upward of $1 million, but the test boat had quality race sails, a full electric-winch package, and a long list of high-spec extras. At nearly 15,000 pounds light, it’s a substantial boat—not trailerable, but foldable with Dragonfly’s trademark technique that Corning describes as mimicking parallel rules. The floats are 2 feet longer than the center hull, with buoyancy pushed well forward into the reversed bows, and the center hull is narrow at the waterline before sweeping upward to a high and hard chine. This pronounced hull shape allows for the generous amount of headroom, and high bench seats that flank a long centerline table, which can, of course, drop down to create a double-size berth.

Allen noted that the center hull’s wide side decks provide a secure pathway to the bow, rather than across the trampolines. He was also impressed with the ease of sailing the boat and the comfort belowdecks. “When we were doing 9 knots, I went below and there was silence. It’s comfortable and beautiful. It would be a blast to do some long point-to-point racing on it, doublehanded or with like a crew of four, max.”
Stewart agreed, adding that beyond its noteworthy gunkholing attributes, the engine is well aft on the center hull, allowing it to be motored safely into shallow anchorages. The daggerboard is mechanically raised into the trunk, and the rudder kicks up. “I also think it would be great for a distance race or rally type of event,” Stewart says. “Its performance and versatility are what appeal to me, but the build quality is what really sets it apart.”
- More: 2024 Boat of the Year , Sailboats
- More Sailboats

Nautor Swan Has A New Pocket Rocket

Pogo Launches its Latest Coastal Rocket

A Deeper Dive Into the Storm 18

2024 Boat of the Year Best Recreational Racer: Z24

One-Design Wingfoil Racing Takes Off

The Wisdom of Augie Diaz

Brauer Sails into Hearts, Minds and History
- Digital Edition
- Customer Service
- Privacy Policy
- Cruising World
- Sailing World
- Salt Water Sportsman
- Sport Fishing
- Wakeboarding
- Plans & Kits
- Plans by type
- Qty in Cart

DUO 900 Study Plans

DUO 900 Plans

Wizard Study Plans Download

Wizard Plans Download

Strike 20 racing trimaran using a F18 beach cat for hulls and rig

Strike 16 Main Hull Only Plans Download

Wingmaran 15 Study Plans Download

Wingmaran 15 Plans and Templates Download

ECO 520 PDF

MaXi The Cat Plans PDF
 Download")
Janus (full plans) Download
5m rodcat beach catamaran plans.
- Total: items /
- Add all to cart
Adding your products to cart
IMAGES
VIDEO
COMMENTS
The DESIGNER'S book TRIMARAN and CATAMARAN CONSTRUCTION is part of the plans (over 21') and covers all phases of construction. Plans are leased to build ONE boat, NO time limit. Tri-Star designs are proven designs, sailing the seven seas since 1964. Free consultation is provided to the original non-professional builder till he or she is sailing ...
This is our video series showing the full build of our Tryst 10 trimaran sailboat. The Tryst 10 main hull is a Duo 10, so the first 12 or so episodes will be...
Need more content from SLV? Join our crew on Patreon for previews of future episodes and regular live streams to chat with us in real time http://bit.ly/SLVP...
Catamaran and Trimaran Boat Plans make it a reality to build your own catamaran or trimaran. Multi-hulled sailing vessels are a special class of boat. A very different mind set is required when thinking about sailing a multi hull, let alone getting your head around building one. There are some unique challenges building a multi-hull sail boat ...
The ultimate multihull design and building resource - catamarans and trimarans to 150 feet. New Design Books Are Here, with 2016 Updates! Home New Designs ... KHSD boat Videos. Tel: 206.719.4893 Email: Kurt Hughes. [email protected] Slater's Landing ...
When John Ordovas contacted me with some drawings of a 64' Trimaran I was intrigued. When he told me that he had assembled a small group of workers, found a ...
Small Trimarans Report. Back in 2010, sailor/naval architect Mike Waters published a 22-page report covering 20 small trimarans. It includes charts, graphs, photos, and critical objective reporting on many of them. Read more…. Review of nine Small Trimarans. Mike Waters' review of nine small folding trimarans 14-20 feet including six ...
Jul 19, 2012. It all started with losing my job. Like many people in recent years, I found myself unemployed, and the lack of activity made for restless hands. I figured since I couldn't find work, I might as well build a boat. I had fond memories of sailing a simple dugout trimaran off the north coast of Bali and decided a small tri would ...
Ed Horstman designed TRIMARAN and CATAMARAN plans are drawn for the first time builder. Plans are concise and clearly drawn so the builder can easily follow each building step. ... Plans are leased to build ONE boat, NO time limit. Tri-Star designs are proven designs, sailing the seven seas since 1964. Free consultation is provided to the ...
You truly will enjoy Trimaran and Catamaran sailing and it's easy to become accustomed to not having to hold onto your coffee mug when sailing. Ed Horstman has over 45 TRI-STAR Trimaran or Catamaran designs you too can build from a selection of Trimaran plans from 18ft. to 104ft. and Catamaran plans from 14ft to 55ft.
Initially, the choice for my new to build boat fell on the high-tech F-36 trimaran, a design by the famous New Zealander Ian Farrier ( † RIP Dec.8, 2017). In those days the F-39 did not exist yet. Although the F-36 missed my preferred folding option, the design nevertheless meets most of my wishes. According to Farrier, there was simply not ...
24 Foot Sailing Trimaran: Indonesian style, built out of recycled stuff.Here we are busting out through the surf in 30mph winds at Stinson Beach California on the maiden voyage. ... If you can't find a free hull, build a hull like the Kenya Canoe but bigger. Use scavenged plywood from crates if you want it free. The wood for the crossbeams came ...
We design world renown sailing catamarans, trimarans and power cats. Contact us to purchase building kits and plans or to find the right professionals and resources to bring your project to life.
Trimaran sail trim. One of the biggest differences between a cruising monohull and a multihull is how the mainsail is trimmed. Leech tension on a yacht is often largely controlled by the kicker and the backstay, while the mainsheet sheets the mainsail in and out, predominantly controlling the angle of the boom to the centreline, and there may be a short traveller.
The Pulse 600 trimaran is a compact sailboat. It's made from lightweight, carbon-reinforced construction and vacuum-formed materials for optimal speed. This trimaran is an ideal option if you are looking for speed. It also features ample deck space, greater stability, and volume than most trimarans of similar size and build.
Here are 6 of the best trailerable trimaran: The Dragonfly series. F-22. Corsair Series. Astus. Weta 14.5. Windrider 17. Choosing the best trailerable trimaran (a multi-hull with three "hulls") will depend on crucial factors like speed, durability, design, and ease of transportation.
building a trimaran Farrier F-9R and go sailing after nearly 4 years of intense work... and every minute of work was worth it! Follow LIGHTNESS on facebook a...
Rapido Trimarans, through our manufacturing facility, Triac Composites, in HCMC, Vietnam can build it for you. While our preference is to build vessels from composites, we can also project-manage the build of steel ships. In August 2019, for example, we completed two x 16m steel fishing vessels for a client in Denmark.
The new "Mini Trimaran" as it is being called (for now) is an evolution of our work in small multihulls over the years. It combines elements of the successful Expedition Sailing Canoe and the "kayak trimaran" named 'Spongebob' into a new vessel.Hull #1 was cut out as a CNC kit in July 2020 and is now in the process of going through sea trials.
Sailing World Magazine's Best Multihull of 2024 is the Dragonfly 40 trimaran, a luxury and high-performance sailboat designed and built for experienced bluewater sailors and cruisers.
This is a rare opportunity for a trimaran sailor. This is a custom-built Kurt Hughes designed trimaran (extended to 46' for additional cruising comfort) that...
Decrease Quantity of Strike 20 racing trimaran using a F18 beach cat for hulls and rig Increase Quantity of Strike 20 racing trimaran using a F18 beach ... Starting with the outward hull side. To make boat building for a first... $190.00. Add to Cart. Qty in Cart: 0. Quantity: Decrease Quantity of ECO 520 PDF Increase Quantity of ECO 520 ...
For their size, trimarans can punch well above their weightin speed, cruising potential, and fun. Monohull sailorTheo Stocker gets to grips with how to handl...