
How to Draw a Motorboat? (Step-by-Step Guide)
Have you ever wanted to draw a motorboat? Capturing the sleek, eye-catching shape of a motorboat on paper is a great way to show off your artistic skills.
This step-by-step guide will show you how to draw a motorboat with confidence.
From sketching out the basic shape to adding shading and color, you’ll learn how to draw a detailed motorboat that looks realistic.
You’ll also learn how to use highlights and shadows to bring your motorboat drawing to life.
For those looking to take their drawing skills to the next level, this guide will provide tips and tricks for advancing your skills.
With practice and patience, you’ll be able to draw a motorboat that looks like it’s ready to set sail.
Table of Contents
Short Answer
To draw a motorboat, start by sketching the basic shape of the boat, including the hull, deck, and cabin.
Add details like the motor, windshield, and seats.
Then, draw in the details around the boat, such as the water and some waves.
Finally, add color and shading to enhance the drawing.
There are many different stylistic approaches to drawing a motorboat, so feel free to experiment with different techniques.
Sketching Out the Basic Shape
Drawing a motorboat is an exciting and creative challenge.
With the right tips and techniques, you can create a realistic and beautiful drawing.
The first step is to sketch out the basic shape of the boat.
Start by drawing the sides and the hull of the boat.
You can use a ruler or other straight edge to draw the sides, making sure the lines are nice and straight.
When drawing the hull, make sure it is curved to give the boat a more natural shape.
Once the basic shape is sketched out, it’s time to add the details.
Drawing the Details

Once you have the basic shape of your motorboat sketched out, its time to begin adding the details.
Start by drawing the motor and propeller, which will be the main source of propulsion for your boat.
Make sure the motor is properly sized and positioned and the propeller is facing the right direction.
Then, move on to the windows, deck, and other details such as steering wheels, life preservers, and ladders.
When drawing the windows, pay attention to the size and shape so they look realistic.
Additionally, ensure the deck is level and the ladder is straight.
With a bit of practice, you can make your motorboat look as realistic as possible.
Adding Shading and Color
Adding shading and color to your motorboat drawing will give it more dimension and realism.
To do this, use a light pencil or charcoal to draw in the shadows and highlights.
Start by lightly shading in the areas that are furthest away from the light source, such as the sides of the boat and the underside of the hull.
You can also add darker shadows and highlights to give your boat more depth and texture.
When adding color, use lighter tones for the areas furthest away from the light source and darker tones for the areas closest to the light.
To make your boat look more realistic, you can add reflections of the light on the surface of the water.
Finally, dont forget to add details such as the motor, propeller, and windows to complete the look of your motorboat.
With a bit of practice and patience, youll be able to draw a realistic motorboat with ease.
Bringing the Drawing to Life

Once you have the outlines of your motorboat in place, its time to bring it to life with shading and color.
Start by adding shadows to the sides and the hull of the boat to create a 3D effect.
You can also create highlights on the deck and the windows to make the details pop.
For a more realistic look, use various shades of gray to add shadows and highlights.
To add color, start by choosing a base color for your motorboat and work from there.
You can use a variety of shades to create depth and dimension, such as light blues, greens, and grays for the water and deeper shades of red or brown for the hull.
Once you have the colors in place, use a mix of dark and light shades to add depth and texture to the drawing.
Finally, use a white pencil to bring the drawing to life with highlights.
You can use this to make the motorboat look shiny and reflective, or to add light and shadows to the windows and deck.
With practice, youll be able to use highlights and shadows to make your motorboat look realistic and realistic.
With a bit of practice and patience, youll be able to draw a motorboat with ease.
With these tips and techniques, youll be able to create a beautiful and lifelike drawing of a motorboat.
Using Highlights and Shadows
Once you have all the outlines of your motorboat drawing in place, the next step is to add highlights and shadows to make it look more realistic.
Highlights and shadows bring depth to your drawing and make it look three-dimensional.
They also help to bring out the details of your motorboat and make it look more lifelike.
To create highlights and shadows, use a pencil or felt-tip pen to draw light and dark lines throughout the drawing.
Start by looking at the light source and determine which areas of the boat should be light and which should be dark.
For example, if the light source is coming from the left side, the right side of the boat should be darker.
When youre adding shadows, be sure to keep them subtle.
You dont want to create too much contrast between the light and dark areas of your drawing.
Instead, aim for a gradual transition between the light and dark.
To create more depth in your drawing, you can also add midtones.
Midtones are the areas between the light and dark areas.
Use a softer pencil or darker felt-tip pen to draw the midtones and blend them with the light and dark areas.
When youre done adding the highlights, shadows, and midtones, you can finish your drawing by adding color and texture.
Use watercolor pencils or markers to add color and texture to your drawing.
To bring out the details of your drawing, you can also use white gel pens to add highlights.
With a bit of practice and patience, you should be able to draw a motorboat with ease.
Dont be afraid to experiment and explore different techniques to achieve the desired look.
With some time and dedication, youll be able to create a realistic and detailed motorboat drawing.
Advancing Your Skills

Once you have the basic structure of your motorboat drawing in place, it’s time to refine your skills and take your drawing to the next level. Here are a few tips and techniques you can use to make your motorboat look even more realistic:
– Use a variety of pencils and erasers to create subtle details. A harder pencil can be used to draw the outlines, while a softer pencil can be used to add shadows and highlights.
– Use different shades of gray to create realistic shadows and highlights. This will give your boat more dimension and make it look more life-like.
– Experiment with different drawing media, such as markers, colored pencils, and watercolors. This will help you create a more unique look for your boat and make it stand out.
– Pay attention to the details. Take the time to draw the motor, the propeller, the windows, and the deck with precision. The more detail you add, the more realistic your boat will look.
– Practice perspective and foreshortening. This will help you create a more accurate and realistic drawing of your boat.
With these tips and techniques, you will be able to take your motorboat drawing skills to the next level.
With a bit of practice and patience, you will be able to create stunning and realistic motorboat drawings.
Practicing and Patience
Drawing a motorboat may seem intimidating at first, but with a bit of practice and patience, anyone can master it.
First, it is important to take things slowly and practice sketching out the basic shape of the motorboat.
This involves drawing the sides of the boat and the hull, the motor, the propeller, the windows, and the deck.
Once you have the basic shape down, you can start adding details and shading.
This will help give your boat a more realistic look.
To bring the drawing to life, use highlights and shadows to create contrast and depth.
With enough practice and patience, you can become an expert at drawing motorboats in no time.
Final Thoughts
Drawing a motorboat is an achievable goal with the right tips and techniques.
With a bit of practice and patience, you can go from sketching out the basic shape to adding shading and color to create a realistic drawing.
To advance your skills, try using different highlights and shadows to bring your motorboat to life.
With enough practice, you’ll be able to draw a motorboat with ease!
James Frami
At the age of 15, he and four other friends from his neighborhood constructed their first boat. He has been sailing for almost 30 years and has a wealth of knowledge that he wants to share with others.
Recent Posts
Does Your Boat License Expire? Here's What You Need to Know
Are you a boat owner looking to stay up-to-date on your license requirements? If so, youve come to the right place! In this article, well cover everything you need to know about boat license...
How to Put Skins on Your Boat in Sea of Thieves? (Complete Guide)
There is a unique sense of pride and accomplishment when you show off a boat you customized to your exact specifications. With Sea of Thieves, you can customize your boat to make it look like your...
Advertisement
How to Draw Speedboats in 5 Steps
- Share Content on Facebook
- Share Content on LinkedIn
- Share Content on Flipboard
- Share Content on Reddit
- Share Content via Email
Zip through the waters and across the page with our easy-to-draw speedboat. Use the directions on this page to get started.
In this article, we'll show you how to draw the above speedboat. Either draw it freehand while looking at your computer monitor or print out this page to get a closer look at each step.
Follow the red lines in each illustration to learn exactly what to draw in that step. The lines drawn in previous steps are shown in gray. Here, we'll show you an illustration of each step and then give you a description of how to draw it.
Ready to get started? Great! Head over to the next page for the first step.
- Draw the Hull
- Add Detail to the Hull
- Draw Windows and a Motor
- Add the Final Touches
1. Draw the Hull

Start by drawing the pointed main shape of the boat. Add a wedge for the windshield.
Check out the next page to find out how to add detail to the hull.
2. Add Detail to the Hull
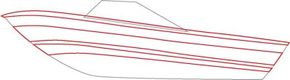
Draw three long rectangles going from front to back on the boat's side.
In the next step, we'll add windows and the motor.
3. Draw Windows and a Motor
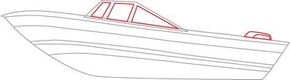
Sketch a triangle and two rectangles for windows inside the wedge shape. At the back of the boat, add curved shapes for the top of the outboard motor.
What good is a boat without water ? We'll take care of that problem in the next step.
4. Draw Water
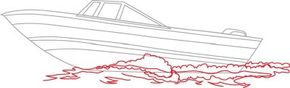
Draw wavy lines for the water and foamy wake coming off the boat.
We'll add the final touches on the next page.
5. Add the Final Touches
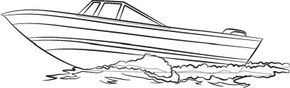
Use a felt-tip pen to trace the lines you want to keep. Erase any extra pencil lines.
With our next project, you can patrol the seas and keep the waters safe. Keep reading to learn how to draw a navy ship .
See all How to Draw articles .
Please copy/paste the following text to properly cite this HowStuffWorks.com article:
- PRO Courses Guides New Tech Help Pro Expert Videos About wikiHow Pro Upgrade Sign In
- EDIT Edit this Article
- EXPLORE Tech Help Pro About Us Random Article Quizzes Request a New Article Community Dashboard This Or That Game Popular Categories Arts and Entertainment Artwork Books Movies Computers and Electronics Computers Phone Skills Technology Hacks Health Men's Health Mental Health Women's Health Relationships Dating Love Relationship Issues Hobbies and Crafts Crafts Drawing Games Education & Communication Communication Skills Personal Development Studying Personal Care and Style Fashion Hair Care Personal Hygiene Youth Personal Care School Stuff Dating All Categories Arts and Entertainment Finance and Business Home and Garden Relationship Quizzes Cars & Other Vehicles Food and Entertaining Personal Care and Style Sports and Fitness Computers and Electronics Health Pets and Animals Travel Education & Communication Hobbies and Crafts Philosophy and Religion Work World Family Life Holidays and Traditions Relationships Youth
- Browse Articles
- Learn Something New
- Quizzes Hot
- This Or That Game
- Train Your Brain
- Explore More
- Support wikiHow
- About wikiHow
- Log in / Sign up
- Hobbies and Crafts
4 Easy Ways to Draw a Boat
Last Updated: April 6, 2023
- Traditional Ship
- Wooden Boat
Things You'll Need
This article was co-authored by Kelly Medford . Kelly Medford is an American painter based in Rome, Italy. She studied classical painting, drawing and printmaking both in the U.S. and in Italy. She works primarily en plein air on the streets of Rome, and also travels for private international collectors on commission. She founded Sketching Rome Tours in 2012 where she teaches sketchbook journaling to visitors of Rome. Kelly is a graduate of the Florence Academy of Art. This article has been viewed 363,225 times.
Want to go sailing but don't have a boat? Don't sweat over it. Chill out and follow this tutorial to learn how to draw a kayak, draw a yacht, draw a rowboat, and draw a sailing ship. If you want to draw a boat, draw an imaginary one or copy a picture from a book or online image.
Note: follow the red line for each step.
Things You Should Know
- Start by drawing the outline of the boat using basic shapes and guidelines.
- Add details to your drawing, like sails, masts, and siding.
- Clean up your drawing by erasing any guidelines.
Drawing a Sailboat

Drawing a Kayak

Drawing a Traditional Ship

Drawing a Realistic Style Wooden Boat

Community Q&A
- Learning to draw is really about learning to see. Study boats each day and draw them until you can get them as close as you can to the real objects you're observing. Thanks Helpful 1 Not Helpful 1
- To get better at drawing, make sure to practice blind contour drawings observing objects and people. Do not worry about the results, as the idea is to train your eye to slow down and to work in tandem with your hand. Thanks Helpful 0 Not Helpful 0

- Sharp Sketching Pencil
- Pencil sharpener
- Colored pencils, crayons, markers or watercolors
You Might Also Like

About This Article

One way to draw a boat is by sketching a sailboat. Start by making the outline of a trapezoid to sketch the main body of the boat. Then, draw a smaller trapezoid in the middle of the boat, with a long line running perpendicular to the body of the boat. Next, draw a right triangle off of the right side of the line, and another, slightly smaller triangle off of the right side of the line. You can make the body of the boat 3-dimensional if you’d like. Once you have the basic shapes, trace the outline and erase the extra pencil marks before filling it in with color. If you want to learn how to draw other kinds of boats, such as a canoe or kayak, keep reading the article! Did this summary help you? Yes No
- Send fan mail to authors
Reader Success Stories
Annabella Schafer
Jan 31, 2017
Did this article help you?

Mar 28, 2016
Shanmuka G.
Feb 20, 2020
Larry Froseth
Oct 15, 2016
Nov 3, 2016

Featured Articles

Trending Articles

Watch Articles

- Terms of Use
- Privacy Policy
- Do Not Sell or Share My Info
- Not Selling Info
Don’t miss out! Sign up for
wikiHow’s newsletter

How to Draw a Boat – An Easy and Realistic Boat Drawing Tutorial
Ahoy there! You are invited on an exciting voyage of artistic discovery today as we learn how to draw a ship, much like those used for the first around-the-world trips. We break this quite complex boat down into very easy-to-follow steps, making this tutorial suitable for artists of any level. If you are ready to set sail, gather your supplies and let us jump right in!
Table of Contents
- 1.1 Step 1: Shape the Main Body of the Boat Sketch
- 1.2 Step 2: Outline Some Details
- 1.3 Step 3: Draw the Sails
- 1.4 Step 4: Add In the Railing and Ropes
- 1.5 Step 5: Draw the Ocean and the Oars
- 1.6 Step 6: Create Texture Within Your Realistic Boat Drawing
- 1.7 Step 7: Add Some Light Texture to the Waves
- 1.8 Step 8: Begin Coloring the Wood of Your Boat Sketch
- 1.9 Step 9: Color the Sails
- 1.10 Step 10: Add Some Color to the Ocean
- 1.11 Step 11: Start Contouring Your Boat Drawing
- 1.12 Step 12: Continue Shading Your Boat Sketch
- 1.13 Step 13: Start Shading the Sails
- 1.14 Step 14: Darken the Shading on the Sails
- 1.15 Step 15: Apply Highlights To Your Drawing of a Boat
- 1.16 Step 16: Create Three-Dimensions in the Water
- 1.17 Step 17: Highlight the Ocean Waves
- 1.18 Step 18: Finishing Your Boat Drawing
- 2.1 How to Make Boat Drawing Easy?
- 2.2 What Colors Do You Need for a Drawing of a Boat?
Step-by-Step Realistic Boat Drawing Tutorial
You can see from the main image that the boat sketch we are going to do today is quite complex. There are many small details and tricky elements, but we have tried to make boat drawing easy for all artists. We begin the tutorial with several simple steps that help us to build up the final shape of the boat drawing. We then begin to add the smaller details, before using color to bring our boat drawing to life.
You can see an outline of the different steps in the collage below.

Most of the realism in our drawing of a boat comes from the coloring steps. Whenever you begin learning how to draw a new subject, we find it best to use a coloring medium that you feel most comfortable with. Whether you are a digital artist or prefer physical mediums, you can simply adjust the instructions to suit your needs. If you are using a physical medium, like paint, we suggest using a light pencil for the initial construction and outlining steps. For digital mediums, use a separate layer for these steps.
If you are ready to dive right in, find somewhere comfortable to sit, and let us begin!
Step 1: Shape the Main Body of the Boat Sketch
We are going to begin our boat drawing by creating the basic shape of the hull. Start by finding the central point of your drawing area, and begin drawing the long curved shape. The shape is like a canoe, with a curve up and in on either end.

Step 2: Outline Some Details
We are now going to begin adding some smaller details. Begin on the far left end of the boat sketch, drawing a curving canopy shape. Add a small narrow band around the base of the boat drawing below this canopy, and then add a small tear-drop shape in the front point of the boat.
You can also add a small rope-like protrusion from the front (right side).

Step 3: Draw the Sails
In this step, we are going to draw the main sail and the front sail of our boat sketch. Begin with the main sail, a large curving rectangle above the middle part of the boat. You can then draw a long mast behind this sail, extending from the base of the boat and up above the top of the sail. You can then draw a smaller and more angled sail above the front bow of the boat.
Again, you can draw the mast which should be angled towards the right side of your canvas and extend slightly above the sail.

Step 4: Add In the Railing and Ropes
There are two main objectives for this step. Firstly, we are going to draw the railing of the deck, and then we are going to add the sail ropes. Let us begin with the barrier, starting with a curving shape that extends along most of the length of the boat. Then, using equally spaced lines, create several support beams. To complete this step, you are going to add the ropes for the sail. Begin by adding a bar along the top of each sail, and then draw several ropes that extend from the top of the masts to each corner of the sails.
You can also draw some ropes that join the sails to the deck of the boat.

Step 5: Draw the Ocean and the Oars
We are now going to add some context to your boat drawing. Begin by creating some gentle ocean waves around the base of the boat drawing. You can then draw some oars that extend from the side of the ship down into these waves. Generally, the oars should be facing backward, but you can create some variation in their angles for additional realism.

Step 6: Create Texture Within Your Realistic Boat Drawing
Things are starting to get exciting now. At this stage, we have the basic elements of our boat drawing complete, and we also have some of the finer details. We are now going to add some textural details to the sails and bow. Let us begin with the sails, using some fine horizontal and vertical lines to create a series of blocks.
Within these blocks, add some fine texture lines to emphasize the three-dimensionality.
Next, using fine and long strokes that follow the shape of the bow, create some wooden plank details. Create texture within these planks, and use fine lines to add more texture where you think it is necessary. As a final detailed touch, draw a wooden eye on the front of the boat sketch.

Step 7: Add Some Light Texture to the Waves
We are now going to add some final texture to our sketch before we begin using color. Within the shape of the waves, create some fine arched lines that represent a realistic ocean wave texture.

Step 8: Begin Coloring the Wood of Your Boat Sketch
In order to create our realistic boat drawing, we are going to build the color up gradually. In this step, we are going to add a base coat of color to the wooden parts of our boat sketch. Use a regular paintbrush and a light brown shade of paint for this.
Fill the base of the boat with an even coat of color, and then move on to the masts.

Step 9: Color the Sails
We are now going to complete our base color coat by coloring the sails. Use a regular paintbrush and a light shade of cream paint to carefully color the main sail and the front sail.

Step 10: Add Some Color to the Ocean
Let us now move on to the ocean, using some light blue paint to fill in the waves surrounding the base of your boat drawing.

Step 11: Start Contouring Your Boat Drawing
Now that we have the base colors down, we are going to begin adding more structure. For this step, you are going to need a small blending brush and a touch of black paint. Begin to add some definitions between the panels of wood on the side of your boat drawing. You can also add some shading to the masts, the oars, and the back curve of your ship.
Tip: When using black for contouring or shading, always begin very lightly and darken as you need to. Black is almost impossible to remove once you have applied it.

Step 12: Continue Shading Your Boat Sketch
We are now going to continue shading our drawing of a boat with a slightly finer tough. Use a sharp detailing brush and some black paint to add some fine shading along the details on the side of your boat. This will include things like shading around the eye, between each of the planks of wood, and within the canopy.

Step 13: Start Shading the Sails
Let us now move on to the sails. With a blending brush and the same brown that you used as the base coat for the boat, create a gentle blend of color up the sails. The bottom and sides of the sails should be slightly darker, and blend smoothly into the lighter cream color at the top.
Tip: For an extra smooth transition, you can use a clean blending brush to carefully all of these colors together.

Step 14: Darken the Shading on the Sails
As we did with the body of our boat drawing, we are now going to add more detailed shadows to the sails. With a small blending brush and some dark grey paint, add shadows on top of the textured areas. The grey shading should mostly be focused around the pleats in the sails, around the edges, and above the texture lines.

Step 15: Apply Highlights To Your Drawing of a Boat
The last few steps have focused on creating darkness within our boat drawing. We are now going to begin to contrast these shadows with a touch of highlighting. With a blending brush and some white paint, begin by creating a faded highlight on the lightest areas of the sails. Then, with a more detailed brush and white paint, apply highlights to the areas of the boat that are most likely to catch the light. These areas include the top of the canopy, the top of the masts, the railing, and on top of the ores.
Tip: When creating highlights, it is easiest to pick a light source. You can then imagine where the light would hit from that angle.

Step 16: Create Three-Dimensions in the Water
We are now going to shift our focus to creating structure within the waves. With a small blending brush and a touch of black paint, apply some light shading along the edges of the water. You can shade beneath the wave lines that you drew previously, giving the impression of moving water.

Step 17: Highlight the Ocean Waves
Just before we finish our realistic boat drawing, we are going to add a few spots of highlight to the water surface. Use a small blending brush and some white paint to apply short strokes of light onto the water surface.

Step 18: Finishing Your Boat Drawing
In this last step, we are going to add some final spots of water spray and then remove the outline. Begin by using a small blending brush and some white paint to create some realistic water splashes against the side of the boat. You can then remove the dark outline form your boat drawing, leaving you with a seamlessly realistic sketch. Use a fine detailing brush and the corresponding color at each point of the outline to carefully trace over it. You can do the same for any inner texture lines.

We really hope you have enjoyed your voyage of discovery today! As with all of our drawing tutorials , we hope that we have made boat drawing easy for artists of any levels. You now know how to draw a ship of any kind, following the same basic process.
Frequently Asked Questions
How to make boat drawing easy.
Learning how to draw a ship can seem like a daunting task. Fortunately, we make it really easy by breaking the process down into easy-to-follow steps. We begin with simple shapes, creating the basic outline of our boat sketch. We then build up a realistic boat drawing by using color to create detail and dimension.
What Colors Do You Need for a Drawing of a Boat?
You only need a few basic colors for this easy and realistic boat drawing. Firstly, you will need several different shades of brown , including one very light cream and a slightly darker shade. You will then also need white, black, and grey for the contouring, Finally, you will need a sea blue shade for the ocean waves around the base of your boat.

Matthew Matthysen is an educated multidisciplinary artist and illustrator. He successfully completed his art degree at the University of Witwatersrand in South Africa, majoring in art history and contemporary drawing. The focus of his thesis was to explore the philosophical implications of the macro and micro-universe on the human experience. Matthew uses diverse media, such as written and hands-on components, to explore various approaches that are on the border between philosophy and science.
Matthew organized various exhibitions before and during his years as a student and is still passionate about doing so today. He currently works as a freelance artist and writer in various fields. He also has a permanent position at a renowned online gallery (ArtGazette) where he produces various works on commission. As a freelance artist, he creates several series and successfully sells them to galleries and collectors. He loves to use his work and skills in various fields of interest.
Matthew has been creating drawing and painting tutorials since the relaunch in 2020. Through his involvement with artincontext.org, he has been able to deepen his knowledge of various painting mediums. For example, watercolor techniques, calligraphy and lately digital drawing, which is becoming more and more popular.
Learn more about Matthew Matthysen and the Art in Context Team .
Similar Posts

How to Draw a Balloon – A Fun and Easy Balloon Drawing Tutorial

How to Draw Bamboo – Capturing Nature’s Grace on Paper

Halloween Coloring Pages – Experience the Creepy Side

How to Draw a Rib Cage – An Easy Rib Cage Drawing

How to Draw a Campfire – Illustrating the Beauty of Firelight

What Is Drawing? – A Detailed Introduction to Drawing Artwork
Leave a reply cancel reply.
Your email address will not be published. Required fields are marked *
Save my name, email, and website in this browser for the next time I comment.

How to Draw a Motorcycle – Step by Step Guide
Complete motorcycle drawing in just 9 easy steps.
The motorcycle, also known as motorbike, bike, or cycle, is a two-wheeled vehicle that is powered by a motor.
The design of a motorcycle varies to cater for different purposes, such as long-distance travel, commuting, sport racing, and off-road cruising.
The extreme popularity of motorcycles nowadays has created a huge demand for a free motorcycle drawing tutorial. Now, you’ve asked for it, so we delivered.
Finally, we present to you—a step-by-step tutorial on how to draw a motorcycle, summed up in 9 quick and easy steps.
This guide consists of easy-to-follow instructions paired with a matching illustration to make the entire process a lot easier for you!

How to Draw a Motorcycle – Let’s get started!
Draw two circles with another smaller circle inside right below the middle of your paper. This forms the front and the rear wheel of the motorcycle.
Make sure that the wheels will be drawn in the correct spot by creating reference lines.
Draw an intersecting horizontal and vertical line across your paper. The wheels should be drawn right underneath the horizontal line in the middle.
Step 2 – How to Draw the Wheels of the Motorcycle
Draw a curved, elongated figure with tapered ends above the upper right side of the front wheel.
Then, draw another figure with a similar shape above the rear wheel. This forms the platforms at the top of both wheels. These two platforms also serve as the hard protective shell covering the wheels.
Step 3 – Next, Draw the Throttle and the Headlight
Draw a slightly diagonal shaft directly connected to the front wheel. Make sure to add a bigger line figure at the bottom, in the middle, and at the top of the shaft. This creates the coverings as well as the handles of the motorcycle.
Afterwards, draw a semicircle on the right side in the middle of the shaft we drew just now.
This forms the headlight in the front of the motorcycle. Then, draw two parallel diagonal lines across the headlight.
Step 4 – Afterwards, Draw the Motorcycle’s Seat
Draw a curved figure attached to the platform right above the rear wheel.
This creates the motorcycle’s seat, which is where riders sit on when driving the motorcycle.
Step 5 – Then, Draw the Gas Tank of the Motorcycle
Draw a sideways irregular oval shape right next to the motorcycle’s seat. This forms the gas tank of the motorcycle, where the gas is stored.
Make sure that the left side of the figure is wider and more rounded while its right side should be more narrow and tapered.
Step 6 – Now, Draw the Oil Tank and the Tail Light
Draw a tilted cube figure with curved edges right underneath the gas tank. This forms the oil tank of the motorcycle.
For the tail light, simply draw a semicircle with two lines in the middle attached to the platform above the rear wheel. This creates the tail light of the motorcycle.
Step 7 – Next, Draw the Muffler of the Motorcycle
Draw a sideways elongated cone figure directly connected to the oil tank, which we drew in the previous step. This creates the muffler of the motorcycle.
Keep in mind that the muffler should begin from the oil tank and extend all the way to the rear wheel of the motorcycle, as shown in the illustration above.
Step 8 – Afterwards, Draw the Body of the Motorcycle
Draw two parallel lines connecting the shaft of the motorcycle and the oil tank at the bottom.
Then, draw an angled line connecting the oil tank and the platform above the rear wheel. This structures the body that supports all parts of the motorcycle.
As you can see in the illustration, the motorcycle is nearly complete! Now, all it’s missing are some details and patterns to complete the drawing!
Step 9 – Add Details and Patterns on the Motorcycle
Add multiple short lines around the rim of both wheels. Then, draw parallel diagonal lines on the surface of the oil tank. This adds details and patterns on the motorcycle, making it appear more realistic!
Don’t forget to add a few more partly visible square figures underneath the seat to complete all parts of the motorcycle!
There you have it—you have successfully drawn a motorcycle! Now, it’s finally time to add colors on the motorcycle to make it colorful and even more realistic!
Motorcycles exist in a wide range of colors, which gives you a lot of color options to choose from when coloring the motorcycle!
Feel free to use any colors you prefer. We suggest using more than one color to make the motorcycle stand out more!

Do this to take your motorcycle drawing to the next level
Take a ride through these tips that will help you improve your drawing even further!
Drawing a motorcycle is no easy task, and this one we worked on in this guide presented a few challenges that we wanted to help you overcome.
Once you have the hang of this motorcycle sketch, you could change up certain details to create a new style of motorcycle.
Changing details such as the wheels, handlebars, mudguards and other elements can help to drastically change the design. Do you have a favorite motorcycle brand you could recreate?
If you would like to go with our previous suggestion or just make the existing design more detailed, you may want to consider using some kind of reference.
You could either use some photos online or ask someone you may know who owns a real motorcycle.
Using a real reference can help you make drawing the smaller details so much easier! It can also help with making it as realistic as possible.
Next, we would recommend adding a background to this motorcycle drawing. Doing this will allow you to show where you would like to be cruising on this motorcycle.
There are so many different places you could draw in the background. Once you have chosen a background setting, you could also add a driver to the motorcycle.
Maybe you could make it look like yourself to make it look as if it is you that is riding it! What background would you like for this picture?
Part of what makes a motorcycle look cool are the colors that are used to decorate it.
We showed you one way that you could color this one in the guide, but you could use any other colors you love to make your own perfect model.
When coloring, you may want to use a few mediums that allow for more precision.
Colored pens, pencils and markers are perfect for coloring smaller spaces and details, and so they would be perfect for details like the mirrors, wheels and handlebars.
Your Motorcycle Drawing is Complete!
We hope you had fun drawing a motorcycle with this step-by-step drawing tutorial.
Now that you can draw a motorcycle, drawing a character riding a motorcycle sounds like a great idea for your next drawing activity! Check out our tutorials on how to draw a boy or a girl to make it happen!
A motorcycle has intricate features and patterns, so being able to draw one is a great achievement!
Make sure to take a photo of your masterpiece and share it on our Facebook page and on Pinterest. You’ve worked so hard for it, so it’s definitely worth sharing!
We’re excited to see your cool motorcycle drawing!
Here Is A Motorcycle Drawing To Inspire You!
Motorcycles represent a form of freedom that allows you to go almost anywhere you want. That’s part why they’re so popular, and many people consider themselves to be motorcycle enthusiasts.
If you have ever wanted to create your very own motorcycle design, then this motorcycle drawing for kids will be the perfect inspiration. It was designed by our artist Amanda to help you as you draw.
She did an amazing job with the details, as they allow you to clearly see all of the components that make up a motorcycle. These can work as a basic guideline that can help get you started.
You can also change a few of the details if there is a specific brand of motorcycle you would like to portray. It would be great to see how you finish off this awesome design!

How to Draw A Monkey – A Step by Step Guide

How To Draw A Nightmare Before Christmas – A Step by Step Guide
© 2024 iHeartCraftyThings
How to Draw a Speedboat
Ready to race across the water at breakneck speeds? In this tutorial, we’ll learn how to draw a speedboat, a sleek and powerful watercraft designed for thrilling adventures. Grab your pencils and paper, and let’s speed off on this artistic journey together!

Materials Needed:
Perfect For:
- Draw a long, curved shape for the body of the speedboat, with a pointed tip at the front.
- Sketch a windshield on top of the front part of the speedboat, using a curved shape.
- Add a small, curved rectangle behind the windshield to create the cockpit area.
- Draw a series of seats inside the cockpit, using curved lines.
- Sketch a steering wheel and dashboard inside the cockpit.
- Add a sleek engine cover at the back of the speedboat, using a curved shape.
- Draw a propeller at the back of the speedboat, under the engine cover.
- To add context, you can draw a watery background with waves and splashes to indicate the speedboat’s high velocity.
Easy Speedboat Drawing for Kids – Step by Step Tutorial

Fantastic job, speed demon! You’ve now learned how to draw a speedboat, an exhilarating watercraft that guarantees excitement on the water. Keep practicing, and soon you’ll be able to create a whole fleet of speedboats ready to race through your artistic oceans!

👇 Don’t Forget to Check Other Boats/Watercraft 👇
- How to Draw a Houseboat
- How to Draw a Cruise Ship
- How to Draw a Cargo Ship
- How to Draw a Submarine
- How to Draw a Gondola
- How to Draw a Ship
- How to Draw a Sailboat
- How to Draw a Ferry
- How to Draw a Canoe
- How to Draw a Raft
- How to Draw a Jet Ski
- How to Draw a Motorboat
Want More Tutorials in This Category?
About the speedboat.
A speedboat is a type of motorboat that is designed to go very fast. They are often used for recreational activities such as waterskiing, wakeboarding, or racing. Speedboats can come in many different sizes and shapes, and are often designed for maneuverability and speed.
How to Draw a Motorcycle
Learn how to draw a great looking Motorcycle with easy, step-by-step drawing instructions, and video tutorial.
By following the simple steps, you too can easily draw a perfect Motorcycle.
FREE DOWNLOAD

Where Can We Send Your Free Coloring Page?
Join our newsletter and get the coloring PDF as a free welcome gift.
- Email This field is for validation purposes and should be left unchanged.
We take your privacy seriously and will never spam you. You can unsubscribe from emails any time in 1-click. Check out our Privacy Policy for full details.
Step-by-Step Instructions for Drawing a Motorcycle

How to Draw a Great Looking Motorcycle for Kids and Beginners - Step 1

1. Begin by drawing two circles. Then, draw a smaller circle within each. These form the motorcycle's wheels.
Easy Motorcycle Drawing - Step 2

2. Draw another small circle inside each of the existing circles. These form the motorcycle's hubcaps. Then, draw pairs of lines between the two inner circles, forming a five-pointed star pattern. These are the spokes of the wheels.
Easy Motorcycle Drawing - Step 3

3. Draw another pair of lines extending from one of the hubcaps, erasing as necessary. Connect the lines with a curved line, then detail the part with a straight line parallel to its upper side. This is the swingarm, part of the rear suspension that holds the rear axle. Enclose a curved shape above the tire to form the rear fender and an irregular shape in front of the wheel. Draw several lines across this part, which represents the muffler.
Easy Motorcycle Drawing - Step 4

4. Enclose a curved shape covering part of the front tire, erasing as necessary. This is the front fender. Enclose a rounded triangle protruding from the fender. Draw another, smaller rounded triangle extending across the hubcap, and connect these with two lines. This forms the fork tube or front suspension.
Easy Motorcycle Drawing - Step 5

5. Use a straight line and two curved lines to draw a curved triangular shape, connecting the front and rear wheels. This forms the bottom of the motorcycle's body.
MORE DRAWING TUTORIALS:
How to draw a lamborghini.

How to Draw the Titanic

How to Draw Thomas the Train

Easy Motorcycle Drawing - Step 6

6. Use curved lines to enclose the irregular shape of the motorcycle's upper body. Note the "C" shaped indentation near the front of the bike. Enclose a rounded triangular shape within the "C." Extend a curved line from this shape and double it back upon itself, forming the handlebar. Use a curved line to draw the remaining handlebar.
Easy Motorcycle Drawing - Step 7

7. Use curved lines to enclose three irregular shapes, completing the motorcycle's body.
Add More Details to Your Motorcycle Picture - Step 8

8. Use curved lines to enclose three elongate irregular shapes, forming the subframe and cowl cover or seat of the motorcycle.
How to Draw a Dirt Bike

Easy How to Draw a Rocket Ship - Step by Step Drawing Guide for Kids and Beginners

How to Draw a Scooter

Complete the Outline of Your Motorcycle Drawing - Step 9

9. Detail the motorcycle. Use curved lines to enclose the shape of the headlight and shapes along the body. Draw curved lines across the handlebars and lower body. Draw the clutch cover using nested ovals just above the muffler.
Color Your Motorcycle Drawing

Color your cartoon motorcycle. Then, check out more fun cartoon object drawing guides , including racecars, trucks, trains, and rocketships.
Who's driving your motorcycle? Take your pick from among our character drawing guides and people drawing guides.

Click HERE to save the tutorial to Pinterest!
Learn More About The Motorcycle Drawing
Motorcycles are two-wheeled (or sometimes three-wheeled) vehicles propelled by an engine. A motorcycle is basically a self-propelled bicycle.
The first motorcycle was built in 1884. Motorcycles are also known as motorbikes or mopeds. Categories or types include racing bikes, superbikes, touring bikes, road bikes, trail bikes, and child bikes.
Did you know? Motorcycle races have been held since at least 1907 when the Tourist Trophy motorcycle races were held to test the endurance of bikes produced by different manufacturers.
Since then, motorcycle sports has grown to encompass trick riding and motocross , a competition that involves stunts and rough terrain.
Since their conception, motorcycles have been a part of popular culture. Mopeds are often used to represent carefree European holidays.
Large bikes like Harley Davidson motorcycles are synonymous with tough biker gangs. Fictional motorcycles include Batman's Batpod, the Tron light cycle, the biker gangs from the anime film Akira, and the sidecar motorcycle used by Wallace and Gromit.
Scroll down for a downloadable PDF of this tutorial.
Would you like to draw a cartoon motorcycle? This easy, step-by-step motorcycle drawing tutorial is here to show you how.
All you will need is a pencil, an eraser, and a sheet of paper. you may also wish to color your finished drawing.
If you liked this drawing tutorial, see also the following guides: Lightning Mcqueen drawing , Bike drawing , and Monster Truck drawing .
Motorcycle Drawing Tutorial - Easy & Fun Printable Pages
Join now and get immediate access to thousands of printable drawing instruction and practice pages!

Learn how to get access to thousands of printable pages!

MEMBER TROUBLESHOOTING
Still seeing ads or not being able to download the PDF?
First, check that you're logged in. You can log in on the member login page .
If you're still not able to download the PDF, the likely solution is to reload the page.
You can do this by clicking the browser reload button.
It is a circular arrow-shaped icon at the top of the browser window, typically found in the upper-left side (you can also use keyboard shortcuts: Ctrl+R on PC and Command+R on Mac).
See a Google Web Story of this Motorcycle Drawing Tutorial.
Motor Boat Drawing royalty-free images
4,727 motor boat drawing stock photos, vectors, and illustrations are available royalty-free for download..

Our company
Press/Media
Investor relations
Shutterstock Blog
Popular searches
Stock Photos and Videos
Stock photos
Stock videos
Stock vectors
Editorial images
Featured photo collections
Sell your content
Affiliate/Reseller
International reseller
Live assignments
Rights and clearance
Website Terms of Use
Terms of Service
Privacy policy
Modern Slavery Statement
Cookie Preferences
Shutterstock.AI
AI style types
Shutterstock mobile app
Android app
© 2003-2024 Shutterstock, Inc.
70 Easy Drawings You Can Do in 5 Minutes or Less
Do you want to learn how to draw but don’t have much time? Or maybe you’re an experienced artist who wants some easy drawings to do on the side. Either way, this blog post is for you!
We’ve collected the best easy drawings you can complete in 5 minutes or less, perfect for beginners and experienced artists alike.
Ready to give easy drawings a try? Grab your pencils and paper, find yourself an easy drawing idea , and let’s get started!
Choosing Your Pencils and Paper
The first step in the drawing process is choosing the right tools.
A standard No. 2 pencil and drawing paper will work just fine, but you can also use colored pencils or markers to add some extra flair to your drawings.
If you’re a beginner, we recommend starting with simple black-and-white easy sketches before moving on to more complex colored drawings. That way, you can practice the basics and gain confidence in your drawing skills before adding color.
Finding Easy Drawings
Now that you have your pencils and paper, it’s time to find easy drawing ideas. There are plenty of online resources with easy drawings for beginners, including YouTube drawing videos and art blogs.
We’ve also included a few easy drawing ideas below that you can print out or draw directly from the screen.
You can also explore easy drawings in nature, like simple shapes and patterns found in plants and animals. Again, start with easy sketches before adding color to make sure you’re comfortable with your tools and techniques.
1. Spaceship

Less than five minutes?! Yes, it’s possible! You don’t have to be an artist to draw a spaceship, and they look even better with color.
Start by drawing a simple shape for your rocket ship’s hull. Then add details like engine exhaust, windows, wings, stars, and asteroids to make it more interesting.
If you want to learn how to draw the zombie in Plants vs. Zombies, here’s an easy video tutorial.
Drawing a zombie may seem intimidating, but with the right techniques, you can create a scary-looking creature in only 5 minutes.
Start by sketching out the overall shape of the head and body. Then add details such as eyes, teeth, and hair to give your zombie a unique look.
If you want to take it one step further, you can add a few rips and tears to the clothing, giving your zombie more of an undead look.
Pikachu is one of the most recognizable and beloved characters in the world of Pokémon. Drawing Pikachu can be a fun and quick way to pass a few minutes while also honing your drawing skills.
Start by sketching out the basic shape, starting with the iconic ears, eyes, and mouth. Then add details like fur and whiskers to bring your drawing to life!
With a few strokes of your pencil, you’ll have an adorable Pikachu drawing in no time.
4. Doraemon
Doraemon is a beloved Japanese anime character and an easy drawing activity for people of all ages.
Start by sketching a circle for the face with his signature ears and nose, then add details like whiskers or glasses to make him look more like the real thing. Give your creation life by adding color!
5. Laughing Santa
Recreating a laughing Santa is the perfect way to channel your inner child.
Begin by sketching Santa’s face, then add details like rosy red cheeks or twinkling eyes to make him look more cheerful. Finally, color it in for an extra-fun result!
6. Christmas Tree
What better way to get into the holiday spirit than drawing a Christmas tree ?
Start with the tree’s shape, then add details like ornaments and candy canes for an extra fun look. Coloring in your design will give it a festive look.
7. Gingerbread Man

What could be more fun than creating your little gingerbread friend? Begin by sketching the gingerbread man’s outline, then add details like buttons and eyes. Once you’re finished drawing out your design, it’s time to bring it to life with color.
8. Christmas Penguin
Adding a Christmas penguin drawing to your décor is an excellent way to spread holiday cheer! Sketch the penguin’s body, then add details like a Santa hat or festive scarf for extra holiday spirit. For even more fun, color it in shades of black and white.
9. Candy Cane
You’ll have a blast drawing a candy cane! To start, capture the classic shape of the cane with your pencil, then add stripes or other designs to make it look more lifelike. You could even color it in for an extra-sweet result!

It doesn’t matter whether you use black-and-white or color to draw a wolf—it will look great either way.
Start by drawing the wolf’s face with pointed ears, then add details like fur and eyes to finish it off. Consider shading and adding texture to give your easy drawing a sense of depth.
11. Baby Shark
Baby shark is a charming, easy-to-follow sketch that features a smiling shark with big eyes, a wide grin, and a friendly fin.
This drawing looks great in both black-and-white and color, so it’s easy to customize and make your own!
12. Cute Dress
Here’s a video tutorial on drawing a cute girly dress.
If you like fashion drawings, this easy dress sketch is perfect for you. It features a simple silhouette with some interesting details like pleats and ruffles.
Just draw the outline of a dress with a few lines and curves, then add some extra details to make it your own.
13. Cute Girl
Here’s another easy-to-follow sketch featuring a cute girl with big eyes and an adorable expression.
This one looks great in both black-and-white and color – just draw the basic shape of the girl, then add some extra details to make your drawing unique.
14. Lollipop
Here’s a video of how to draw an easy lollipop.
Another easy drawing idea is this lollipop sketch.
Draw a curved line for the stick and an oval shape for the candy. Then, add some swirls and other details to make it your own. If you’re feeling creative, you can add color to your design.
15. Mickey Mouse
Here’s a classic drawing idea for Disney fans – Mickey Mouse!
Draw circles for his head and ears, then add details like eyes, nose, and mouth to finish it off. This one looks great in black and white or with a few colorful touches.
You can also follow this easy tutorial:
16. Anime Eyes
If you’re looking for easy anime drawings, this is a great place to start. Simply draw two circles and add some details like eyelashes and pupils to make it your own. If you’re feeling creative, go ahead and color it in!
Here’s a guide on how to color anime eyes:
Drawing a UFO is simple and enjoyable. Start by drawing the round shape of the UFO, then add details like stars or aliens to make it more interesting. You can also color it for an extra-cool result.
18. Camping Area

Here’s another great idea for your next drawing – a camping scene!
You can draw the outline of a tent, trees, and stars in the night sky. Add some extra details, like people around the campfire or animal drawings walking by, to make it more interesting.
If you’re looking for drawing ideas for beginners , this simple nose sketch is perfect.
Once you’ve got your basic shape, start adding shading to give the nose a three-dimensional effect. Use hatching or crosshatching techniques to create shadows and highlights on your drawing.
20. Diamond
Here’s a quick but fabulous drawing idea – a diamond! Just draw four shapes and connect them together, then add some extra details to make it your own. You can also paint it to make it look more glamorous.
21. Easter Bunny

Why not try this adorable Easter bunny drawing idea? Draw two big ears, then add eyes, whiskers, and a fluffy tail to finish it off. If you’re feeling extra festive, bring out the coloring supplies and have at it!
22. Cute Cat
If you’re looking for an easy drawing idea, why not try a cat? Draw the cat with two ears and eyes, then add details like whiskers, fur tufts, and claws to make it your own. You can also color it if you want to add some extra flair.

Roses have been used to symbolize love, beauty, and admiration for centuries, so creating your version of this classic flower is sure to make any art project special.
Simply draw the petals, then add some details like leaves and buds. Not only can you color it to create a lovely piece of art, but you can also frame it and hang it up for all to see!
Drawing a braid is easy and fun! Draw a curved line with some loops, then add details like beads or flowers to make it more interesting. Coloring your braid drawing is a great way to give it extra personality.
25. Eifel Tower
Do you want to draw an iconic structure in less than 5 minutes? Then the Eiffel Tower could be your perfect choice!
Start by sketching a rough outline of the tower and then add details like windows and balconies. You can also add details like plants or people at the foot of the tower for added dimension.
26. Tiny Penguin
Did you know that penguins are one of the easiest animal drawings?
Sketch the penguin with two flippers, then add some details like eyes, beak, and feathers. If you want to make your design even cuter, color it in!
27. Sea Turtle
This cute little guy is a breeze to draw and will only take about five minutes of your time!
Start with the long oval body, then add rounder shapes for the flippers and head. Outline it in black ink and finish off with some scales and details. You can use colorful markers to create a fun pattern on the turtle’s shell.
Here’s another easy way to draw a turtle:
28. Baby Alligator

This super-easy drawing can be done in minutes and is a great place to start for beginner artists.
Begin by drawing the shape of an alligator’s head, followed by the neck. Then draw two parallel curved lines at the bottom to make the legs. Finish it with two small circles on its back for eyes, and you’re done!
29. Planets
Drawing planets can be a great way to show off your artistic skills! Use colors like blues and greens or vibrant shades for a fun look.
Outline the planets’ round shapes, then add details like stars and asteroids. You can even use different shades of color to give your planet depth and texture.
Here’s how to draw our solar system:
30. Little Mermaid

If you’re looking for a cute and easy drawing idea that only takes 5 minutes or less, why not try the Little Mermaid?
Start by sketching a rough outline of the mermaid’s body. Make sure to include her long flowing hair, then add details like eyes, nose, and lips. Finish off the drawing with a tail and a seashell necklace.

Not only is drawing hands easy, but it’s also therapeutic. Just draw circles for the joints, then add lines for the fingers to finish it off. Alternatively, you can add shadows to give it more depth.
Draw a simple mouth with teeth in five minutes or less!
Sketch the outline of the lips, then draw several small curved lines to create a set of teeth. You can also add other elements like tongue if you want.
Anyone can have fun drawing dice, regardless of skill level! Just draw simple lines and slight curves, then add details like numbers to make it more interesting. You can also color it in for a vibrant look.
34. Ballerina Shoes

You don’t have to be a professional artist to draw beautiful ballerina shoes that look amazing in any color scheme.
All you need are simple shapes for the shoe’s sole, heel, and straps, and then add details like ribbons, buckles, or bows. Once you’ve got your shoes down, try experimenting with different colors and textures to give your drawing a unique twist.
35. Woman’s Face
In less than 5 minutes, you can draw a woman’s face with some realistic features. Start by sketching out the shapes and then add facial features like eyes, nose, ears, and mouth.
You can also add details like hair and eyebrows to make it lifelike. To finish your masterpiece, use shading and color to bring out the different elements of your drawing.
36. Head in the Clouds

This timeless design can be recreated in five minutes or less – perfect for when you only have a little time to spare!
Draw an oval shape for the head, then add details like stars or birds to make it more interesting. When you daydream, it’s easy to let your mind wander and feel at ease.
37. Astronaut
Children will love this easy step-by-step drawing of an astronaut. Draw a space suit with a helmet, then add details like stars and planets to make it more exciting.
Here’s another way to do it:
38. Elephant
Drawing an elephant can be fun and easy, taking only 3 to 5 minutes of your time.
Start by drawing the head and trunk of the elephant. From there, fill in details like eyes, legs, tail, tusks, and other features that give it its unique charm. Once satisfied with your drawing, you can add color to make it more lively and interesting.
You can have an elephant drawing session with kids by following this tutorial:
39. Message in a Bottle

Drawing a message in a bottle is an easy and fun way to express your creativity. Just draw a bottle, then add details like stars or messages to make it more interesting. Or, you can color it in for an even more magical look.
40. Nature in a Triangle

Incorporating nature into your drawings is easy and will make them look great. Start with a triangle, then add details like trees, mountains, or birds to make it more interesting. For an even more beautiful look, color it in!
41. Unicorn
Drawing unicorns is one of the most popular doodles out there! It’s not only fun to draw but also quite simple.
Start by outlining a unicorn, then use your pencil to draw horns from the highest point of its head. Give your unicorn some ears, eyes, and a mouth. If you want, you can color it for a truly magical result!
Here’s another easy way to do it:
42. Octopus

Who doesn’t love drawing an octopus? You can have a great-looking octopus with just a few simple lines.
First, draw the head and body of the octopus using curved lines. Then add eight tentacles and some suction cups. Finish by drawing the eyes, and you’ll have an amazing drawing in less than five minutes!
43. Hedgehog
Draw a cute and simple hedgehog that kids will love with this easy step-by-step guide! Start by drawing an oval shape for the body, then add details like spines and a nose to finish it off.
You can also follow this video:
This easy drawing idea of a whale is perfect for beginners and looks great in any color palette.
Just draw an oval shape for the whale’s body, then add details like eyes and fins. Voila! You now have a cute whale swimming in the ocean. Not bad for 5 minutes of drawing time!
Another easy drawing idea you can do in five minutes or less! Owls are a popular subject for many artists, and with good reason – they have wide eyes, big wings, and intricate feathers.
Drawing an owl is easier than it looks. To get started, lightly sketch the shape of the head and body of the owl using a pencil. Then, add details like the eyes and wings, ensuring correct proportions.
Here’s a clever and easy way to draw an owl using the Number 22:
No matter your skill level, you can draw a cute panda in less than 5 minutes! Start by drawing a circle for the head and body, then add two circles for the eyes and black patches for the paws.
Here’s a quick guide on how to draw a panda:
A duck is one of the easiest animal drawings and a classic choice for kids. Draw its simple shape – an oval for its head with a curved bill, then add details like wings and feathers.
Finally, add some feet to your duck with a few curved lines! With these easy steps, you can draw an adorable duck in just 5 minutes or less.
Here’s how to draw a realistic duck using the Number 2 as a guide:
48. Sleeping Moon

The moon is one of the easiest things to draw, and it can be quite calming.
Just draw a crescent moon, then add details like stars or clouds to make it more interesting. You can also color it in with different shades of blue and gray for an extra-magical look.
49. Smiling Sun

Drawing a sun is an easy way to satisfy your creative urges. First, draw a circle with beams of light, then add extras like clouds or planets to make it more captivating. For an even sunnier result, color it yellow and orange.
50. Dragonfly
Kids will love drawing a dragonfly! To begin, sketch the body of the insect on your paper. You can draw an oval shape for the head and two attached wings.
Then, draw four thin legs extending from each side of the body. Finally, add a few details like eyes and antennas to make it look more lifelike.
51. Band-aid

This simple drawing only takes a few minutes to complete, and it looks great! Begin by sketching the outline of a band-aid with curved sides. Then have some fun and go wild by adding extras like stars or hearts.
52. Stegosaurus
Stegosaurus is one of the easiest dinosaurs to try out if you’re just starting with drawing. Its recognizable shapes make it a good subject for even novice artists.
Start by sketching the body and the triangular plates down the back of the dinosaur. Then, add triangular spikes on the end of its tail. Finally, draw four legs and a head with two eyes to complete your stegosaurus drawing!
53. Eye Glasses
Sketching glasses are a great way to spend your extra time. To start, establish the outline of the glasses by drawing the frame and a bridge. After that, add authentic details like lenses. Fill your design with color for an extra-cool look.
54. Ice Cream
Ice cream is delicious, and drawing it can be a fun way to show off your artistic skills. Begin by sketching a scoop of ice cream cone, then add details like sprinkles or chocolate syrup for a delicious look. For a tasty finish, paint it with various colors!
55. Tea Cup

Drawing a tea cup is an easy and creative way to practice your drawing skills. Start by sketching the cup’s shape, making sure you pay attention to the details like its handle and saucer.
You can add more elements, such as steam or patterns around the cup. Finally, give it some dimension by adding colors and shadows.
56. Cute Cake
Designing a cake with pencil and paper is simple and fun. Draw a circle or oval shape for the cake with frosting, then add details like candles and sprinkles to give it that special touch. For more fun, color it with different shades for a vibrant finish.
Here’s a step-by-step guide on how to draw a BTS cake:
57. Cute Lipstick
Drawing cute lipstick is an easy and fun idea for anyone looking to create a quick sketch.
Start by lightly drawing an oval shape in the center of the page. From there, draw two small circles at the bottom of the oval for the base of the lipstick tube. Create details like ridges along the tube or swirls on the cap.
58. Cupcake

Draw a cupcake in under 5 minutes! All you need is some paper, pencils and your imagination.
Sketch a simple circle for the base of the cupcake and some curved lines. After that, add details like sprinkles or icing. To finish it off, use multiple colors to make it look extra sweet.
59. Rainbow Cloud
With this easy tutorial, you’ll be drawing a rainbow cloud in no time!
Start by sketching the basic shapes of clouds with a rainbow in between, then add details like raindrops to make it look more lifelike. For extra color and charm, paint it with shades of yellow, pink, and blue.
60. Cute Shooting Star
This is another easy drawing idea you can complete in less than 5 minutes. Begin by outlining the star, then add details like streaks or sparkles. And that’s it!
You now have a cute shooting star drawing that you can color with shades of yellow and pink for a magical finish.
61. Apple Watch
Drawing an Apple Watch is not only easy but also a fun way to bring technology to life.
Sketch the shape of the watch and its iconic buttons, then add details like bands or stickers for a more realistic look. Color it in with shades of white and silver for an extra-enjoyable result!
62. Cute Watermelon

This cute watermelon drawing is super easy to create and can be done in under 5 minutes!
Draw the large oval shape of the watermelon. Don’t forget to add seeds, texture, and color using just a few simple lines. Draw stripes along the sides of your watermelon to give it its unique look.
63. Yummy Pizza
Try your hand at drawing a delicious-looking pizza in just 5 minutes or less. With some creativity and helpful tips from us, you can have a great-looking pizza drawing in no time.
Start by sketching out a round pizza shape with your pencil. Then, draw fun details like pepperoni, olives, mushrooms, or cheese – whatever looks best to you!
64. Cute Basketball

Anyone can channel their inner athlete by drawing a cute basketball. Draw a circle for the ball, then add details like stars or stripes for a more playful look. Finally, color it in with different shades of orange and yellow for an extra-fun result!
65. Chimney
Drawing a chimney is a great way to express creativity in a short amount of time. Once the shapes are down, feel free to customize your chimney however you’d like!
Add some smoke coming out of the top, or make it look more elaborate with extra decorations. You can even combine different types of bricks for an interesting effect.
66. Pumpkin
Pumpkins are a classic drawing idea, and this one is easy to do in minutes.
Just draw an oval shape with a few lines for the stem and leaves, then you’re done! You can also add some details like eyes, teeth, or vines if you want to make it more complex.
67. Spooky Ghost
Use your artistic skills to create a spooky ghost!
First, sketch the shape of a ghost. Then add eyes, arms, or any other details you want. Finally, use shades of white and grey for the color scheme to make it look extra creepy.

Who doesn’t love a donut? Draw one with this easy tutorial!
Begin by sketching two circles for the donut, then add details like sprinkles or frosting. To finish it off, color it in with shades of pink and brown for an extra-delicious result!

Try your hand at being creative by sketching a monkey. First, draw the monkey’s face, then add features such as fur or a mouth. Make it extra fun by coloring it with shades of brown and yellow.
70. Hello Kitty
Drawing Hello Kitty is a fantastic way to widen your creativity and imagination. Start by sketching a bow and a circle for her head, then add details like whiskers for an extra-cute look. For even more fun, color it in shades of pink and white.
There you have it! We hope you had fun practicing your skills and found easy drawing ideas that inspire you to create something unique .
Whether you’re an aspiring artist or a seasoned pro, easy things to draw are a great way to practice and improve your skills. Enjoy!
Related Posts

31 Days of Christmas Drawings to Radiate the Holiday Spirit
The joy of Christmas lies not only in receiving but also in giving, and what better way to give than through your artistic creations?

31 Captivating Chalk Art Ideas to Inspire Beginners and Pros
Discover chalk art ideas to inspire your next art project, perfect for both beginners and seasoned pros. Create artistic pavement arts today!

25 Drawing Easy Butterfly Ideas to Unleash Your Creative Wings
Explore a world of creativity with drawing easy butterfly ideas. Release your imagination and create stunning butterfly art with these inspiring concepts!
Leave a Reply Cancel reply
Your email address will not be published. Required fields are marked *
Save my name, email, and website in this browser for the next time I comment.
IMAGES
VIDEO
COMMENTS
Hi Everyone, In This Video I Show You How To Draw A Speedboat Step By Step 🛥️. Follow My Step By Step Drawing Tutorial And Make Your Own Speedboat Drawing E...
Add a small, curved rectangle behind the windshield to create the cockpit area. Draw a series of seats inside the cockpit, using curved lines. Sketch a steering wheel and dashboard inside the cockpit. Add an outboard motor at the back of the motorboat, using a combination of rectangular and curved shapes. Draw a propeller at the bottom of the ...
Learn how to Draw and Colour Motorboat in a very simple and easy way. Just follow the steps and lines and you are there with your drawing. For more videos an...
Complete The Motorboat Drawing. Complete the motorboat drawing by first coloring the hull with a green crayon. Next, shade the center on top of the hull with a yellow crayon. Now, fill in the lining on the side of the hull with a dark purple crayon. After that, color the top part of the windshield with an orange crayon and the bottom part with ...
Short Answer. To draw a motorboat, start by sketching the basic shape of the boat, including the hull, deck, and cabin. Add details like the motor, windshield, and seats. Then, draw in the details around the boat, such as the water and some waves. Finally, add color and shading to enhance the drawing.
How to draw a Motorboat-in easy steps for children, kids, beginners lesson.Tutorial of drawing technique .Drawing tutorial,Art Tutorial Youtube VideoSubscri...
Complete The Speedboat Drawing. Complete the speedboat drawing by first coloring the hull with red and orange crayons. Next, shade the windshield with different shades of purple. Now, fill in the outboard motor with a purple crayon. Finally, color the wake and waves with light and dark blue crayons.
6. Extend two vertical straight lines from the middle of the boat. Connect them at the top with a short line, and erase lines from between them. This is the mast that supports the sails. Then, draw rectangle-shaped seats inside the hull. Draw a straight line from the back corner of the hull to give the boat a three-dimensional shape.
1. Draw the Hull. Start by drawing the pointed main shape of the boat. Add a wedge for the windshield. Check out the next page to find out how to add detail to the hull. 2. Add Detail to the Hull. Draw three long rectangles going from front to back on the boat's side. In the next step, we'll add windows and the motor.
Sketch the main body of the sailboat. Start by drawing a trapezoid shape. 2. Sketch a line perpendicular to the body of the boat. Next, draw a small trapezoid where this line is connected to the boat. 3. Sketch another line. This time, place the line perpendicular to the first. Add more details to the stand of the mast.
Drawing Lessons for kids: How to Draw a Motorboat Created Date: 6/12/2022 8:06:09 AM ...
How to draw a motor Boat Step by Step | Easy drawings | for beginners#drawing #boat #easy #simple #cute #coloredpencils #colourdrawing #colouring #sailing #r...
Step 2: Outline Some Details. We are now going to begin adding some smaller details. Begin on the far left end of the boat sketch, drawing a curving canopy shape. Add a small narrow band around the base of the boat drawing below this canopy, and then add a small tear-drop shape in the front point of the boat.
Step 3 - Next, Draw the Throttle and the Headlight. Draw a slightly diagonal shaft directly connected to the front wheel. Make sure to add a bigger line figure at the bottom, in the middle, and at the top of the shaft. This creates the coverings as well as the handles of the motorcycle. Afterwards, draw a semicircle on the right side in the ...
Add a small, curved rectangle behind the windshield to create the cockpit area. Draw a series of seats inside the cockpit, using curved lines. Sketch a steering wheel and dashboard inside the cockpit. Add a sleek engine cover at the back of the speedboat, using a curved shape. Draw a propeller at the back of the speedboat, under the engine cover.
Motor Boat Doodle, Motor boat cartoon drawing, simple ship sketch drawing, toy ship silhouette, boat mascot logo. Boat illustration. continuous line drawing from the boat traveling at high speed in the waters. concept of traveling by yacht. yacht go isolated with white backgrounds.
Hello Friends!Now we will learn How to Draw Motorboat for Beginners.This video is perfect for those of you who want to start learning to draw. Easy Sea Vehic...
Easy Motorcycle Drawing - Step 3. 3. Draw another pair of lines extending from one of the hubcaps, erasing as necessary. Connect the lines with a curved line, then detail the part with a straight line parallel to its upper side. This is the swingarm, part of the rear suspension that holds the rear axle. Enclose a curved shape above the tire to ...
Search from Motorboat Drawing stock photos, pictures and royalty-free images from iStock. Find high-quality stock photos that you won't find anywhere else.
4,726 motor boat drawing stock photos, vectors, and illustrations are available royalty-free for download. Find Motor Boat Drawing stock images in HD and millions of other royalty-free stock photos, illustrations and vectors in the Shutterstock collection. Thousands of new, high-quality pictures added every day.
Learn how to draw a speedboat in a fun and exciting way. This motorboat drawing can be done by following the video step by step.A motorboat or a speedboat is...
Here's a clever and easy way to draw an owl using the Number 22: Easy owl drawing by KUCH SIKHO. 46. Panda. No matter your skill level, you can draw a cute panda in less than 5 minutes! Start by drawing a circle for the head and body, then add two circles for the eyes and black patches for the paws.
How to draw Motor Boat#motorboat #boat #boatdrawing