- Club Finder


Enterprise Rigging Guide
Go To: Sailing - Rigging Guides
Posted on 19 July 2008 18:33
A very popular two handed boat, many of us may have started our sailing lives in an Enterprise, and many are bought and sold each year. With a strong class association and good racing circuit, Enterprises are a good boat to choose, particularly if you're not nimble enough for a faster Laser or RS double hander.
They're durable, very forgiving, undemanding, and fairly easy to repair. Either made from GRP (fibreglass) or wood, there are any Enterprises around, particularly on Ebay. If you've just bought one and don't know how to rig it, or are thinking of buying one, then read on.
Photo 1, The Enterprise
Photo 2, Seats and centreboard
While the Enterprise is a restricted design class, due to them being manufactured by a number of makers, over the last 55 years many different configurations of Enterprise have been built, some with built in bouyancy tanks, some with bouyancy bags instead, some with a sealed under foredeck, some without, some with transom flaps, others with just self-bailers. The differences also extend into the rigging; we will try to cover some of the differences in the article, but this is written for a fibreglass hull, with internal bouyancy tanks.
Photo 3, Toestrap adjusters
Photo 4, the Transom
Photo 5, Vernier adjusters on the shroud
Photo 6, the foredeck and mast step
Chances are if you buy an Enterprise, it won't be disassembled to the point of a Topper or Laser. For that reason, we aren't going to completely disassemble the boat and put absolutely everything together, for example the toestraps, and the mast. We will do a later article on how to raise (step) a mast; if you need assistance on this, pretty much anyone at your sailing club should be able to help.
Photo 7, the mast step and toestraps
Photo 8, one of two of the self-bailers,
Photo 9, The transom and traveller
Photo 10, The rudder pintles
Before we start, we'd just like to point out that in most Enterprises, you'll have two figure eight cleats for the halyards. We did originally in this one, until about a week before we did this, when someone (for once not us) decided to hoist a halyard with a little too much effort, and snapped off the top of one of the cleats.
What You Need
Mast, Spreads, Shroud, and Forestay (unless you've bought from new, these should all be together) Main Sail, Jib Sail Battens Main Sheet + Blocks, Jib Sheet Kicking strap/boom vang assembly + lines Outhaul Downhaul Boom Tiller + Tiller Extension, Rudder Painter Hull (bit obvious this one) + Centreboard Bungs (depending upon boat type).
Photo 11, all the ropes laid out on the rudder blade
Photo 12, the parts we need to rig the Enterprise
Please be aware that your boat may not come as class legal, unless you buy it new or off a serious racer. There is no one "legal" layout for an Enterprise; you need to get your boat "measured" and a measurement certificate drawn up if you plan to seriously race. Not all clubs require this; if you're sailing at a smaller club, then find out first whether you need to spend this money. The class association is a good place to start looking into this.
Lets Get Started!
Make sure you start with a clean boat, go all over it, and make sure nothing is broken, or if it is broken, make sure its' not important enough to stop you rigging the boat, or sailing it afterwards. Ensure you have all of the parts listed above if you need them; it's always a good idea to have a spares box with odds and ends of rope and fittings in. If you're like us, this may be several boxes, with more than a few odds and ends...
Photo 13, The forestay
There is a divided opinion on whether to rig boats on land or on the water - we'd suggest if it's not terribly windy, to rig the boat on land, hoist the jib, pointed head to wind, in anything other than a gentle breeze getting the mainsail ready, but hoisting it on the water. It's usual to start rigging the Enterprise front to back, starting with the jib.
As you can see on this example, the mast is already raised, with a length of rope securing the forestay to the bowplate on the front of the deck in Photo 13 (although a bottlescrew could be used instead), and the shrouds fitted to the shroudplates with "vernier" stay adjusters (Photo 5). These adjusters allow you to alter the angle of the mast forward and backward, known as the mast rake. The mast rake directly affects the centre of effort, and whether the boat will show (#) weather or (#) lee helm. The mast is stepped on the deck on this boat, with the mast step a separate piece of wood under the deck to the hull (Photo 6), which the kicking strap and toe straps are secured to (Photo 7).
Photo 14, clipping on the jib
Photo 15, Undoing a rope stopper
Open up and check your jib sail, and unroll it. Attach the tack (front corner) of the jib sail to the metal loop on the front of the deck (Photo 14), using a shackle - which type you use is not important, but it's best to use the smallest one possible (less weight). Attach the end of the halyard to the top of the jib sail using whichever fitting is necessary - on this example, it's a rope stopper. Make sure before you attach this to the sail there are no twists in the luff of the sail. Attach the stopper as shown, by making a bight in the rope, passing it through, then pass the stopper through the loop, and tighten (Photos 16-19).
Photo 16, Fixing a rope stopper
Photo 17, Fixing a rope stopper to a sail
Photo 18, Fixing a rope stopper to a sail
Photo 19, Fixing a rope stopper to a sail
To raise the jib, pull on the other end of the halyard (Photo 20). It should go up with very little resistance (other than any wind). Do not wrap the rope around your hand (Photo 21) - if you can't pull it up, bundle some slack rope in your hand for more grip, or get some plastic coated gloves.
Photo 20, Hoisting the jib
Photo 21, Never wrap the halyard rope around your hand
When the jib is fully raised, cleat it off around whichever fitting appropriate - in this case it's a figure 8 cleat. Take the rope around the outside of the cleat once (Photo 22), then figure 8 over the cleat once, then make a loop (Photo 23), with the working end becoming trapped underneath as you half-figure eight the rope around the cleat, as shown (Photo 24). This traps off the rope. Do not endlessly figure 8 the rope around the cleat - in an emergency this makes it difficult to uncleat quickly. Neatly bundle any remaining rope, and stow it over the top of the cleat, in a halyard back, or out of the way (Photo 25).
Photo 22, Figure 8 cleat the halyard
Photo 23, Form a loop
Photo 24, Lock off the halyard rope around the cleat
Photo 25, Tidy up the remaining rope
Next, if they are not already attached to the sail, tie on the jib sheets. FInd the middle piece of the rope, and tie a knot of some sort in it, either a double overhand knot as shown in the picture, or a stopper knot either side of the hole (which is less likely to cause the jib sheets to twist around each other). Ensure the jib sheets are not twisted then pass them through fairleed for the jib sheet jammers, inside the shrouds, and place a stopper knot or figure eight knot about 12 inches from the end of the rope (Photo 26). Make sure the jib sheets are not jammed off on land, as shown. If a gust comes, there is no freedom in the rope, and the boat could be taken off the trolley (Photo 27).
Photo 26, make sure the jib sheets aren't twisted
Photo 27, pass the jib sheets through the fairleads
If it's not already attached, then fix the main swivel block to the traveller on the transom of the boat. It should also have a becket on the top (Photo 30). It may not always look like the one in the picture - there are many variations of blocks made by many different manufacturers. The basic criteria for this one is to be big enough to take the mainsheet, with a swivel fitting at the base (so it will rotate around) and a becket at the top (which looks like a small fixed roller and is there to tie the end of the rope around). Next, fit the other block (which is just a plain pulley block with no becket or swivel base) to the underneath of the end of the boom (Photo 31).
Photo 30, Attach the lower mainblock
Photo 31, Attach the top mainblock
Now it's time to add the mainsheet. Tie one end around the becket on the bottom mainblock, using a bowline (Photo 32). Keep the knot as small as possible - if you make it too big, it will interfere with pulling the sail in tightly. Take the working (free) end, and pass it through the block on the underside of the boom, going through from the front to back (Photo 33), and then pass it down and through the lower block, from back to front (Photo 34). The working end then goes into the boat (Photo 35).
Photo 32, Bowline on the becket of the lower block
Photo 33, mainsheet through the upper block
Photo 34, mainsheet back through the lower block
Photo 35, mainsheet finished
Tie a stopper knot in the free end of the rope, to stop the rope end from passing through the pulley blocks - not something you want to have to fix on the water! To determine where a stopper knot should be put to limit the amount the mainsail can pull the boom out, wait until the sail is rigged, and pull the boom out sideways as far as it will go until just before it touches the shroud. Place a stopper knot in the rope here, and it will stop any damage to the shrouds during fast gybes.
The Main Sail
Unfold and spread the main sail out on a clear patch of ground. Check it over for any new holes or rips you may not have noticed before - this should be done every time you use it, because if you use an already damaged sail, you risk damaging it even more. Next, take the battens (stiff thin pieces of wood or plastic), figure out which fits in which pocket (the top one is usually smaller unless it's a full width or snap batten), and insert them as shown (Photo 37).
Photo 36, The business end of the outhaul
Photo 37, Insert the battens into the sail
Next. take the bottom back corner of the sail (the clew), and feed it into the front end of the boom (Photo 38), which should have a slot running along it's upper side. There may or may not be a plastic car (a little plastic object) on the bottom corner to feed into this track. On our boat we did not use the plastic car, because the sail was originally for a different boat. Pull the sail all the way through the boom track, until the front end reaches the front end of the boom, and secure it appropriately (in this case, with a split pin through holes in the boom and the sail as shown), as shown in Photo 39.
Photo 38, thread the sail into the boom
Photo 39, secure the front bottom corner of the sail
Next, attach the outhaul to the back end of the sail. Because this boom is slightly too large for the sail (actually we think the outhaul rope end shown has been shortened so the working end that clips onto the clew of the sail is too short), we took a rope from the sail to the shackle of the outhaul (Photo 40). This rope can be tied off in different ways, but if you run it around a couple of times, it becomes a makeshift 2:1 or 4:1 ratio system and you can pull the sail out easier (Photo 41).
Photo 40, attach the outhaul to the back bottom corner
Photo 41, tie it securely
If you don't have a pulley system, in many Enterprises the outhaul is just tied from the sail to a fixture on the end of the boom. This isn't ideal, as you cannot adjust the outhaul while sailing, and if you are serious about racing you will need to replace this. The outhaul on this boat can be seen in Photo 36.
Photo 42, Attach the halyard to the main sail
Photo 43, feed the mainsail head car up the mast slot
Now the main sail is ready to go up. Attach it to the end of the halyard (in this case using a stopper, Photo 42), and while one person feeds the luff of the mainsail into the mast track (Photo 43), the other should pull on the other end of the halyard to hoist it (Photo 44). Sails on older boats can be quite hard to hoist - if you are having any trouble hoisting the sail, make sure the mast track is free from any obstructions. Also make sure if there is a turning block at the bottom or top of the mast that it is well oiled and moves freely - this makes the sail pull up the mast much easier. A frayed luff can also make it difficult to hoist the sail.
Photo 44, Hoist the mainsail, use gloves if necessary
Photo 45, put the boom on the gooseneck
The final part of hoisting is the hardest. This Enterprise has an adjustable goose neck - if this is the case, then put the boom on the gooseneck, untighten it, and move it up as high as possible (Photo 45). Next, finish hoisting the sail to the top of the mast, cleat off the halyard as with the jib halyard (there will usually be a cleat for this), and then pull down on the boom and pull the gooseneck down, with it pulling the luff of the sail taut (Photo 46). This is much easier than putting the gooseneck in a lower position, and trying to pull the sail up the mast and make it taut this way. Tension the outhaul as necessary for wind conditions (Photo 47).
Photo 46, Lower the gooseneck and tighten the luff of the sail
Photo 47, Tighten the outhaul as necessary
A downhaul should be used as another sail control for the mainsail - this boat didn't have fittings for one, so we simply took a length of rope from points available and tied down the front corner of the mainsail (Photo 48). If there is not much wind when you plan to sail this may not be necessary. Once again, if you are serious about your sailing or racing, we're sure you'll replace this setup with something more appropriate.
Photo 48, attach the downhaul or cunningham
Photo 49, Assemble the kicking strap
Next, assemble the kicking strap/boom vang (Photo 49). Once again, there are many different configurations for this in an Enterprise, including various longer setups for single handed sailing. This one however is a simple 2:1 system with a single pulley block and a V-Jammer, assembled as shown. Fix the bottom end to the fitting in the bottom of the boat (in this case on the mast foot, Photo 50), and the top end fits into the fitting on the underside of the boom (Photo 51).
Photo 50, attach the kicker to the mast step
Photo 51, attach the other end to the boom
Photo 52, the assembled and installed kicking strap
Fit the rudder onto the pintles on the back of the boat (Photo 53). The rudder may come with two ropes - an uphaul and a downhaul. Slot the tiller extension into the top of the rudder, underneath the traveller, and secure the tiller to the rudder (in this case using a split pin). Feed the ropes for the uphaul and downhaul into the boat underneath the traveller, and attach onto the tiller where necessary (Photo 54).
Photo 53, The rudder attached and tiller inserted
Photo 54, the rudder uphaul rope secured
So there we have it, a fully rigged Enterprise. Because it's a restricted design rather than a one-design, there are different variations between boats, and we will add some pictures of these variations very soon!
Photo 55, The enterprise, fully rigged
Photo 56, The enterprise, fully rigged

Fig 1. Get all the gear ready

Home - About Us - Sailing - Club Finder - Links - Link To Us - Join Us - Contact Us - Classes - Reviews - Photo Galleries - Glossary - Knots
Disclaimer - Privacy Policy
The Worldwide Leader in Sailmaking
- Sail Care & Repair
- Sailing Gear
- Sail Finder
- Custom Sails
- One Design Sails
- Flying Sails
- New Sail Quote
- 3Di Technology
- Helix Technology
- Sail Design
- NPL RENEW Sustainable Sailcloth
- Sailcloth & Material Guide
- Polo Shirts
- Sweaters & Cardigans
- Sweatshirts & Hoodies
- Accessories
- Mid & Baselayers
- Deckwear & Footwear
- Luggage & Accessories
- Spring Summer '24
- Sailor Jackets
- Maserati X North Sails
- NS x Slowear
- Sailor Jacket
- Sustainability
- North Sails Blog
- Sail Like A Girl
- Icon Sailor Jacket
- Our Locations
- North SUP Boards
- North Foils
- North Kiteboarding
- North Windsurfing
SAIL FINDER
SAILING GEAR
COLLECTIONS & COLLAB
COLLECTIONS
WE ARE NORTH SAILS
ACTION SPORTS
Popular Search Terms
Collections
Sorry, no results for ""
ENTERPRISE TUNING GUIDE
This tuning guide has been prepared to help you get the most out of your North Sails as quickly as possible. It is meant as a starting point only, as we cannot cover all options and techniques. Feel free to modify and experiment in small steps to find what suits you best. If you find a settings that really work well, please keep us informed.
Mast Preparation
Ensure all sheaves are free running and the rigging is clean prior to stepping the mast.
Spreader Angle: Measure from spreader tip to tip.
Super Spar M2 Sleaved – 780 mm Proctor D+ – 760 mm
Spreader Length: Measure from spreader tip to wall of mast.
Super Spar M2 Sleaved – 410mm
Proctor D+ – 410mm
Rig Tension / Mast Rake
Rig tension is measured on the shrouds with a 3mm wire gauge. Mast rake is measured from top of mast to the centre of the transom. For sailing in all conditions the rig should be set up with Jib hoisted and tension fully on:
Rig Tension: 400lbs Mast Rake: 6470mm
This should make the mast straight with no Mainsail hoisted.
Ensure the Mainsail is fully hoisted – halyards do stretch.
Battens should be left in the sail at all times and whilst not afloat, the sail should be rolled down the leech, parallel to the battens.
This is used to position draft in the sail. Do not use any Cunningham until you become overpowered in heavy airs, then pull Cunningham on progressively harder as the breeze increases. This will move the draft of the sail forward in the top and de-power the upper leech.
Beating: In light and heavy airs the foot of the sail should be pulled tight. In medium airs, ease approximately 12mm.
Running: Keep the foot tight in all conditions.
Reaching: Ease fully in medium conditions, in light airs ease 25mm and in heavy airs pull out tight.
To find Jib lead position, follow the sheeting angle through the Jib clew. This should divide the Jib luff approximately in half. When sailing upwind in a Force 3, all the tell tales should break together. In medium/heavy airs, the Jib should be sheeted hard to maximise pointing ability.
In lighter conditions the Jib sheet needs to be eased approximately 12mm to keep the top of the leech open. Once a fairlead position has been found, use it in all conditions with very heavy airs, then move back 25mm. This will flatten the base of the Jib and open the leech, keeping the boat driving and on her feet.
Good luck on the water!
Featured stories, pursuing perfection: tom gillard and the one design team, a visionary sail designer | gautier sergent (1977-2024), how to care for your foul weather gear.
- Refresh page
- Plan Your Visit
- Plan Your Trip
- Group Tours
- Research Center & Archives
- Educational Programs
- Bibliography
- Related Links
- Events Calendar
- The Heritage Museum Plan
- Book A Historic Property
- Governance Resources
- Press Releases
- NISHM in the News
- Sponsorship
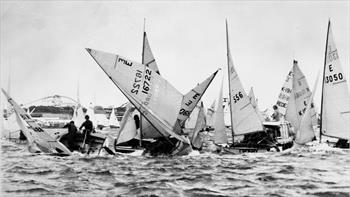
In 1929 Sir Thomas Lipton issued a challenge to the Americans for the America's Cup. It was his fifth challenge and signified a whole new era in design evolution and racing. The late 1920s and 1930s also heralded the beginning of an age when yachts from both sides of the Atlantic were being raced under the same rule — the American Universal Rule. Previously, British yachts had raced under the International Rule, a rule that gave an advantage to bermudan rigged yachts, but which was restrictive for boats bigger than 48ft (141—2m). The Americans wanted to race bigger boats and so introduced the Universal Rule. It was based on ideas proposed by Nat Herreshoff and meant waterline length could be increased without sail area being restricted, as it had been under the International Rule. This was compensated by a larger displacement and draught was limited to 15ft (4.6m). The J-Class were the foremost designs under this rule.
Under the International Rule, yachts were very similar in specification, but under the Universal Rule they differed considerably. Several existing yachts, Astra, Candida, White Heather II and Britannia , were converted to comply with the rule and raced alongside the Js. They cannot, however, be classed as true Js. Of the true J-Class, only ten were ever built and these raced together for just eight seasons from 1930 to 1937. The rules for the J-Class stipulated that length overall had to exceed 120ft; LWL had to be between 79 and 87ft (36.6 x 24-26.5m) and they could displace up to 160 tons.
In answer to Lipton's challenge of 1929 the Americans designed four J-Class yachts as possible defenders. Enterprise, Whirlwind, Yankee and Weetamoe were launched within a month of each other; Weetamoe and Enterprise from the Herreshoff yard and Yankee and Whirlwind from Lawley & Son's yard in Bristol.
Enterprise was the first launched on 14 April 1930 and was later chosen as the Cup defender. At 80ft (24.4m) LWL she was shortest of the four US Js and conventional in all aspects. Designed by W Starling Burgess, she had lightweight rigging and was the fastest of the four to windward in moderate airs.
Whirlwind , the second J launched 16 days later, was the most revolutionary of the four. Francis L Herreshoff had moved away from conventional yachts and designed a boat which took the new rule to its extremes. Whirlwind combined many new ideas and Herreshoff experimented with hull shape and rig. She was the longest of the early Js at 86ft (26m) on the waterline and remained so until Ranger and Endeavour II were built in 1937. She was built of semi-composite construction (the other three American Js were built out of the highly expensive tobin bronze), was double-ended and had a permanent backstay. Uffa Fox described her profile as: "Very pleasing to the eye, the stem sweeping down to the keel in a very sweet line, and to a man who, like myself, believes that a pointed stern is a logical ending for all vessels, her stern is a joy to behold." He predicted "If the Yacht Racing Rules govern well and wisely, we shall see Whirlwind racing 50 years hence. If they do not she will probably be cruising then." But Whirlwind met an early demise. Her building was delayed as she didn't meet Lloyd's A1 scantling rules and she wasn't chosen to be the 1930s defender. She was often out-performed when close hauled, her steering gear making her difficult to steer. She was eventually scrapped along with Enterprise in 1935. However, her unusual double headsail rig was later adopted by the rest of the Js.
The third American J, Yankee , was the best all-rounder. At 84ft on the waterline and 125ft (25.6 x 38m) length overall, she was solidly made of tobin bronze and was extremely well balanced. Designed by Frank Paine, Yankee had an almost straight sheerline and easy lines. She was a powerful contender for defender, but not fine tuned enough to succeed. She did, however, take part in the 1934 America's Cup trials and with alterations to her rig, to carry more sail, and bow, which was lengthened and made more of a V-shape, she then proved more successful, especially in light winds.
Of the American Js, Yankee was the only one to sail in British waters when she was bought by Gerald Lambert and crossed the Atlantic in 1935. She was scrapped in 1941.
The fourth of the American Js was Weetamoe , which was designed by Clinton Crane and was the narrowest of the early four. Despite claims that Yankee was the best all-rounder, Weetamoe is said to have been the closest rival to Enterprise to be the Cup defender. Charles Nedwick, in Ian Dear's book Enterprise to Endeavour, describes Weetamoe as having a profile "that is practically a triangle, with a straight line from the after end of the waterline to the bottom of the keel and thence a line which is slightly convex, and then slightly concave to the forward end of the waterline." In an attempt to better performance and make her less tender, her profile below the water was radically altered in 1934 with a new contour and bulb keel. The alterations failed and not long afterwards were reversed. In common with the other Js, she had about 43ft (13m) of overhang and her hull, Nicholson opined, "was the best of all the US Js".
1930 In August Enterprise qualified for the America’s Cup racing off Mattapoisett Massachusetts by defeating rival yachts Yankee , Whirlwind and Weetamoe .
The Americans had a distinct advantage over Britain in the 1930 America's Cup. They had the money to build four Js over Britain's one, yet Shamrock V was a hot contender. She was designed by Nicholson and built at the family yard in 1930, and before she crossed the Atlantic to attend the Cup she had notched up more than 700 sea miles (1,296km), won 15 out of the 22 races she had entered and had been tweaked and tested to a high degree. When Shamrock V and Enterprise eventually met off Newport, Rhode Island, later that year, the two Js were well matched in hull profile, but differed significantly in rig. Enterprise's rigging was lighter, she had the Park Avenue boom, which was so advantageous to windward, and had lots of winches on board. Shamrock V meanwhile, was under-winched and hard work to sail. She has since, however, proved her success in that she is still sailing today.
Enterprise , winner of the 14th America’s Cup, in 1930, crushing Shamrock 4-0.
Just after the America's Cup races, Enterprise was dry-docked. It would never sail again.
1935 Broken up for scrap.
Source:www.classicboat.co.uk 7/2/2007
Cup(s) Sailed: 1930 (won)
Crew: 31
Owners: Winthrop W. Aldrich, Harold S. Vanderbilt, and Vincent Astor
Year Built: 1930
Launched: April 14, 1930
Type: Keel Sloop, fitted with two centerboards
Designer: William Starling Burgess
Builder: Herreshoff Manufacturing Company
Construction
Frames: Steel
Planking Top: Steel — Supplied by Lukens
Planking Bottom: Tobin Bronze
Mast: Aluminum
Spinnaker Pole: Wood
Keel Ballast: Lead
Length Overall: 119.7 ft. / 36.49 m
Length Waterline: 80.0 ft. / 24.38 m
Beam: 22.1 ft. / 6.73 m
Draft: 14.5 ft. / 4.42 m
Draft with Keel Lowered: N/A
Displacement: 127.6 tons
Tonnage: N⁄A
Sail Area: 2,311.5 sq. ft. / 704.48 sq. m
Mast: 150.8 ft. / 45.97 m
Boom: 78.8 ft. / 24.01 m
Bowsprit: N/A
Top Mast: N/A
Source:www.americascup.com 7/2/2007
Guide to Understanding Sail Rig Types (with Pictures)
There are a lot of different sail rig types and it can be difficult to remember what's what. So I've come up with a system. Let me explain it in this article.
What are the different types of sail rig? The sail rig is determined by the number of masts and the layout and shape of sails. Most modern ships are fore-and-aft rigged, while old ships are square-rigged. Rigs with one mast are sloops and cutters. Ketches, yawls, brigs, and schooners have two masts. Barques have three masts. Rigs can contain up to seven masts.
'Yeah, that's a gaff brig, and that a Bermuda cutter' - If you don't know what this means (neither did I) and want to know what to call a two-masted ship with a square-rigged mainsail, this article is definitely for you.

On this page:
More info on sail rig types, mast configurations and rig types, rigs with one mast, rigs with two masts, rigs with three masts, related questions.
This article is part 2 of my series on sails and rig types. Part 1 is all about the different types of sails. If you want to know everything there is to know about sails once and for all, I really recommend you read it. It gives a good overview of sail types and is easy to understand.

The Ultimate Guide to Sail Types and Rigs (with Pictures)
First of all, what is a sail rig? A sail rig is the way in which the sails are attached to the mast(s). In other words, it's the setup or configuration of the sailboat. The rig consists of the sail and mast hardware. The sail rig and sail type are both part of the sail plan. We usually use the sail rig type to refer to the type of boat.
Let's start by taking a look at the most commonly used modern sail rigs. Don't worry if you don't exactly understand what's going on. At the end of this article, you'll understand everything about rig types.

The sail rig and sail plan are often used interchangeably. When we talk of the sail rig we usually mean the sail plan . Although they are not quite the same. A sail plan is the set of drawings by the naval architect that shows the different combinations of sails and how they are set up for different weather conditions. For example a light air sail plan, storm sail plan, and the working sail plan (which is used most of the time).
So let's take a look at the three things that make up the sail plan.
The 3 things that make up the sail plan
I want to do a quick recap of my previous article. A sail plan is made up of:
- Mast configuration - refers to the number of masts and where they are placed
- Sail type - refers to the sail shape and functionality
- Rig type - refers to the way these sails are set up on your boat
I'll explore the most common rig types in detail later in this post. I've also added pictures to learn to recognize them more easily. ( Click here to skip to the section with pictures ).
How to recognize the sail plan?
So how do you know what kind of boat you're dealing with? If you want to determine what the rig type of a boat is, you need to look at these three things:
- Check the number of masts, and how they are set up.
- You look at the type of sails used (the shape of the sails, how many there are, and what functionality they have).
- And you have to determine the rig type, which means the way the sails are set up.
Below I'll explain each of these factors in more detail.
The most common rig types on sailboats
To give you an idea of the most-used sail rigs, I'll quickly summarize some sail plans below and mention the three things that make up their sail plan.
- Bermuda sloop - one mast, one mainsail, one headsail, fore-and-aft rigged
- Gaff cutter - one mast, one mainsail, two staysails, fore-and-aft rigged
- Gaff schooner - two-masted (foremast), two mainsails, staysails, fore-and-aft rigged
- Gaff ketch - two-masted (mizzen), two mainsails, staysails, fore-and-aft rigged
- Full-rigged ship or tall ship - three or more masts, mainsail on each mast, staysails, square-rigged
The first word is the shape and rigging of the mainsail. So this is the way the sail is attached to the mast. I'll go into this later on. The second word refers to the mast setup and amount of sails used.
Most sailboats are Bermuda sloops. Gaff-rigged sails are mostly found on older, classic boats. Square-rigged sails are generally not used anymore.
But first I want to discuss the three factors that make up the sail plan in more detail.
Ways to rig sails
There are basically two ways to rig sails:
- From side to side, called Square-rigged sails - the classic pirate sails
- From front to back, called Fore-and-aft rigged sails - the modern sail rig
Almost all boats are fore-and-aft rigged nowadays.
Square sails are good for running downwind, but they're pretty useless when you're on an upwind tack. These sails were used on Viking longships, for example. Their boats were quicker downwind than the boats with fore-and-aft rigged sails, but they didn't handle as well.
The Arabs first used fore-and-aft rigged sails, making them quicker in difficult wind conditions.
Quick recap from part 1: the reason most boats are fore-and-aft rigged today is the increased maneuverability of this configuration. A square-rigged ship is only good for downwind runs, but a fore-and-aft rigged ship can sail close to the wind, using the lift to move forward.
The way the sails are attached to the mast determines the shape of the sail. The square-rigged sails are always attached the same way to the mast. The fore-and-aft rig, however, has a lot of variations.
The three main sail rigs are:
- Bermuda rig - most used - has a three-sided (triangular) mainsail
- Gaff rig - has a four-sided mainsail, the head of the mainsail is guided by a gaff
- Lateen rig - has a three-sided (triangular) mainsail on a long yard
The Bermuda is the most used, the gaff is a bit old-fashioned, and the lateen rig is outdated (about a thousand years). Lateen rigs were used by the Moors. The Bermuda rig is actually based on the Lateen rig (the Dutch got inspired by the Moors).

Other rig types that are not very common anymore are:
- Junk rig - has horizontal battens to control the sail
- Settee rig - Lateen with the front corner cut off
- Crabclaw rig
Mast configuration
Okay, we know the shape of the mainsail. Now it's time to take a look at the mast configuration. The first thing is the number of masts:
- one-masted boats
- two-masted boats
- three-masted boats
- four masts or up
- full or ship-rigged boats - also called 'ships' or 'tall ships'
I've briefly mentioned the one and two mast configurations in part 1 of this article. In this part, I'll also go over the three-masted configurations, and the tall ships as well.
A boat with one mast has a straightforward configuration because there's just one mast. You can choose to carry more sails or less, but that's about it.
A boat with two masts or more gets interesting. When you add a mast, it means you have to decide where to put the extra mast: in front, or in back of the mainmast. You can also choose whether or not the extra mast will carry an extra mainsail. The placement and size of the extra mast are important in determining what kind of boat we're dealing with. So you start by locating the largest mast, which is always the mainmast.
From front to back: the first mast is called the foremast. The middle mast is called the mainmast. And the rear mast is called the mizzenmast.

What is the mizzenmast? The mizzenmast is the aft-most (rear) mast on a sailboat with three or more masts or the mast behind the mainmast on a boat with two masts. The mizzenmast carries the mizzen sail. On a two-masted boat, the mizzenmast is always (slightly) smaller than the mainmast. What is the purpose of the mizzen sail? The mizzen sail provides more sail area and flexibility in sail plan. It can be used as a big wind rudder, helping the sailor to have more control over the stern of the ship. It pushes the stern away from the wind and forces the bow in the opposite way. This may help to bring the bow into the wind when at anchor.
I always look at the number of masts first, because this is the easiest to spot. So to make this stuff more easy to understand, I've divided up the rig types based on the number of masts below.
Why would you want more masts and sail anyways?
Good question. The biggest advantage of two masts compared to one (let's say a ketch compared to a sloop), is that it allows you to use multiple smaller sails to get the same sail area. It also allows for shorter masts.
This means you reduce the stress on the rigging and the masts, which makes the ketch rig safer and less prone to wear and tear. It also doesn't capsize as quickly. So there are a couple of real advantages of a ketch rig over a sloop rig.
In the case of one mast, we look at the number of sails it carries.
Boats with one mast can have either one sail, two sails, or three or more sails.
Most single-masted boats are sloops, which means one mast with two sails (mainsail + headsail). The extra sail increases maneuverability. The mainsail gives you control over the stern, while the headsail gives you control over the bow.
Sailor tip: you steer a boat using its sails, not using its rudder.
The one-masted rigs are:
- Cat - one mast, one sail
- Sloop - one mast, two sails
- Cutter - one mast, three or more sails

The cat is the simplest sail plan and has one mast with one sail. It's easy to handle alone, so it's very popular as a fishing boat. Most (very) small sailboats are catboats, like the Sunfish, and many Laser varieties. But it has a limited sail area and doesn't give you the control and options you have with more sails.
The most common sail plan is the sloop. It has one mast and two sails: the main and headsail. Most sloops have a Bermuda mainsail. It's one of the best racing rigs because it's able to sail very close to the wind (also called 'weatherly'). It's one of the fastest rig types for upwind sailing.
It's a simple sail plan that allows for high performance, and you can sail it short-handed. That's why most sailboats you see today are (Bermuda) sloops.
This rig is also called the Marconi rig, and it was developed by a Dutch Bermudian (or a Bermudian Dutchman) - someone from Holland who lived on Bermuda.
A cutter has three or more sails. Usually, the sail plan looks a lot like the sloop, but it has three headsails instead of one. Naval cutters can carry up to 6 sails.
Cutters have larger sail area, so they are better in light air. The partition of the sail area into more smaller sails give you more control in heavier winds as well. Cutters are considered better for bluewater sailing than sloops (although sloops will do fine also). But the additional sails just give you a bit more to play with.
Two-masted boats can have an extra mast in front or behind the mainmast. If the extra mast is behind (aft of) the mainmast, it's called a mizzenmast . If it's in front of the mainmast, it's called a foremast .
If you look at a boat with two masts and it has a foremast, it's most likely either a schooner or a brig. It's easy to recognize a foremast: the foremast is smaller than the aft mast.
If the aft mast is smaller than the front mast, it is a sail plan with a mizzenmast. That means the extra mast has been placed at the back of the boat. In this case, the front mast isn't the foremast, but the mainmast. Boats with two masts that have a mizzenmast are most likely a yawl or ketch.
The two-masted rigs are:
- Lugger - two masts (mizzen), with lugsail (a cross between gaff rig and lateen rig) on both masts
- Yawl - two masts (mizzen), fore-and-aft rigged on both masts. Main mast is much taller than mizzen. Mizzen without a mainsail.
- Ketch - two masts (mizzen), fore-and-aft rigged on both masts. Main mast with only slightly smaller mizzen. Mizzen has mainsail.
- Schooner - two masts (foremast), generally gaff rig on both masts. Main mast with only slightly smaller foremast. Sometimes build with three masts, up to seven in the age of sail.
- Bilander - two masts (foremast). Has a lateen-rigged mainsail and square-rigged sails on the foremast and topsails.
- Brig - two masts (foremast), partially square-rigged. The main mast carries small lateen-rigged sail.

The yawl has two masts that are fore-and-aft rigged and a mizzenmast. The mizzenmast is much shorter than the mainmast, and it doesn't carry a mainsail. The mizzenmast is located aft of the rudder and is mainly used to increase helm balance.
A ketch has two masts that are fore-and-aft rigged. The extra mast is a mizzenmast. It's nearly as tall as the mainmast and carries a mainsail. Usually, the mainsails of the ketch are gaff-rigged, but there are Bermuda-rigged ketches too. The mizzenmast is located in front of the rudder instead of aft, as on the yawl.
The function of the ketch's mizzen sail is different from that of the yawl. It's actually used to drive the boat forward, and the mizzen sail, together with the headsail, are sufficient to sail the ketch. The mizzen sail on a yawl can't really drive the boat forward.
Schooners have two masts that are fore-and-aft rigged. The extra mast is a foremast which is generally smaller than the mainmast, but it does carry a mainsail. Schooners are also built with a lot more masts, up to seven (not anymore). The schooner's mainsails are generally gaff-rigged.
The schooner is easy to sail but not very fast. It handles easier than a sloop, except for upwind, and it's only because of better technology that sloops are now more popular than the schooner.
The brig has two masts. The foremast is always square-rigged. The mainmast can be square-rigged or is partially square-rigged. Some brigs carry a lateen mainsail on the mainmast, with square-rigged topsails.
Some variations on the brig are:
Brigantine - two masts (foremast), partially square-rigged. Mainmast carries no square-rigged mainsail.
Hermaphrodite brig - also called half brig or schooner brig. Has two masts (foremast), partially square-rigged. Mainmast carries a gaff rig mainsail and topsail, making it half schooner.
Three-masted boats are mostly barques or schooners. Sometimes sail plans with two masts are used with more masts.
The three-masted rigs are:
- Barque - three masts, fore, and mainmast are square-rigged, the mizzenmast is usually gaff-rigged. All masts carry mainsail.
- Barquentine - three masts, foremast is square-rigged, the main and mizzenmast are fore-and-aft rigged. Also called the schooner barque.
- Polacca - three masts, foremast is square-rigged, the main and mizzenmast are lateen-rigged.
- Xebec - three masts, all masts are lateen-rigged.

A barque has three or four masts. The fore and mainmast are square-rigged, and the mizzen fore-and-aft, usually gaff-rigged. Carries a mainsail on each mast, but the mainsail shape differs per mast (square or gaff). Barques were built with up to five masts. Four-masted barques were quite common.
Barques were a good alternative to full-rigged ships because they require a lot fewer sailors. But they were also slower. Very popular rig for ocean crossings, so a great rig for merchants who travel long distances and don't want 30 - 50 sailors to run their ship.
Barquentine
The barquentine usually has three masts. The foremast is square-rigged and the main and mizzenmast fore-and-aft. The rear masts are usually gaff-rigged.
Faster than a barque or a schooner, but the performance is worse than both.
The polacca or polacre rig has three masts with a square-rigged foremast. The main and mizzenmast are lateen-rigged. Beautiful boat to see. Polacca literally means 'Polish' (it's Italian). It was a popular rig type in the Mediterranean in the 17th century. It looks like the xebec, which has three lateen-rigged masts.
Fun fact: polaccas were used by a Dutch sailor-turned-Turkish-pirate (called Murat Reis).
The xebec is a Mediterranean trading ship with three masts. All masts are lateen-rigged. I couldn't find any surviving xebecs, only models and paintings. So I guess this rig is outdated a long time.
A boat with three or more masts that all carry square-rigged sails is called a ship, a tall ship, or a full-rigged ship. So it's at this point that we start calling boats 'ships'. It has nothing to do with size but with the type of rigging.
More sails mean less stress on all of them. These ships use a lot of sails to distribute the forces, which reduces the stress on the rigging and the masts. Square sails mean double the sail area in comparison to triangular sails.
They are quite fast for their size, and they could outrun most sloops and schooners (schooners were relatively a lot heavier). The reason is that tall ships could be a lot longer than sloops, giving them a lot of extra hull speed. Sloops couldn't be as large because there weren't strong enough materials available. Try making a single triangular sail with a sail area of over 500 sq. ft. from linen.
So a lot of smaller sails made sense. You could have a large ship with a good maximum hull speed, without your sails ripping apart with every gust of wind.
But you need A LOT of sailors to sail a tall ship: about 30 sailors in total to ie. reef down sails and operate the ship. That's really a lot.
Tall ships are used nowadays for racing, with the popular tall ship races traveling the world. Every four years I go and check them out when they are at Harlingen (which is very close to where I live).
Check out the amazing ships in this video of the tall ship races last year near my hometown. (The event was organized by friends of mine).
What is the difference between a schooner and a sloop? A schooner has two masts, whereas the sloop only has one. The schooner carries more sails, with a mainsail on both masts. Also, sloops are usually Bermuda-rigged, whereas schooners are usually gaff-rigged. Most schooners also carry one or two additional headsails, in contrast to the single jib of the sloop.
What do you call a two-masted sailboat? A two-masted sailboat is most likely a yawl, ketch, schooner, or brig. To determine which one it is you have to locate the mainmast (the tallest). At the rear: schooner or brig. In front: yawl or ketch. Brigs have a square-rigged foremast, schooners don't. Ketches carry a mainsail on the rear mast; yawls don't.
What is a sloop rig? A sloop rig is a sailboat with one mast and two sails: a mainsail and headsail. It's a simple sail plan that handles well and offers good upwind performance. The sloop rig can be sailed shorthanded and is able to sail very close to the wind, making it very popular. Most recreational sailboats use a sloop rig.
What is the difference between a ketch and a yawl? The most important difference between a ketch and a yawl are the position and height of the mizzenmast. The mizzenmast on a yawl is located aft of the rudder, is shorter than the mainmast and doesn't carry a mainsail. On a ketch, it's nearly as long as the mainmast and carries a mainsail.

There are a wonderful lots of DIY changeability shows on the cable airwaves these days.
Rick the rigger
There are SO many errors on this site it really should be taken down.
First major mistake is to say you are no longer afraid of the sea.
One that truly gets up my nose is the term ‘fully’ rigged ship. It’s a FULL rigged ship!! Your mast names are the wrong way round and just because there may be 3 it doesn’t automatically mean the one in the middle is the main.
I could go on and totally destroy your over inflated but fragile ego but I won’t. All I will say is go learn a lot more before posting.
Shawn Buckles
Thanks for your feedback. If you like to point out anything more specific, please let me know and I will update the articles. I’ve changed fully-rigged to full-rigged ship - which is a typo on my part. I try to be as concise as I can, but, obviously, we all make mistakes every now and then. The great thing about the internet is that we can learn from each other and update our knowledge together.
If you want to write yourself and share your knowledge, please consider applying as a writer for my blog by clicking on the top banner.
Thanks, Shawn
Well, I feel that I’ve learned a bit from this. The information is clear and well laid out. Is it accurate? I can’t see anything at odds with the little I knew before, except that I understood a xebec has a square rigged centre mainmast, such as the Pelican ( https://www.adventureundersail.com/ )
Hi, Shawn, You forgot (failed) to mention another type of rig? The oldest type of rig known and still functions today JUNK RIG!
Why are so many of the comments here negative. I think it is wonderful to share knowledge and learn together. I knew a little about the subject (I’m an Aubrey-Maturin fan!) but still found this clarified some things for me. I can’t comment therefore on the accuracy of the article, but it seems clear to me that the spirit of the author is positive. We owe you some more bonhomme I suggest Shawn.
As they say in the Navy: “BZ” - for a good article.
Been reading S.M. Stirling and wanted to understand the ship types he references. Thank you, very helpful.
This site is an awesome starting point for anyone who would like to get an overview of the subject. I am gratefull to Shawn for sharing - Thanks & Kudos to you! If the negative reviewers want to get a deeper technical knowledge that is accurate to the n-th then go study the appropriate material. Contribute rather than destroy another’s good work. Well done Shawn. Great job!
Good stuff Shawn - very helpful. As a novice, it’s too confusing to figure out in bits and pieces. Thanks for laying it out.
First of all I have to say that Rick ‘the rigger’ is obviously the one with the “over inflated but fragile ego” and I laughed when you suggested he share his knowledge on your blog, well played!
As for the content it’s great, hope to read more soon!
Alec Lowenthal
Shawn, I have a painting of a Spanish vessel, two masted, with. Lateen sails on both masts and a jib. The mainsail is ahead of the main mast (fore) and the other is aft of the mizzen mast. Would this be what you call lugger rig? I have not seen a similar picture. Thanks, Alec.
Thank you for your article I found easy to read and understand, and more importantly remember, which emphasises the well written.. Pity about the negative comments, but love your proactive responses!
This vessel, “SEBASTIAN” out of Garrucha, Almería, España, was painted by Gustave Gillman in 1899.
Sorry, picture not accepted!
Thank you for a very informative article. I sail a bit and am always looking for more knowledge. I like the way you put forth your info and I feel if you can’t say anything positive, then that person should have their own blog or keep their opinions to their-self. I will be looking for more from you. I salute your way of dealing with negative comments.
Thank you for a great intro to sailing boats! I searched different sailboats because I use old sails tp make bags and wanted to learn the difference. Way more than I ever expected. Thanks for all the work put in to teach the rest of us.
Your description of a cutter is lacking, and your illustrations of “cutters” are actually cutter-rigged sloops. On a true cutter, the mast is moved further aft (with more than 40% of the ship forward of the mast). A sloop uses tension in the backstay to tension the luff of the foresail. The cutter can’t do this.
Also, a bermuda-rigged ketch will have a line running from the top of the mainmast to the top of the mizzenmast.
wow great guide to rig types! thanks
Interesting guide, however I am confused about the description of the brig. You say the main mast on a brig can have a lateen sail, but in your picture it looks like a gaff sail to me. How is it a lateen sail?
Hi Shawn, thank you for taking the time to share this information. It is clear and very helpful. I am new to sailing and thinking of buying my own blue water yacht. The information you have supplied is very useful. I still am seeking more information on performance and safety. Please keep up the good work. Best Regards
mickey fanelli
I’m starting to repair a model sailboat used in the lake I have three masts that have long been broken off and the sails need replacement. So my question is there a special relationship between the three masts I do have reminents of where the masts should go. they all broke off the boat along with the sails I can figure out where they go because of the old glue marks but it makes no sense. or does it really matter on a model thank you mickey
Cool, total novice here. I have learnt a lot. Thanks for sharing - the diagrams along with the text make it really easy to understand, especially for a beginner who hasn’t even stepped on a sailing boat.
Daryl Beatt
Thank you. Cleared up quite a few things for me. For example, I was familiar with the names “Xebecs” and “Polaccas” from recent reading about the Barbary War. I had gathered that the two Barbary types were better suited to sailing in the Med, but perhaps they were less able to be adaptable to military uses,(but one might assume that would be ok if one plans to board and fight, as opposed to fight a running gun duel). Specifically, the strangely one sided August 1, 1801 battle between the USS Enterprise under Lt. John Sterett and the Polacca cruiser Tripoli under Admiral Rais Mahomet Rous. On paper both ships seemed nearly equal in size, guns and crew, but pictures of the battle are confusing. While the Enterprise is usually rendered as the familiar schooner, the polacca Tripoli has been pictured in radically different ways. Thus the Wikipedia picture by Hoff in 1878 used to illustrate the Battle shows a Brig design for Tripoli, indicating 77 years later, polaccas were no longer common.
Lee Christiansen
I am curious as to what you would call a modern race boat with a fractional jib,not equipped for full masthead hoist? Thanks Lee
Thanks Guy: The information and pictures really eliminate a lot of the mystery of the terminology and the meanings. Also appreciate the insight of the handling idiosyncrasies “hand” (staff) requirements to manage a vessel for one that has not been on the water much. I long to spend significant time afloat, but have concern about the ability to handle a vessel due to advancing age. The Significant Other prefers to sit (in AC comfort)and be entertained by parties of cruise line employees. Thanks again for the information.
Gordon Smith
Your discussion made no mention of the galleon, a vessel with either square-rigged Fore and Main masts and a shorter lateen-rigged Mizzen, or, on larger galleons, square-rigged Fore and Main masts, with a lateen-rigged Mizzen and a lateen-rigged Bonaventure mast, both shorter than either the Fore or Main masts. Also, it was not uncommon for a galleon to hoist a square-rigged bowsprit topsail in addition to the usual square-rigged spritsail.
Emma Delaney
As a hobbyist, I was hesitant to invest in expensive CAD software, but CADHOBBY IntelliCAD has proven to be a cost-effective alternative that delivers the same quality and performance.
https://www.cadhobby.com/
Leave a comment
You may also like.
What's that sail for? Generally, I don't know. So I've come up with a system. I'll explain you everything there is to know about sails and rigs in this article.

17 Sailboat Types Explained: How To Recognize Them

Different Types of Sailing and Racing Explained

How Are Sail Numbers Assigned? (And how to pick yours)
Own your first boat within a year on any budget.
A sailboat doesn't have to be expensive if you know what you're doing. If you want to learn how to make your sailing dream reality within a year, leave your email and I'll send you free updates . I don't like spam - I will only send helpful content.
Ready to Own Your First Boat?
Just tell us the best email address to send your tips to:

- CLASSIFIEDS
- NEWSLETTERS
- SUBMIT NEWS

Brief history of the Enterprise Class as it celebrates its 60th anniversary

Related Articles
Upcoming Events
Sailboat Rigging Specifications: Everything You Need to Know
by Emma Sullivan | Aug 1, 2023 | Sailboat Maintenance
Short answer: Sailboat rigging specifications
Sailboat rigging specifications refer to the measurements and details of the various components that make up a sailboat’s rig. This includes the type and size of the standing rigging (such as shrouds and stays), running rigging (such as halyards and sheets), mast height, boom length, and sail dimensions. These specifications are essential for proper performance, safety, and handling of a sailboat.
1) Understanding Sailboat Rigging Specifications: A Comprehensive Guide
Understanding Sailboat Rigging Specifications: A Comprehensive Guide
Sailing enthusiasts often find themselves entranced by the beauty and grace of a sailboat slicing through the water, powered solely by the wind . But behind every successful sailboat is a well-designed rigging system that plays a crucial role in its performance and safety. In this comprehensive guide, we will delve into the world of sailboat rigging specifications, unraveling the intricacies and shedding light on the key aspects every sailor should understand.
To embark on this journey of unraveling sailboat rigging specifications, one must first comprehend their fundamental purpose. Rigging refers to the various components that support and control the sails, enhancing their efficiency in harnessing wind power. It comprises intricate networks of wires, ropes, blocks, pulleys, and fittings meticulously designed to distribute loads evenly across the hull while enabling precise control over sail adjustments.
The importance of understanding these specifications cannot be overstated. Rigging functions as an interconnected system where even slight adjustments can have a profound impact on sailing performance . Familiarity with rigging specifications empowers sailors to optimize their boat’s performance while ensuring safe navigation under diverse weather conditions.
Let’s dive deeper into some essential elements that make up a sailboat ‘s rigging specification:
1) Standing Rigging: The standing rigging forms the backbone of any sailboat ‘s rigging system. It consists predominantly of stainless steel wire cables known as ‘stays’ or ‘shrouds,’ which hold up the mast and distribute its loads across multiple points on the hull. Understanding how factors like wire diameter (gauge), construction (1×19 or 7×7), material grade (316 or 304 stainless steel), and tension affect overall stability plays a vital role in maintaining a balanced vessel capable of handling varying wind conditions.
2) Running Rigging: Unlike standing rigging that remains static during normal sailing operations, running rigging controls various sail adjustments in response to wind conditions. It includes halyards, sheets, and control lines that enable raising and lowering sails, trimming them for maximum efficiency, and altering boom positions. Knowing the properties of different ropes (known as lines) like rope material (nylon, polyester, or Dyneema), diameter, and construction allows sailors to optimize their boat’s performance while ensuring ease of handling.
3) Sail Controls: Sail controls encompass a variety of mechanisms essential for regulating the shape and tension of the sails. Devices such as sail tracks, winches, blocks, travelers, and cleats collaborate harmoniously with rigging components to achieve precise control over sail shape, twist, camber, draft position – all crucial factors influencing both speed and safety. Familiarity with these specifications enables sailors to adeptly adjust their sails’ performance based on wind strength and direction.
4) Safety Considerations: Rigging specifications hold a critical role in ensuring safety during sailing ventures. Inspecting the rigging thoroughly before setting sail is imperative. Checking for corrosion or wear on wire cables, fraying on ropes or lines can help prevent disastrous failures mid-journey. Additionally, understanding load limits associated with each component guarantees sailors neither underload nor overload any part of their rigging system.
By now it should be evident that understanding sailboat rigging specifications is indispensable for every sailor aiming to unlock their vessel’s true potential while prioritizing safety. With constant advancements in materials technology providing an array of options for upgrading rigging systems tailored to specific sailing needs – from club racing to bluewater cruising – keeping abreast of new developments becomes even more crucial.
Maintaining a well-maintained rigging system is not merely about technicalities; it represents an art form that requires skillful orchestration by blending engineering prowess with a deep appreciation for the timeless elegance embodied by these majestic vessels. So next time you set out on your sailboat, take a moment to marvel at the intricate rigging system that steers you toward adventure and understanding .
2) How to Determine the Right Sailboat Rigging Specifications for Your Vessel
In the exciting world of sailing, the rigging of your sailboat plays a crucial role in ensuring a successful, safe, and enjoyable voyage. Just like a well-tailored suit, finding the right specifications for your vessel’s rigging is essential to maximize performance on the water. Whether you’re an experienced sailor or a novice embarking on your first adventure, understanding how to determine the ideal sailboat rigging specifications can make all the difference.
But fear not! We’ve got you covered with some expert tips to help you navigate through this process. Let’s dive in and unravel the mysteries behind finding the perfect rigging setup for your vessel.
1) Understand Your Boat
Before delving into determining proper sailboat rigging specifications, it’s important to comprehend your boat inside out. Consider its design, size, weight distribution, and intended use. No two boats are exactly alike, and thus each requires specific considerations when it comes to rigging .
For example, if you own a racing yacht designed for speed and agility, your rigging will likely be tuned for optimal aerodynamics while maintaining stability. On the other hand, if you have a leisurely cruising boat built for comfort and relaxation, your rigging may focus more on ease of handling without compromising safety.
2) Seek Professional Advice
While it’s tempting to rely solely on your own instincts and knowledge when determining sailboat rigging specifications, consulting a professional is highly recommended. An experienced rigger or naval architect can provide valuable insights based on their expertise and extensive background in handling various vessels.
These professionals can assess factors such as mast height/length ratio (aspect ratio), headstay tension requirements, shroud angles/tensions (depending on single or multiple spreaders), boom height relative to deck level – just to name a few critical parameters that contribute to successful sailboat performance.
3) Analyze Sail Plan
Your boat’s unique characteristics should be accounted for when analyzing the sail plan. Consider the number and types of sails you have or plan to use—main, jib, genoa, or spinnaker—and their respective sizes and geometries. The size and positioning of your sail ‘s luff length, foot length, and clew height will influence rigging decisions.
By understanding the relationship between your vessel’s sail plan and rigging, you can optimize control and response while sailing in various wind conditions. For instance, a high-performance racing yacht may require a more powerful rig with adjustable backstays or hydraulic tensioners to handle large headsails effectively.
4) Safety First
While we all love chasing speed on the water, it’s crucial not to neglect safety considerations when determining rigging specifications. Overloading the rigging beyond its limits can lead to disastrous consequences. Carefully analyze the breaking load ratings of wires/ropes and fittings used in your sailboat’s rig system.
Additionally, regular inspections and maintenance are paramount to detect any potential weaknesses before they become serious issues during your sailing adventures . Never compromise safety for performance gains; instead, strike a balance between both aspects for an enjoyable and secure experience on board.
5) Experiment & Fine-Tune
When it comes to sailboat rigging specifications, finding the perfect setup might require some trial-and-error experimentation combined with meticulous fine-tuning. Keep track of changes made and their effect on different sailing conditions.
Don’t be afraid to reach out to other sailors within your community who might have similar vessels or experiences as they can offer valuable suggestions based on their firsthand encounters. Joining online forums or attending boat shows/seminars can also provide opportunities for networking with like-minded enthusiasts eager to share insights into optimizing sailboat rigging setups.
In conclusion, determining the right sailboat rigging specifications is an art that combines science, experience, and personal preferences. By thoroughly understanding your boat ‘s characteristics, seeking professional advice, analyzing your sail plan, prioritizing safety, and embracing experimentation, you can find the perfect balance that suits your vessel’s needs. So, hoist the sails high and set off on unforgettable sailing adventures with confidence and finesse!
3) Step-by-Step Process: Setting Sailboat Rigging Specifications like a Pro
Title: Mastering the Art of Setting Sailboat Rigging Specifications: A Professional’s Step-by-Step Process
Introduction: Setting sail on a mesmerizing adventure calls for meticulous attention to detail when it comes to sailboat rigging. Even the slightest miscalculation or oversight can have a significant impact on safety, performance, and overall sailing experience. In this article, we unveil a comprehensive step-by-step process that will empower you to set sailboat rigging specifications like a true professional – ensuring smooth navigation and maximizing your boat’s potential. So, fasten your seatbelts (or should we say lifelines), as we embark on this exciting journey!
1) Understanding the Basics: Before diving into the specifics, let’s brush up our understanding of sailboat rigging. Sailboat rigging refers to the collection of intricate systems that support and control the sails aboard a boat . It includes elements such as mast, shrouds, stays, halyards, sheets, and various fittings responsible for tensioning and maneuvering sails .
2) Inspection is Key: To begin our step-by-step process, inspect your entire sailboat meticulously. Look out for signs of wear and tear in the hardware components including shackles, turnbuckles, blocks, cleats – anything that plays a crucial role in securing your rigging. Ensure all fixings are tight and secure; any loose connections can be disastrous while hoisting sails in rough waters .
3) Evaluate the Lines: Next up is evaluating your lines – halyards and sheets. Check for degradation caused by exposure to UV radiation or harsh weather conditions . Replace worn-out lines promptly as frail ropes pose great risks during maneuvers when under high loads.
4) Determine Your Sailing Style: Now it’s time to assess your unique sailing style! Are you an adrenaline-seeking racer or more inclined towards leisurely cruising? This assessment helps understand the necessary adjustments required in rigging setup. Racers typically prefer minimal weight and maximum control, while cruisers prioritize ease of handling and comfort. Knowing your preference will allow you to fine-tune your rigging specifications accordingly.
5) Measurements That Matter: Precise measurements play a vital role in achieving the desired rigging tension and performance. Carefully measure the heights of your mast, boom, and other essential spars to ensure proper alignment during installation . Always refer to manufacturer guidelines for recommended measurements as they vary across different sailboats.
6) Understanding Tension: To create optimal sail shape and performance, understanding tension is crucial. Referred to as tuning the rig, setting proper tension in shrouds and stays allows for controlled sail draft and minimizes distortion under varying wind conditions. Consult professional tuning guides or seek assistance from sailing experts if needed; mastering this skill could significantly impact your boat’s overall stability and speed.
7) Partnering with Professionals: Suppose you find yourself overwhelmed by the complex world of sailboat rigging specifications. In that case, partnering with professionals can be an excellent way to gain valuable insights and guidance specific to your boat’s make and model. Rigging specialists possess extensive knowledge regarding different components, methodologies, and cutting-edge advancements in the industry – guiding you towards optimal rigging configurations tailored to suit your needs.
8) Going Beyond Theory: Putting theoretical knowledge into practice through experimentation is essential when it comes to refining sailboat rigging specifications like a pro. Head out on shorter cruises initially where you can gradually fine-tune adjustments based on real-world sailing experiences . This hands-on approach ensures you become intimately familiar with your boat ‘s behavior under various wind conditions – turning you into a confident skipper who knows their vessel inside out.
Conclusion: Rigging a sailboat may seem daunting but breaking it down into manageable steps demystifies this intricate process. By understanding the basics, inspecting meticulously, evaluating lines, accounting for sailing style, measuring accurately, tensioning skillfully, seeking professional guidance when needed, and continuously experimenting, you’ll be well on your way to becoming a pro at setting sailboat rigging specifications. So go ahead – seize the wind and waves with confidence as you embark on unforgettable journeys aboard your perfectly rigged vessel !
4) FAQs about Sailboat Rigging Specifications Answered
When it comes to sailboat rigging, there are lots of questions that may arise. Understanding the specifications and requirements can be a bit confusing for beginners and even experienced sailors. Fear not! We have compiled some frequently asked questions about sailboat rigging specifications to provide you with comprehensive answers.
1. What are sailboat rigging specifications? Sailboat rigging specifications refer to the guidelines and requirements set for the rigging components on a boat. It includes details such as the type and size of wire used, fittings, tensions, and other important measurements needed to ensure the stability and safety of your sailboat’s mast and sails.
2. Which factors determine the sailboat’s rigging specifications? Several factors come into play when determining sailboat rigging specifications: boat size, displacement, type of sailing (cruising or racing), mast height, length overall, beam width, keel design, mast construction material (aluminum or carbon fiber), among other considerations. Different boats will have different specific requirements based on these factors.
3. Why is it important to adhere to proper sailboat rigging specifications? Adhering to proper sailboat rigging specifications is crucial for maintaining safety while at sea. Rigging components are responsible for supporting the mast and sails in changing weather conditions and intense pressures caused by wind. Without adhering to appropriate specifications, the integrity of your rig could compromise stability or even lead to catastrophic failures like broken masts or torn sails .
4. How often should I inspect my sailboat’s rigging ? Regular inspections of your sailboat’s rigging are essential for identifying any signs of wear or damage which could lead to failure. The frequency of inspections depends on various factors such as how often you use your boat, sailing conditions (rough or calm waters), saltwater exposure (corrosion risks), and age of components. Most experts recommend at least an annual rig inspection, but it’s always a good idea to consult your boat manufacturer or a professional rigger for specific guidance.
5. Can I upgrade my sailboat’s rigging specifications? Yes, upgrading a sailboat’s rigging is possible and sometimes even necessary. Upgrading can improve performance, reduce weight aloft, increase durability, and enhance safety. However, determining the appropriate upgrades requires careful evaluation of your boat ‘s characteristics and intended use. Consulting with experienced sailors or professional riggers will help you make informed decisions about potential upgrades.
6. What are some common signs of worn-out or damaged rigging components? There are several signs that indicate worn-out or damaged rigging components: loose wires or strands, broken strands, rust or corrosion on fittings and wire surfaces, elongation/stretching of wire cables beyond their original length, fraying or chafing of cables near attachment points. Recognizing these symptoms early allows for prompt replacement before they compromise the structural integrity of your sailboat.
In conclusion, understanding sailboat rigging specifications is crucial for the safety and longevity of your vessel. Adhering to proper specifications not only ensures stability but also minimizes the risk of failures while sailing. Regular inspections and timely replacements are key to maintaining reliable rigging. Remember to seek advice from professionals when making changes or upgrades to ensure you choose the right specifications for your boat . Keep sailing safe and enjoy the adventure!
5) The Importance of Sailboat Rigging Specifications: Ensuring Safety and Performance
When it comes to sailboats, safety and performance are paramount. One crucial aspect that often gets overlooked is the rigging specifications. Rigging refers to the system of ropes, wires, and hardware that support and control the sails, ensuring smooth navigation on the water . While it may seem like a mundane technicality, proper sailboat rigging specifications play a pivotal role in both the safety of the crew and the boat’s overall performance.
First and foremost, sailboat rigging specifications are essential for ensuring the safety of everyone onboard. A well-maintained and correctly installed rigging system reduces the risk of accidents, such as mast failure or rig collapse. Sailboats can encounter powerful winds and turbulent waters that put immense strain on their rigging. With precise specifications, sailors can have peace of mind knowing that their boat’s rigging is up to par and capable of withstanding challenging conditions.
Additionally, sailboat rigging specifications are crucial for optimizing performance on the water. An improperly rigged boat can experience inefficiencies in sail trim, resulting in decreased speed and maneuverability. Precision is key when it comes to adjusting tensions in various parts of a sailing vessel’s rigging system – from shrouds and stays to halyards and sheets – as these adjustments directly impact how efficiently a boat harnesses wind power for propulsion.
Not only do accurate sailboat rigging specifications enhance a boat’s speed potential but they also contribute to improved handling characteristics. When every element of the rigging is properly tensioned according to manufacturer recommendations or customized preferences, sailors have better control over their vessel’s stability both while cruising or racing competitively.
Furthermore, maintaining appropriate sailboat rigging specifications aids in prolonging the lifespan of an entire sailing craft. Regular inspections will help identify any signs of wear or damage on hardware components such as clevis pins, turnbuckles, or swage fittings; thus allowing timely replacements before they lead to catastrophic failures. Moreover, old or worn-out rigging can gradually cause stress points to develop on the mast, deck, and hull – compromising structural integrity over time. With meticulous attention to detail and adherence to specifications, sailboat owners can prevent costly repairs or potentially life-threatening situations .
Aside from safety and performance benefits, adhering to sailboat rigging specifications also demonstrates a high level of professionalism. Whether you are an experienced sailor or a novice boat owner, consulting and complying with manufacturer guidelines or hiring expert riggers showcases a deep understanding and respect for the intricate mechanics of sailing vessels. It exemplifies a commitment towards mastering the art of sailing and upholding industry standards.
In conclusion, sailboat rigging specifications might appear insignificant at first glance; however, their importance cannot be underestimated when it comes to safety, performance optimization, vessel longevity, and professional responsibility. By ensuring that every aspect of a sailboat’s rigging complies with established guidelines or customized preferences within safe parameters provided by manufacturers and experts alike — sailors can enjoy not only smooth-sailing experiences but also preserve the overall value of their prized watercraft. So before setting off on your next nautical adventure, take the time to pay attention to your sailboat’s rigging specifications – it could make all the difference in creating a memorable voyage while safeguarding everyone onboard.
6) Top Factors to Consider when Choosing Sailboat Rigging Specifications
When it comes to sailboat rigging specifications, there are several factors that every sailor should consider before making a decision. The rigging plays a crucial role in the performance and safety of your sailboat, so choosing the right specifications is paramount. In this article, we will outline the top factors to consider when selecting sailboat riggin…
1) Type of Sailboat : The first factor to consider is the type of sailboat you own or plan to purchase. Different types of sailboats have different rigging requirements. For example, a racing yacht would require a more sophisticated and adjustable rigging system compared to a small pleasure cruiser. Understanding your sailboat’s design and intended use will help you narrow down your options.
2) Material: The material used for the rigging greatly impacts its durability and performance. Stainless steel is widely regarded as the best choice due to its resistance to corrosion and high tensile strength. However, there are different grades of stainless steel, such as 316 marine-grade or 304 structural-grade, each offering varying levels of durability and cost-effectiveness.
3) Size and Diameter: Choosing the appropriate size and diameter for your sailboat’s rigging is crucial. It is important to find a balance between strength and weight. Thicker rigging provides more strength but adds unnecessary weight that may impact sailing performance . On the other hand, skimping on thickness compromises safety during heavy winds or rough seas.
4) Rig Configuration: Consider how you want your sailboat rigged – whether it’s a single mast with one main sail or multiple masts with various sails. The type of rig configuration affects not only your boat ‘s maneuverability but also its overall complexity and maintenance requirements.
5) Cost: While it’s tempting to opt for cheaper options, remember that quality always comes at a price. Investing in high-quality rigging may save you money in the long run by minimizing maintenance costs or potential failures. However, this doesn’t mean you have to break the bank – finding a balance between quality and cost-effectiveness is key.
6) Expert Advice: Finally, consulting with industry professionals or experienced sailors can provide valuable insights before finalizing your rigging specifications. They can offer advice based on their expertise and personal experiences, helping you navigate the vast array of choices in the market.
In conclusion, sailboat rigging specifications should not be taken lightly. Considering factors such as sailboat type , material, size and diameter, rig configuration, cost, and seeking expert advice will ensure that your sailboat’s rigging meets your specific needs. By carefully assessing these factors, you can set sail with confidence knowing that your rigging is both reliable and efficient.
Recent Posts

- Sailboat Gear and Equipment
- Sailboat Lifestyle
- Sailboat Maintenance
- Sailboat Racing
- Sailboat Tips and Tricks
- Sailboat Types
- Sailing Adventures
- Sailing Destinations
- Sailing Safety
- Sailing Techniques

Beginner’s Guide: How To Rig A Sailboat – Step By Step Tutorial
Alex Morgan
Rigging a sailboat is a crucial process that ensures the proper setup and functioning of a sailboat’s various components. Understanding the process and components involved in rigging is essential for any sailor or boat enthusiast. In this article, we will provide a comprehensive guide on how to rig a sailboat.
Introduction to Rigging a Sailboat
Rigging a sailboat refers to the process of setting up the components that enable the sailboat to navigate through the water using wind power. This includes assembling and positioning various parts such as the mast, boom, standing rigging, running rigging, and sails.
Understanding the Components of a Sailboat Rigging
Before diving into the rigging process, it is important to have a good understanding of the key components involved. These components include:
The mast is the tall vertical spar that provides vertical support to the sails and holds them in place.
The boom is the horizontal spar that runs along the bottom edge of the sail and helps control the shape and position of the sail.
- Standing Rigging:
Standing rigging consists of the wires and cables that support and stabilize the mast, keeping it upright.
- Running Rigging:
Running rigging refers to the lines and ropes used to control the sails, such as halyards, sheets, and control lines.
Preparing to Rig a Sailboat
Before rigging a sailboat, there are a few important steps to take. These include:
- Checking the Weather Conditions:
It is crucial to assess the weather conditions before rigging a sailboat. Unfavorable weather, such as high winds or storms, can make rigging unsafe.
- Gathering the Necessary Tools and Equipment:
Make sure to have all the necessary tools and equipment readily available before starting the rigging process. This may include wrenches, hammers, tape, and other common tools.
- Inspecting the Rigging Components:
In the upcoming sections of this article, we will provide a step-by-step guide on how to rig a sailboat, as well as important safety considerations and tips to keep in mind. By following these guidelines, you will be able to rig your sailboat correctly and safely, allowing for a smooth and enjoyable sailing experience.
Key takeaway:
- Rigging a sailboat maximizes efficiency: Proper rigging allows for optimized sailing performance, ensuring the boat moves smoothly through the water.
- Understanding sailboat rigging components: Familiarity with the various parts of a sailboat rigging, such as the mast, boom, and standing and running riggings, is essential for effective rigging setup.
- Importance of safety in sailboat rigging: Ensuring safety is crucial during the rigging process, including wearing a personal flotation device, securing loose ends and lines, and being mindful of overhead power lines.
Get ready to set sail and dive into the fascinating world of sailboat rigging! We’ll embark on a journey to understand the various components that make up a sailboat’s rigging. From the majestic mast to the nimble boom , and the intricate standing rigging to the dynamic running rigging , we’ll explore the crucial elements that ensure smooth sailing. Not forgetting the magnificent sail, which catches the wind and propels us forward. So grab your sea legs and let’s uncover the secrets of sailboat rigging together.
Understanding the mast is crucial when rigging a sailboat. Here are the key components and steps to consider:
1. The mast supports the sails and rigging of the sailboat. It is made of aluminum or carbon fiber .
2. Before stepping the mast , ensure that the area is clear and the boat is stable. Have all necessary tools and equipment ready.
3. Inspect the mast for damage or wear. Check for corrosion , loose fittings , and cracks . Address any issues before proceeding.
4. To step the mast , carefully lift it into an upright position and insert the base into the mast step on the deck of the sailboat.
5. Secure the mast using the appropriate rigging and fasteners . Attach the standing rigging , such as shrouds and stays , to the mast and the boat’s hull .
Fact: The mast of a sailboat is designed to withstand wind resistance and the tension of the rigging for stability and safe sailing.
The boom is an essential part of sailboat rigging. It is a horizontal spar that stretches from the mast to the aft of the boat. Constructed with durable yet lightweight materials like aluminum or carbon fiber, the boom provides crucial support and has control over the shape and position of the sail. It is connected to the mast through a boom gooseneck , allowing it to pivot. One end of the boom is attached to the mainsail, while the other end is equipped with a boom vang or kicker, which manages the tension and angle of the boom. When the sail is raised, the boom is also lifted and positioned horizontally by using the topping lift or lazy jacks.
An incident serves as a warning that emphasizes the significance of properly securing the boom. In strong winds, an improperly fastened boom swung across the deck, resulting in damage to the boat and creating a safety hazard. This incident highlights the importance of correctly installing and securely fastening all rigging components, including the boom, to prevent accidents and damage.
3. Standing Rigging
When rigging a sailboat, the standing rigging plays a vital role in providing stability and support to the mast . It consists of several key components, including the mast itself, along with the shrouds , forestay , backstay , and intermediate shrouds .
The mast, a vertical pole , acts as the primary support structure for the sails and the standing rigging. Connected to the top of the mast are the shrouds , which are cables or wires that extend to the sides of the boat, providing essential lateral support .
The forestay is another vital piece of the standing rigging. It is a cable or wire that runs from the top of the mast to the bow of the boat, ensuring forward support . Similarly, the backstay , also a cable or wire, runs from the mast’s top to the stern of the boat, providing important backward support .
To further enhance the rig’s stability , intermediate shrouds are installed. These additional cables or wires are positioned between the main shrouds, as well as the forestay or backstay. They offer extra support , strengthening the standing rigging system.
Regular inspections of the standing rigging are essential to detect any signs of wear, such as fraying or corrosion . It is crucial to ensure that all connections within the rig are tight and secure, to uphold its integrity. Should any issues be identified, immediate attention must be given to prevent accidents or damage to the boat. Prioritizing safety is of utmost importance when rigging a sailboat, thereby necessitating proper maintenance of the standing rigging. This ensures a safe and enjoyable sailing experience.
Note: <p> tags have been kept intact.
4. Running Rigging
Running Rigging
When rigging a sailboat, the running rigging is essential for controlling the sails and adjusting their position. It is important to consider several aspects when dealing with the running rigging.
1. Choose the right rope: The running rigging typically consists of ropes with varying properties such as strength, stretch, and durability. Weather conditions and sailboat size should be considered when selecting the appropriate rope.
2. Inspect and maintain the running rigging: Regularly check for signs of wear, fraying, or damage. To ensure safety and efficiency, replace worn-out ropes.
3. Learn essential knot tying techniques: Having knowledge of knots like the bowline, cleat hitch, and reef knot is crucial for securing the running rigging and adjusting sails.
4. Understand different controls: The running rigging includes controls such as halyards, sheets, and control lines. Familiarize yourself with their functions and proper usage to effectively control sail position and tension.
5. Practice proper sail trimming: Adjusting the tension of the running rigging significantly affects sailboat performance. Mastering sail trimming techniques will help optimize sail shape and maximize speed.
By considering these factors and mastering running rigging techniques, you can enhance your sailing experience and ensure the safe operation of your sailboat.
The sail is the central component of sailboat rigging as it effectively harnesses the power of the wind to propel the boat.
When considering the sail, there are several key aspects to keep in mind:
– Material: Sails are typically constructed from durable and lightweight materials such as Dacron or polyester. These materials provide strength and resistance to various weather conditions.
– Shape: The shape of the sail plays a critical role in its overall performance. A well-shaped sail should have a smooth and aerodynamic profile, which allows for maximum efficiency in capturing wind power.
– Size: The size of the sail is determined by its sail area, which is measured in square feet or square meters. Larger sails have the ability to generate more power, but they require greater skill and experience to handle effectively.
– Reefing: Reefing is the process of reducing the sail’s size to adapt to strong winds. Sails equipped with reefing points allow sailors to decrease the sail area, providing better control in challenging weather conditions.
– Types: There are various types of sails, each specifically designed for different purposes. Common sail types include mainsails, jibs, genoas, spinnakers, and storm sails. Each type possesses its own unique characteristics and is utilized under specific wind conditions.
Understanding the sail and its characteristics is vital for sailors, as it directly influences the boat’s speed, maneuverability, and overall safety on the water.
Getting ready to rig a sailboat requires careful preparation and attention to detail. In this section, we’ll dive into the essential steps you need to take before setting sail. From checking the weather conditions to gathering the necessary tools and equipment, and inspecting the rigging components, we’ll ensure that you’re fully equipped to navigate the open waters with confidence. So, let’s get started on our journey to successfully rigging a sailboat!
1. Checking the Weather Conditions
Checking the weather conditions is crucial before rigging a sailboat for a safe and enjoyable sailing experience. Monitoring the wind speed is important in order to assess the ideal sailing conditions . By checking the wind speed forecast , you can determine if the wind is strong or light . Strong winds can make sailboat control difficult, while very light winds can result in slow progress.
Another important factor to consider is the wind direction . Assessing the wind direction is crucial for route planning and sail adjustment. Favorable wind direction helps propel the sailboat efficiently, making your sailing experience more enjoyable.
In addition to wind speed and direction, it is also important to consider weather patterns . Keep an eye out for impending storms or heavy rain. It is best to avoid sailing in severe weather conditions that may pose a safety risk. Safety should always be a top priority when venturing out on a sailboat.
Another aspect to consider is visibility . Ensure good visibility by checking for fog, haze, or any other conditions that may hinder navigation. Clear visibility is important for being aware of other boats and potential obstacles that may come your way.
Be aware of the local conditions . Take into account factors such as sea breezes, coastal influences, or tidal currents. These local factors greatly affect sailboat performance and safety. By considering all of these elements, you can have a successful and enjoyable sailing experience.
Here’s a true story to emphasize the importance of checking the weather conditions. One sunny afternoon, a group of friends decided to go sailing. Before heading out, they took the time to check the weather conditions. They noticed that the wind speed was expected to be around 10 knots, which was perfect for their sailboat. The wind direction was coming from the northwest, allowing for a pleasant upwind journey. With clear visibility and no approaching storms, they set out confidently, enjoying a smooth and exhilarating sail. This positive experience was made possible by their careful attention to checking the weather conditions beforehand.
2. Gathering the Necessary Tools and Equipment
To efficiently gather all of the necessary tools and equipment for rigging a sailboat, follow these simple steps:
- First and foremost, carefully inspect your toolbox to ensure that you have all of the basic tools such as wrenches, screwdrivers, and pliers.
- Make sure to check if you have a tape measure or ruler available as they are essential for precise measurements of ropes or cables.
- Don’t forget to include a sharp knife or rope cutter in your arsenal as they will come in handy for cutting ropes or cables to the desired lengths.
- Gather all the required rigging hardware including shackles, pulleys, cleats, and turnbuckles.
- It is always prudent to check for spare ropes or cables in case replacements are needed during the rigging process.
- If needed, consider having a sailing knife or marlinspike tool for splicing ropes or cables.
- For rigging a larger sailboat, it is crucial to have a mast crane or hoist to assist with stepping the mast.
- Ensure that you have a ladder or some other means of reaching higher parts of the sailboat, such as the top of the mast.
Once, during the preparation of rigging my sailboat, I had a moment of realization when I discovered that I had forgotten to bring a screwdriver . This unfortunate predicament occurred while I was in a remote location with no nearby stores. Being resourceful, I improvised by utilizing a multipurpose tool with a small knife blade, which served as a makeshift screwdriver. Although it was not the ideal solution, it allowed me to accomplish the task. Since that incident, I have learned the importance of double-checking my toolbox before commencing any rigging endeavor. This practice ensures that I have all of the necessary tools and equipment, preventing any unexpected surprises along the way.
3. Inspecting the Rigging Components
Inspecting the rigging components is essential for rigging a sailboat safely. Here is a step-by-step guide on inspecting the rigging components:
1. Visually inspect the mast, boom, and standing rigging for damage, such as corrosion, cracks, or loose fittings.
2. Check the tension of the standing rigging using a tension gauge. It should be within the recommended range from the manufacturer.
3. Examine the turnbuckles, clevis pins, and shackles for wear or deformation. Replace any damaged or worn-out hardware.
4. Inspect the running rigging, including halyards and sheets, for fraying, signs of wear, or weak spots. Replace any worn-out lines.
5. Check the sail for tears, wear, or missing hardware such as grommets or luff tape.
6. Pay attention to the connections between the standing rigging and the mast. Ensure secure connections without any loose or missing cotter pins or rigging screws.
7. Inspect all fittings, such as mast steps, spreader brackets, and tangs, to ensure they are securely fastened and in good condition.
8. Conduct a sea trial to assess the rigging’s performance and make necessary adjustments.
Regularly inspecting the rigging components is crucial for maintaining the sailboat’s rigging system’s integrity, ensuring safe sailing conditions, and preventing accidents or failures at sea.
Once, I went sailing on a friend’s boat without inspecting the rigging components beforehand. While at sea, a sudden gust of wind caused one of the shrouds to snap. Fortunately, no one was hurt, but we had to cut the sail loose and carefully return to the marina. This incident taught me the importance of inspecting the rigging components before sailing to avoid unforeseen dangers.
Step-by-Step Guide on How to Rig a Sailboat
Get ready to set sail with our step-by-step guide on rigging a sailboat ! We’ll take you through the process from start to finish, covering everything from stepping the mast to setting up the running rigging . Learn the essential techniques and tips for each sub-section, including attaching the standing rigging and installing the boom and sails . Whether you’re a seasoned sailor or a beginner, this guide will have you ready to navigate the open waters with confidence .
1. Stepping the Mast
To step the mast of a sailboat, follow these steps:
1. Prepare the mast: Position the mast near the base of the boat.
2. Attach the base plate: Securely fasten the base plate to the designated area on the boat.
3. Insert the mast step: Lower the mast step into the base plate and align it with the holes or slots.
4. Secure the mast step: Use fastening screws or bolts to fix the mast step in place.
5. Raise the mast: Lift the mast upright with the help of one or more crew members.
6. Align the mast: Adjust the mast so that it is straight and aligned with the boat’s centerline.
7. Attach the shrouds: Connect the shrouds to the upper section of the mast, ensuring proper tension.
8. Secure the forestay: Attach the forestay to the bow of the boat, ensuring it is securely fastened.
9. Final adjustments: Check the tension of the shrouds and forestay, making any necessary rigging adjustments.
Following these steps ensures that the mast is properly stepped and securely in place, allowing for a safe and efficient rigging process. Always prioritize safety precautions and follow manufacturer guidelines for your specific sailboat model.
2. Attaching the Standing Rigging
To attach the standing rigging on a sailboat, commence by preparing the essential tools and equipment, including wire cutters, crimping tools, and turnbuckles.
Next, carefully inspect the standing rigging components for any indications of wear or damage.
After inspection, fasten the bottom ends of the shrouds and stays to the chainplates on the deck.
Then, securely affix the top ends of the shrouds and stays to the mast using adjustable turnbuckles .
To ensure proper tension, adjust the turnbuckles accordingly until the mast is upright and centered.
Utilize a tension gauge to measure the tension in the standing rigging, aiming for around 15-20% of the breaking strength of the rigging wire.
Double-check all connections and fittings to verify their security and proper tightness.
It is crucial to regularly inspect the standing rigging for any signs of wear or fatigue and make any necessary adjustments or replacements.
By diligently following these steps, you can effectively attach the standing rigging on your sailboat, ensuring its stability and safety while on the water.
3. Installing the Boom and Sails
To successfully complete the installation of the boom and sails on a sailboat, follow these steps:
1. Begin by securely attaching the boom to the mast. Slide it into the gooseneck fitting and ensure it is firmly fastened using a boom vang or another appropriate mechanism.
2. Next, attach the main sail to the boom. Slide the luff of the sail into the mast track and securely fix it in place using sail slides or cars.
3. Connect the mainsheet to the boom. One end should be attached to the boom while the other end is connected to a block or cleat on the boat.
4. Proceed to attach the jib or genoa. Make sure to securely attach the hanks or furler line to the forestay to ensure stability.
5. Connect the jib sheets. One end of each jib sheet should be attached to the clew of the jib or genoa, while the other end is connected to a block or winch on the boat.
6. Before setting sail, it is essential to thoroughly inspect all lines and connections. Ensure that they are properly tensioned and that all connections are securely fastened.
During my own experience of installing the boom and sails on my sailboat, I unexpectedly encountered a strong gust of wind. As a result, the boom began swinging uncontrollably, requiring me to quickly secure it to prevent any damage. This particular incident served as a vital reminder of the significance of properly attaching and securing the boom, as well as the importance of being prepared for unforeseen weather conditions while rigging a sailboat.
4. Setting Up the Running Rigging
Setting up the running rigging on a sailboat involves several important steps. First, attach the halyard securely to the head of the sail. Then, connect the sheets to the clew of the sail. If necessary, make sure to secure the reefing lines . Attach the outhaul line to the clew of the sail and connect the downhaul line to the tack of the sail. It is crucial to ensure that all lines are properly cleated and organized. Take a moment to double-check the tension and alignment of each line. If you are using a roller furling system, carefully wrap the line around the furling drum and securely fasten it. Perform a thorough visual inspection of the running rigging to check for any signs of wear or damage. Properly setting up the running rigging is essential for safe and efficient sailing. It allows for precise control of the sail’s position and shape, ultimately optimizing the boat’s performance on the water.
Safety Considerations and Tips
When it comes to rigging a sailboat, safety should always be our top priority. In this section, we’ll explore essential safety considerations and share some valuable tips to ensure smooth sailing. From the importance of wearing a personal flotation device to securing loose ends and lines, and being cautious around overhead power lines, we’ll equip you with the knowledge and awareness needed for a safe and enjoyable sailing experience. So, let’s set sail and dive into the world of safety on the water!
1. Always Wear a Personal Flotation Device
When rigging a sailboat, it is crucial to prioritize safety and always wear a personal flotation device ( PFD ). Follow these steps to properly use a PFD:
- Select the appropriate Coast Guard-approved PFD that fits your size and weight.
- Put on the PFD correctly by placing your arms through the armholes and securing all the straps for a snug fit .
- Adjust the PFD for comfort , ensuring it is neither too tight nor too loose, allowing freedom of movement and adequate buoyancy .
- Regularly inspect the PFD for any signs of wear or damage, such as tears or broken straps, and replace any damaged PFDs immediately .
- Always wear your PFD when on or near the water, even if you are a strong swimmer .
By always wearing a personal flotation device and following these steps, you will ensure your safety and reduce the risk of accidents while rigging a sailboat. Remember, prioritize safety when enjoying water activities.
2. Secure Loose Ends and Lines
Inspect lines and ropes for frayed or damaged areas. Secure loose ends and lines with knots or appropriate cleats or clamps. Ensure all lines are properly tensioned to prevent loosening during sailing. Double-check all connections and attachments for security. Use additional safety measures like extra knots or stopper knots to prevent line slippage.
To ensure a safe sailing experience , it is crucial to secure loose ends and lines properly . Neglecting this important step can lead to accidents or damage to the sailboat. By inspecting, securing, and tensioning lines , you can have peace of mind knowing that everything is in place. Replace or repair any compromised lines or ropes promptly. Securing loose ends and lines allows for worry-free sailing trips .
3. Be Mindful of Overhead Power Lines
When rigging a sailboat, it is crucial to be mindful of overhead power lines for safety. It is important to survey the area for power lines before rigging the sailboat. Maintain a safe distance of at least 10 feet from power lines. It is crucial to avoid hoisting tall masts or long antenna systems near power lines to prevent contact. Lower the mast and tall structures when passing under a power line to minimize the risk of contact. It is also essential to be cautious in areas where power lines run over the water and steer clear to prevent accidents.
A true story emphasizes the importance of being mindful of overhead power lines. In this case, a group of sailors disregarded safety precautions and their sailboat’s mast made contact with a low-hanging power line, resulting in a dangerous electrical shock. Fortunately, no serious injuries occurred, but it serves as a stark reminder of the need to be aware of power lines while rigging a sailboat.
Some Facts About How To Rig A Sailboat:
- ✅ Small sailboat rigging projects can improve sailing performance and save money. (Source: stingysailor.com)
- ✅ Rigging guides are available for small sailboats, providing instructions and tips for rigging. (Source: westcoastsailing.net)
- ✅ Running rigging includes lines used to control and trim the sails, such as halyards and sheets. (Source: sailingellidah.com)
- ✅ Hardware used in sailboat rigging includes winches, blocks, and furling systems. (Source: sailingellidah.com)
- ✅ A step-by-step guide can help beginners rig a small sailboat for sailing. (Source: tripsavvy.com)
Frequently Asked Questions
1. how do i rig a small sailboat.
To rig a small sailboat, follow these steps: – Install or check the rudder, ensuring it is firmly attached. – Attach or check the tiller, the long steering arm mounted to the rudder. – Attach the jib halyard by connecting the halyard shackle to the head of the sail and the grommet in the tack to the bottom of the forestay. – Hank on the jib by attaching the hanks of the sail to the forestay one at a time. – Run the jib sheets by tying or shackling them to the clew of the sail and running them back to the cockpit. – Attach the mainsail by spreading it out and attaching the halyard shackle to the head of the sail. – Secure the tack, clew, and foot of the mainsail to the boom using various lines and mechanisms. – Insert the mainsail slugs into the mast groove, gradually raising the mainsail as the slugs are inserted. – Cleat the main halyard and lower the centerboard into the water. – Raise the jib by pulling down on the jib halyard and cleating it on the other side of the mast. – Tighten the mainsheet and one jibsheet to adjust the sails and start moving forward.
2. What are the different types of sailboat rigs?
Sailboat rigs can be classified into three main types: – Sloop rig: This rig has a single mast with a mainsail and a headsail, typically a jib or genoa. – Cutter rig: This rig has two headsails, a smaller jib or staysail closer to the mast, and a larger headsail, usually a genoa, forward of it, alongside a mainsail. – Ketch rig: This rig has two masts, with the main mast taller than the mizzen mast. It usually has a mainsail, headsail, and a mizzen sail. Each rig has distinct characteristics and is suitable for different sailing conditions and preferences.
3. What are the essential parts of a sailboat?
The essential parts of a sailboat include: – Mast: The tall vertical spar that supports the sails. – Boom: The horizontal spar connected to the mast, which extends outward and supports the foot of the mainsail. – Rudder: The underwater appendage that steers the boat. – Centerboard or keel: A retractable or fixed fin-like structure that provides stability and prevents sideways drift. – Sails: The fabric structures that capture the wind’s energy to propel the boat. – Running rigging: The lines or ropes used to control the sails and sailing equipment. – Standing rigging: The wires and cables that support the mast and reinforce the spars. These are the basic components necessary for the functioning of a sailboat.
4. What is a spinnaker halyard?
A spinnaker halyard is a line used to hoist and control a spinnaker sail. The spinnaker is a large, lightweight sail that is used for downwind sailing or reaching in moderate to strong winds. The halyard attaches to the head of the spinnaker and is used to raise it to the top of the mast. Once hoisted, the spinnaker halyard can be adjusted to control the tension and shape of the sail.
5. Why is it important to maintain and replace worn running rigging?
It is important to maintain and replace worn running rigging for several reasons: – Safety: Worn or damaged rigging can compromise the integrity and stability of the boat, posing a safety risk to both crew and vessel. – Performance: Worn rigging can affect the efficiency and performance of the sails, diminishing the boat’s speed and maneuverability. – Reliability: Aging or worn rigging is more prone to failure, which can lead to unexpected problems and breakdowns. Regular inspection and replacement of worn running rigging is essential to ensure the safe and efficient operation of a sailboat.
6. Where can I find sailboat rigging books or guides?
There are several sources where you can find sailboat rigging books or guides: – Online: Websites such as West Coast Sailing and Stingy Sailor offer downloadable rigging guides for different sailboat models. – Bookstores: Many bookstores carry a wide selection of boating and sailing books, including those specifically focused on sailboat rigging. – Sailing schools and clubs: Local sailing schools or yacht clubs often have resources available for learning about sailboat rigging. – Manufacturers: Some sailboat manufacturers, like Hobie Cat and RS Sailing, provide rigging guides for their specific sailboat models. Consulting these resources can provide valuable information and instructions for rigging your sailboat properly.
About the author

Leave a Reply Cancel reply
Your email address will not be published. Required fields are marked *
Save my name, email, and website in this browser for the next time I comment.
Latest posts

The history of sailing – from ancient times to modern adventures
History of Sailing Sailing is a time-honored tradition that has evolved over millennia, from its humble beginnings as a means of transportation to a beloved modern-day recreational activity. The history of sailing is a fascinating journey that spans cultures and centuries, rich in innovation and adventure. In this article, we’ll explore the remarkable evolution of…

Sailing Solo: Adventures and Challenges of Single-Handed Sailing
Solo Sailing Sailing has always been a pursuit of freedom, adventure, and self-discovery. While sailing with a crew is a fantastic experience, there’s a unique allure to sailing solo – just you, the wind, and the open sea. Single-handed sailing, as it’s often called, is a journey of self-reliance, resilience, and the ultimate test of…

Sustainable Sailing: Eco-Friendly Practices on the boat
Eco Friendly Sailing Sailing is an exhilarating and timeless way to explore the beauty of the open water, but it’s important to remember that our oceans and environment need our protection. Sustainable sailing, which involves eco-friendly practices and mindful decision-making, allows sailors to enjoy their adventures while minimizing their impact on the environment. In this…
The global authority in superyachting
- NEWSLETTERS
- Yachts Home
- The Superyacht Directory
- Yacht Reports
- Brokerage News
- The largest yachts in the world
- The Register
- Yacht Advice
- Yacht Design
- 12m to 24m yachts
- Monaco Yacht Show
- Builder Directory
- Designer Directory
- Interior Design Directory
- Naval Architect Directory
- Yachts for sale home
- Motor yachts
- Sailing yachts
- Explorer yachts
- Classic yachts
- Sale Broker Directory
- Charter Home
- Yachts for Charter
- Charter Destinations
- Charter Broker Directory
- Destinations Home
- Mediterranean
- South Pacific
- Rest of the World
- Boat Life Home
- Owners' Experiences
- Interiors Suppliers
- Owners' Club
- Captains' Club
- BOAT Showcase
- Boat Presents
- Events Home
- World Superyacht Awards
- Superyacht Design Festival
- Design and Innovation Awards
- Young Designer of the Year Award
- Artistry and Craft Awards
- Explorer Yachts Summit
- Ocean Talks
- The Ocean Awards
- BOAT Connect
- Between the bays
- Golf Invitational
- Boat Pro Home
- Pricing Plan
- Superyacht Insight
- Product Features
- Premium Content
- Testimonials
- Global Order Book
- Tenders & Equipment
.jpg/r%5Bwidth%5D=320/c01b08f0-3198-11ec-b3da-5dc06521023f-Black%20Pearl%20-%20Tom%20Van%20Oossanen%20(3).webp "rigging enterprise sailboat")
The definitive guide to sailing yacht rigging
Related articles, superyacht directory.
Do you know your Bermudan rig from your DynaRig or wingsails? And which is best? BOAT explains it all...
Take a look at a modern racing yacht from above, beating to windward and heeled to the breeze, and you can see at a glance why Bermudan rigs have stood the test of time. With its fore and aft sails bladed into efficient aerodynamic shapes, a modern yacht can slice close to the wind and be driven hard. Such a sight would have been outlandish a century ago. Then, a typical trading barquentine could set 18 sails to catch light airs, but it needed a large crew to battle with canvas far out on the yards. In a modern miracle as incredible in its way as flight, today’s racing yachts can sail faster than the speed of the wind – in some cases several times faster.
A mainsail set on a single spar is an age-old concept but only in the 19th century was it adapted as the Bermudan or Marconi rig. A one-piece mainsail set on a mast without a gaff, hoisted with one halyard and controlled by one sheet, was simpler and more efficient. This revolution became the power train of pleasure yachting and racing.
But perhaps the time is coming for a re-evaluation of simpler rigs requiring fewer crew – alternatives with lower loads operated by automated systems. In an era of reduced carbon consumption, could more radical sailplans even herald a revival in sail power?
The evergreen Bermudan rig
The Bermudan rig is the all-rounder, able to perform well at all angles of sail. It is efficient upwind, while downwind the sail area can be significantly boosted with a big gennaker or spinnaker. For good reasons, it is the first choice for nearly every modern sailing yacht up to around 60 to 65 metres for cruising and regatta racing alike. At larger sizes, however, things start to become trickier, and the trade-offs get interesting.
Over the last decade, sail handling technology has steadily advanced to allow sloop rigs to grow larger and larger. “But with that comes a highly loaded rig, many tonnes of compression from tension in the rigging, and you have to build structure in the boat to accept that,” explains Paul MacDonald, founder and superyacht sales manager of Southern Spars.
“You have to have a lot of deck gear and captive winches below decks and the machinery for that. But over the years, boom furling systems and MPS [Multi Purpose Sails for downwind angles] stored on a drum, for example, have made sail handling safer.
Bill Tripp is the designer behind the 86-metre Aquijo , which broke new ground in 2015 as the world’s largest Bermudan ketch. Tripp prefers to call the rig a "sketch", a portmanteau word for a rig that is neither a sloop nor a ketch “because the main and mizzen are identical”. Even though the sailplan is divided over two masts, each spar is still a towering 90 metres above the water. Aquijo perfectly illustrates the issues involved with a Bermudan rig when scaled up.
“The sloop is great but I prefer the ‘sketch’ for sailing around the world under full control due to the desirability of a two-masted rig for reaching ability, which dominates passages, and the safety of controllable loads when sailing in all kinds of conditions miles from nowhere,” he says.
Upwind, Aquijo sets a jib, staysail, mainsail and mizzen, all in North Sails 3Di, totalling 3,821 square metres. A furling Code sail for reaching and downwind angles increases that to a vast 5,051 square metres.
While Aquijo has a crew retinue of 17, it can be controlled under sail by six or seven people. With custom winches to handle halyards and sheets, the sails can be hoisted astonishingly quickly for such a large rig. “It takes five minutes to put the main up, on average, and the main and mizzen can go up at the same time,” Tripp says. Aquijo has now sailed 100,000 nautical miles around the world and the owner is planning another circumnavigation through the Northwest Passage.
Tripp is not convinced of the wisdom of a much larger single-masted sloop rig. “If you are day sailing in the Med, a sloop would be awesome, but I am not sure if you had fewer sails you would be able to [reduce canvas] well enough. Also the mast is a windage problem when the keel is up and you are beam-to. If you are on anchor, that’s no problem but you’d have to be able to cope with being on the docks in 70 knots. The windage at 120 metres is not only more but the centre of effort is so much higher, and so the heeling loads all go up.”
However, British designer Malcolm McKeon , the name behind the high-performance, sloop-rigged carbon composite superyachts Missy and Ribelle , is pushing the sloop rig to new heights. His 85-metre design concept Apex, developed with Royal Huisman , would be the largest sloop-rigged yacht in the world. “The loads are enormous,” he admits, “but it is all scalable.”
“The big disadvantage is sail handling. The downwind sails are pretty complicated once you start hoisting and retrieving, even with drum and reel systems. It is not straightforward.” But, he adds, “I think we know the advantages of a sloop: if you want all-round performance you can’t beat it, even at the top end.”
Advantages of a clipper rig
The DynaRig has been around as a concept since the 1960s when German engineer Wilhelm Prölss devised these free-standing, rotating rigs as a fuel-saving solution for large commercial vessels. The idea was ahead of its time, so much so that its first realisation came nearly 40 years later when American owner Tom Perkins bought the residual technology and commissioned Dykstra Naval Architects to create a three-masted DynaRig for Maltese Falcon , his 88-metre Perini Navi.
The DynaRig is not as efficient upwind as the Bermudan rig, and is probably not the best solution for a yacht smaller than around 65 metres, suggests Jeroen de Vos of Dykstra. “We wouldn’t advise putting a DynaRig on a small yacht because there are other ways to manage sail handling. But on a larger yacht the DynaRig becomes an alternative because there is no rigging, no highly loaded sheets, low-tech [small] sails and no big winches.”
The beauty of the DynaRig is that its automatic systems can be handled by one or two people and, notes de Vos, “you don’t have to get out of your chair to go sailing. Maltese Falcon can sail on and off the anchor and can set 2,400 square metres of sail in six minutes. On other boats it takes six minutes to get the sail cover off.”
Damon Roberts of Magma Structures, which built the rigs for Maltese Falcon and the only other DynaRig yacht to date, the 106-metre Black Pearl , says: “You can do any manoeuvre easily; it’s like sailing a dinghy. There are no highly loaded sheets or ropes or flogging lines. You can luff up, bear away, tack and gybe at any time and really enjoy sailing the boat without any apparent fuss.”
So with all these advantages, why has the DynaRig been chosen for only two sailing superyachts? For some designers, such as Malcolm McKeon, it is partly to do with compromises imposed by the large mast tubes and bearing diameters on the internal structure and layout, “particularly in the cockpit area,” he says. He also points out that the clipper ship look is not to every owner’s taste. “Sloops are more conventional looking,” he says.
Damon Roberts says there is still development work to be done. He has teamed up with Southern Spars and, with their additional resources, expects evolution with several new projects. “These include two at the moment that are twin-masted DynaRigs,” he says. “We did quite a lot of wind tunnel work early on as we felt that was really the sweet spot for it, and people will be stunned at how efficient these are.”
The future of the wingsail
Wingsails have been around for decades too, but with their adoption by the last two America’s Cups and the confluence with foiling technology, they have undergone rapid and revolutionary development.
To date, there is no proven solution for reefing a wing that would be suitable for offshore cruising or ocean passages. As the pronounced aerodynamic “nose” at the leading edge of a wing can develop force in strong winds, they could potentially make a large yacht uncontrollable in port as well.
“How do you get rid of sail and how does [a boat] handle when caught out in heavy wind conditions – which you will be? How do you keep the angle of attack all the way up the rig and how do you handle squalls?” Roberts asks. “A mechanism to reduce sail might be easy to sketch out but it is difficult to engineer.”
Jeroen de Vos says: “The wingsails are more developed towards performance and I wouldn’t say that they are as practical as soft sails or would ever make handling easier. But if somebody wants that, why not? Reefable soft sails, wings that are inflated, hoisted panels, possibly these are applicable. The development of this area is happening very rapidly.”
Paul MacDonald of Southern Spars agrees that the time is not here yet but thinks it will come. “In reality we are in the early days of wings. For the America’s Cup, they are the most efficient way of sailing by a long shot, but with them comes handling issues, which the industry hasn’t resolved yet. But I am sure they will be in 10 years’ time. Designers such as VPLP are starting to [work on concepts] and we are going to see something that is usable and efficient and suitable for ocean work eventually,” he says. “And whatever the solution is, you imagine that it will scale.”
Looking to the future
A drive for greener superyachts could present an opportunity for sail, but perhaps it needs to be less daunting.
“There is this intimidation of sheets and backstays, and sailing is a language you don’t learn in a year,” Tripp says. “But we have a project we are doing now with a yard with some new rig technology and some soft wings that we think is going to be viable.
“We can uncomplicate sailing more. If we can win people over from motorboats it will help, but we are only winning these battles one or two at a time. We need [more] projects like Sailing Yacht A , which are something really different, and do more things better with less energy. We as architects need to elicit change.”
McKeon also sees change coming. “People are more and more concerned about keeping their image green and sails are the way to do that,” he says. “Simpler sailing systems are needed. The current generation is used to Bermudan sloops. In years to come, the traditionalists will all be gone, and maybe new people will be more accepting of [different ideas]. I think in the future we will certainly have wings.”
More about this yacht
Yachts for sale, similar yachts for sale, yachts for charter, more stories, most popular, from our partners, sponsored listings.
- INSTRUCTIONAL CLINICS
- BASIC SAILING
- ADVANCED SAILING
- SPINNAKER CLINIC
LASER SAILING
- HOBIE CAT SAILING
- KEELBOAT SAILING LEVEL 1
- KEELBOAT SAILING LEVEL 2
- KEELBOAT SAILING LEVEL 3
- BASIC CRUISING CERTIFICATION COURSE
- COASTAL NAVIGATION
- SMALL BOAT SAILING PRIVATE LESSON
- WAKEBOARDING FREERIDE SESSION
- SUNRISE WAKEBOARDING
- DAWN PATROL WAKESURFING
- EARLY BIRD WATERSKIING
- WAKEBOARDING PRIVATE LESSON
- SURFING-FOUR SESSION
- INTRODUCTION TO SURFING
- PADDLE SMARTER CLINIC
- MOONLIGHT PADDLING
- STAND UP PADDLEBOARD YOGA
- POWER PADDLE CLINIC
- PADDLE GAMES
- INTRODUCTION TO KAYAKING
- SEA KAYAKING QUALIFICATION
- ADVENTURE KAYAK
- WINDSURFING LEVEL 1
- SAFE POWERBOAT HANDLING
- SEMESTER STAND UP PADDLEBOARD YOGA
- SEMESTER INTERMEDIATE SURFING
- SEMESTER WAKEBOARDING AND WAKESURFING
- SEMESTER SAILING
- SEMESTER WINDSURFING
- SEMESTER SURFING
- SEMESTER WAKEBOARDING
- SEMESTER SEA KAYAKING
- SEMESTER STAND UP PADDLING
- YOUTH BASIC SAILING
- YOUTH ADVENTURE SAILING
- YOUTH WAKESPORTS SESSION
- STEM EXPLORATIONS- THINK LIKE A SCIENTIST
- STEM EXPLORATIONS- ROV DESIGN CHALLENGE
- STEM EXPLORATIONS- OCEAN LITERACY AND CONSERVATION
- STEM EXPLORATIONS- MICROSCOPIC MYSTERIES
- STEM EXPLORATIONS-SEINING FOR SCIENCE
- Private Lessons
- Sailboat Rentals
- Stand Up Paddleboard Rentals
- Kayak Rentals
- Windsurfer Rentals
- Wakeboarding Boat Rentals
- Surfboard and Bodyboard Rentals
- Miscellaneous Equipment Rentals
- Party Packages
- Group Lessons
- Company Picnics
- Weekend Enrichment
- Spring Camp
- Summer Camp
- Birthday Party Packages
- Gift Certificates
- Hours & Directions
- Parking Information
- General Information
- Boats for Sale
- Forms & Waivers

Develop the skills to sail the fast and responsive Laser, an Olympic class racing sailboat. The Laser is the most popular sailboat in the world with more than 200,000 built. This class is ideal for solo sailors that would like to improve their technical sailing skills and enjoy a physical challenge.
What Will I Learn?
By the end of Laser Sailing you will be able to independently launch, rig, and sail a Laser sailing dinghy. Topics covered include:
- Launching and rigging the Laser
- Laser capsize recovery
- Controlling sail shape with sail controls
- Body mechanics
- Tell-tale use
- Roll tacks
Topics are introduced on land and then practiced on Mission Bay in a 14' Laser sailboat. Upon successful completion of the class you will be qualified to rent the Laser so you will be able to keep sailing and practicing your skills after the class ends.
Is this the right class for me?
Laser Sailing is one of two small boat sailing classes for students who have completed Advanced Sailing at MBAC. Laser Sailing is a good option if you are looking to sail and be eligible to rent a single handed performance boat. MBAC requires that you bring at least one other person with you to rent a Hobie Getaway, but you can rent a Laser by yourself.
Hobie Cat Sailing is the right class for you if you want to become eligible to rent Hobie Getaways at MBAC. Additionally Hobie Cat Sailing is less physically demanding than Laser Sailing and you can expect to stay drier on the Hobie Getaway than the Laser.
If you have some sailing experience but have never taken a formal sailing class, we suggest starting with Basic Sailing or Basic Keelboat Level 1 . Our experience has shown that people who learn to sail informally often have gaps in their knowledge that are best addressed by completing an entry-level class.
Requirements
- Prerequisite: MBAC Advanced Sailing or equivalent experience.
- This class is open to all participants aged 14 and up.
- A general liability waiver is required to participate. Anyone under 18 must have a waiver signed by their parent or legal guardian.
- Participants must acknowledge that they are water safe (able to swim 50 meters and comfortably tread water).
How to Prepare
Wear comfortable clothes that can get wet and dress in layers. The temperature can feel much cooler than expected once you are on the water, so it is a good idea to bring a jacket, even on warm days. We suggest comfortable closed-toed shoes. Sunglasses and a hat are highly recommended. Lifejackets are provided.
The Laser can be a wet boat to sail, so be prepared to get wet during this class. You will practice capsize recoveries, but it is also likely that you will accidently capsize a few times during this class. Bring swimwear and a change of clothes to class each day. You may use a MBAC wetsuit for no additional charge while participating in this class.
Bring sunscreen, a refillable water bottle, and snacks or lunch (for all-day classes). MBAC has a water bottle refilling station and there are a number of restaurants nearby, but keep in mind that food and drink are not available for purchase at MBAC.
Parking can be a challenge at MBAC, especially during the summer months. Please visit our parking page for more information.
What's Next?
Upon successful completion of Laser Sailing you will be qualified to rent Lasers at MBAC by yourself. If you are looking to continue your sailing education after this course we recommend Hobie Cat Sailing .
sailing Discounts!
Package price includes Basic Sailing, Advanced Sailing, and Hobie Cat Sailing
$470.00 Package Fee $315.00 SDSU/UCSD Student Fee
SOUTHERN CALIFORNIA MARINE ENTERPRISES
Site navigation [skip].
- Tempered Water Air Condioning
- Self Contained Air Conditioning
- Split Gas Air Conditioning
- Seawater Pumps
- Air Cooled Air Conditioning
- DuraSea Rooftop Air Conditioner
- EnviroComfort R-410A Retrofit Kit
- Cuddy dc Air Conditioning Kit
- March Pump Family
- Breathe Easy InDuct Air Purifier
- Breathe-Easy-portable
- Chilled Water Air Conditioning
- Radome ECU (HSA16K) for Ductable Radar Dome Applications
- Guidelines for Selecting A/C for Your Boat
- MasterVolt Batteries
- Charge Master Series
- Mass Charger Series
- ManualChargeMate2502_090205
- ManualChargeMate1202_090205
- DC MASTER / MAC/MAGIC Converters
- Charge Regulators
- Mastervolt Inverter/Charger Combos
- Isolation Transformers
- Mastervolt Panels/Displays
- AC System Monitor
- Standard Line Power Distribution Panels
- Delux & Premier Line Power Distribution Panels
- Solar Regulators
- Transfer Switches
- Sol-Go Solar Panels
- Cobra Wire & Cable
- FTZ Electrical Connectors
- Zeus Alternator Regulator
- EXHAUST HOSE.pdf
- FUEL HOSE.pdf
- SANITATION HOSE.pdf
- WATER SYSTEM HOSE.pdf
- U-Line Ice Makers
- ISOTHERM Ice Makers
- Vitrifrigo Ice Makers
- Eskimo-Ice EI540D & EI1000D
- LED General Lighting Festoon Base Replacement Bulbs
- LED General Lighting BA-15 Base Replacement Bulbs
- LED G-4 Bulb replacements
- Flood and Spot Light LED Replacement Bulbs
- LED General Lighting Misc. Replacement Bulbs
- LED Navigation Encapsulated Replacement Bulbs
- LED Navigation Fixtures and Bulbs
- LED Exterior Flood Light Fixtures
- LED Engine Room/Utility Lights
- LED Waterproof Strip Lighting
- High Output LED Light Bars
- LED Ceiling & Wall Fixtures
- Blown Glass LED Hanging Light Fixtures
- Bilge Pumps
- Deck Washdown
- Water Pressure Pumps
- CB SERIES TOP LOADING
- 2690_CD-030_spec_sheet-20090630-Web
- L-2607 CF Series Portable Refrigerators-Freezers
- L-2604 CR Series Built-in Refrigerators
- CDR-50 DRAWER REFRIGERATOR
- L-3209 HZB Series Portable Ice Makers Spec Sheet
- ADLER/BARBOUR COLDMACHINES
- 2693_AB_ColdMachine_spec_sheet-20090630-Web
- 2692_AB_CoolMatic_specsheet-20090630-Web
- 2146_GRU_Passagemaker_specsheet-20090227-Web
- 0831_KRA_specsheet-20090717-Web
- Cruise 30.pdf
- cruise 65-130.pdf
- cruise 165-271.pdf
- cruise freezers.pdf
- drawer 49-55.pdf
- drawer 65.pdf
- cruise 105-190.pdf
- DE-0041/EV-0041
- DE-0061/EV-0061
- DE-788 / EV0788
- ltplates2013
- LT SPEC SHEET
- Single Door Refrigerators
- Single Door Freezers
- Two Door Units
- Sea Classic / Sea Steel
- Drawer Units
- Conversion Units
- SeaLand VacuFlush Systems
- Tecma Toilets
- Isotemp Water Heaters
- AquaMatic Mid to Large Powerboats - 40-80ft
- BLUE SEA SYSTEMS
- CZONE DIGITAL SWITCHING
- Espar Diesel Heaters
- Johnson Pumps
- LunaSea Lighting
- March Pumps
- Marine Hardware
- Marine Systems, Inc.
- PanelTronics
- Sea Recovery
- Victron Energy
- Whisper Power
- Zeus by Arco
Air Conditioning
Led lighting, refrigeration/freezer, water heaters, water makers.
IMAGES
VIDEO
COMMENTS
Enterprise Rigging Guide. Go To: Sailing - Rigging Guides. Posted on 19 July 2008 18:33. A very popular two handed boat, many of us may have started our sailing lives in an Enterprise, and many are bought and sold each year. With a strong class association and good racing circuit, Enterprises are a good boat to choose, particularly if you're ...
Rigging and Sail Tuning a simple dinghy. How to get the best from your boat. Redditch Sailing Club. Enterprise Dinghy.
Rigging an Enterprise
Rig; Rig type: Sloop: Sails; Upwind sail area: 115 sq ft (10.7 m 2) Racing; D-PN: 92.6: RYA PN: 1117 [edit on Wikidata] The Enterprise is a Bermuda rigged sailing dinghy with a double-chined hull and distinctive blue sails. Normally crewed by two, and sometimes carrying a third crew member, it may also be sailed single-handed.
Rigging a Enterprise sailing dinghy is relatively simple and can be done using a few basic steps. Put the mast in the step (hole) at the center of the boat. Attach the Jib Halyard to the head of the jib sail and hoist it up the mast. Attach the main halyard to the head of the mainsail and hoist it up the mast.
Rig Tension / Mast Rake. Rig tension is measured on the shrouds with a 3mm wire gauge. Mast rake is measured from top of mast to the centre of the transom. For sailing in all conditions the rig should be set up with Jib hoisted and tension fully on: Rig Tension: 400lbs Mast Rake: 6470mm. This should make the mast straight with no Mainsail ...
Topic. I recently acquired an old Enterprise sailboat I am restoring. I have all the bits, pieces, parts, sails, etc. but anticipate problems figuring out the rigging when I get to the put it all together stage, probably several months down the road. Is there anyone out there with a functional Enterprise that would be willing to help, answer ...
S.A.: Sail Area. The total combined area of the sails when sailing upwind. S.A. (reported) is the area reported by the builder. (Verses ** S.A. (100% Fore + Main Triangles) which is the area as defined by the rig measurements.) S.A. (reported) can differ depending on the size of the head sail used to calculate the S.A.
Enterprise was the first launched on 14 April 1930 and was later chosen as the Cup defender. At 80ft (24.4m) LWL she was shortest of the four US Js and conventional in all aspects. Designed by W Starling Burgess, she had lightweight rigging and was the fastest of the four to windward in moderate airs.
www.BoatLinkMalta.com presents a tutorial video for beginners illustrating the step-by-step process of how to rig up and launch an Enterprise sailing dinghy....
The sail rig is determined by the number of masts and the layout and shape of sails. Most modern ships are fore-and-aft rigged, while old ships are square-rigged. ... While the Enterprise is usually rendered as the familiar schooner, the polacca Tripoli has been pictured in radically different ways. Thus the Wikipedia picture by Hoff in 1878 ...
It was on January 9th 1956 that two Enterprise dinghies sailed across the Channel between Dover and Calais in the middle of the night. This remarkable achievement rocked the sailing world, brought international recognition to the designer Jack Holt, and was the PR stunt that marked the launch of a boat that is still today one of the world's most popular dinghies.
The rig or rigging on a sailboat is a common term for two parts: The standing rigging consists of wires supporting the mast on a sailboat and reinforcing the spars from the force of the sails when sailing. The running rigging consists of the halyards, sheets, and lines we use to hoist, lower, operate, and control the sails on a sailboat.
Sailing enthusiasts often find themselves entranced by the beauty and grace of a sailboat slicing through the water, powered solely by the wind.But behind every successful sailboat is a well-designed rigging system that plays a crucial role in its performance and safety. In this comprehensive guide, we will delve into the world of sailboat rigging specifications, unraveling the intricacies and ...
5. Secure the mast using the appropriate rigging and fasteners. Attach the standing rigging, such as shrouds and stays, to the mast and the boat's hull. Fact: The mast of a sailboat is designed to withstand wind resistance and the tension of the rigging for stability and safe sailing. 2.
PLEASE NOTE: THIS VIDEO HAS BEEN UPDATED WITH ENHANCED GRAPHICS AND IMPROVED SOUND. CHECK IT OUT HERE https://youtu.be/tRgWtPaCQQcA beginners guide to sailbo...
The Bermudan rig is the all-rounder, able to perform well at all angles of sail. It is efficient upwind, while downwind the sail area can be significantly boosted with a big gennaker or spinnaker. For good reasons, it is the first choice for nearly every modern sailing yacht up to around 60 to 65 metres for cruising and regatta racing alike.
By Robin Iversen January 12, 2024. The running rigging on a sailboat consists of all the lines used to hoist, lower, and control the sails and sailing equipment. These lines usually have different colors and patterns to easily identify their function and location on the vessel. Looking at the spaghetti of lines with different colors and ...
LASER SAILING. Develop the skills to sail the fast and responsive Laser, an Olympic class racing sailboat. The Laser is the most popular sailboat in the world with more than 200,000 built. This class is ideal for solo sailors that would like to improve their technical sailing skills and enjoy a physical challenge.
ArborLift, Inc., Santa Clara, California. 30 likes. ArborLift, Inc. and South Bay Crane & RIgging is a crane & rigging company located in Santa Clara. Our equipment includes hydraulic truck cranes,...
A beginners guide to sailboat rigging, including standing rigging and running rigging. This animated tutorial is the first in a series and covers sails, line...
Home; Products. Air Conditioning. Cruisair. Tempered Water Air Condioning; Self Contained Air Conditioning; Split Gas Air Conditioning; Controls; Seawater Pumps
US Rigging Supply is a 35-year old ISO9001:2008 Certified Manufacturer of high performance custom cable and wire rope assemblies in long or short runs, lanyards and slings, and a Master Distributor of wire rope, aircraft cable, fittings and Factory Direct source for copper, stainless steel and aluminum swaging sleeves, wire rope clips and turnbuckles with a history of quality and customer service.