~ Back to Rigging ~

Wire Rigging Vs. Synthetic Rigging Vs. Rod Rigging
Synthetic rigging has been getting more and more common recently. rod rigging has lost some popularity in the past decade due to parts availability issues from manufacturers. wire rigging has remained tried and true to the test of time. in looking at each of these stay materials we find some advantages and disadvantages. let’s take a look….

WIRE RIGGING:

Wire rigging, generally, is the most common form of standing rigging found on sailboats today. 1 x 19 standard stainless steel specifically is the most common style of wire used. All of these types of wires can be found in both metric and imperial size ranges except for Dyform/ Compact Strand which is only available in metric sizing (at least as far as I know). Stainless steel wire can come in many grades; in marine applications a minimum of 304 grade is recommended, but we [at TRC] won’t touch it unless it is the more corrosion resistant 316 grade.
Wire comes in as the lowest cost product of the three, especially when using swage fittings. Life expectancy is very good with regular inspection , 7-20 years or 15-25k nautical miles depending on use and region. It lasts not as long as rod, but longer than synthetics. It also is the stretchiest and most elastic of the three choices and therefore offers the lowest performance.
ROD RIGGING:

Nitronic 50 (XM-19) Rod rigging has extremely long life expectancy attributed to design (mono strand) and the composition of the alloy making it very corrosion resistant. It is arguable that the lifespan of a Nitronic 50 piece of rod will outlast all other stay materials. One of the recent misconceptions about rod is that it is very expensive to replace and also hard to find parts. Hence more and more people have been asking about converting their rod rigged boats to wire (but more on that below).
Contrary to recent rumors, rod rigging parts and service are readily available at The Rigging Company!
Rod rigging does require a more in-depth service protocol during recommended intervals, which includes unstepping the mast to inspect and re-head the rod as needed. It should be known that the cost for this is very reasonable, nowhere close to the cost of re-rigging. Yes, when dealing with complete rod replacement (not service) which is rarely the case, one can expect to pay a bit more for rod rigging, relatively speaking of course.
SYNTHETIC RIGGING:

The downsides of synthetic stays are they are generally more expensive (except single braid Dyneema perhaps) than the other stay materials out there. Even with great strides, claiming 10 years of lifespan with service, in the carbon fiber side of things, synthetic rigging will not last as long as the metal stuff. The last downside I always point out is, although some of these materials are extremely chafe resistant (varying depending on construction technique and material choice, of course), I will stand firm that they are no match to that of metal wire or rod.

INTERCHANGEABILITY OF STAY MATERIALS:
Lastly, I’d like to touch on the subject of switching from one stay material to another. As I mentioned above, many people with rod rigging have been asking about changing over to wire. I think this is mainly attributed to the lack of service centers and parts availability for rod rigging IMHO. I will try and keep this short and sweet by starting off with the fact that it will likely cost more money to change over the rod rigging to wire, even though wire rigging is slightly less expensive (again, generally speaking). There are attachment point changes as well breaking strength considerations which can become a problem especially when considering pin sizing.
~It will likely cost more money to change over the rod rigging to wire~
Conversely, upgrading from wire to rod rigging presents similar issues. Having said all of that, there are some (very few) boats with rod rigging that can easily get away with changing things over. Valiant is one that comes to mind. This is because they utilize conventional attachment points.
To finish this up, if talking about synthetic upgrades from rod or wire there are some better options for you. The main reason for this being a more viable option is that synthetic rigging was developed to be an upgrade from wire or rod (barring some of the newer super yacht designs, probably a non-point to you, the reader, since you are on this site). Whereas rod and wire rigging was primarily developed to be OEM equipment, not an upgrade option. Thus, if you have wire or rod…chances are, you are better off sticking with what was there originally, OR upgrading to synthetic.
Thanks for the read and please be so kind and leave us your thoughts below.
Similar Posts
Ac and the vor.
Some big news in the two sailing events that will always have my full attention. The Americas Cup has announced the return of the classic (yet modernly equipped) J Class boats for the 35th edition of the Americas cup taking place in 2017, in Bermuda. This will add some class back into the highly modern,…
Rod Rigging
In the world of sailboat standing rigging there are three common materials used, stainless steel wire, Nitronic 50 rod, and various types of synthetic fibers, which are becoming more and more popular. I want to talk today about Nitronic 50 stainless steel rod. This specific type of stainless steel is very strong and noble. Rod…
The New Volvo Ocean Race 2014-2015……
…….will have an all woman team. Awesome! Quite the line up as well. Boys you better step up your game. Remember, the new VOR boats will be one design. I can’t wait! [youtube http://www.youtube.com/watch?v=PdroQqOuMVE&w=560&h=315]
Synthetic VS. Vinyl Coated VS. Un-coated Stainless Steel Lifelines
Many people these days are looking towards synthetics or to un-coated stainless steel to replace their lifelines over the traditional vinyl coated lifelines of the past. First, let’s talk a little bit about the cons of using vinyl coated wire: the wire cannot be visually inspected for failure, the wire is typically made from a…
The Making of the J-Class “Atlantis”
Check out the level of quality and professionalism in this compressed yacht building video of the aluminum J Class, “Atlantis”. What an intense project. The yacht had been commissioned for a Dutch owner and the design was based on the original plans for a ‘Super J’, designed by Frank C Paine in the 1930’s. [youtube…
Still Here, Are You Coming Down?
Leave a reply cancel reply.
Your email address will not be published. Required fields are marked *
Save my name, email, and website in this browser for the next time I comment.
32 Comments
I was looking at a Valiant 39 with rod rigging and my first reaction was to wonder if it was possible to change to standard wire rigging.
Thanks for the comment. The short answer yes, I think it would be a very simple swap on the Valiant Yachts due to their use of conventional, non-rod-specific, tangs (mast attachment points.
Good luck in your endeavors and let us know if we can help you further.
Great breakdown of wire, synthetic, and rod rigging! Your insights on the pros and cons of each type are invaluable. As a sailing enthusiast, I appreciate the detailed comparison that helps me make an informed decision for my boat rigging. The visuals and explanations make it accessible even for those new to the sailing world.
Hello, Thanks for this article, it was a lot educational. I have a Question I didn’t find anywhere. My J24 has 1×19 Dyform 3/16 shrouds and I started thinking that the tensions I m using from the North Sails tuning guide are referred to standard 1×19 shrouds, but Dyform are less stretcher and stiffer (so to speak). so the question is, should I have to use a different tension with Dyform, or it doesn’t matter? maybe less tension because it stretch less? Oh! one more thing, does tension gauge reading is correct in this shrouds? (as cable is more compact in diameter and stiffer)
The theory of what you are saying make sense. I would start with: A. A good static dock tune, B. Set the rig to your sailmakers tuning guide, C. Go sail. While sailing close hauled, observe the leeward shrouds (in the lulls). If you see the shrouds are just beginning to slack, then it’s PERFECT, and just follow the guide! If they look like they aren’t moving, take some turns off until they just begin to go limp (in the lulls). Once back at the dock, note the gauge settings and this should allow you to scale your pre-sail tension settings up and down, relative to your guide, from there.
At the end of the day it is important to remember the guide is just that, a guide. Eventually you will just feel things like the rig needs to be tighter or looser because it just… feels right. If you are running some heavier crew that day, you may soften things up, and visa-versa, etc…
Hope that helps and happy sailing.
I also thank you for this excellent summary! I’m cautiously returning to sailing in New England after a decades-long hiatus. I bought a 1982 Catalina 27, and I’m unsure of the age of the rigging or if it needs to be replaced. How do I determine such a thing? Also, if you have an inspection/maintenance checklist/schedule, I’d be very glad to see it. Thanks.
Thanks for the kind words. Other than asking the previous owner you can send along some pictures of things to [email protected] and we can likely tell once we put our eyes on things.
I own a nine meter cruising catamaran. I had the mast and rigging done about 16 years ago. Being a cat the deck is one meter above the waterline so the rigging isn’t close to the water. The rigging is 8mm Compact 1 * 19 S/S. I do no more than 500 nautical miles per year (generally less). Should I look at replacing my rigging soon or can I probably get a few more years from it?
Where on the planet does the boat spend most of it’s time?
“Cobwebs” is moored in a sheltered area on the southern shores in Lake Macquarie, about 80 miles north of Sydney. Most of the weather systems are south westerlies and passes overhead as Cobs is moored close to the land. I check the rigging on a regular basis and clean the lower sections with soapy fresh water. It’s going to cost me about $1600 Aus to replace the rigging so if I can stretch this out for a couple of years I will be happy to do so. Your thoughts on this issue will be most appreciative, regards Ross C.
If this lake is fresh water you are very likely in better shape than those on Saltwater. The three factors are: salt air and water content, how close you are to the equator (sunlight), and also use. Use, encompasses the boat sitting at the dock. At the dock, the rigging experiences what they call “Cycle Loading” even if not sailed. So fresh water and the rigging being removed and stored when the boat is not in use will generally offer the longest lifespan.
Having said that 16 years even in those ideal conditions is nearing it’s end. So inspect it more than regularly, and prepare yourself for the inevitable.
PS – $1600 sounds reasonable for what it’s worth.
I hope that’s somewhat helpful.
Cheers, ~T.R.C.
SUPERBLY INFORMATIVE ARTICLE (MARGINALLY DATED OR OTHERWISE). OF THE SLOOPS I HAVE OWNED, ALL WERE RIGGED WITH WIRE (1-19) AND, DESPITE OPEN OCEAN AIR (20-35 KNOTS) BEING THE PLAT DU JOUR IN HAWAIIAN WATERS, I NEVER HAD AN ISSUE OF ANY SORT. THANKS TO YOUR FINE REVIEW i SHALL STAY WHERE I AM IN THE FORTHCOMING RE-RIGGING AND LEAVE THE ROD AND SYNTHETICS TO THE THOSE OF THE RACING CLASSES. MANY THANKS AGAIN… AND I SHALL REFER TO YOUR SITE OFTEN!
Thank you for your super helpful article, as it’s really informative having a side by side comparison for the three rigging types in one place. I have a 25′ trailerable coastal cruiser that I’m pondering switching from wire rigging to synthetic. The spreaders, though, just have a filed groove on the end for the shrouds to pass through (and the small holes on either side with which to wire the shroud in place). How do you eliminate chafing and make sure the shrouds stay in place with synthetic rigging running over the end of the spreaders? Cheers, Brandt
Find a piece of heavy rubber or vinyl or plastic tubing that the stay material fits through freely. Then cut about 2″ or so of said tubing with nice clean ends. Then file the slots open to accept said piece of rubber tubing or the like. Then, roll up a piece of sand paper to make the edges smooth and soften the aluminum slot. This should give you a fairlead and allow you to seize the synthetic stay to the spreader as you would with wire. The tubing should acting as a ferrule or buffer between metal slot and synthetic rope.
Hope that makes sense and is helpful.
Good Luck, ~T.R.C.
Good article but you never gave us an idea how much does rod last like you did with wire. Is there a guidance number of years and miles? Thanks
Great point! There’s always something missing.
We’ve written about this in a blog called “Rod Rigging” which is linked in the article, but it is’t clear.
Thanks! ~T.R.C.
This article should be updated. Synthetic rigging suppliers now say that it should be sized based on creep rather than breaking strength. Synthetic rigging tends to be much more elastic than wire rigging.
Thanks Jake,
No doubt, this (creep) is a major factor in choosing the right stay material size. Carbon rigging perhaps being the exception, but I am curious for more information on this.
We will indeed update this soon. For now our suppliers still size by tonnage. Also the pin sizes associated with the stay’s diameter are a factor in how we decide which diameter stay your boat requires.
Thanks for caring and thanks for the comment. Most of these seemingly simple write ups require regular updates as the market and the knowledge associated is changing constantly.
It’s comments like these that help us stay sharp.
Regards, ~T.R.C.
- Pingback: Why Choose Dyneema Rope vs Steel Wire Rope For Heavy-Duty Rigging?
I am going ocean sailing on a hallberg rassy 26 the rug needs replacing. Its all 6mm1x19 the back stay is 5mm I want to change to dyform the same size with stalok fittings to make it stronger. Your thoughts please
I am thinking of taking my hallberg rassy 26 on ocean passage and need ro renew the standing rigging she has 6mm all round and a 5 mm baxkstay I want stronger so am rhinking of using dyform same sizes with stalok fittings. Any thoughts ?
Thanks hope that helps and let us know if we can help you out further.
I have a C & C 42 Landfall with rod rigging. 1978 year is old but it is what i could afford. Think about long cruising at 68 but want somebody to look at rigging before i go. Atlantic Yacht Basin got all my money and say dead batteries? They laugh they fixed alternator and recommend i come back.
Thanks How does one measure tension in Aramid stays? SS
Very good question…I would use a Loos and Co. rigging tension gauge . It has nice, fair nylon rollers that will agree with the fiber stay materials.
In my mast with rod uppers there is a clindrical device that holds the rod ends at each side. Can the rods be removed? And how is the clindrical device held to the mast?
Hi Ernie, those seem exactly like the tangs we warn about in this blog….. https://theriggingco.com/2015/02/20/rod-rigging/
Also this has a technical drawing of the tangs that you are asking about (pretty sure).
YES, you can remove them, but you may find that they are more than you bragined for. HEAT is recommended.
Please call or email us for further assistance. We’d be glad to help.
Thanks for Reading,
Informative article. I am looking at a boat now with carbon mast and boom with PBO rigging. I took particular note of your comment on PBO “good luck with that one”. What do you mean by that? I am assuming that you are not a fan of PBO rigging.
Hi Charlie,
Another super informative post thank you! If you fancy a holiday in NZ then my wire rigging needs replacing next year. Also the spinnaker halyard keeps jumping out of the sheave at the top of the mast requiring someone to go up every time to get it down. As you can imagine this is getting quite tiresome! Anyway we will get the mast out next year to sort it. We do have a good rigging team here in Christchurch who can sort it. (unless you fancy a holiday that is…?!) ha ha. By the way is that the reflection on the transom of that yacht? What a great paint job!
HA! Thanks Viki! Actually, the wife and I have always quite fancied a vacay to NZ. It may be a long shot, but doable. We’ll need to exchange a few emails, answer a few questions. First let’s see what the wife says.
Yeah, that boat is incredible.
Username or Email Address
Remember Me
Lost your password?
Review Cart
No products in the cart.
- Privacy Overview
- Strictly Necessary Cookies
This website uses cookies so that we can provide you with the best user experience possible. Cookie information is stored in your browser and performs functions such as recognising you when you return to our website and helping our team to understand which sections of the website you find most interesting and useful.
Strictly Necessary Cookie should be enabled at all times so that we can save your preferences for cookie settings.
If you disable this cookie, we will not be able to save your preferences. This means that every time you visit this website you will need to enable or disable cookies again.
- Boats & Gear
- Instructional
- Cruising Stories
- Cruising Destinations
- Race Results
- Race Reports
- Racing Technique
- Submit a Classified Ad
- Boats for Sale
- All Classifieds
- Terms & Conditions
- Your Dashboard
- Seattle Area Racing Calendar (SARC)
- 48° North Cruising Rally
- Croatia Flotilla
- Winds of Change: Rod Rigging Functionality, Interchangability, and Availability Considering Industry Changes
- Boating News
This article, by Lisa Vizzini, was originally published in the June 2017 issue of 48° North.
Earlier this year, the sailboat industry was shaken when Hall Spars and Navtec Rigging Solutions closed their United States operations. Over the years, Navtec and Hall shared many progressive, engineering driven, high profile projects. The loss of these two innovative domestic manufacturers leaves many, especially those with rod-rigged boats, asking who will fill the voids; and more specifically, about the future of rod rigging availability.
Hall Spars, founded in 1980, fabricated high quality aluminum, and later carbon, spars and rigging components. Their state-of-the-art plant in Rhode Island boasted a 185’ carbon autoclave. When I visited in 2009, Nan Hall proudly showed off the 65’ carbon boom and described the process for building the 179’ mast for the modern J-Class sloop, Lionheart . Over the years, many sailors had the pleasure of directly speaking with Nan Hall about their Hall-rigged project. Nan was always patient and courteous. While Hall Spars closed their US facility, Hall Spars New Zealand and Holland were still operating. At the time of this writing, new developments are still taking place. North Technology Group (the corporation that encompasses North Sails and other businesses) has purchased Hall Spars Worldwide. It is good to know that the intellectual property at Hall is not going to be lost.
In 1970, Navtec was founded by Ken King with the goal to bring better rod rigging technology to the marketplace. Their initial customers were America’s Cup contenders. At Navtec, Beau LeBlanc, Ty Goss, and other brilliant engineers were consistently forthcoming with information about rigging and hydraulics when asked by enthusiasts and professionals alike. Ty thoughtfully explained the intricacies of rod parts to me on more than one occasion.
Though Hall’s closure came as a surprise to many, signs that Navtec was on the edge – such as production delays and various delivery issues – have been apparent for at least a decade. The good news is that Navtec’s slow decline gave the industry time to adjust. In other words, these closures do not mean the demise of rod rigging in the United States, though they may cause a price increase for rod rigging.
Considering these industry changes, this is a good time to examine some of the similarities and differences in how rod and wire rigging function, what the processes for replacement entail, and some best practices for maintenance and inspection.
Many cruising boats were originally designed for wire rigs and there is rarely a reason for those boats to consider going to rod. Wire offers excellent value, longevity and availability the world over. A significant majority of sailboats still have wire rigging.
Rod rigging generally offers some better performance characteristics, and can be seen on a variety of boats, like many J/Boats, C&C, Beneteau, Waterline, Sabre, and Valiant Yachts, as well as custom racers and cruisers.
Rod is constructed from Nitronic 50 stainless steel, a material different from the 316 or 304 stainless steel usually used for wire standing rigging. Nitronic 50 better resists elongation, corrosion, and fatigue cycling. For a given diameter, rod has a higher tensile strength, and less windage and weight per foot of wire rigging. Because rod is not a woven or twisted construction like wire or other synthetics which are used for standing rigging, it is inherently more stable. The lack of stretch allows for less tension in the rig to support the mast, as well as a more reliable set of the rig under varying pressure and loads. This is especially important for rigs with swept back spreaders and masts that are highly adjustable as a part of sail trim and performance.
Considering a switch from rod to wire, or vice versa, should involve careful examination of the rig design, shroud angles, mast components, stiffness of the rig, load characteristics and bending moments.
A mast with tangs for marine eyes can be a simple switch from rod to wire. Elements affecting this option would be rod to wire size, chain plate pin size, and elongation concerns. Any replacement of rod with wire must have the same or greater minimum breaking load. The wire size selected must match the current mast tang and chain plate pin size or the tangs and chain plates would need to be changed to fit.
The stretch factor and the mechanical tensioning of the stay or shroud need to be analyzed carefully. It is possible that a long run of type 316 wire could elongate enough that the turnbuckle becomes two-blocked or runs out of adjustment before the wire is adequately tensioned.
A mast with rod stem ball receptacles is likely to be more challenging to convert to wire. This can involve removal of older stem ball tang sets, installation of proper fit compression tubes, bolts, and new tangs for marine eyes or other wire fittings. The sailor will have to weigh the cost of this with the cost of the rod replacement, and think about the different properties of the rigging types.
How long rigging lasts is subject to many different factors: age, miles, loads in comparison to break strength, sailing conditions and environmental conditions. Here in the northwest, rigging tends to last longer than warmer climes or those where air pollution is prevalent.
The heuristic for wire standing rigging is that it will provide good service for eight to ten years depending on the sailing conditions, environment, and use. It is a good idea to inspect at five year increments or 30,000 miles, which ever comes first.
By comparison, rod should be inspected after a maximum of 40,000 to 60,000 sailing miles or six years, whichever comes first. A proper inspection involves un-stepping the mast, scanning the rod inch by inch, and inspection of each cold head.
If issues are discovered with the rod heads and there is enough room in the turnbuckles, or longer screws can be used, a new cold head can be formed. It is recommended that the turnbuckles be replaced at least every ten years. Often there will be a stainless or aluminum tube called a “bend” over the rod where it passes through the spreader. The spreader bends are set at a precise angle and this can sometimes mean that the rod in this position will need to be replaced for proper fit of the shroud.
Taking care of your rod rig has similarities to caring for a wire standing rig. Like wire or other rigging materials rod wears out from cycling, fatigue, and corrosion. It stands to reason that keeping the stainless clean, allowing it to breathe, and proper tension will prolong its life.
Here in the Pacific Northwest, any rigging shop that has previously been able to accommodate rod rigging repair and replacement projects can continue to offer that service, despite the changes in the industry.
Hayn Marine has purchased and taken ownership of the intellectual property (engineering drawings) from Navtec. They will continue, as they have been for several years, to provide quality rod parts.
Despite industry changes, rod rigging is still a viable, and sometimes necessary, choice for many sailors. It can hold a value position for sailors seeking predicable rigging performance for whom the cost of composite parallel construction rigging can be impractical.
Lisa Vizzini and her husband, Dan Kulin, are the owners and operators of Port Townsend Rigging .

Lisa Vizzini
Lisa Vizinni has owned Port Townsend Rigging and Spars (PTR) for more than twenty years, and is passionate about sharing her experience and helping the sailing community. Learn more about PTR at http://www.porttownsendrigging.com/
Featured , Events Coverage
Fisheries Supply Spring Swap Meet Set for April 20
March 4, 2024
Boating News , Featured
Columnist Lisa Mighetto Wins BWI Writing Award for Her 48N Story, “Once More, With Feeling”
February 23, 2024

Cruising , Featured , Events Coverage
Only Six Spots Remain on 48° North Cruising Rally July 28 – August 2… Register today!
February 13, 2024
Christina Wolfe of Orcas Island Wins Rolex Yachtswoman of the Year!
February 2, 2024

Come Visit 48° North at the Seattle Boat Show!
Cruising Destinations , Featured , Events Coverage
CYC Seattle’s Fridays in February Series 2024
January 26, 2024
Please verify you are a human
Access to this page has been denied because we believe you are using automation tools to browse the website.
This may happen as a result of the following:
- Javascript is disabled or blocked by an extension (ad blockers for example)
- Your browser does not support cookies
Please make sure that Javascript and cookies are enabled on your browser and that you are not blocking them from loading.
Reference ID: 4bdadb88-dbe0-11ee-815f-2a9e26148216
Powered by PerimeterX , Inc.
- BOAT OF THE YEAR
- Newsletters
- Sailboat Reviews
- Boating Safety
- Sailing Totem
- Charter Resources
- Destinations
- Galley Recipes
- Living Aboard
- Sails and Rigging
- Maintenance
- Best Marine Electronics & Technology
Replacing Your Sailboat Rigging
- By Wendy Mitman Clarke
- Updated: March 23, 2020
Whether you’re buying a used sailboat that’s new to you or you’ve owned your boat for decades, the standing rigging is what keeps the mast in place, and thus requires particular attention. How do you know when it’s time to re-rig? There are some obvious answers to this one — for instance, if your wire rigging has broken strands or if it’s suffering from “candy-striping,” i.e., rust-colored streaks swirling down the wire. The latter may indicate two things: one, that it’s simply surface rust, which you should be able to polish off, or two, that as the wire was being manufactured, a strand might have picked up some contamination during the process and is compromised, which is cause for concern. A third visual indicator are cracks in swaged fittings, some of the most common end fittings for wire. Cracks are hard to see (use a magnifying glass), and sometimes marks that look like cracks can be left by the machine used to create the swage. Then there’s just age, and this factor as a reason to re-rig is more subject to a boat’s history than anything else.
“There’s a rule of thumb, but it varies rigger to rigger,” says Steve Madden, co-owner of M Yacht Services in Annapolis and the head of its M Rigging division. “My belief is that you should be replacing your sailboat’s standing rigging every 10 to 15 years.” But this time frame also is variable, depending on the boat’s purpose and use. For instance, for an offshore bluewater boat, Madden recommends 10 years, and for a serious coastal cruiser, more like 12.
“The biggest thing we like to have is the history of the boat: what kind of boat it is, how it’s been sailed and where has it been sailed,” says Jay Herman, owner of Annapolis Rigging. “That history will affect what kind of life you get out of your standing rigging.” Some insurance companies, he says, will require a re-rig if you’re purchasing a used boat that has standing rigging older than 15 years.
Either way, Jimmie Cockerill, co-owner of the Rigging Company in Annapolis, recommends that for a sailboat with wire rigging, the mast should be pulled and all fittings and wire visually inspected every five to six years. And although rod rigging may be able to last longer than wire, it too needs to be serviced every five to six years to get the most life out of it. Sticking to the 10-year rule, Madden says, means that for the most part, any corrosion or failure points will be eliminated with a re-rig.
How the rigging has been tuned is also part of a boat’s story. For instance, Madden says, he recently had a customer whose 46-foot cutter had a rigging failure at six years. The customer had had the boat re-rigged, and during a trip to the BVI, the new wire stretched. The owner didn’t adjust the rigging to compensate for the stretch for several seasons. “That was a case of not knowing that the worst thing you can do to standing rigging is have it loose on the leeward side,” he says. “Sailboat rigging very rarely fails from being overloaded. There’s such a safety margin in rigging. So you’re sailing offshore and you’re looking at the windward shroud that’s taut, and that’s not the one to worry about. It’s when the leeward side starts flopping around that you’re asking for trouble.”
Stainless steel has a finite number of cycles — essentially, movements, whether fore and aft or side to side. “The theory is that it can take 10 to 15 years of cycling, but this continual motion when it’s unloaded is what fatigues the wire,” Madden says. “There’s no real way of measuring that. Die testing won’t pick it up, and it’s rare that a wire will give you warning before breaking.”
So how often should standing rigging be replaced? For all of these reasons, most riggers agree that when your sailboat’s standing rigging approaches 15 years old, it’s a good time to consider replacing it.
Wire or Rod Sailboat Rigging?
Riggers say the question of whether to rig with wire or rod is usually fairly easily answered: Run what you brung. In other words, if your boat already has rod rigging, with all of the end fittings to terminate the rods both on deck and in or on the mast, then sticking with rod will ultimately be less expensive than making the switch to wire. Likewise, if you already have wire with fittings that accommodate your boat and mast, stick with wire. Aside from the relative cost differences between rod and wire (rod is more expensive), what also makes a switch pricey is having to significantly modify the mast to accept the different rigging.
Although rod rigging is more common on racing boats, many well-known cruising-boat builders, such as Valiant, Bristol, J/Boats and Hinckley, have rod-rigged models. The benefits of rod are less stretch, less weight, less windage, and arguably longer life than wire, because there’s less possibility for corrosion of the rod itself.
That said, some sailors prefer wire over rod for a number of reasons. First, it’s easier to fix in remote places and on your own. With a spare mechanical end fitting, wire and the proper tools, you can replace a stay pretty much anywhere. Similarly, it’s easier to find usable replacement parts far from busy ports. Wire rigging is generally less expensive and easier to handle. Finally, rod rigging requires a particular type of terminus — called a cold head — that can be fabricated only with a purpose-built machine, which only a rigging shop will have. You cannot use a mechanical fitting on rod rigging.
In the past, long-distance cruisers typically chose wire rigging with mechanical fittings for all of these reasons. They also would carry a piece of wire as long as the longest stay on the boat — coiled and stowed, which undeniably was sometimes easier said than done — as well as spare end fittings and the tools needed to replace a broken shroud or stay. Today, with the advent of super-strong synthetic line such as AmSteel and Dyneema, the need for that extra wire and gear is eliminated. For instance, the Rigging Company makes a spare-stay kit that can accommodate either wire or rod rigging repairs, Cockerill says. It has a synthetic stay with an eye splice, a toolless turnbuckle (the Handy Lock, made by C. Sherman Johnson), quick-release fast pins with an attached lanyard, several high-strength Dyneema loops, and even a heavy-duty zip tie to fish loops in and out of holes in a mast.
“The idea is you come on deck with this small canvas bag and make it happen,” Cockerill says. “Let’s say you ripped a tang out of the mast; you can use a Dyneema loop to create another attachment point. A smaller loop is a makeshift chainplate attachment — you can attach it to a neighboring chainplate and attach the stay to it. It’s good enough to get you to safety and someplace you can make a more permanent repair.” Riggers say very few sailors re-rig from wire to rod or the reverse, but if switching is on your mind, have a professional make a full assessment first.
There are so many variables in the system — types of end fittings, types of masts, types of attachment points — that each boat will have its own specific requirements that can affect cost. For that reason, it’s difficult to give an accurate estimate of the cost of making the switch, even for an average 40-footer.
End Fittings for Sailboat Rigging
All standing rigging, whether rod or wire, has to end in a fitting that attaches to the deck and mast. The three most commonly used types of attachments are swaged and mechanical fittings for wire, and cold heads for rod. Generally, end fittings fall into a few classes: studs, eyes, forks and hooks, each of which comes in a dizzying array of sizes and configurations. There are multiple combinations and variations: For instance, if your mast has double tangs, most likely the end fitting will be an eye — although it can be a marine eye or an aircraft eye, which differ primarily in shape. All rod rigging terminates in a cold head, which accommodates the end fitting or is encapsulated by the end fitting. This could be a marine eye, a marine fork, a T-head or a J-hook, among others.
A swaged fitting is a terminus that’s attached using a machine called a swager. It rolls the end fitting through two opposing dies and compresses the fitting on the wire so tightly that it can’t pull out. “The theory is that you’ve crushed it so tightly that all the wires inside have just merged into one solid piece of stainless,” Madden says. Swaging must be professionally done, and the result is extremely strong and generally has a long life. Top manufacturers of swaged fittings are Hayn Marine Rigging Products, Alexander Roberts and C. Sherman Johnson.
Mechanical fittings can be applied using a few common hand tools by the mechanically handy DIY sailor, which is one reason they’re popular. The two primary manufacturers of mechanical fittings presently are Sta-Lok and Petersen Stainless, which produces Hi-MOD. Both are located in the U.K., and the products are distributed in the U.S. through vendors like Hayn, West Marine, Defender, and local chandleries and riggers. Generally, they consist of either three or four parts (Sta-Lok has three; Hi-MOD has four), including a sleeve; a cone; in Hi-MOD’s case, a crown wheel; and the terminal (an eye, fork, stud, etc.). If you follow directions, they are fairly straightforward to install, although not especially easy. “The mechanical fasteners are great in that you can terminate and then look inside to be sure it’s formed correctly, so you do have a way of inspecting your work,” Madden says.
However, they generally cost more than a swaged fitting; Herman says while Hi-MOD’s newer mechanical fittings are “definitely more user-friendly to assemble, they’re twice the cost of a swaged fitting.” Some riggers will recommend swaged fittings for the mast end of the rigging and mechanical fittings at the deck level: Corrosion is less prevalent at the top of the mast, and you can more easily and regularly inspect mechanical fittings at deck level, where they’re frequently subjected to salt water
Should You Replace Your Sailboat’s Rigging Yourself?
So you’ve determined your sailboat’s standing rigging needs work. Do you hire a pro or go it alone? Good question. Yes, doing it yourself will theoretically save money. For an average 40-foot boat, Cockerill estimates about $100 per foot to re-rig with wire rigging ($4,000), as well as the round-trip cost to haul and launch the boat and unstep and step the rig (an additional $2,500 or so). By taking on the labor yourself, you’ll probably save as much as $2,000 on the re-rigging cost, he says. Madden says that cost isn’t linear, though; as you go up in size (a bigger boat needs heavier wire and larger fittings), you’ll spend more. He’d estimate more like $4,600 for a 40-foot boat, but all of these numbers depend on how much is involved: Are there furlers? What kind of end fittings? Are the chainplates sound? Depending on the answers to those questions and others, a professionally done re-rig for a 40-footer could be closer to $6,000 or more.
If you go DIY, you will be limited to mechanical end fittings unless you hire a rigger to swage your end fittings. The Rigging Company gears much of its sales to DIY sailors and is beginning an e-commerce site to cater specifically to handy individuals. But Cockerill says it quickly becomes evident whether an owner feels comfortable enough to do the work. “You should be mechanically inclined,” he says, “and the way to find that out is if I start talking all this technical jargon and you decide whether you’re suited to handle that at all.”
Additionally, a DIY sailor needs to do plenty of research, particularly when it comes to wire quality, which is something professional sailboat rigging companies watch like hawks. Although anyone can walk into a local chandlery and buy wire, that doesn’t mean the wire is of the highest quality. Marine-suitable stainless wire is called 316 grade, but even that doesn’t mean you’re necessarily getting high-quality wire. Much depends on where it is manufactured; Herman and other riggers say the best wire today is coming from South Korea through a manufacturer called KOS, making wire to military specifications. It’s imported and sold through distributors like Alps Wire Rope.
“We only sell guaranteed-content, guaranteed-process wire,” Herman says. “There are other wires out there that are cheaper, but they’re not guaranteed.”
As for sources of wire and fittings, there are many, including major chandleries and vendors, like West Marine and Defender, as well as some private riggers, like Annapolis Rigging and the Rigging Company, which will work with you to define what you need and help you source parts and materials.
One thing all the riggers I spoke with expressed emphatically was that stainless steel needs oxygen to create a fine film of oxidation that protects the metal. The fastest route to crevice corrosion is to cover the metal with plastic or leather turnbuckle covers or to coat the fittings in tape. Enough tape to cover a cotter pin suffices; otherwise, leave the metal open to the air. Likewise, if you are re-rigging your sailboatboat, use the opportunity to check your chainplates (easily the subject of another article entirely), since that’s one of the most common points of rigging failure.
Another factor in your DIY decision-making process is simple: peace of mind. “Most of my clients say to me without any prompting, ‘This is one area I feel should be done by a professional,’’’ Madden says. “You’re out there offshore and there’s a squall coming and you start worrying about the craziest of things, and you don’t want to have any unknowns.” That’s especially true of the system that keeps the mast and sails up.
Wendy Mitman Clarke is currently between passages. She’s the director of media relations at Washington College in Chestertown, Maryland, and she and her family continue to pine and plan for the day they can return to the cruising life.
- More: How To , mast , Refits , rig , rigging , sails and rigging , Upgrades
- More How To
It’s Time to Rethink Your Ditch Kit
8 ways to prevent seasickness, how to de-winterize your diesel engine, for sale: hallberg-rassy 46, the reality of fixing up an old boat, meet the wauquiez 55, new program for female sailors.
- Digital Edition
- Customer Service
- Privacy Policy
- Terms of Use
- Email Newsletters
- Cruising World
- Florida Travel + Life
- Sailing World
- Salt Water Sportsman
- Sport Fishing
- Wakeboarding
Many products featured on this site were editorially chosen. Cruising World may receive financial compensation for products purchased through this site.
Copyright © 2024 Cruising World. A Bonnier LLC Company . All rights reserved. Reproduction in whole or in part without permission is prohibited.
- New Sailboats
- Sailboats 21-30ft
- Sailboats 31-35ft
- Sailboats 36-40ft
- Sailboats Over 40ft
- Sailboats Under 21feet
- used_sailboats
- Apps and Computer Programs
- Communications
- Fishfinders
- Handheld Electronics
- Plotters MFDS Rradar
- Wind, Speed & Depth Instruments
- Anchoring Mooring
- Running Rigging
- Sails Canvas
- Standing Rigging
- Diesel Engines
- Off Grid Energy
- Cleaning Waxing
- DIY Projects
- Repair, Tools & Materials
- Spare Parts
- Tools & Gadgets
- Cabin Comfort
- Ventilation
- Footwear Apparel
- Foul Weather Gear
- Mailport & PS Advisor
- Inside Practical Sailor Blog
- Activate My Web Access
- Reset Password
- Pay My Bill
- Customer Service

- Free Newsletter
- Give a Gift
Cal 2-46: A Venerable Lapworth Design Brought Up to Date

Rhumb Lines: Show Highlights from Annapolis

Open Transom Pros and Cons

Mailport: Charley Morgan, Locker Safety, Fast Bottom Paint

Do-it-yourself Electrical System Survey and Inspection

Install a Standalone Sounder Without Drilling

The Tricked Out Tillerpilot

Resolving Common Steering Problems

Top-notch Wind Indicators

The Everlasting Multihull Trampoline

In Search of the Snag-free Clew

The Cruising Sailor’s Argument for High-tech Fibers

Breaking Point: What Can Go Wrong With Your Yanmar?

Rudder Mods for Low-speed Docking

Using Heat to Bend PVC Pipe

Mildew-resistant Caulks for Boats

Can We Trust Plastic Boat Parts?

Repairing Molded Plastics

Mailport: Marine plywood, fuel additives, through bolt options, winch handle holders

The Day Sailor’s First-Aid Kit

Choosing and Securing Seat Cushions

Cockpit Drains on Race Boats

Rhumb Lines: Livin’ the Wharf Rat Life

Resurrecting Slippery Boat Shoes

Shoe Goo’s Gift to Sailors

PS Advisor: Tank Monitor and Camera Mount Hacks

Tricks and Tips to Forming Do-it-yourself Rigging Terminals

Marine Toilet Maintenance Tips

Learning to Live with Plastic Boat Bits

The Ultimate Guide to Caring for Clear Plastic

Preventing Mildew in Marine Fabrics
- Sails, Rigging & Deck Gear
Standing Rigging: How Tight Is Right?
Standing rigging tension is a peculiarly under-addressed subject. Easy to see how it would worry a new boat owner or someone going to sea.
Most experts step aboard, yank or twang the shrouds and stays and mutter, Pretty slack, Too Tight, or, Thats about right.
Youll find in the sailing literature very few discussions of the question: What does tight mean?
Even riggers rarely explain how much tension they like to see.
There are a few sailors who like the rigging so tight you could send an elephant up the backstay. It can result in excessive loads and wear on fittings, chain plates and the hull. The ultimate penalty for those who can’t stand any sag in the forestay is what ocean racing sailors call a gravity storm or, less dramatically, dropping the rig.
Others like to take up the slack just enough so that the rig is at rest when the boat is motionless. This approach sometimes leaves excessive slack to leeward that can result in shock loads, excessive wear and misalignment in fittings. It may take longer, but the ultimate penalty is the same.
In between (and probably in the most logical position) are those who like to take up the slack and stretch the wire just a bit. This is frequently accomplished, at least for the stays, with an adjustable backstay. When sailing, especially on the wind, tighten down to minimize slack in the forestay. When reaching, running or at anchor, ease off.
But the question is: How much stretch…especially in the shrouds?
If you stretch the wire 5% of its breaking strength, it will be considered moderate tension. Crank in 15% of the breaking strength and it is regarded as tight. These figures apply for any diameter of wire. You need only know the wires breaking strength.
Three years ago, in the June 15, 1995 issue, we published a discussion of the views of author Richard Henderson, Skenes Elements of Yacht Design and several riggers, along with an evaluation of an excellent booklet published by Sailsystems about a Selden Mast approach (described in detail in the October 15, 1991 issue) and an entirely new method developed by Michael Dimen, who called his gadget a Rigstick.
Mentioned was the familiar (see photo) Loos rigging tension gauge, which comes in two sizes. The Model 91 ($39) is for wire 3/32″ to 5/32″. The Model 90 ($45.50) is for 3/16″ to 9/32″. The gauge depends on the bending property of aluminum plate.
The strange-looking gauges don’t willingly produce great accuracy because you have to hold one reading steady while noting another, which also requires that you make a judgment about where the centerline of the wire falls on a scale. Not easy to do.
The big name in galvanized and stainless cable (as wire is called in the trade), cable hardware and tools, Loos & Co., Inc. went looking for a better mousetrap.
Who did Gus Loos go to? The guy who designed the original gauge, his old friend, Donald J. Jordan, an 82-year-old retired Pratt & Whitney engineer who has been sailing out of Marblehead, Massachusetts, in the likes of Lightnings, Friendship sloops, Sound Schooners (which was the prized New York Yacht Club class in 1918), Pearson Wanderers and currently in a 16′ Starling Burgess design, appropriately called a Marblehead.
The old tension gauge wasnt bad, said Jordan. But it tended to get bent. Then the patent ran out and I told Gus we could do a better one.
The new version (see photo) is a distinct improvement over the old aluminum version. A better design, its also much more substantially made of aluminum, stainless and nylon.
The design problems were interesting, Jordan said. A conventional cable tension gauge has two rollers at the ends with a spring-loaded plunger in the middle and a dial gauge to measure the plunger movement. The wheels have to rotate…because they must permit some small but vital movement. That makes the tool expensive. My approach was to have two stationary wheels and a carefully contrived square slider in a arc-slot on the other.
The new Loos gauges use a long-lasting stainless spring to produce the tension. Slip the lower grooved wheels on a shroud or stay, pull the lanyard to engage the upper hook, relax, read the tension at your leisure and consult the scale to learn the pounds of pressure on the wire and the percentage of breaking strength of the wire. There are three wire gauge notches in the edge. The gauge can be left on the wire while turnbuckle adjustments are made.
The accompanying booklet, very well-done, contains a good tight discussion of the subject; some recommendations; a table on how to equalize tension in different sizes of wire, and line-drawn diagrams clearly showing rig tensions (windward and leeward) created by light, medium and heavy winds.
The wire gauge comes in three sizes, for 3/32″-5/32″, 3/16″-1/4″ and 9/32″-3/8″. West Marine sells them, respectively, for $57.99, $69.99 and $$122.99. Defender Industries cuts them to $49.95, $51.95 and $105.95. Prices in the BOAT/U.S. catalog are in between.
What if, instead of 1×19 wire, you have rod rigging? There are four new models that are bigger, heavier and, of course, more costly. They work the same, but take some arm strength. One is for .172-.250 rod, another for .281-.375. Two others models are for metric rod. West Marine sells the rod gauges for $186.99. Neither Defender nor BOAT/U.S. shows them in their catalogs.
Contact- Loos & Co., Inc., 901 Industrial Blvd., Naples, FL 34104, 800/321-5667. Rigstick, 311 Jackson, Port Townsend, WA 98368; 800/488-0855. Sailsystems, PO Box 1218, Marblehead, MA 01945; 978/745-0440.
RELATED ARTICLES MORE FROM AUTHOR
Leave a reply cancel reply.
Log in to leave a comment
- Privacy Policy
- Do Not Sell My Personal Information
- Online Account Activation
- Privacy Manager

We are your Guiding Light.
Boston harbor's premier sailboat rigging and marine systems service company., sailboat rigging and more., marine systems service.
JN Rigging provides sailboat rigging, marine systems and mechanical services to New England's discerning sailors. We specialize in outfitting cruising sailboats for extended offshore passage-making. We strive to create quality rigging and marine systems solutions, blending traditional techniques with modern approach and materials. We also proudly offer the latest in marine energy products, including highly-efficient flexible solar power, hydro-electric generation and lithium-ion battery systems. We aim to help advance yacht systems technology forward to create truly self-reliant and sustainable energy solutions for our customers.
JN Rigging works with a variety of clients and sailing vessels of all shapes and sizes, from the small dinghy sailer to larger high-performance cruising and racing craft. Additionally, we provide sailing product and system design support and consultation to several boat builders and sailing equipment manufacturers. We're always looking for new and interesting ways to apply our knowledge and skills.
Located at the historic Hingham Shipyard, JN Rigging strives to be the trusted resource and purveyor of quality rigging products, service and consultation to the Boston and South Shore sailing communities, and beyond.
Check out our latest projects!
News & updates, check out and subscribe to our blog..
Copyright © 2020 JN Rigging, LLC. All rights reserved.
Standing Rigging (or ‘Name That Stay’)
Published by rigworks on november 19, 2019.
Question: When your riggers talk about standing rigging, they often use terms I don’t recognize. Can you break it down for me?
From the Rigger: Let’s play ‘Name that Stay’…

Forestay (1 or HS) – The forestay, or headstay, connects the mast to the front (bow) of the boat and keeps your mast from falling aft.
- Your forestay can be full length (masthead to deck) or fractional (1/8 to 1/4 from the top of the mast to the deck).
- Inner forestays, including staysail stays, solent stays and baby stays, connect to the mast below the main forestay and to the deck aft of the main forestay. Inner forestays allow you to hoist small inner headsails and/or provide additional stability to your rig.
Backstay (2 or BS) – The backstay runs from the mast to the back of the boat (transom) and is often adjustable to control forestay tension and the shape of the sails.
- A backstay can be either continuous (direct from mast to transom) or it may split in the lower section (7) with “legs” that ‘V’ out to the edges of the transom.
- Backstays often have hydraulic or manual tensioners built into them to increase forestay tension and bend the mast, which flattens your mainsail.
- Running backstays can be removable, adjustable, and provide additional support and tuning usually on fractional rigs. They run to the outer edges of the transom and are adjusted with each tack. The windward running back is in tension and the leeward is eased so as not to interfere with the boom and sails.
- Checkstays, useful on fractional rigs with bendy masts, are attached well below the backstay and provide aft tension to the mid panels of the mast to reduce mast bend and provide stabilization to reduce the mast from pumping.
Shrouds – Shrouds support the mast from side to side. Shrouds are either continuous or discontinuous .
Continuous rigging, common in production sailboats, means that each shroud (except the lowers) is a continuous piece of material that connects to the mast at some point, passes through the spreaders without terminating, and continues to the deck. There may be a number of continuous shrouds on your boat ( see Figure 1 ).
- Cap shrouds (3) , sometimes called uppers, extend from masthead to the chainplates at the deck.
- Intermediate shrouds (4) extend from mid-mast panel to deck.
- Lower shrouds extend from below the spreader-base to the chainplates. Fore- (5) and Aft-Lowers (6) connect to the deck either forward or aft of the cap shroud.
Discontinuous rigging, common on high performance sailboats, is a series of shorter lengths that terminate in tip cups at each spreader. The diameter of the wire/rod can be reduced in the upper sections where loads are lighter, reducing overall weight. These independent sections are referred to as V# and D# ( see Figure 2 ). For example, V1 is the lowest vertical shroud that extends from the deck to the outer tip of the first spreader. D1 is the lowest diagonal shroud that extends from the deck to the mast at the base of the first spreader. The highest section that extends from the upper spreader to the mast head may be labeled either V# or D#.
A sailboat’s standing rigging is generally built from wire rope, rod, or occasionally a super-strong synthetic fibered rope such as Dyneema ® , carbon fiber, kevlar or PBO.
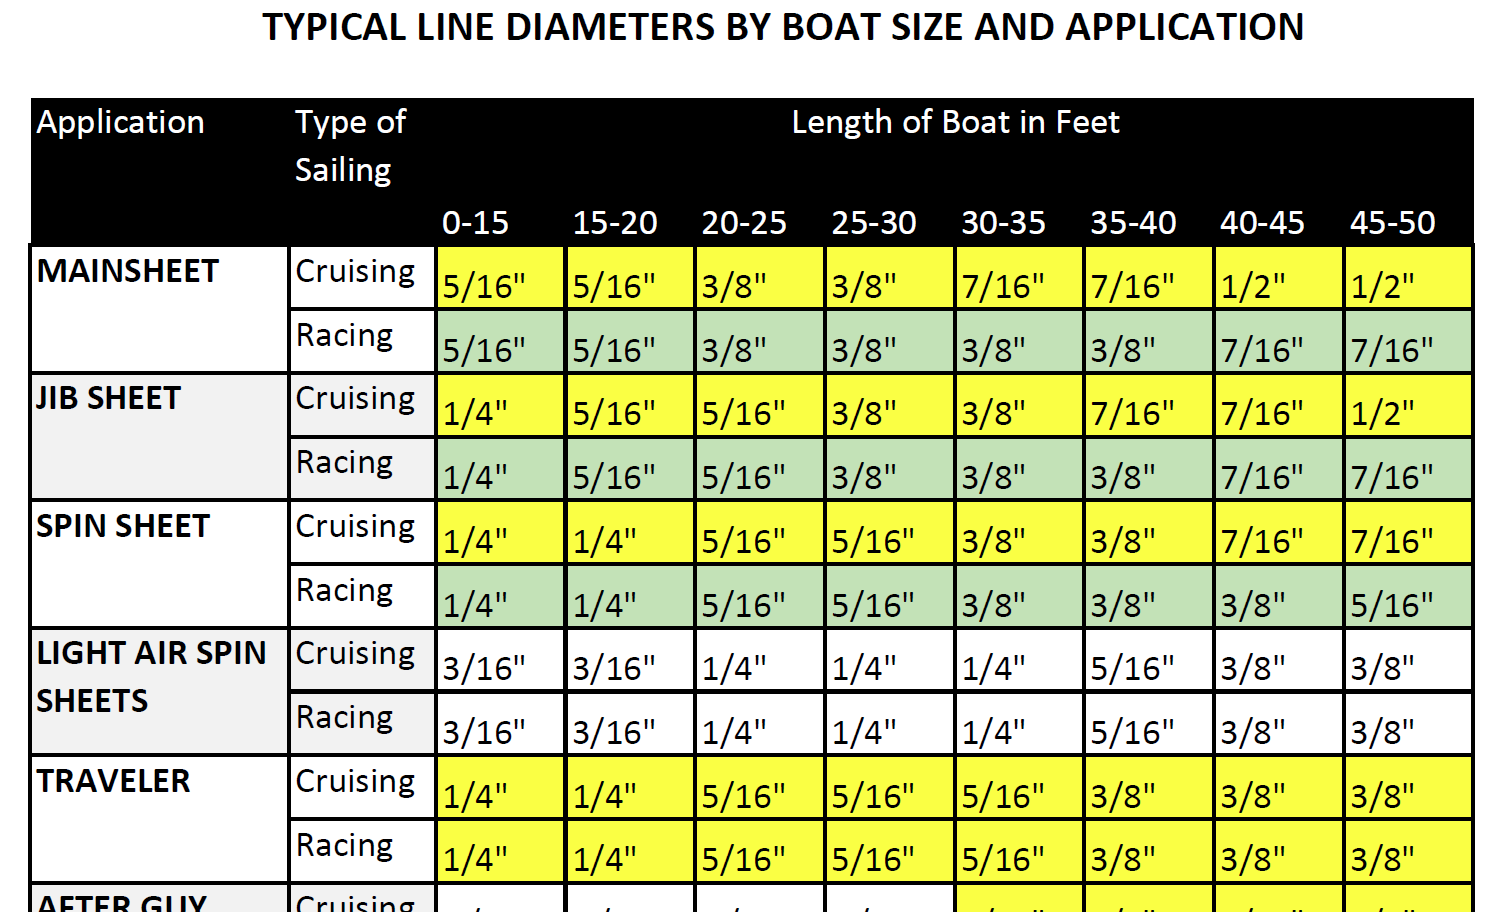
- 1×19 316 grade stainless steel Wire Rope (1 group of 19 wires, very stiff with low stretch) is standard on most sailboats. Wire rope is sized/priced by its diameter which varies from boat to boat, 3/16” through 1/2″ being the most common range.
- 1×19 Compact Strand or Dyform wire, a more expensive alternative, is used to increase strength, reduce stretch, and minimize diameter on high performance boats such as catamarans. It is also the best alternative when replacing rod with wire.
- Rod rigging offers lower stretch, longer life expectancy, and higher breaking strength than wire. Unlike wire rope, rod is defined by its breaking strength, usually ranging from -10 to -40 (approx. 10k to 40k breaking strength), rather than diameter. So, for example, we refer to 7/16” wire (diameter) vs. -10 Rod (breaking strength).
- Composite Rigging is a popular option for racing boats. It offers comparable breaking strengths to wire and rod with a significant reduction in weight and often lower stretch.
Are your eyes crossing yet? This is probably enough for now, but stay tuned for our next ‘Ask the Rigger’. We will continue this discussion with some of the fittings/connections/hardware associated with your standing rigging.
Related Posts
Ask the Rigger
Do your masthead sheaves need replacing.
Question: My halyard is binding. What’s up? From the Rigger: Most boat owners do not climb their masts regularly, but our riggers spend a lot of time up there. And they often find badly damaged Read more…
Selecting Rope – Length, Diameter, Type
Question: Do you have guidelines for selecting halyards, sheets, etc. for my sailboat? From the Rigger: First, if your old rope served its purpose but needs replacing, we recommend duplicating it as closely as possible Read more…
Spinlock Deckvest Maintenance
Question: What can I do to ensure that my Spinlock Deckvest is well-maintained and ready for the upcoming season? From the Rigger: We are so glad you asked! Deckvests need to be maintained so that Read more…
Rod Rigging Replacement Cost: 2023 Breakdown
Although rod rigging is stronger and lighter than wire rigging, over time it can still wear out and need replacement. You can replace the rod rigging on your boat all by yourself, but you still need to spend money on materials and equipment. If you're curious about the overall replacement costs, let's break down how much you need to prepare to replace your rod rigging in 2023 and provide tips for reducing your overall costs.
The cost of rod rigging replacement ranges from $8,000 to $20,000. The cost of materials averages from $5,000 to $10,000, while the cost of labor is between $2,000 and $5,000. Expenses for equipment range from $1,000 to $2,000, while the cost of permits or inspections is estimated to be around $500 to $1,000.
The three types of materials commonly used in rod rigging are stainless steel, nitronic 50 stainless steel, and synthetic rigging. The cost of each material per foot will affect the overall cost of replacing rod rigging. Let's compare the prices of each material per foot.
- You will only need to spend around $6,000–$15,000 for materials and equipment for DIY rod rigging replacement.
- Budget at least $1,000–$2,000 for high-quality equipment to help lower long-term maintenance costs.
- A more experienced professional rigger usually charges a high rate, around $50-$150 per hour, but they may also be able to complete the replacement more efficiently and with higher quality.
- Synthetic rigging is the lightest and strongest option, as well as the one with the highest upfront costs, ranging from $25 - $50 per foot.
- If your boat is valued at $100,000, the estimated insurance cost for rod rigging replacement could be around $1,000–$2,000 (which is around 1-2% of the total value of the boat).

Detailed Breakdown Of Rod Rigging Replacement Costs In 2023
Below are the main cost factors involved in rod rigging replacement:
Account for rod rigging material costs
Rod rigging is typically more expensive than wire rigging, but it is also more durable and can last for about 10–20 years. . The estimated cost ranges from $5,000 - $10,000.
There are several types of materials that can be used for rod rigging replacement, and each comes with different costs:
Stainless steel is known for its strength and durability
Stainless steel is also a popular choice for rigging because it is resistant to corrosion and is relatively easy to maintain. It is often used in cruising boats and is suitable for most sailing conditions. Here's our article about the advantages of using stainless steel for rigging .
Nitronic 50 stainless steel has a higher tensile strength than the regular one
Nitronic 50 stainless steel is a high-performance material that is becoming increasingly popular in the sailing industry because it is more resistant to elongation, corrosion, and fatigue cycling.
It is also lighter and has less windage per foot of wire rigging. As a result, it is often used in racing boats where weight and wind resistance are critical factors. It is also often considered as an alternative material to stainless steel when replacing standing riggings .
Synthetic rigging is made from woven high-strength fibers
Synthetic rigging, such as Dyneema or composite rigging, is a relatively new development in the sailing industry. It is made from high-strength fibers that are woven together to create a lightweight and strong rigging system.
It is often used in racing boats due to its low weight and wind resistance. It is also becoming more popular in cruising boats due to its ease of handling and maintenance. If you're opting for Dyneema as your choice of material, here's how much it can cost.
Factor in the labor costs
The estimated cost range of hiring a professional rigger ranges from $2,000 - $5,000 depending on the hourly rate of the professional and the time required for the replacement. On average, hourly rates for rigging professionals range from $50-$150 per hour.
Now, the time required for rod rigging replacement depends on the size of the boat and the complexity of the rigging system but it can take anywhere from a few days to a few weeks to complete. This includes the time needed to remove the old rigging, install the new rigging, and perform any necessary adjustments and tuning.
Note that some professionals may charge a flat fee for the entire project, while others may charge an hourly rate. Try to get quotes from multiple professionals to compare costs and ensure that all aspects of the replacement are included in the quote.
You might also want to consider the experience level and reputation of the professional hired, as a more experienced professional may charge a higher rate but may also be able to complete the replacement more efficiently and with higher quality.
Take into consideration the cost of equipment
The estimated cost range allotted for equipment is around $1,000 - $2,000. Some common equipment needed includes rigging tools such as wire cutters, swage tools, and turnbuckle wrenches, as well as hardware such as clevis pins, cotter pins, and thimbles.
Perhaps consider the specific needs of the project when selecting equipment, as some boats may require specialized equipment that can increase the cost. Higher-quality equipment may be more expensive, but can also be more durable and reliable, leading to lower long-term maintenance costs. Cheaper equipment may be more affordable, but can also be more prone to breaking or wearing out quickly.
Budget for permits or inspections
Some common permits required may include permits for working in a marina or boatyard, permits for working in a protected or environmentally sensitive area, or permits for working on a historic or landmark vessel. You could research the specific permits required for the location and type of boat before starting the replacement.
Some locations may require inspections of the rigging system after the replacement is complete. For example, some states may require a safety inspection of the rigging system before the boat can be launched. Some permits may also be free, while others may require a fee.
Prepare for insurance costs
A rough estimate for insurance costs could be around 1-2% of the total value of the boat. So if the boat is valued at $100,000, the estimated insurance cost for rod rigging replacement could be around $1,000-$2,000.
If you have insurance for your sailboat , try to check your policy to see if it covers rod rigging replacement. Some insurance companies may cover the cost of replacement if the rigging fails due to normal wear and tear or if it is damaged in an accident. However, some policies may only cover the cost of replacement if the rigging fails due to a specific cause, such as a lightning strike.
If your boat is older and has a lower value, it may not be worth the cost of replacing the rigging. However, if your boat is newer and has a higher value, it may be worth the investment to ensure that your rigging is in good condition.
Recommendations To Reduce Overall Replacement Costs
Below are some tips to cut down on the overall costs of replacing rod rigging:
1. A regular inspection ensures the safety and longevity of your rod rigging
Over time, rod rigging can weaken and become more prone to failure, especially if it is exposed to harsh sailing conditions, which is why regular inspection is needed. In fact, manufacturers recommend replacing the standing rigging at least every 10–15 years.
Regular inspection involves checking the condition of the rod rigging and looking for signs of wear, corrosion, or damage. You can do this inspection yourself or hire a professional to do it for you. If you choose to do it yourself, you may need to have the necessary knowledge and tools to do it safely and effectively.
One way to inspect your rod rigging is to use a magnifying glass to look for signs of wear or corrosion. You should also check the fittings and connections for signs of damage or wear. If you notice any issues, it's important to address them right away to prevent further damage.
Regular inspection can help you catch potential problems before they become major issues. By catching problems early, you can save yourself time and money in the long run. It's much cheaper to replace a few pieces of rod rigging than to replace the entire rigging system.
In addition to regular inspection, you also need to know when to replace your rod rigging. Rod rigging typically has a lifespan of around 8–10 years, depending on factors such as sailing conditions and age. If your rod rigging is approaching this age, it's a good idea to start planning for its replacement.
2. Consider DIY options
The cost of DIY rod rigging replacement depends on the specific needs of the project, but on average, the cost of materials and equipment can range from $6,000-$15,000.
Doing the rod rigging replacement yourself can save you a significant amount of money on labor costs as well as potential equipment rental. It can also be a rewarding and educational experience for boat owners who want to learn more about their rigging system.
However, without proper experience and training, DIY replacement can be dangerous and can result in mistakes that can compromise the safety and performance of the rigging system. Additionally, it may not be covered by insurance, which can be a significant risk in the event of an accident.
Leave a comment
You may also like, what's the life expectancy of rod rigging.
Rod rigging has several advantages over traditional rigging, including increased strength, reduced weight, and improved aerodynamics, which explains why it is …

Average Cost to Replace Standing Rigging (with Examples)

How Often Should Standing Rigging Be Replaced? (Minimally)

Exact Cost To Replace Standing Rigging in Australia

Average Cost of Dyneema Rigging (Different Rig Types)
Own your first boat within a year on any budget.
A sailboat doesn't have to be expensive if you know what you're doing. If you want to learn how to make your sailing dream reality within a year, leave your email and I'll send you free updates . I don't like spam - I will only send helpful content.
Ready to Own Your First Boat?
Just tell us the best email address to send your tips to:
This page is currently offline due to an unexpected error. We are very sorry for the inconvenience and will fix it as soon as possible.
Advice for developers and administrators: Enable debug mode to get further information about the error.
Service Locator
- Angler Endorsement
- Boat Towing Coverage
- Mechanical Breakdown
- Insurance Requirements in Mexico
- Agreed Hull Value
- Actual Cash Value
- Liability Only
- Insurance Payment Options
- Claims Information
- Towing Service Agreement
- Membership Plans
- Boat Show Tickets
- BoatUS Boats For Sale
- Membership Payment Options
- Consumer Affairs
- Boat Documentation Requirements
- Installation Instructions
- Shipping & Handling Information
- Contact Boat Lettering
- End User Agreement
- Frequently Asked Questions
- Vessel Documentation
- BoatUS Foundation
- Government Affairs
- Powercruisers
- Buying & Selling Advice
- Maintenance
- Tow Vehicles
- Make & Create
- Makeovers & Refitting
- Accessories
- Electronics
- Skills, Tips, Tools
- Spring Preparation
- Winterization
- Boaters’ Rights
- Environment & Clean Water
- Boat Safety
- Navigational Hazards
- Personal Safety
- Batteries & Onboard Power
- Motors, Engines, Propulsion
- Best Day on the Water
- Books & Movies
- Communication & Etiquette
- Contests & Sweepstakes
- Colleges & Tech Schools
- Food, Drink, Entertainment
- New To Boating
- Travel & Destinations
- Watersports
- Anchors & Anchoring
- Boat Handling
Inspecting Sailboat Rigging
Advertisement
Here's how to go over your rig with a fine tooth comb.

Sight up the mast. Is it straight?
If there's one thing production sailboats have in common, it's that nearly all of them use stainless-steel standing rigging, whether wire or rod. There are likely also stainless steel fittings, chainplates and turnbuckles. Stainless steel is a great material for rigging but has its Achilles heel: corrosion. Stainless steel in a saltwater environment will eventually suffer from some form of corrosion, whether it's stress-crack corrosion, fatigue cracking or crevice corrosion. Sailboat rigging in freshwater may also suffer from stress and fatigue cracking (see below). What might appear to be a small crack or area of pitting will degrade the fitting by eating away at the metal. Any cracks or corrosion will weaken the fitting, and the failure of a single fitting can bring down a rig.
Stainless Steel Failures
Stainless-steel rigging under heavy stress can have stress cracking or fractures that will often be identified by hairline cracks. These cracks will lead to stress-crack corrosion and crevice corrosion in the saltwater environment.

Crevice corrosion can also develop in areas of pitting when the stainless steel is devoid of oxygen. This is the most common form of corrosion on a stainless-steel chainplate. This chainplate was cut in half to demonstrate how far the pitting went into the metal.

1. Take a look at the overall rig
Sight up the rig from deck level. How is the geometry? All stays and shrouds should be run without any bends and at even angles. Are there hard spots or kinks where a stay has an awkward bend? Standing in front of the mast, sight up from the base. Is the mast in column (straight)? There should be no bends in the mast side-to-side or facing forward. Walk around to all of the shrouds and stays and give them a pull. They all should feel roughly at the same tension. To be accurate, you would want to use a tension gauge. But when I first start inspecting a rig, I'm mostly trying to get a feel if anything appears to be dramatically out of tune.

Left: Inspect swages carefully for corrosion; this swage has broken strands. Right: This crack was only visible after cleaning off the surface rust.
2. Inspect all the deck fittings and wire.
If the mast is deck-stepped, start at the base, looking for corrosion on the step and cracks in the base of the mast. Then working clockwise to make sure you don't miss anything, inspect all fittings from eye level to deck level including swages/mechanical fittings, turnbuckles, chainplates, and toggles. Start with the wire at eye level, and scan downward, checking for rust and broken strands. For rod rigging, we're looking for cracks or corrosion. Take a good look for corrosion where the wire enters the swage or mechanical fitting. Next check the t-bolts, tangs, turnbuckles, and pins. Clean any rust off with the Scotch-Brite pad. This is important: anything more than light rust staining could be an indication of crevice corrosion, which weakens the metal. You may not be able to remove all of the rust, but you do need to see the underlying metal. Use your magnifying glass to look for cracks and pitting on the fitting. The turnbuckles should be straight without any bend to them. Inspect the condition of the threads of the stud. Ensure the turnbuckles have locking pins. Photograph the fittings, especially where you think you have sighted a crack or pitting. Get up close with the camera on the macro setting and make sure that the area of concern is in focus; this is important when you enlarge the photo later.

This chainplate has a crack just above where it passes through the deck.
3. Pay attention to the chainplates.
Inspect the caulking where it enters the deck; it should not be cracked or peeling. Look for cracks in the chainplates on the edges and especially around the pinholes. For external chainplates, inspect along the edges for cracks and rust blooms. A small amount of rust may be OK; it might just be staining, though it should still be investigated. But significant rust is a sign that there may be crevice corrosion, which is a reason to pull and inspect the chainplates. Unfortunately, the area that is probably affected the most is buried and not visible unless the chainplate is removed. Stainless-steel corrosion happens much faster when there is no oxygen present — like where the chainplates pass through the deck, which is why we'll inspect them belowdecks as well.

Look for peeling paint, which may be a sign of corrosion, and cracks at the gooseneck and other boom fittings.
4. Inspect all attachments to the mast and boom on deck and at eye level.
Inspect the gooseneck fitting for the mast and the vang attachment for corrosion or cracks. Any attachment points on the boom for running rigging also need to be inspected. Again, take close-up photos if you find any problems. Check all blocks to make sure they turn freely. All shackles should be secured with seizing wire. The winches need to turn freely and stop when the direction is reversed. Do the line stoppers stop the line? Give the line a good tug with the line stopper closed. There should be no movement. Inspect each piece of the running rigging for wear. What is the condition of the halyard and the safety line (a second halyard) you will use for going aloft? Don't take chances here.

Check for white powder and pitting on aluminum mast steps and at the base of the mast.
5. Inspect the condition of the mast step.
Mast steps here are often in a damp environment, and a lot of mast steps are made from non-stainless steel on older boats, which can rust. Some boats have an aluminum mast step. If the step or base of the mast is corroding, it will have white powder on it. Remove the powder and look for pitting underneath. If you find pitting here, or on any other aluminum fitting, such as the mast or boom, have a rigger follow up with a professional inspection.

Painting chainplates is a bad idea because it hides corrosion. Once rust is visible through the paint, the corrosion is severe, and the chainplate will need to be replaced.
6. Go below to take a look at the chainplates.
Are there signs of water intrusion on the bulkheads? You might have to remove some cover panels to gain access to the chainplates. Are there signs of rust? Clean any rust with your nylon pad. Use a flashlight and your magnifying glass to inspect the chainplate carefully. Pay close attention to the edges of the chainplate for rust and cracks. Cracks and corrosion can develop behind the chainplate and where it passes through the deck. Again, these are areas that are deprived of oxygen where crevice corrosion will develop. Chainplates don't last forever, and if you want to be absolutely sure you can count on them, I'd recommend replacing them after 20 years of service or if there are any signs of crevice corrosion, which can happen in less than 15 years in harsh environments.

Broken wire at swage fitting on a catamaran mast head.
7. If you found no deficiencies then it is time to go up the mast.
If you are not comfortable, then I recommend having a professional rigger conduct the aloft part of the inspection. Never do this by yourself, even if you have a hoist that allows you to do so. Have someone there to assist you and to manage your safety line. For the aloft portion of the inspection, work your way up from the bottom, rather than starting at the top. This way, if you are at the spreaders and find a cracked swage fitting, you can make the decision to stop. This part of the inspection will be conducted in the same manner as the lower fittings and chainplates, this time also paying close attention to where fasteners are installed into the mast. On an unpainted aluminum mast, we are looking for the white powder and pitting which are signs of corrosion and can lead to hairline cracks. Again, if you clean the powder away and find pitting, you'll need to have a professional rigger take a look. On a wooden mast, you're looking for soft wood and discoloration where the fastener goes into the wood. For carbon fiber you're looking for cracks. Inspect the spreader ends and tips for wear and the condition of the boots.
8. Thought you were finished?
Not yet. Now go find somewhere comfortable and view all of your photos on a tablet or computer. Enlarge them to help find any cracks or pitting. This is why you took your photos in order and made notes about what was what. Discuss any of your findings that concern you with a professional rigger. Save all of your photos in a file so you can compare them the next time you do the inspection.
Now that you've done a bottom-to-top rig inspection, you can feel more comfortable the next time the wind pipes up. At the beginning of each season, take an hour or so to re-inspect the rig, focusing on the areas you might have noted to keep an eye on.
Related Articles
The truth about ceramic coatings for boats.
Our editor investigates the marketing claims of consumer-grade ceramic coatings.
Fine-Tune Your Side Scan Fishfinder
Take your side-scanning fishfinder off auto mode, and you’ll be spotting your prey from afar in no time
DIY Boat Foam Decking
Closed-cell foam flooring helps make boating more comfortable. Here’s how to install it on your vessel
Click to explore related articles
Dylan Bailey
Contributor, BoatUS Magazine
Dylan Bailey is a marine surveyor with more than 30 years in the marine industry.
BoatUS Magazine Is A Benefit Of BoatUS Membership
Membership Benefits Include:
Subscription to the print version of BoatUS Magazine
4% back on purchases from West Marine stores or online at WestMarine.com
Discounts on fuel, transient slips, repairs and more at over 1,200 businesses
Deals on cruises, charters, car rentals, hotel stays and more…
All for only $25/year!
We use cookies to enhance your visit to our website and to improve your experience. By continuing to use our website, you’re agreeing to our cookie policy.
No products in the cart.
Sailing Ellidah is supported by our readers. Buying through our links may earn us an affiliate commission at no extra cost to you.
The Running Rigging On A Sailboat Explained
The running rigging on a sailboat consists of all the lines used to hoist, lower, and control the sails and sailing equipment. These lines usually have different colors and patterns to easily identify their function and location on the vessel.
Looking at the spaghetti of lines with different colors and patterns might get your head spinning. But don’t worry, it is actually pretty simple. Each line on a sailboat has a function, and you’ll often find labels describing them in the cockpit and on the mast.
In this guide, I’ll walk you through the functions of every component of the running rigging. We’ll also look at the hardware we use to operate it and get up to speed on some of the terminology.
The difference between standing rigging and running rigging
Sometimes things can get confusing as some of our nautical terms are used for multiple items depending on the context. Let me clarify just briefly:
The rig or rigging on a sailboat is a common term for two parts, the standing , and the running rigging.
- The standing rigging consists of wires supporting the mast on a sailboat and reinforcing the spars from the force of the sails when sailing. Check out my guide on standing rigging here!
- The running rigging consists of the halyards, sheets, and lines we use to hoist, lower, operate and control the sails on a sailboat which we will explore in this guide.
The components of the running rigging
Knowing the running rigging is an essential part of sailing, whether you are sailing a cruising boat or crewing on a large yacht. Different types of sailing vessels have different amounts of running rigging.
For example, a sloop rig has fewer lines than a ketch, which has multiple masts and requires a separate halyard, outhaul, and sheet for its mizzen sail. Similarly, a cutter rig needs another halyard and extra sheets for its additional headsail.
You can dive deeper and read more about Sloop rigs, Ketch Rigs, Cutter rigs, and many others here .
Take a look at this sailboat rigging diagram:
Lines are a type of rope with a smooth surface that works well on winches found on sailboats. They come in various styles and sizes and have different stretch capabilities.
Dyneema and other synthetic fibers have ultra-high tensile strength and low stretch. These high-performance lines last a long time, and I highly recommend them as a cruiser using them for my halyards.
A halyard is a line used to raise and lower the sail. It runs from the head of the sail to the masthead through a block and continues down to the deck. Running the halyard back to the cockpit is common, but many prefer to leave it on the mast.
Fun fact: Old traditional sailboats sometimes used a stainless steel wire attached to the head of the sail instead of a line!
Jib, Genoa, and Staysail Halyards
The halyard for the headsail is run through a block in front of the masthead. If your boat has a staysail, it needs a separate halyard. These lines are primarily untouched on vessels with a furling system except when you pack the sail away or back up. Commonly referred to as the jib halyard.
Spinnaker Halyard
A spinnaker halyard is basically the same as the main halyard but used to hoist and lower the spinnaker, gennaker, or parasailor.
The spinnaker halyard is also excellent for climbing up the front of the mast, hoisting the dinghy on deck, lifting the outboard, and many other things.
A sheet is a line you use to control and trim a sail to the angle of the wind . The mainsheet controls the angle of the mainsail and is attached between the boom and the mainsheet traveler . The two headsail sheets are connected to the sail’s clew (lower aft corner) and run back to each side of the cockpit.
These are control lines used to adjust the angle and tension of the sail. It is also the line used to unfurl a headsail on a furling system. Depending on what sail you are referring to, this can be the Genoa sheet , the Jib sheet , the Gennaker sheet , etc.
The outhaul is a line attached to the clew of the mainsail and used to adjust the foot tension. It works runs from the mainsail clew to the end of the boom and back to the mast. In many cases, back to the cockpit. On a boat with in-mast furling , this is the line you use to pull the sail out of the mast.
Topping lift
The topping lift is a line attached to the boom’s end and runs through the masthead and down to the deck or cockpit. It lifts and holds the boom and functions well as a spare main halyard. Some types of sailboat rigging don’t use a topping lift for their boom but a boom vang instead. Others have both!
Topping lifts can also be used to lift other spars.
A downhaul is a line used to lower with and typically used to haul the mainsail down when reefing and lowering the spinnaker and whisker poles. The downhaul can also control the tack of an asymmetrical spinnaker, gennaker, or parasailor.
Tweaker and Barber Haul
A tweaker is a line, often elastic, attached to the sheet of a headsail and used to fine-tune the tension on the sheet.
Barber haul
A barber haul is a line attached to a headsail’s sheet to adjust the sheeting angle to the wind. It is often used to pull the clew further toward the center or outboard than the cars allow.
Boom Preventer
A boom preventer is a line attached to the boom’s end when sailing off the wind. Its function is to hold the spar in place and prevent it from swinging wildly.
If the boat were to get an accidental gybe, it could cause serious damage to the rigging or even harm people on board. It is important for the rigger to be cautious when setting up the boom preventer.
Running Backstay
Running backstays is similar to a normal backstay but uses a line instead of a hydraulic tensioner. Some rigs have additional check stays or runners as well.
Bonus tip: Reefing
The term reefing is used when reducing the effective sailing area exposed to the wind of a given sail. Headsails are usually reefed by partially furling them in, and they often have marks for what we refer to as 1st, 2nd, and 3rd reefs.
The mainsail is reefed similarly with an in-mast furling or in-boom furling system.
On a traditional mast, we use a system called slab reefing. The system has reefing lines running through the boom to reinforced points on the luff and leech, allowing you to pull the sail down to the boom and effectively reduce the sail area.
Having at least two reefing points in the mainsail is normal, but most cruising sailboats have 3. The 3rd is used for the heaviest conditions, giving you only a tiny bit of sail area exposed to the wind.
You want to reef your sails before the wind increases to a point where your boat gets overpowered.
It is essential to practice your reefing technique . You will find yourself in situations with rapidly increasing winds where you need to reduce your sails quickly.
Rule of thumb: If you think setting a reef might be a good idea, do it.
Shaking a reef is the term used when we sail with a reefed sail and want to increase the sail area back to full.
Hardware used for sail handling and the running rigging
Furling system.
Most sailboats have their headsail on a furling system. A furling system is a tube that runs along the forestay from the bottom furler drum to the masthead swivel.
This system allows you to roll the headsail around the forestay, making furling the sail in and out accessible. It is also convenient when reefing the sail when the wind picks up, as you can easily do this from the safety of the cockpit. These furling systems come in manual versions and electric versions.
In-mast furling
In-mast furling is a system that rolls the mainsail in and out of the mast. To unfurl the mainsail, we use the outhaul .
In-boom furling
In-boom furling is a system that rolls the mainsail in and out of the boom. This system has been costly and has mostly been seen on big yachts earlier. They are becoming more affordable and common on smaller boats, though. To unfurl this setup, we use the main halyard.
A Stack pack is also called a Lazy Bag or Lazy Pack. It is a bag with a zip attached to the boom where the mainsail is stored when unused. It protects the mainsail from UV rays from the sun and weather elements. It is a very nice and tidy way to store the mainsail and reefing lines if you don’t have in-mast or in-boom furling.
Lazy Jacks is a system of lines running from the stack pack to the mast. The Lazy Jacks guide the mainsail up and down from the Stack Pack and prevent it from falling down on the deck. It is also possible to rig Lazy Jacks without a Stack Pack.
A block is a pulley with a sheave wheel. Blocks are used to change the direction of a pull on a line or rope and give a mechanical advantage. They have many uses, especially onboard sailboats.
A winch is a metal drum that gives you a mechanical advantage to control and tighten lines. These can be operated by turning a rope around it and pulling manually or by a winch handle to get more force. Most modern winches are self-tailing, which means they lock the line on so you can winch the line without holding on to it. Some boats even have electrical winches operated by a button.
Mainsheet Traveler
The mainsheet traveler is a horizontal track that the mainsheet is attached to through a series of blocks. The traveler enables you to adjust and lock the boom at an angle and also plays a critical part in trimming the mainsail.
Most cruising sailboats have their traveler attached to the top of the coachroof in front of the spray hood. A racing boat typically has the traveler in the cockpit near the helm to give the helmsman better control over the mainsheet.
The cars are basically a pulley or block attached to a track on the port and starboard deck that your headsail sheets run through. Cars are used to control the angle of the sheet between the clew and the deck. The cars are handy when you trim the sail to set the right balance of tension between the foot and leech, depending on your point of sail.
The jammer is used to lock a line in place. Most sailboats use these for locking the halyards, mainsheet, outhaul, reef lines, traveler lines, boom vang lines, etc. You can pull or winch a line through a closed jammer, but it won’t run away if you let go of it unless you open the lock.
As I explained earlier, it is normal to have most or all of the lines led back to the cockpit, and they are usually run through a series of jammers.
The jammers are often labeled with the name of the line it locks, which makes it easier to remember which line goes where.
Spinnaker Pole
A spinnaker pole is a spar used to wing out a headsail when sailing off the wind, particularly the spinnaker. The spinnaker pole should have the same length as the distance between the mast and the forestay measured along the deck. We use a fore and aft guy and the pole’s topping lift to rig a pole correctly.
The rigging varies depending on the layout of the boat, but it usually looks like this:
- One line runs from the bow to the end of the pole.
- An aft line runs from near the stern to the end of the pole.
- A topping lift is used to raise and lower the pole.
Whisker Pole
A whisker pole is similar to the spinnaker pole and is rigged similarly. It is typically built lighter and attached to a track on the mast. These can be found in fixed lengths or adjustable lengths. Ideally, the length should be the same as the foot of the headsail you intend to pole out.
Boom Vang/Rod Kicker
The Boom Vang has a few different names. Rod-kicker, kicking strap, or kicker. It is used to tension the boom downwards. When you are sailing downwind and have the boom far out, the mainsheet won’t pull the boom down as much as inboard, and you can then use the vang to adjust the twist and shape of the mainsail.
Mooring line
A mooring line is a traditional rope lead through a fairlead to the vessel’s cleat and a mooring buoy, key, or pontoon.
Final words
Congratulations! By now, you should have a much better understanding of how the running rig on a sailboat functions. We’ve covered the different lines, their purpose, and the hardware used to operate them. I hope you’ve enjoyed this guide and learned something new.
Now it’s time to take what you’ve learned and put it into practice by getting out on the water, setting sail, and getting hands-on experience with the lines.
Or you can continue to my following guide and learn more about the different types of sails .
Sharing is caring!
Skipper, Electrician and ROV Pilot
Robin is the founder and owner of Sailing Ellidah and has been living on his sailboat since 2019. He is currently on a journey to sail around the world and is passionate about writing his story and helpful content to inspire others who share his interest in sailing.
Leave a Reply Cancel reply
Your email address will not be published. Required fields are marked *
- Billing Terms and Conditions
- Shipping and Return Policy
- Shopping Cart
Better Sailing

What is Sailboat Rigging?
The domain of rigging is an essential matter for the safety and good performance of your sailboat. Nowadays, the type of rigging is still evolving. Generally, rigging is depending on the type of sail used or the number of masts. As a basic rule, the replacement of the standing rig should be done every 10 years, except for multihulls or regattas, and rod or composite fiber rigging. A good set of rigging is of great importance in order to ensure navigation without causing any damage. A useful tip is to perform often thorough checks of the state of the rigging of your sailboat. Like this, you will prevent any possible damages from happening. So, let’s examine what exactly is sailboat rigging.
Standing and Running Rigging
Standing rigging supports your sailboat’s mast. The standing rigging consists of all the stainless steel wires that are used to support the mast. Moreover, standing rigging includes the rods, wires, and fixed lines that support the masts or bowsprit on a sailing vessel. In addition, all these reinforce the spars against wind loads transferred from the sails. On the other hand, running rigging is the rigging for controlling and shaping the sails on a sailboat. Running rigging consists of the main and jib sheet, the boom vang, the downhaul, and the jib halyard.
The subdivision of running rigging concerns the jeers, lifts, and halyards (halyards). This supporting equipment raises or lowers the sails and also controls the lower corners of the sails, i.e. the tacks and sheets. Over the centuries and up until nowadays, the history of sailboats rigging is still developing. What we’ve learned by now is that the combination of square and fore-and-aft sails in a full-rigged ship creates a highly complex, and mutually reliant set of components.
Wire Rigging
Wire rigging is the most common form of standing rigging on sailboats today. Furthermore, the style of the wire used is made of stainless steel, which is also a common wire style. What is advantageous with wire is that it’s quite affordable, especially when using swage fittings. The wire has also a long life expectancy, about 10 to 20 years, depending on use and the region you’re sailing to. However, wire rigging is more elastic than rod and synthetic rigging, thus it offers the lowest performance.
Rod Rigging
The rod rigging composition is of high-quality materials that provide low stretching. Moreover, it has a very long lifespan and great breaking strength, much more than that of its wire counterpart. Its life expectancy is attributed to the design, which is a mono strand, as well as to its composition that makes it very corrosion resistant.
Synthetic Rigging
Synthetic rigging is a new type of rigging and just like a rod, has minimum breaking strength. Nowadays, synthetic rigging offers low stretch performance features (that may vary depending on construction type), which are quite good for sailboats, among others. However, synthetic rigging will not last as long as the metal components. Most of the time, metal wire and rod are far better than synthetic rigging.
Based on the two rig types which are square-rigged and fore-and-aft, let’s divide the fore-and-aft rigs into three groups:
- Lateen Rig has a three-sided mainsail on a long yard.
- Bermuda rig which has a three-sided mainsail.
- Gaff rig is the head of the mainsail and has a four-sided mainsail.

Parts of a Sailboat Rigging and Terminology
Cruising sailboats will usually have their mast supported by 1 x 19 stainless steel wire. However, there are some racing sailboats that may choose rod rigging. Why? That’s because rod rigging has a stretch coefficient that is some 20% less than wire. The downside is that it’s more difficult to install and adjust, as well as less flexible with a shorter life span. So, let’s move on and see the parts of the sailboat’s rigging and their terminology:
- Forestay and Backstay : Forestay and backstay support the mast fore and aft. The forestay keeps the mast from falling backward. It attaches at the top of the mast. The backstay is important for the sail’s control because it directly affects the headsail and mainsail.
- Cap Shrouds and Lower Shrouds : These parts hold the mast steady athwartship. The shrouds are attached to the masthead and via chainplates to the hull. Moreover, forward and aft lower shrouds provide further support. The lower shrouds are always connected to the mast, just under the first spreader, and at the other end to the hull.
- Spreaders : In general, spreaders keep the shrouds away from the mast. What is of high importance, in terms of stability, is their length and fore-and-aft angle. The rigs of cruising boats may have up to three pairs of spreaders, depending on a number of factors such as the sailboat’s size and type. Keep in mind that the more spreaders a sailboat has then the lighter the mast section can be. Last but not least, the spreaders must be robust in order to withstand the compression loads of the shrouds.
- Masts and Booms : Masts are tall spars that carry the sails, navigate the sailboat, and control its position. Sailboat booms are horizontal spars to which the foot of a sail is bent. The booms attach to the lower part of the mast. There are some sailboats with unstayed masts, like the junk rig and catboat rigs. They have no standing rigging at all, and neither stays to support them. For example, a Bermuda rig has a single mast and just one headsail, thus a relatively simple rigging layout. On the other hand, schooners or ketches have a really complex rigging, i.e. with multi-spreader rigs. Apparently, the mast on a sailboat is an important component.
- Chainplates, Toggles, and Turnbuckles : These important components of sailboat rigging attach the shrouds to the hull. The chainplate is a metal plate that fastens to a strong point in the hull. Toggles are comprised of stainless steel fittings that absorb non-linear loads, located between the shrouds and the chainplate. Turnbuckles (or rigging screws) are also stainless steel materials that allow the shroud tension to adjust better.
- Parts of Running Rigging : As mentioned above, running rigging has to do about shaping, supporting, and stabilizing the sails on a sailing boat. Therefore, the necessary materials for running rigging are numerous and need further explanation. Some of these materials are: The topping lifts, the halyards, the outhauls and downhauls, the boom vangs, the sheets, and more.
Sailboat Rigging – Summary
So, what is sailboat rigging? Sailboat rigging concerns the wires, lines, and ropes that hold the rig and control the sails. To be more accurate, this means the tensioned stays and shrouds that support the mast. Rigging has to do about the booms, masts, yards, sails, stays, and cordage. Same way with cars, sailboats also have an engine, but in the form of sails. This is the standing and running rigging. When we refer to standing rigging this means that the stays and shrouds are supported by the mast. On the other hand, running rigging refers to rope halyards, sheets, and other control lines. Depending on the type of your sailboat, this sail-engine might be old, new, or maybe somewhere in between.

Peter is the editor of Better Sailing. He has sailed for countless hours and has maintained his own boats and sailboats for years. After years of trial and error, he decided to start this website to share the knowledge.
Related Posts

Sailing with Friends: Tie Knots, Navigate the Seas and Create Unforgettable Memories

Atlantic vs Pacific: Which is More Dangerous for Sailing?

Lagoon Catamaran Review: Are Lagoon Catamarans Good?

Best Inboard Boat Engine Brands
- Buyer's Guide
- Destinations
- Maintenance
- Sailing Info
Hit enter to search or ESC to close.

- Forum Listing
- Marketplace
- Advanced Search
- About The Boat
- Sailboat Design and Construction
- SailNet is a forum community dedicated to Sailing enthusiasts. Come join the discussion about sailing, modifications, classifieds, troubleshooting, repairs, reviews, maintenance, and more!
Standing Rigging: Rod vs Wire
- Add to quote
Fellow sailnetters, I would be interested in learning the pros and cons of rod versus wire standing rigging methods. I have always heard rod was better, but, if so, why? Do both require tuning at similar intervals? With "normal" use, how long could each be expected to last before all new rigging needs to be installed - 10, 20, 30 years? I am sure this topic has been covered before, but I have not been able to find. As always, thanks for the education. Jim SeaQwest

Rod has pros and cons like any rigging. Pros: Lighter, less weight aloft, lower windage, greater strength to weight ratio. Cons: harder to inspect, can fail with little warning, harder to replace or repair in remote ports, As for how long it lasts, it depends on whether you're on salt or fresh water, whether you sail year round or for just the sailing season, whether you race or just cruise, etc. Wire rigging is heavier, creates more windage and has a lower strength-to-weight ratio than rod, but is easier to replace, can be replaced using all ship-board hand tools, is easier to inspect. You can easily carry spare wire-rope rigging, but carrying spare rod rigging is much more difficult. Synthetic rigging, like Colligo's Dynex Dux-based rigging, is also a reasonable choice, but it is more expensive than wire rope or rod rigging generally. It is lighter and has a better strength-to-weight ratio than metal rigging, but is susceptible to being cut...
Thanks Sailingdog. I would have naively guessed rod to be the heavier of the two because it is suppose to be stronger and, of course, less flexible. As for longevity, let's say the boat is docked in the northeast in saltwater, used 6 months a year as a coastal cruiser and never raced. Generally, I would assume the rigging, if wire, would be good for about 10 years. Would it be a significantly longer life span for rod rigging? Which would be the more desirable rigging on a mid-size (35') coastal cruiser, occasionally bluewatered, never raced, mono-hull sailing vessel? Wow...that "can fail with little warning" part is scary! Thanks again. Jim SeaQwest

Thanks Tommays. 20+ years! It may cost more, but if you get twice the life span, it should be worth it. Based on what I am hearing, rod seems to be the more desirable rigging. Thanks. Jim SeaQwest
It depends. If you are going cruising, I would recommend wire, not rod, rigging. You can't really carry spare rod rigging very easily. You can't adjust the length of it without specialized tools, where mechanical fittings--like Hayn HiMod, StaLok and Norseman--allow you to shorten wire rigging with only basic handtools.

I have rod rigging on my CS36M. The boat has been down south for 8 trips so it's had salt and fresh water. Bought it in 1988, still going strong, 22 years. Kinked the forestay once when removing the mast, had to replace it. Other than that no problems. We remove the mast every fall and the rod rigging is a bit unwieldy compared with wire but you get used to it.

Over the years we've had two rod rigging failures. One a D1 shroud, the other a deckstay, both on a 40 footer we owned previously. A quick tack saved the rig in the first instance. Both failures were traced to seized rod end fittings in the turnbuckle barrel. (actually the deck stay had been welded to the turnbuckle... same effect) As it was explained to me, every time the load surges on a rig, eg going over a wave, there's a torsional stress applied (ie the rod twists and untwists a bit) The rod end is meant to move within the turnbuckle at this time. If the rod end is seized that stress 'works' the rod where it exits the turnbuckle, eventually failing there. Whoever welded our deckstay created the same scenario. The rigging was, to our knowledge, original and about 15 years old at the time. We subsequently loosened the rig, opened up and freed all the rod ends, applying lanakote to keep the ends free and had no further issues - I believe the boat is still sailing today with the same rod, other than the replaced parts, now well over 20 years on. There's lots to like about rod, but wire will often give you some warning, or more easily observed indication of pending failure.

We replaced our rod forestay a season back, when we put in roller-furling and found that the original forestay had a kink in it, hidden underneath the tuff-luff for we don't know how long. The rigger said the heads on the Navtec rod tend to crack through metal fatigue: repeated loading and unloading. He would have simply re-headed the original rod if it hadn't had the kink. We've raced our boat hard for the past 12 years, but she was built in 1981. We do look over the rig carefully each season, but not with dye or anything too fancy. Things can break, anytime, of course. On a different boat I was on, we had a wire shroud suddenly let go in the Bay of Biscay, despite it's having been carefully checked over before the boat had sailed Transatlantic, up the Irish Sea to the Hebridies, and back down to the Gironde estuary.

Navtec offers an excellent (albeit very conservative) guide to inspecting rigging , including guides to the life expectancy of rod rigging.
Thanks for that, I have rod rigging that I have yet to inspect closely.
- ?
- 173.6K members
Top Contributors this Month

- standing rigging
- rope and line
- cams, cleats and clutches
- head sail gear
- roller furling
- main sail control
- mast hardware
- eye straps and pad eyes
- fairleads and bulls eyes
- anchor and docking
- miscellaneous hardware
- Alexander Roberts
- My Wishlist
Rigging Only is a full service rigging shop. All running rigging, standing rigging, life lines, wire splicing, and custom hardware are assembled right here in our shop. We know our products, and we deliver that expertise with every job we do.
N ote: Some orders may incur additional shipping costs, particularly those with heavy or long items.
All prices are subject to change without notice.

Location & Hours

- Customer Service
- Order Tracking
- Your Account
- Store Policies & Info
- Privacy Policy
- Helpful Links
- Payment Methods
Shopping Cart: 0 Items
RC Sailboat Rigging Setup- Briefed in 17 Easy Steps
Table of Contents
Introduction
To build a model sailboat, you’ll need a lot of time, patience, and talent. Remote control sailboat beginners should start by altering or fixing a pre-existing model. It is possible to create a quicker and more sophisticated sailboat by rigging an existing model.
What to do for the rc sailboat rigging setup ?
Tether the retaining bolt and wire mainsail luff. Insert the mast stub and slide the entire main boom assembly. Push the masthead and backstay crane. Adjust the sail to match the mast reinforcement ring. Attach the eye in the mainsail clew. Close the hooks. Set the backstay’s length to the right.
To get the overall understanding, read the entire article.
Things to Bring
- Stitching Device
- Sailboat Controlled via Remote
- Thread Made From Polyester
- Fisherman’s Spectra Line
- Dacron Sails
- Utility knife
Procedure for Rigging
Use these rigging guidelines to their full extent. This ensures that the boat will sail with the qualities and performance that its creators intended. You can also check the RC dirt oval setup guide to ease your work.
Step 1: Replace Old Sails
Remove and replace the old sails. Cut out the new main and headsails from Dacron. Measure the old ones from the model and add a half-inch on each side to the new measurements. Tether the retaining bolt.
Step 2: Wire Mainsail with Eyelets
All six eyelets on the mainsail luff should have wired mainsail luff rings attached to them.
Step 3: Place the Mast Stab
Be careful not to get the plastic collar’s bevelled edge. Insert the mast stub into the bottom of the mast.
Step 4: Slide Main Boom
From the bottom, slide the entire main boom assembly onto the mast stub.
Step 5: Slide Rings Under the Mast
Starting at the luff of the mainsail, slide all rings beneath the mast one at a time.
Step 6: Assemble Plug
Push the masthead and backstay crane. Assemble the plug into the mast. Cut a 250mm Dyneema length and tie the mainsail’s head to the backstay crane.
Step 7: Layout the Sail
Adjust the sail to match the mast reinforcement ring at its highest point. The sail’s head may readily swivel. Poles are sheeted out at an angle of 80 degrees when the boat’s sailing with the breeze.
Step 8: Attach the Cunningham
Attach the Cunningham (downhaul) as demonstrated by cutting a 300mm length of Dyneema. Tie a cord to the eye in the gooseneck fitting’s uppermost eye.
Step 9: Tie Bowsie’s Eye
Follow this path: First, tie one end to a Bowsie’s eye. Then, tie a second Bowsie’s eye; finally, tie a third Bowsie’s eye.
Step 10: Attach the Mainsail Clew
Attach the eye in the mainsail clew (bottom right corner) to the mainsail clew using a line.
Step 11: Close the Hook
Close the hook’s open end with thin-nosed pliers. Keep your sail from falling off while you’re out on the water.
Step 12: Replace the Sail If Needed
If you need to replace the sail, simply use a flat-bladed screwdriver to pry it open once again.
Step 13: Cut Dyneema
For the Backstay, cut a 900mm length of Dyneema. The Backstay Crane’s end hole has a loop where you can tie a piece of string.
It’s time to attach one of our 6mm stainless steel rings to its bottom end. Using a Mast Socket, insert the mast and the rigged Mainsail into the hull.
Step 14: Attach the Loop
Once you’ve cut a 500mm piece of Dyneema, tie a loop in one end. Weave the other end through the first small gaps in a Bowsie. Then throw the rim at the bottom of the Backstay.
Finish it back at the Bowsie. Using a metal hook in the Transom (rear edge of the hull), attach the loop to the backstay. Then put the Bowsie nearly halfway along the bottom rope and secure it.
Step 15: Tighten the Leech
To allow the leech (back edge) of the main to twist a little, lightly tighten the compression strut. Such that the leech (back edge) is under mild tension. Adjust the Cunnigham such that the luff of the sail is just slightly strained.
Step 16: Adjust the Position of the Rings
Set the backstay’s length to the right. A spacing of roughly 25 millimetres between the boom tube’s centre. Achieve the sail foot midway by adjusting the position of the silicon rings (SR5) and the mainsail clew hook.
Step 17: Connect the Foresail
Use the spectra fishing line to loop between the grommet and the eyebolt. Connect the foresail to the top of the mast before the mainsail.
To make use of the foresail, equip the boat’s bow with a second, shorter boom. Connect the sail’s grommets to the short boom’s front and back eye bolts with spectra lines.
You can check these suggested rigging tools. You need these tools for rigging setup-
Apply a few drops of thin CA adhesive into the Dyneema cord at the point of the cut. Then cut through it at an angle. The cut end will be firm and pointed, making it simple to weave through the Bowsies.
A dollop of thin CA adhesive applied to the knot can help keep it in place. Once you’ve tied it, trim any extra rope.
Don’t use hot gun glue as it doesn’t stick to this type of surface. If you take the time to secure all knots now, you’ll have a long-term reliable vessel.
Tips for Better Setup
A Dacron sleeve should be added where the lines come into contact with the hulls or plastic parts. Because Spectra is extremely powerful and can shred into the material.
Ask sailmakers for scraps or old, ripped sails that you may use to build the remote control boat sails. Only if they are willing to part with them.
There are a few things to keep in mind when it comes to rigging more sophisticated rigs. Like double mast designs or using spinnakers until you’ve gained some experience in the activity. Always clean your RC boat as you clean your RC car to avoid rusting.
How tight should the rigging on a sailboat be?
If you push or tug on them, they shouldn’t wiggle about too much. So make sure they’re snug. Tighten them up if they’re still slack or floppy.There is no need to tighten any of the other shrouds after the cap shrouds are in place. Because they follow in consecutive order.
What’s the simplest way to sail a boat?
The Lateen Rig is a great starting sailboat. It only requires 2 ropes in its basic form.The Lateen Rig is one of the most basic sailing rigs. A spar, boom, and mast are all part of this rig. As are a single jib sheet and mainsheet.
How much does it take to replace a sailboat’s rigging?
Re-rigging a sailboat can cost anything from $1,000 to $5,000. Re-rigging a 40-foot boat with wire is estimated to cost roughly $100 per foot. Which includes the round-trip costs of hauling, launching, and unstepping the rig (about $2,500).
Final Words
We’ve discussed here in detail on the rc sailboat rigging setup. This should help with the rigging setup, and we sincerely hope it does.
OK, so the above may look a little daunting. You’ll be able to recall this procedure with ease after completing it five or six times. Be familiar with and comfortable with your tools, settings, and methods.
The very best to you!
Travis Murray
Leave a Comment Cancel reply
Save my name, email, and website in this browser for the next time I comment.
IMAGES
VIDEO
COMMENTS
Rod Rigging. By The Rigging Company February 20, 2015January 31, 2016. In the world of sailboat standing rigging there are three common materials used, stainless steel wire, Nitronic 50 rod, and various types of synthetic fibers, which are becoming more and more popular. I want to talk today about Nitronic 50 stainless steel rod.
Nitronic 50 Straightened Rod. Sailing Services has a deep commitment to riggers and marine industry professionals. We manufacture our rigging using the highest quality stainless steel components for the strongest and best looking shrouds, stays, lifelines and architectural rigging assemblies. Solid strand stainless steel.
Spars, Rigging, and Hardware for Sailboats. Rig-Rite, Inc. Phone: (001) 401-739-1140 -- FAX: (001) 401-739-1149 www.RigRite.com Ordering/Questions: ... Rod Rigging Industry standard Rod Rigging is cold-drawn to size from Nitronic 50 (22-13-5) stainless alloy. The cold drawing process produces rod with approximately 200,000-psi ultimate tensile ...
Rod rigging has several advantages over traditional rigging, including increased strength, reduced weight, and improved aerodynamics, which explains why it is commonly used on high-performance racing sailboats. If it was raced regularly, the rigging could experience higher loads than normal, leading to a shorter life. To help you assess the …
Stainless steel wire rope, in the sailing world, generally comes in 4 construction types: 1 x 19, 7 x 7, 7 x 19 (pictured left), and 1 x 19 Dyform or Compact Strand (pictured right). Standard 1 x 19 stainless steel wire is primarily used in standing rigging and now (within the last 10 years or so) also lifelines.
Wire offers excellent value, longevity and availability the world over. A significant majority of sailboats still have wire rigging. Rod rigging generally offers some better performance characteristics, and can be seen on a variety of boats, like many J/Boats, C&C, Beneteau, Waterline, Sabre, and Valiant Yachts, as well as custom racers and ...
West Marine Rigging Services can create a custom anchoring solution for your boat including rope-to-chain spliced rodes for windlasses. Select from double-braid, single-braid, 8-plait, or three-strand nylon line and Proof-Coil, High-Test, or Grade 70 chain. We're also experts in mooring pendants for either seasonal or transient use, and anchor ...
Good question. Yes, doing it yourself will theoretically save money. For an average 40-foot boat, Cockerill estimates about $100 per foot to re-rig with wire rigging ($4,000), as well as the round-trip cost to haul and launch the boat and unstep and step the rig (an additional $2,500 or so).
Prices in the BOAT/U.S. catalog are in between. What if, instead of 1×19 wire, you have rod rigging? There are four new models that are bigger, heavier and, of course, more costly. They work the same, but take some arm strength. One is for .172-.250 rod, another for .281-.375. Two others models are for metric rod.
Check your spreaders, chainplates and turnbuckles for cracking, fatigue, missing cotter pins/rings, etc. Check the deck around the chainplates and mast for cracking and delamination. If in doubt, get a professional opinion. The cost to replace standing rigging obviously varies from boat to boat. Give us a call, and we can give you a rough quote.
Marine Systems Service. JN Rigging provides sailboat rigging, marine systems and mechanical services to New England's discerning sailors. We specialize in outfitting cruising sailboats for extended offshore passage-making. We strive to create quality rigging and marine systems solutions, blending traditional techniques with modern approach and ...
A sailboat's standing rigging is generally built from wire rope, rod, or occasionally a super-strong synthetic fibered rope such as Dyneema ®, carbon fiber, kevlar or PBO. 1×19 316 grade stainless steel Wire Rope (1 group of 19 wires, very stiff with low stretch) is standard on most sailboats. Wire rope is sized/priced by its diameter which ...
The rig or rigging on a sailboat is a common term for two parts: The standing rigging consists of wires supporting the mast on a sailboat and reinforcing the spars from the force of the sails when sailing. The running rigging consists of the halyards, sheets, and lines we use to hoist, lower, operate, and control the sails on a sailboat.
Some higher-end performance boats and larger cruising yachts are fitted with rod rigging, which has a high strength-to-weight ratio and low windage on account of the smaller diameters that can be used. ... The deceptive simplicity of the typical sailboat rig can lead to a kind of benign neglect on the part of the boat owner. Since so many ...
The cost of rod rigging replacement ranges from $8,000 to $20,000. The cost of materials averages from $5,000 to $10,000, while the cost of labor is between $2,000 and $5,000. Expenses for equipment range from $1,000 to $2,000, while the cost of permits or inspections is estimated to be around $500 to $1,000.
If there's one thing production sailboats have in common, it's that nearly all of them use stainless-steel standing rigging, whether wire or rod. There are likely also stainless steel fittings, chainplates and turnbuckles. Stainless steel is a great material for rigging but has its Achilles heel: corrosion.
By Robin Iversen January 12, 2024. The running rigging on a sailboat consists of all the lines used to hoist, lower, and control the sails and sailing equipment. These lines usually have different colors and patterns to easily identify their function and location on the vessel. Looking at the spaghetti of lines with different colors and ...
If you would like to measure your rigging yourself proceed to step 5. Find a flat surface large enough that you can fully stretch your rigging out for measurement. Lay out the wire and attach one end of your wire segment to a secure fixed point. You can use a large nail or screw on the dock. "Stretch" the wire straight and ensure there are ...
The domain of rigging is an essential matter for the safety and good performance of your sailboat. Nowadays, the type of rigging is still evolving. Generally, rigging is depending on the type of sail used or the number of masts. As a basic rule, the replacement of the standing rig should be done every 10 years, except for multihulls or regattas, and rod or composite fiber rigging. A good set ...
Rod has pros and cons like any rigging. Pros: Lighter, less weight aloft, lower windage, greater strength to weight ratio. Wire rigging is heavier, creates more windage and has a lower strength-to-weight ratio than rod, but is easier to replace, can be replaced using all ship-board hand tools, is easier to inspect.
Rigging Only is dedicated to providing quality sailboat hardware and sailboat rigging at affordable prices to sailors through out the world. Checkout View Cart (0) (508) 992-0434. Toggle navigation. Shop All . standing rigging; life lines; rope and line; blocks; cams, cleats and clutches;
Re-rigging a sailboat can cost anything from $1,000 to $5,000. Re-rigging a 40-foot boat with wire is estimated to cost roughly $100 per foot. Which includes the round-trip costs of hauling, launching, and unstepping the rig (about $2,500). Final Words. We've discussed here in detail on the rc sailboat rigging setup. This should help with the ...