
Your shopping cart is empty!

Sunfish Repair Notes
WARNING: Some of the materials in the repair and maintenanceof fiberglass are highly flammable and should be used with the utmost care. The following items are not to be used anywhere near fire or an open flame (cigarettes, cigars, pipes): acetone, rubbing alcohol, resin.
AIR TEST PROCEDURE
Materials Needed: - Cellophane Tape - Liquid Detergent - Bucket - Paint Brush - Water - Tire Pump, compressed air
- Mix water and 50% soap to make a quart of sudsy water.
- Tape over the vent hole located in the forward wall of cockpit of Sunfish.
- Prepare second piece of tape for use over drain plug.
- Blow air into hull through the drain plug, which is located on the starboard side of the deck, by using your mouth, tire pump or compressed air (max. 3 oz.).
- Tape drain plug immediately to trap pressure in hull.
- With the paint brush, apply soapy solution around the outside edge of the boat, (where the deck and hull seam is), around the mast tube and daggerboard trunk. Note: You must also soap the bottom of the daggerboard trunk at the same time. Draw a solid bubble across the mast tube opening. Soap all hardware and any locations you suspect might leak, including the splash rail (coaming).
- When you locate a leak, circle the area with a grease pencil then rinse the boat with clean water and let dry.
- Turn the boat over and test the hull.
SCRATCHES
Clean the scratched area, using a clean cloth saturated in rubbing alcohol or acetone, to remove all loose debris. Wetsand with #600 grit sand paper, (using a sanding block to avoid digging into the gelcoat). Sand JUST until scratches disappear. Wipe area with cloth saturated in water. Be careful not to over sand. Avoid going all the way through the gelcoat. Confine sanding to scratched are only. Buff up shine with compound.
AIR BUBBLES
- Flat Surfaces - With the edge of a putty knife, chip away all loose particles of gelcoat from area. Using the blunt edge of knife, tap surrounding area to insure all hidden bubbles are located. Chip them out. Lightly sand hole with #120 grit sand paper, then clean with acetone saturated cloth to make sure area is completely clean of any dust particles. Put cellophane tape alongside the bubble, (see diagram #1), three times the length of the bubble and three layers thick. Run tape perpendicular to tape, overlapping the edges (equal layers thick) to square off patching area (see diagram #1). Mix the gelcoat with catalyst to make a very thick paste, fill in the bubble. Smooth patch by running a clean putty knife over the area, keeping the edges of the knife on the tape (see diagram #2). Remove excess gelcoat with an acetone saturated cloth. Let cure. Finish patch by wet sanding with #600 grit sand paper until patch blends in with the rest of the surface area.
- Vertical Surfaces - Follow the directions for cleaning and chipping, mentioned under Flat Surfaces. Place the double layers of tape on, as stated. Before added the gelcoat, place top piece of tape on, adhering from the bottom up. Pour a little gelcoat into the hole. Let cure until sticky, add more gelcoat. Build up slightly higher than the rest of the boat, wet sand as stated under Scratches (see diagram #3).
LEAKS IN MAST TUBE
TOP - Sand with #80 sand paper about a quarter inch down from the lip. Clean with acetone or rubbing alcohol. Take a piece of matting and break it up into shreds. Mix with resin (fine saw dust will also work), and catalyst. Fill in sanded area. Let cure and air test. Sand down until flush with tube side using #120 sand paper. BOTTOM - Mix resin with shredded mat or saw dust, and catalyst. Be careful not to let mixture get too thick - pancake syrup - and pour enough to cover the bottom and fill in recess (see diagram). Let cure and air test. MIDDLE - Sand problem area with #80 sand paper and clean. Saturate a piece of fiberglass mat with catalyzed resin one inch larger than the crack or hole. Carefully place it over area, smoothing out any air bubbles with a popsicle stick or hacksaw blade. Let dry and sand until patch is flush with tube and mast slides in easily. NOTE: THIS REPAIR IS FOR HOLES ONLY. IF LEAK OR AIR BUBBLES, FILL WITH CATALYZED RESIN ONLY. DAGGERBOARD TRUNK - Sand area with #80 sand paper, clean. Mix resin, catalyst, and shredded mat (or saw dust) and fill area, spread with popsicle stick or hacksaw blade. Let cure. Sand with #120 sand paper until daggerboard fits into slot without scratching.
LEAKS IN FLANGE
To remove aluminum trim, see page 5. Rout or sand in center of flange where leak appears. Continue approximately 1" on both sides of affected area to insure complete removal of damaged or imperfect section. Clean. Mix shredded mat or saw dust with catalyzed resin (thick). Fill routed area completely. Let cure, air test.
LEAKS IN COCKPIT TUB
Turn boat over and sand seam between tub and deck, clean. Mix shredded mat, or saw dust, with resin and catalyst. Pour mixture into a heavy-weight plastic bag and cut off a corner. Apply to top of tub, all around the inside. Let cure, air test.
PUNCTURES AND FRACTURES
- Rout out hole or crack, enlarging one to two inches. Sand perimeter, to smooth edges and remove all loose particles of gelcoat and fiberglass. NOTE: ROUT THROUGH ALL LAYERS OF FIBERGLASS. Clean away dust particles with an acetone saturated cloth.
- Cut pieces of cardboard, mat and woven roving, all one inch larger than hole.
- String a piece of thin wire through the cardboard in a "U" fashion, then saturate in catalyzed resin.
- Saturate mat and string onto cardboard. Repeat process with woven roving.
- Secure tightly to raised wooden structure as indicated in diagram #6 to hold patch into place. Let cure.
- Mix resin, catalyst and shredded mat to make a putty. Fill in patched area with mixture. Let cure.
- Block sand patched area until it is a little lower than previous contour. lean. Apply gelcoat per instruction under Gelcoat Bubbles.
REMOVAL AND REPLACEMENT OF TRIM
REMOVAL Tools Needed: - #30 Drill - Hammer - Sharp Edge Putty Knife
- Drill out existing rivets with #30 drill and mark old holes.
- Patch with catalyzed resin.
REPLACEMENT Tools Needed: - Pop Rivet Tool - 1/8" Pop Rivets - Pliers - Drill
- Place boat on saw horses.
- Leave a 12" overhang on stern.
- Starting at point A, press the trim onto the boat. Use the head of a rubber mallet placed horizontally between you and the boat. Push with your stomach to hold the trim in place as you drill. Drill only through the top layer of aluminum and fiberglass. DO NOT DRILL THROUGH BOTTOM LAYER OF TRIM. Be sure to drill new holes, judging by grease pencil marks of existing holes. Insert new rivets and finish.
- Bend stern piece around corner (use gentle pressure to bend). If a bump appears, crimp down with a pair of pliers with tape on the jaws to eliminate gouging trim. Saw off excess.
- Bend next piece (#2) around bow using same procedure as steps #2 and #3. Attach.
- Bend piece (#3) around stern following step #3.

- O’pen Skiff Purchase Page
- ILCA – Element 6
- RS Sailboats
- Sunfish – Recreational
- Sunfish – Race Version
- Sunfish Sails
- LaserPerformance Sunfish Parts Price List
- 420 – Zim Sailing
- Finding the Right Laser Rig: Formula
- Racks by Dynamic Dollies and Racks
- Load Rite Trailers
- Load Rite Sunfish Trailer
- **NEW** LoadRite for Sailboats
- Sunfish Dolly by Dynamic
- Optimist Dolly by Dynamic
- How to Apply Laser Sail Numbers
- Applying Laser Sail Numbers
- North Sails for LaserPerformance Dinghies
- About/Contact
Sunfish Hull Repair – Shoreline Method

Keel repair – old method
One of our customers wanted us to repair damage that was done to his Sunfish hull during a storm on Lake Ontario. Looking at videos we found that many people cut out the damage on a keel area and replace it with newly laid fiberglass. If the keel was completely worn away we might be forced to choose this method, but many times all that will be needed is a long crack repair.
In this video we demonstrate our Shoreline method that requires less removal of original material. The method also requires the installation of fiberglass battens as backer cleats to support the newly repaired section. With our method we will be able to maintain the original profile of the hull more successfully than tying to rebuild a section that has been cut away.
This video shows our experiment used on a very small area of damage on a keel We will post the next video showing a much more substantial crack, and how our batten method was applied.

Batten method – a more surgical technique
Share this:
- Click to email this to a friend (Opens in new window)
- Click to share on Facebook (Opens in new window)
- Click to share on Twitter (Opens in new window)
- Click to print (Opens in new window)
- Click to share on Pinterest (Opens in new window)
- Click to share on LinkedIn (Opens in new window)
- Click to share on Tumblr (Opens in new window)
- Click to share on Reddit (Opens in new window)

THE MELGES 15!
THE ROCKET! Built in the USA
SUNFISH – SAIL A CLASSIC!
Recent Posts

Hours & Info
Search products.
Contact us:
Any questions about the sailboats we sell, or the services we provide? We’re always eager to talk sailing and would enjoy helping you with any of your sailing needs. Contact Us
Designed by WPZOOM

- Service and Repair
Linthicum Sailmakers Serving Sailors in NJ, NY, PA, MD, & DE
Request A Quote Today

Linthicum Sailmakers, a family owned business, has been providing high quality sails and related services since 1966. At Linthicum Sailmakers we are not only committed to the craft, but also to making your sailing smoother and more enjoyable. We pride ourselves in serving you. That's why we keep the Linthicum Promise, a strong commitment to our customers to do what we say we are going to do, when we say we are going to do it.

Linthicum's experience is extensive. Brad started with Sunfish sails in his basement in 1966. Since then he has made thousands of sails for boats from dinghies to ocean going cruisers. Need a Gaff sail? Battened sail? Multi-hull sail? Spinnaker? The company has an extensive database of rig dimensions and sail plans for thousands of boats. In addition, we now employ the latest in computer design and cutting technology. You will definitely find the right sail for your boat at Linthicum Sailmakers because we make the sail according to the boat dimensions and your requirements. Because each sail is hand crafted right here in our Somerdale, NJ loft, you can even stop by and check on its progress.

In addition to sail making, We offers expert sail repair, sail modification, cleaning, canvas work, rigging, and cushion cleaning. Linthicum Sailmakers is conveniently located near the Route 30 (White Horse Pike) exit of 295.
We'd be delighted to provide a quote on new sails in a timely manner. Please call us or fill out our easy contact form and indicate you'd like a quote.

Linthicum Sailmakers Inc. 607 Grace St. Somerdale, NJ 08083
Phone: 856-783-4288
Email: [email protected]
Hours: It's best to call.
Winter drop off and pickup hours are 9:30 to 1:30 weekdays.
We are also available evenings and weekends by appointment.
Serving the sailing community since 1966

Winter is here! It's a perfect time to beat the spring rush! Bring your sails, canvas and rigging needs in now so you'll be ready for spring splash!
Services include:
Sail Inspection and Repair
Sail Cleaning
New Sail Construction
Canvas Cleaning and Repair Including Window Replacement Rigging Fabrication
Call Today for Details and Free Estimates!
The Linthicum Promise
We do what we say we are going to do.
We do it when we say we are going to do it.
Rely on Linthicum Sailmakers.
Web View Mobile View
Become the Confident Skipper of Your Own Sailboat
Learn how to repair your sunfish sailboat with our user-friendly guide and save $100s.
- Post author: Anns
- Post published: October 13, 2022
- Post category: Uncategorized
- Post comments: 0 Comments
Introduction
As a Sunfish sailboat owner, it is important to learn how to repair your boat. The Sunfish sailboat comes with many parts that can become damaged over time. Some of these parts are more likely than others to require replacement, but all should be looked at carefully before each trip out on the water. It is also important to make sure that everything is in working order before taking off for a fun day of sailing.
The Sunfish sailboat has a primary hull, rudder, and daggerboard.
The Sunfish sailboat has a primary hull, rudder, and daggerboard. The hull is the main body of the boat, which includes everything from back to bow. The daggerboard is a retractable keel that can be lowered or raised by hand. It helps the boat stay upright in rough water conditions when it’s not sailing or being towed by motorboats. The rudder is a steering device attached to the bottom of your primary hull by cables or ropes (depending on your model).
These components can become damaged, lose pieces or break away.
The rudder and daggerboard are two key components of your Sunfish sailboat. The rudder is attached to the rear of the boat, while the daggerboard is attached to the bottom of the hull. These components can become damaged, lose pieces or break away. If they do, they will need to be replaced with new ones before heading out on your next sailing adventure!
Some parts and accessories may need replacing more than others.
The good news is that some parts and accessories may need replacing more than others. For example, if you are experiencing problems with your Sunfish, it is important to fix the problem as soon as possible. If you wait too long, it could become more difficult and expensive to fix later on. However, there are some things that do not wear out or break down all at once (for example motor mounts). This means that even though they haven’t been replaced yet from when your sailboat was new in 1965 (which would have been when your dad bought it), there isn’t any reason why these parts would need replacing now unless something has changed about how often or hard these items get used over time (for example an engine mount might break off if someone accidentally leans against it).
These are the parts on your Sunfish that are most likely to need replacement.
Let’s take a look at some of the parts on your Sunfish that are most likely to need replacement.
- The hulls. These are the most important part of your boat, so even if you have an old set that needs new paint, it’s worth keeping them around until you can afford to replace them. In addition to looking for cracks and holes in your hulls, check for areas where the paint has worn away completely—this will help you determine whether or not they’re still safe to use. If any of these problems exist, it’ll be time for new ones!
- Rudders and daggerboards. These two pieces are usually attached firmly in place, but they’re also potential sources of leaks and other problems if they aren’t properly secured or maintained by their owners over time: so make sure yours stay secure! To do this simply tighten both screws with pliers once every year or two (or whenever necessary). This simple action could significantly extend their lifespan while saving money down the road since replacing them would require buying expensive parts as well as labor costs involved with installing those same exact components again after removing whatever caused damage in first place (such as corrosion).
- Seat cushions: Sunfish seats tend not wear out very often compared its other components but there may come point when need replacing anyway due being old enough which means possibly dangerous conditions like falling apart at seams due exposure harsh elements such as rainwater damaging materials used making its construction process waterproof up until now without proper care taken place beforehand during manufacturing stage itself; therefore important advice here applies especially during rainy season when boats get stuck inside garage/sheds etcetera without proper maintenance done beforehand because such events lead directly back again towards improper maintenance regimen being applied throughout entire fleet overall thus causing extensive amounts damage depending on severity level encountered during inspection process itself; therefore best practice recommendation would be always go ahead invest into quality construction materials instead cheap substitutes sometimes found
Hulls can become worn and weathered, which makes them more susceptible to damage.
The hull is the part of your Sunfish sailboat that sits on top of the bottom panels. Hulls can become worn and weathered, which makes them more susceptible to damage. As such, it is important to pay attention to your hulls for cracks or chips in the surface. If you see these signs on one or both of your hulls, it is time to replace them with new ones. If you are not sure whether or not there is any damage on your current hull(s), take them to a professional who can inspect them and let you know if they need replacing as soon as possible.
Your daggerboard should remain secure in your sailboat.
Your daggerboard should remain secure in your sailboat. This fin-like board helps to keep the boat balanced while sailing and if it breaks away, you will have to replace it.
The daggerboard is attached directly to the keel with a pin or bolt (which may be rusted). The best way to remove this fastener is with a hammer and chisel. Once you get it loose, take out all of screws attaching your keel plate onto the hull of your sailboat and lift off this plate so that you can access your daggerboard more easily.
If it is not secure, or missing completely due to a breakaway or other incident, you will have trouble controlling the boat during sailing.
The rudder is used to control the direction of your boat. It’s typically attached to the stern of your vessel with a hinge and steering wheel, allowing you to maneuver easily. It’s a crucial part of sailing because without it, you wouldn’t be able to steer your craft.
The rudder is also called a tiller when referring specifically to small boats such as Sunfish sailboats or kayaks. When using this term, think back to those days when you were driving around on land—it’s basically an extension for your hand that helps steer through waves or wind gusts!
If your boat’s rudder has been weakened due to excessive wear and tear or damage, you should have it replaced as soon as possible.
The rudder is the primary steering mechanism for a Sunfish sailboat. It can be damaged by impact or wear and tear, meaning that if your boat has been in the water for a long time and has seen many hours of use, you may need to replace it before going out on another adventure.
The rudder is a flexible fin attached to the back of your Sunfish sailboat that controls its direction in water.
Any damage should be fixed immediately for safety reasons.
As a general rule, any damage should be fixed immediately for safety reasons. If you don’t fix the damage and something else breaks, then you could end up with a much more serious problem on your hands. For example, if you have a broken rudder but do not replace it right away, then it is possible that the hull will start to wear away at the point where it connects with the rudder blade. This could cause an accident while sailing or even sink your boat!
You should also make sure that your sailboat is 100% safe before using it again after repairing any damages caused by an accident or storm. You can ask someone who has experience working on boats about how exactly to fix specific parts of your vessel; however, this may not always be possible or practical depending on how far into fixing everything goes (e.g., finding someone nearby who knows specifically how to repair what needs fixing). In these situations (especially when dealing with large ships), we recommend seeking help from professional mechanics such as those found in shipyards near where they live so they don’t waste time trying DIY techniques which aren’t going to work anyway due simply because they don’t know enough about these machines yet.”
With this guide, we hope you have gained the knowledge and confidence to fix your Sunfish sailboat. We understand that this can be a daunting task for someone who is unfamiliar with boats or sailing. However, if you follow our simple steps, you will get through it easily!
You Might Also Like
How to pick the right boat, 10 benefits of sailing, leave a reply cancel reply.
Save my name, email, and website in this browser for the next time I comment.
Jay's Technical Talk
My external memory, 1977 amf alcort sunfish sailboat restoration.

I purchased an old (1977 manufacture date) AMF Alcort Sunfish 14 foot sailing dinghy. It was mostly complete and almost “ready-to-sail”, except for the broken auto-bailer, and cracked rudder, but the price was right.
Since I had to repair the crack in the rudder, I decided to go overboard and completely restore the entire rudder and tiller assembly. And once the rudder looked nice, I had left-over varnish and decided to go ahead and re-surface the daggerboard as well.
After the first sail I drained all of the water out of the hull (which MIGHT have already been in there…..maybe….) and purchased a better drain plug and rigged up a solar powered fan to dry things out. If I find water inside after the second sail, I’ll probably be doing some fiberglass hull repair.
You can see all of the details by watching the (multiple!) videos in this YouTube playlist: https://www.youtube.com/playlist?list=PLmHP4lUqxKmv13lkNpPqG2FbnV9L4aaL0
I’ve found that the Better Boat Mini-Paddle fits perfectly into the rear cubbyhole on my 1977 boat.
Related posts:
- Philips Norelco QT4085 beard trimmer disassembly and battery replacement
- Using Cloudflare to speed up webpage loading speeds
- Nissan Leaf 12 volt accessory battery replacement
Leave a Reply Cancel reply
Your email address will not be published. Required fields are marked *
Building, restoration, and repair with epoxy

Sunfish Wood Restoration
By don gutzmer – gbi technical advisor.
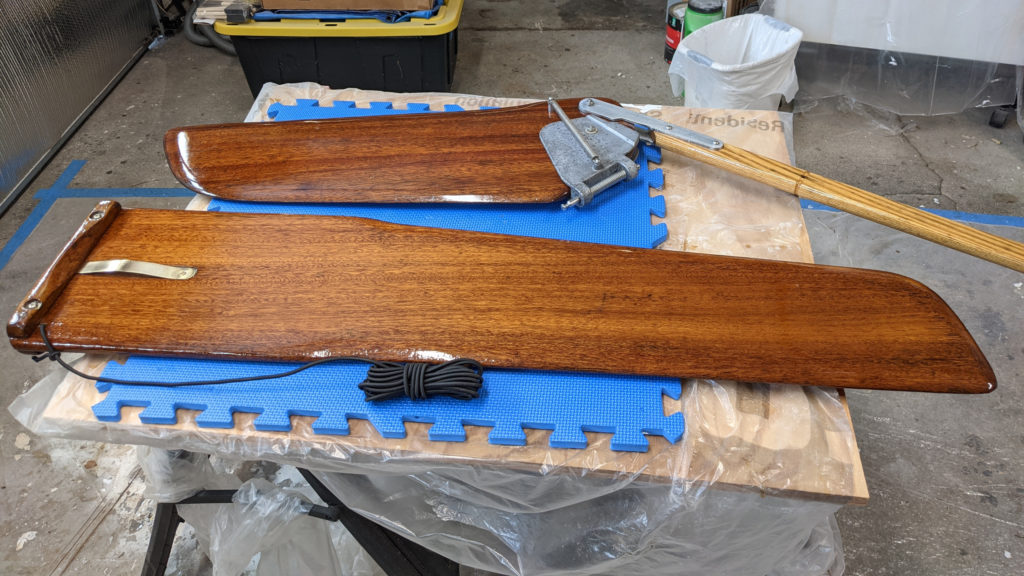
During the fall of 2016, I took a technical call from a customer who owned a Sunfish Sailboat. He lived in the area and was looking for help repairing a few minor gel coat cracks and restoring his wooden daggerboard and rudder. I told him I would be happy to help because this would be a good opportunity to write an article about using WEST SYSTEM 105 Resin and 207 Special Clear Hardener for the wood restoration part of his project. The mahogany daggerboard and rudder had weathered over the years because of only being varnished.
Rudder before work began
To remove all the varnish I used 100-grit sandpaper on an orbital sander, then sanded by hand with 120-grit sandpaper parallel to the grain. After everything was sanded a shop vacuum helped remove any remaining sanding dust.
WEST SYSTEM 105 Resin and 207 Special Clear Hardener were used to provide the clear, natural wood finish. The epoxy was rolled on the surface with an 800 Roller Cover and tipped off by dragging a section of roller cover over the wet epoxy to remove air bubbles and roller marks; this method is called rolling and tipping.
The Sunfish’s rudder and daggerboard sanded and the first coat of epoxy was applied.
The epoxy was re-coated every three to four hours to build-up three coats on each side. One side was done each day. To make sure the epoxy coating was smooth and flat, a single-edged razor blade was used at a slight angle to scrape the surface. The razor blade would only remove the high spots of the epoxy. Then the epoxy coating was sanded dull with 220-grit sandpaper. Two coats of Captain’s Varnish 1015 provided the final finish.
After 3 coats of epoxy were applied
The customer was very pleased with the results of the finished boards.
The finished Sunfish rudder and daggerboard

Learn How To Sail A Sunfish Like a Pro: Essential Tips and Techniques
Alex Morgan

Sailing a Sunfish sailboat can be an exhilarating and rewarding experience for water enthusiasts. Whether you’re a beginner or a seasoned sailor, mastering the art of sailing a Sunfish requires knowledge, practice, and a little bit of adventure. In this comprehensive guide, we will take you through the essential steps and techniques involved in sailing a Sunfish.
The Sunfish sailboat is a popular recreational single-handed dinghy known for its simplicity, maneuverability, and versatility. Before getting on the water, it is crucial to understand the key features of the Sunfish sailboat, such as its design, hull construction, and rigging components.
To ensure a safe and enjoyable sailing experience, proper preparation is essential. This includes checking the equipment and safety gear to ensure they are in good condition and preparing the Sunfish sailboat by inspecting the hull, mast, sail, and rudder.
Mastering the basic sailing techniques is the foundation of sailing a Sunfish. This involves rigging the sailboat, understanding wind direction, adjusting sail trim, and effectively steering and controlling the rudder.
For those looking to take their sailing skills to the next level, advanced techniques such as sail positioning and shaping, tacking and jibing, and harnessing the power of the wind will be explored. These skills allow for greater control, speed, and maneuverability while sailing.
Safety should always be a top priority when sailing. We will provide important safety tips and precautions to ensure your well-being on the water, including proper use of personal flotation devices and understanding weather conditions.
We will discuss common mistakes to avoid while sailing a Sunfish, such as improper weight distribution, overestimating wind conditions, and neglecting maintenance and equipment checks.
By following this comprehensive guide, both novice and experienced sailors can enhance their Sunfish sailing skills, gain confidence on the water, and enjoy the thrill of sailing a Sunfish to the fullest. So, get ready to set sail and embark on an exciting journey with your Sunfish sailboat.
Key takeaway:
- Understanding the Sunfish Sailboat: Familiarize yourself with the key features of a Sunfish sailboat to ensure a safe and enjoyable sailing experience.
- Master the basics: Learn how to properly rig the Sunfish sailboat, understand wind direction and sail trim, and control the rudder for basic sailing techniques.
- Advance your skills: Explore sail positioning and shaping, practice tacking and jibing, and harness the power of the wind to enhance your sailing abilities.
Understanding the Sunfish Sailboat
Get ready to embark on an exciting journey into the world of sunfish sailboats ! In this section, we’ll dive deep into understanding the ins and outs of these magnificent vessels. From exploring the key features that make the sunfish sailboat a true marvel, to discovering the secrets of its exceptional performance, we’ll uncover everything you need to know to become a knowledgeable sailor. So buckle up and get ready to set sail with us!
Key Features of a Sunfish Sailboat
The hull of a Sunfish sailboat is fiberglass, making it lightweight and easy to maneuver. It has a triangular lateen sail that can be easily raised and lowered. The mast is aluminum, providing durability and stability. A daggerboard is used for lateral resistance and can be easily raised or lowered to adjust direction. The cockpit is spacious enough for one or two people to sit or move around comfortably. It has a simple rigging system, allowing for quick and easy setup and takedown. The Sunfish sailboat has a self-bailing cockpit, meaning water automatically drains out for enhanced safety. It has a kick-up rudder, which can be lifted out of the water to avoid obstacles or shallow areas. Known for stability and ease of handling, the Sunfish sailboat is suitable for beginners and experienced sailors. It can be easily transported on top of a car or trailer, making it convenient for sailing in different locations.
The Sunfish sailboat was introduced in 1952 by Alex Bryan and Cortlandt Heyniger . They aimed to create a small, affordable, and versatile sailboat for recreational sailing. The design quickly gained popularity, and millions have been sold worldwide since then. Its accessibility, simplicity, and reliability have made it a favorite choice for beginners and seasoned sailors. Over the years, the Sunfish sailboat has undergone minor design modifications but has remained true to its principles of stability, easy handling, and fun on the water. Today, it continues to be a beloved sailboat for individuals and families looking to enjoy the thrill of sailing in a compact and budget-friendly vessel.
Preparing for Sailing
Want to set sail on a Sunfish ? In this section, we’ll cover all the essential steps to get you ready for a smooth sailing experience. From checking your equipment and safety gear to preparing the Sunfish sailboat , we’ve got you covered. So, grab your sunscreen and let’s dive into the preparations that will ensure a fantastic time out on the water!
Checking Equipment and Safety Gear
Checking Equipment and Safety Gear is essential before setting sail on a Sunfish sailboat. Here is a comprehensive list of steps to follow:
1. Inspect life jackets: Ensure enough life jackets onboard for each person in good condition with no tears or damages.
2. Check safety lines: Verify securely attached and in good working condition.
3. Examine anchor and rope: Make sure anchor securely fastened and rope in good condition, free from fraying or knots.
4. Test horn or whistle: Ensure functioning properly and can produce a loud sound to signal for help if needed.
5. Inspect first aid kit: Check fully stocked with essential items such as bandages, antiseptic wipes, and pain relievers.
6. Verify presence of fire extinguisher: Confirm readily available on the boat and within expiry date.
7. Check communication devices: Test VHF radio or other communication devices onboard to ensure proper working order.
8. Ensure navigation lights are functional: Confirm working correctly, especially if planning to sail at night.
9. Check for any leaks: Inspect boat’s hull for any leaks or damages that could affect buoyancy.
10. Examine rigging and sails: Inspect for signs of wear, tear, or damage. Replace or repair as necessary.
True story: Once, while preparing to sail on a Sunfish, a sailor discovered a tear in their life jacket during the equipment check. Thanks to their thorough inspection, they promptly replaced the damaged life jacket and ensured everyone’s safety on the water. Remember, checking equipment and safety gear is crucial for a safe and enjoyable sailing experience.
Preparing the Sunfish Sailboat
To prepare the Sunfish sailboat, follow these steps:
1. Inspect the hull for damage or cracks. Repair or replace damaged parts.
2. Check the mast and boom for wear or damage. Ensure they are securely attached.
3. Attach the main sail to the halyard and raise it up the mast. Properly tension the sail.
4. Attach the boom to the mast and secure the mainsail to the boom using sail ties.
5. Check the daggerboard and rudder to ensure they are securely in place.
6. Attach the rudder to the stern of the boat and ensure it moves freely.
7. Inspect the lines and rigging to ensure they are in good condition and properly rigged.
8. Check the bailer and mast flotation to ensure they are functioning properly.
9. Attach any necessary safety equipment, such as a life jacket or whistle.
10. Double-check that all equipment is secure and properly fastened.
The Sunfish sailboat , known for its simplicity, affordability, and ease of use, can be prepared by following these steps. It was designed by Alcort, Inc. in the United States during the early 1950s and has gained popularity ever since. The design of the Sunfish sailboat has remained largely unchanged, with minor modifications made for better performance. It is a popular choice among sailors of all skill levels due to its lightweight design and stable hull, which make it suitable for racing, recreational sailing, and teaching sailing techniques. With its timeless design and versatility on the water, the Sunfish is a beloved classic in the world of sailboats.
Basic Sailing Techniques
Mastering the art of sailing a Sunfish requires a deep understanding of basic sailing techniques. From rigging the Sunfish sailboat to navigating wind direction and sail trim, and even mastering the art of steering and controlling the rudder , each sub-section in this voyage of discovery will unlock the essential skills needed to glide smoothly across the water. So grab your lifejacket and let’s embark on this thrilling adventure of Sunfish sailing mastery .
Rigging the Sunfish Sailboat
Rigging the Sunfish Sailboat is necessary before sailing. Follow these steps:
- Attach the mast to the mast step at the front of the Sunfish sailboat.
- Secure the sail to the halyard and hoist it up the mast, ensuring proper attachment.
- Connect the boom to the gooseneck at the bottom of the mast.
- Attach the mainsheet to the rear of the boom and thread it through the blocks on the Sunfish.
- Connect the mainsheet to the traveler, a sliding bar at the back of the boat.
- Attach the rudder to the back of the Sunfish, making sure it is securely in place.
- Check all the lines and rigging to ensure proper tightening and securing.
Once the Sunfish sailboat is rigged, you can start your sailing adventure. Always double-check your rigging before going on the water and familiarize yourself with the boat’s operation. Remember that weather conditions can impact sailing, so adjust the sail trim accordingly. Happy sailing!
Understanding Wind Direction and Sail Trim
Understanding wind direction and sail trim is crucial for successful sailing of a Sunfish sailboat. Adjusting the sail trim based on wind direction is key to optimizing the boat’s performance.
To determine wind direction, look for visual cues such as flags, water ripples, or movement of tree branches. It’s important to remember that wind can change direction, so regularly assess its angle relative to your boat.
Once wind direction is identified, adjust the sail trim accordingly. For effective upwind sailing, tightly trim the sail to catch more wind, creating lift and propelling the boat forward. Conversely, when sailing downwind, ease the sail to maximize the catching area and take advantage of the force of the wind pushing from behind.
Sail trim requires continuous monitoring and adjustment as the wind changes. Experimenting with different trim settings will help you find the optimal balance between speed and control .
Understanding wind direction and sail trim improves with practice and experience. Sailing and observing wind behavior will enhance your ability to instinctively trim the sail and enjoy a smooth and exhilarating sailing experience.
Steering and Controlling the Rudder
- 1. Check rudder position: Before steering the Sunfish sailboat, ensure that the rudder is centered, aligned with the boat’s keel, and straight.
- 2. Hold tiller extension: Firmly grasp the tiller extension, a long handle connected to the rudder. Maintain a comfortable grip while allowing for movement and flexibility.
- 3. Understand tiller and rudder relationship: The tiller is connected to the rudder, and any tiller movement directly affects the rudder’s position. Moving the tiller to the right turns the rudder right, and moving the tiller to the left turns the rudder left.
- 4. Adjust rudder angle: To steer the Sunfish sailboat, adjust the rudder angle. Push the tiller extension to the left to turn right, and push it to the right to turn left.
- 5. Maintain balance and stability: When steering and controlling the rudder, maintain balance and stability on the sailboat. Distribute weight evenly, stay centered in the boat, and make subtle adjustments for control.
Practice steering and controlling the rudder in different weather conditions and sailboat speeds to enhance proficiency. Through practice, you will develop a better understanding of effectively maneuvering the Sunfish sailboat.
Advanced Sailing Skills
Mastering the art of sailing a Sunfish requires more than just the basics. In this section, we’ll dive into advanced sailing skills that will take your Sunfish adventures to the next level. Discover the secrets of effective sail positioning and shaping , the art of tacking and jibing with finesse, and how to truly harness the power of the wind . Get ready to elevate your sailing game and navigate the waters with confidence.
Sail Positioning and Shaping
When sailing a Sunfish, proper sail positioning and shaping are key to efficient sailing. Consider the following factors:
– Wind direction: Position the sail perpendicular to the wind for maximum power.
– Sail shape: Adjust the sail’s shape using the cunningham, outhaul, and boomvang control lines.
– Cunningham: Tighten the cunningham to flatten the sail and reduce draft, especially in strong winds or for better upwind performance.
– Outhaul: Adjust the outhaul to control tension on the foot of the sail. Tightening it flattens the sail for increased speed and control in stronger winds.
– Boomvang: Properly adjust the boomvang to control tension on the leech of the sail and achieve optimal sail shape and control.
– Weight distribution: Positioning your body weight correctly on the boat is crucial for stability and performance. Adjust your position to maintain control and balance.
– Foot position: Properly position your feet on the hiking straps to balance and stabilize the boat. This allows for necessary sail adjustments and effective boat control.
– Continuously observe the sail and make necessary adjustments to adapt to changing wind conditions and optimize performance.
Mastering sail positioning and shaping in Sunfish sailing can greatly enhance your sailing experience and improve overall performance on the water.
Tacking and Jibing
– Prepare the Sunfish sailboat for tacking or jibing by trimming the sail and maintaining a steady speed. Begin the maneuver by turning the bow of the boat into the wind and crossing to the other side. Release the sail as the boat turns to make the turn smoother. Change sides on the boat to balance the weight and aid in the turn. Quickly switch the sail to the new side as the boat completes the turn and the wind fills the sail. Pull in the sail and adjust the trim for the desired speed and direction.
For jibing , turn the stern of the boat through the wind to change the direction. Prepare to release the sail as the boat turns and let it swing across. Cross over to the opposite side of the boat for balance during the turn. Guide the sail smoothly to the new side and adjust the trim accordingly. Continuously monitor the wind and make minor adjustments to maintain control and maximize efficiency.
Harnessing the Power of the Wind
Harnessing the Power of the Wind is crucial for successful Sunfish sailing. Here are some key points to consider:
1. Positioning the sail: Properly position the sail to catch the wind and propel the boat forward. Adjust the sail based on the wind direction and intensity.
2. Sail trim: Maintain proper sail trim to optimize wind capture. Adjust the sheet to keep it taut but not too tight. Watch for signs of luffing or flapping, which indicate insufficient use of wind power.
3. Using the telltales: Utilize the telltales on the sail to determine wind flow across its surface. The position and direction of the telltales help gauge proper sail trim. Adjust the sail to maximize wind efficiency.
4. Feathering: Reduce wind resistance and maintain forward momentum in strong winds by angling the sail away from the wind. This technique prevents excessive heeling and maintains control over the boat.
5. Understanding gusts and lulls: Be aware of changes in wind intensity. In gusts, loosen the sail to prevent overpowering. In lulls, adjust the sail to catch any available wind. Adapting to changing wind conditions improves overall sailing performance.
By implementing these techniques, you can effectively harness the power of the wind during your Sunfish sailing adventures. Practice and experience will improve your understanding of wind dynamics and enhance your sailing skills. Enjoy the exhilaration of harnessing nature’s force and explore the open water with confidence.
Safety Tips and Precautions
- Always prioritize safety when sailing a Sunfish by following these safety tips and precautions.
- Check the weather forecast before setting sail to ensure a safe and enjoyable experience.
- Before launching your Sunfish, inspect it for damages or leaks to prevent any potential accidents.
- To stay within the rules and regulations , familiarize yourself with the sailing rules of your location.
- Be mindful of your surroundings and keep an eye out for other boats or obstacles in the water to maintain a safe voyage.
- Keep a whistle or horn on board so you can easily signal for help in case of emergencies.
- Stay hydrated during your sailing trip by bringing enough water for your journey.
- Protect yourself from the sun’s harmful rays by wearing sunscreen and a hat.
Always prioritize safety when sailing a Sunfish and follow these precautions for a pleasant and secure sailing experience.
Common Mistakes to Avoid
- Not wearing a life jacket: Avoid not wearing a life jacket while sailing a Sunfish. Prioritize safety on the water and always wear a properly fitted life jacket to prevent accidents or drowning.
- Ignoring weather conditions: Avoid ignoring weather conditions. Check the weather forecast before sailing. Strong winds, storms, or other adverse conditions can make sailing difficult and dangerous.
- Overlooking proper rigging: Properly rigging the Sunfish is essential for a successful sail. Don’t overlook the rigging process. Ensure the mast, boom, and sail are correctly attached and tensioned for optimal sailing.
- Not understanding the centerboard: The centerboard plays a crucial role in maneuvering the Sunfish. Understand how to use it correctly for control and stability. Learn how to adjust it based on wind and water conditions.
- Forgetting to secure the mainsheet: The mainsheet controls the sail’s position and power. Avoid forgetting to secure it properly to prevent accidental jibes and loss of control.
Some Facts About How To Sail A Sunfish:
- ✅ The Sunfish is a small, one-person sailboat that has been popular for generations. (Source: Our Team)
- ✅ It is a personal-size, beach-launched sailing dinghy with a flat hull and a crab claw sail. (Source: Our Team)
- ✅ The Sunfish was developed by Alcort, Inc. in the 1950s and has since become the most popular fiberglass boat ever designed, with a quarter million sold worldwide. (Source: Our Team)
- ✅ Setting up a Sunfish takes less than 10 minutes and requires no special knowledge or fancy sailor’s knots. (Source: Our Team)
- ✅ There are resources available, such as YouTube videos and sailing classes, to help beginners learn to sail a Sunfish. (Source: Our Team)
Frequently Asked Questions
1. how long does it take to set up a sunfish sailboat.
Setting up a Sunfish takes less than 10 minutes and requires no special knowledge or fancy sailor’s knots.
2. Can a Sunfish sailboat be launched from anywhere?
Yes, a Sunfish sailboat can be launched from the beach, dock, or anywhere with water access.
3. Are there resources available to help beginners learn to sail a Sunfish?
Yes, there are resources available such as YouTube videos and sailing classes that can help beginners learn to sail a Sunfish.
4. What is the sail plan and hull of a sailboat?
The sail plan and hull of a sailboat create lift forces in 3 dimensions as they react to wind and water.
5. How can I achieve balance and control while sailing a Sunfish?
Balancing the forces of the sail and hull is key to maintaining control and speed. Experimentation and practice are necessary to find the best settings and achieve comfort and control while sailing.
6. What are some tips for adjusting the sail’s center of effort and improving control?
Lowering the sail on the mast can help reduce heeling and allow for better control through hiking. Adjusting the gooseneck on the boom can reduce weather helm and improve control. Other controls like the vang, outhaul, and cunningham can further tweak the sail’s center of effort and de-power the sail.
About the author

Leave a Reply Cancel reply
Your email address will not be published. Required fields are marked *
Save my name, email, and website in this browser for the next time I comment.
Latest posts

The history of sailing – from ancient times to modern adventures
History of Sailing Sailing is a time-honored tradition that has evolved over millennia, from its humble beginnings as a means of transportation to a beloved modern-day recreational activity. The history of sailing is a fascinating journey that spans cultures and centuries, rich in innovation and adventure. In this article, we’ll explore the remarkable evolution of…

Sailing Solo: Adventures and Challenges of Single-Handed Sailing
Solo Sailing Sailing has always been a pursuit of freedom, adventure, and self-discovery. While sailing with a crew is a fantastic experience, there’s a unique allure to sailing solo – just you, the wind, and the open sea. Single-handed sailing, as it’s often called, is a journey of self-reliance, resilience, and the ultimate test of…

Sustainable Sailing: Eco-Friendly Practices on the boat
Eco Friendly Sailing Sailing is an exhilarating and timeless way to explore the beauty of the open water, but it’s important to remember that our oceans and environment need our protection. Sustainable sailing, which involves eco-friendly practices and mindful decision-making, allows sailors to enjoy their adventures while minimizing their impact on the environment. In this…
FREE STANDARD SHIPPING ON ALL ORDERS. Details
- Prevail III Inshore Spinning Rod
- Spinfisher VII Spinning Reel
- Squall II Lever Drag Conventional Reel
- Wrath II Spinning Reel
- Battle III LE Combo
- Slammer IV Spinning Reel 6500 5:6:1
- International VISX Extreme Conventional Reel 50 3:5:1
- Fathom II Lever Drag Two-Speed Conventional Reel 60N
- Inshore Fishing
- Nearshore Fishing
- Offshore Fishing
- Surf Fishing
- 1000 - 2000
- 2000 - 3000
- 3000 - 4000
- 4000 - 5000
- 5000 - 6000
- 6000 - 7000
- 7000 - 8000
- International
- Pliers & Crimps
- Filet Knives
- Line Winder
- Oil, Grease & Cleaner
- Rod and Reel Covers
- Performance Wear
Your cart is currently empty. Stock up on what you need for your next adventure.
- Inshore fishing reels
- Saltwater rods
- Fishing gear
- Inshore fishing combos
- Fillet knife
- Casting rods
- Spinning rods
- Shipping Information
- Track Your Order
- Register Your Product
- Returns Policy
- Warranty Policy
- Repairs & Services
- Performance Parts
- Dealer Locator
- Privacy Policy
- Terms of Use
- ADA Statement
Repairs & Services
Professional repairs.
Let our trained staff of technicians, or your local authorized reel warranty center, inspect your reels, put them in perfect working condition, and make them look and work like new again.
Reel Service
Need your PENN reels repaired, greased or cleaned? Let our trained staff of professional technicians inspect your reels, put them in perfect working condition, and make them look and work like new again.
What We Need From You
- Your reel (Please make sure you properly package and insure your reel. We recommend you send your reels to PENN via UPS so that the shipment can be tracked and we can verify receipt of your goods.)
- Dated reel proof of purchase (For warranty consideration a dated proof of purchase must be included with returned product.)
- Completed Repair Form (Please DO NOT Send C ash)
Where to Send Your Reel
In the U.S.
- Factory Service Department PENN Fishing Tackle Mfg. Co. 3028 West Hunting Park Avenue Philadelphia, PA 19132 (800) 892-5444
- Aikman’s Sporting Goods Repair 3010 Novar Road Mississauga, ON L5B 1S4 (905) 277-3595 [email protected]
Mike's Reel Repair #208-45910 Rowat Ave Chilliwack, BC, V2P0L2
Reel Repair Pricing
- Handling/Processing/Packaging/Diagnosis/Supplies Fixed fee = $10.00 per reel
- Flat Labor rate = Based on model
- Parts = Per Consumer Price List
- Shipping = Per UPS rates
Parts & Service
Reels are completely disassembled, degreased and cleaned, all parts are inspected, worn parts are replaced, reel is properly lubricated, reassembled and inspected for proper operation.
Shipping charges are based on the weight of the shipment, value of the shipment, destination and number of reels in the shipment.
Reels No Longer Serviced
We regret to inform you that we are no longer able to service the following PENN reels and downriggers. We appreciate your patronage and apologize for any inconvenience this may cause you.
Spinning reels:
- AF/Affinity
- Captiva/CV2
- Spinfisher Greenie & Z-Series
- Silver Series
Conventional reels:
- GLS Lever Drag
- Baitcast/Levelmatic (910/920/930/940)
- GTO Level Wind
- Mag Power 970/80/90
- 800 Series of line counter reels
- Mariner Series
- 118 16/0 Senator reel
- Electric/Manual Downriggers
While we no longer service these reels, they are still eligible for our exchange program, which offers customers an upgrade to a new series of reel (refurbished or new) at a discounted price with a full one-year warranty. If your PENN reel is not on this list, please contact us for information about servicing/exchanging your reel.
Rod Service
PENN warrants to the original purchaser that its rods are free from defects in materials or workmanship for a period of one year from the date of purchase. PENN is not responsible for normal wear and tear, nor failures caused by accidents, abuse, alteration, modification, misuse or improper care. This applies to either rods purchased separately or as a combo unit.
We do not offer repair or parts for rods. If your rod failed due to a manufacturing defect and is still under warranty, we will be happy to replace it with a new rod of the same or a comparable model. If your rod is within the original warranty period, we will need to inspect your rod to determine the nature of the defect. Please send the following items to [email protected] . These easy steps will help us take care of your warranty claim as efficiently as possible:
- Photograph of rod clearly showing the model (found directly above the handle)
- Photograph clearly showing the broken area(s) of the rod
- Copy of the dated receipt or proof of purchase
- A brief description of how your rod broke
- Your address and a daytime contact number
Rods under warranty will be replaced for a processing fee of $19.95 US. We will contact you directly to take payment, which can be made by phone via credit card. In the event your rod is no longer manufactured or is currently unavailable, we will also give you a call to discuss your replacement options. Rods that do not qualify for warranty replacement may also be submitted for a discounted replacement. Please contact us directly for details at (800) 892 – 5444 (Monday thru Friday, 8 AM- 6 PM EST).
- Choosing a selection results in a full page refresh.
Fibrenew Loudoun
Photos & videos.
See all 21 photos

Services Offered
Verified by Business
Furniture repair
You Might Also Consider

Asco American Stripping
18.8 miles away from Fibrenew Loudoun
John C. said "I have a very old cast iron antique that is a family heirloom. It was in tough shape and needed stripped down and painted. After researching and reading a lot of reviews I went to ASCO. Turned out to be the perfect place. I brought…" read more
in Powder Coating

Nick Greer Antiques Conservator
15.2 miles away from Fibrenew Loudoun
Restore your favorite antiques to a like-new condition with reliable antique restoration services from Nick Greer Antiques Conservator. Our 14-member team has a diverse set of specialty skills and extensive experience. We measure… read more
in Furniture Reupholstery, Antiques, Furniture Repair

Professional Carpet Restoration
S D. said "I don't usually post reviews but please stop browsing and just call PCR! You won't regret it! 1. They don't push products or services. I hate when people do this but they are actually interested in helping you resolve your issue…" read more
in Damage Restoration, Carpet Cleaning
About the Business
Business owner information
Business Owner
Fibrenew Loudoun specializes in the repair, restoration and renewal of leather, plastics, vinyl, fabric and upholstery servicing six major markets: automotive, aviation, commercial, medical, marine and residential. Utilizing our services to repair damaged materials in your vehicle, boat, airplane, home or office offers an environmentally-friendly and cost-effective alternative to replacement. Leather Repair, Vinyl Restoration and Plastic Renewal Services in: Centreville, VA; Reston, VA; Leesburg, VA; McLean, VA; Ashburn, VA; Oakton, VA; Sterling, VA; Winchester, VA; South Riding, VA; Herndon, VA; Chantilly, VA; Fairfax, VA; Lincoln, VA; Aldie, VA; Franklin Farm, VA; Vienna, VA; Great Falls, VA; Gainesville, VA; Purcellville, VA; Warrenton, VA; Oak Hill, VA …
Location & Hours
Suggest an edit

Ashburn, VA 20147
Serving Ashburn Area
Amenities and More
Ask the community.
Ask a question
Yelp users haven’t asked any questions yet about Fibrenew Loudoun .
Recommended Reviews
- 1 star rating Not good
- 2 star rating Could’ve been better
- 3 star rating OK
- 4 star rating Good
- 5 star rating Great
Select your rating
Overall rating
I accidentally gouged the faux leather steering wheel of my Tesla with a coat zipper and found Michael after researching other leather repair and auto upholstery shops. He came to my house and repaired the nearly two inch long damage so that it was good as new and virtually indistinguishable from the original. His service was prompt and efficient and the cost more than reasonable. Months later, I noticed the repair starting to wear away and reached out again to Michael to touch things up. He was back at my house within days and refinished what I thought to be normal wear and tear, refusing to take any payment for it, not even a tip to buy so much as a cup of coffee. A man who stands behind his work, how rare is that these days? He is a true professional and if you need any kind of leather repair you need look no further.
a true artist my boy wrote on our seats with a pen the front drivers seat was worn from use repaired like new very fair pricing very very nice guy ultra professional
1 other review that is not currently recommended

Sparkle Upholstery
23.3 miles away from Fibrenew Loudoun
Kathi K. said "These folks are incredible! My elderly mother had to stay with me after I had an accident and she could not get up from my sagging couch cushions. I called Sparkle Upholstery and she told me they could fix them the same day. They…" read more
in Furniture Repair, Furniture Reupholstery

Signature Elevators & Accessible Design
17.2 miles away from Fibrenew Loudoun
Bob S. said "My wife and I have a PVE37 (two-person) elevator installed by Signature Elevators & Accessible Design in March 2019. It's clear, cylindrical walls blend in perfectly with our home's modern design. The elevator has been almost…" read more
in Elevator Services
Browse Nearby
Thrift Stores
Restaurants
Things to Do
Sewing & Alterations
Junk Removal & Hauling
Furniture Repair Cost Guide
Recliner Repair Near Me
Other Furniture Repair Nearby
Find more Furniture Repair near Fibrenew Loudoun
People found Fibrenew Loudoun by searching for…
Leather Repair Ashburn
Related Cost Guides
Air Duct Cleaning
Appliances & Repair
Art Restoration
Furniture Repair
Septic Services
Vocal Coaches
Watch Repair
- 5 More Cost Guides
People Also Viewed

Custom Upholstering & Total Restorations

Antonio Martinez Furniture Repair

Termini Furniture Service

Leather Clinic

Refinishing Express
ALREADY COVERED INTERIORS & UPHOLSTERY LLC

Chesapeake Artistry

Harry C Johnson & Son

Oriental Rug Weavers

J&D Upholstery
IMAGES
VIDEO
COMMENTS
I made this group for owners who are trying to repair their Sunfish and Sailfish boats. Please post pics and give explanations of your project boats. I seek to help people find parts, and make...
Bucket and water. 12 chunks of terry cloth (cut up old bath towels into 8 chunks each) Wet-sand paper in 320, 400, 500, 600, 800, 1000, and 1500 grits. If your scratches are particularly large or numerous you may also want 180 and 240 grit papers. For whichever grit you use first you will need about 5 sheets.
Sunfish Repair Notes. WARNING: ... With the paint brush, apply soapy solution around the outside edge of the boat, (where the deck and hull seam is), around the mast tube and daggerboard trunk. Note: You must also soap the bottom of the daggerboard trunk at the same time. Draw a solid bubble across the mast tube opening.
Sunfish Hull Repair - Shoreline Method. March 30, 2014. Keel repair - old method. One of our customers wanted us to repair damage that was done to his Sunfish hull during a storm on Lake Ontario. Looking at videos we found that many people cut out the damage on a keel area and replace it with newly laid fiberglass. If the keel was ...
try—to remove it. All that happened was some of the edge material got stressed. (Kind of like "spider cracks" in Sunfish gelcoat—you can see about three small horizontal lines in the photo below). A repair kit is made for TPO roofs, but their minimum order was a bit much in dollars, and too much in material.
Brad started with Sunfish sails in his basement in 1966. Since then he has made thousands of sails for boats from dinghies to ocean going cruisers. Need a Gaff sail? ... We offers expert sail repair, sail modification, cleaning, canvas work, rigging, and cushion cleaning. Linthicum Sailmakers is conveniently located near the Route 30 (White ...
Shoreline fiberglass batten method for fixing inaccessible areas in a sailboat hull.
Remove this material and re-glass. If you are repairing an area that has completely penetrated the laminate, try to bevel out an area 12X the laminate thickness in order to do a proper repair. In other words a hole in a 1/4 inch laminate would require a 3 inch diameter bevelled area to glass in.
As a Sunfish sailboat owner, it is important to learn how to repair your boat. The Sunfish sailboat comes with many parts that can become damaged over time. Some of these parts are more likely than others to require replacement, but all should be looked at carefully before each trip out on the water. It is also important to make sure that ...
I bought a Sunfish Sailboat for $100 and unsurprisingly it needs some work. There are a few holes in the fiberglass and a few very questionable past repairs....
1977 AMF Alcort Sunfish Sailboat Restoration. I purchased an old (1977 manufacture date) AMF Alcort Sunfish 14 foot sailing dinghy. It was mostly complete and almost "ready-to-sail", except for the broken auto-bailer, and cracked rudder, but the price was right. Since I had to repair the crack in the rudder, I decided to go overboard and ...
Don Gutzmer restores a Sunfish sailboat to its original beauty with with his know-how, a little elbow grease, and WEST SYSTEM Epoxy. Epoxyworks Building, restoration, and repair with epoxy ... Wooden Boat Repair and tagged #44, brightwork, Don Gutzmer, Epoxyworks 44, Spring 2017, Sunfish on April 8, 2017 by Grace Ombry.
Shoreline Sailboats method of repairing structural cracks in Sunfish Sailboat hulls using fiberglass battens as backer cleats.
The Sunfish Owner's Manual is a one stop resource for the world's most popular sailboat. Inside there are chapters on the History of the Sunfish, and illustrated chapters on how to Buy, Rig, Sail, Maintain, Restore, Store, Transport and Sell the Sunfish.
AeroSouth, Sunfish Mainsheet Hanger Clip (Set of 3, Blue), SNF-MNS-HNG-CLP-B. Set of three Sunfish mainsheet hanger clips. Made of durable PETG plastic. Fitted for the 1.5" diam.. $25.00. Sunfish Direct offers a complete line of sunfish hardware, parts and supplies for the sunfish enthusiasts. One source for all of your sunfish parts and sales.
Repair or replace damaged parts. 2. Check the mast and boom for wear or damage. Ensure they are securely attached. 3. Attach the main sail to the halyard and raise it up the mast. Properly tension the sail. ... The Sunfish sailboat, known for its simplicity, affordability, and ease of use, ...
in this Video, Sunfish Sailor, Lee Montes, shows all sunfish sailing enthusiasts how to repair their Mast Base or Mast Caps for their Sunfish and Laser Sailb...
Find new and used sailboats for sale in Virginia, including boat prices, photos, and more. For sale by owner, boat dealers and manufacturers - find your boat at Boat Trader!
Factory Service Department. PENN Fishing Tackle Mfg. Co. 3028 West Hunting Park Avenue. Philadelphia, PA 19132. (800) 892-5444. In Canada. Aikman's Sporting Goods Repair. 3010 Novar Road. Mississauga, ON L5B 1S4.
There are two boat ramps that allow anglers access to the lake: DWR boat ramp is located at the back of a protected cove near the dam and is for angler use only. The other boat ramp is located in Burke Lake Park around the mid-lake region. Handicapped-accessible fishing piers are positioned near the dam and can be reached from the DWR boat ramp ...
Sunfish sailboat deck seam repair, foam replacement, bow handle backer
Sunfish Sailor, Lee Montes, reviews How to Repair Corroded and Broken Sunfish Spars so you can sail for years to come. This easy to do repair helps you main...
Specialties: Fibrenew Loudoun specializes in the repair, restoration and renewal of leather, plastics, vinyl, fabric and upholstery servicing six major markets: automotive, aviation, commercial, medical, marine and residential. Utilizing our services to repair damaged materials in your vehicle, boat, airplane, home or office offers an environmentally-friendly and cost-effective alternative to ...