Reviving Your Sunfish: How To Repaint And Restore Your Beloved Sailboat
- Last updated Dec 09, 2023
- Difficulty Beginner
- Category Sunfish

Are you ready to set sail and embark on a thrilling adventure in the open waters? If you are a proud owner of a Sunfish sailboat, you must know that the key to maintaining its beauty and longevity lies in proper care and maintenance. One crucial aspect of this is repainting your Sunfish when its vibrant colors start to fade away. In this guide, we will unravel the secrets to repainting your Sunfish, reviving its stunning appearance, and ensuring many more delightful voyages to come. So grab your paintbrushes and let's dive into the world of Sunfish restoration!

What You'll Learn
What steps are involved in preparing a sunfish for repainting, what type of paint should be used on a sunfish for the best results, can i repaint a sunfish without removing the old paint first, how long does it typically take to repaint a sunfish from start to finish, are there any special techniques or tools required for repainting a sunfish.
Preparing a Sunfish for Repainting: Step-by-Step Guide
If you own a Sunfish sailboat, you may eventually find that its paint has become worn or faded, and that it's time to give it a fresh coat. Repainting a Sunfish can be a fun and rewarding project, but it requires careful preparation to achieve the best results. In this article, we will guide you through the step-by-step process of preparing a Sunfish for repainting.
Step 1: Evaluate the Condition of the Sunfish
Before you start the repainting process, take a close look at the boat's current condition. Assess the condition of the existing paint, as well as any areas of damage or imperfections. This evaluation will help you determine the amount of preparation work required and the type of paint you will need.
Step 2: Gather the Necessary Tools and Materials
To prepare a Sunfish for repainting, you will need a variety of tools and materials. These may include sandpaper, a putty knife or scraper, a heat gun or hairdryer, a solvent or paint stripper, a primer, a paintbrush or roller, and the desired paint color. Make sure you have all the necessary supplies before you begin.
Step 3: Remove the Old Paint
The first step in preparing a Sunfish for repainting is to remove the old paint. Start by using a scraper or putty knife to carefully scrape off any loose or flaking paint. Be gentle to avoid damaging the boat's surface. Next, use sandpaper to smooth out any rough areas or remaining paint. You may need to use a heat gun or hairdryer to soften stubborn paint for easier removal. If the existing paint is in good condition, you may be able to skip this step and proceed directly to surface preparation.
Step 4: Surface Preparation
After removing or evaluating the existing paint, it's time to prepare the surface for the new paint. Start by washing the boat thoroughly to remove any dirt, grease, or other contaminants. Use a mild detergent and water, and rinse thoroughly. Once the boat is clean and dry, use sandpaper to lightly roughen the surface. This will help the new paint adhere better.
Step 5: Fill in Imperfections
Inspect the boat for any imperfections, such as dents, scratches, or holes. Use a suitable filler, such as epoxy or wood filler, to fill in these areas. Follow the manufacturer's instructions for mixing and applying the filler. After the filler has dried, use sandpaper to smooth the repaired areas until they are level with the surrounding surface.
Step 6: Apply Primer
Priming the surface is an essential step to ensure good adhesion and durability of the new paint. Choose a primer that is compatible with the type of paint you will be using. Apply the primer in thin, even coats, following the manufacturer's instructions. Let each coat dry completely before applying the next. Sand the primed surface lightly between coats to promote adhesion.
Step 7: Paint the Sunfish
Finally, it's time to paint the Sunfish. Choose a high-quality marine paint that is suitable for the specific conditions in which you will be using the boat. Apply the paint in thin, even coats using a brush or roller. Allow each coat to dry fully before applying the next. Depending on the desired finish, you may need to apply multiple coats of paint.
Step 8: Finishing Touches
Once the final coat of paint has dried, inspect the boat for any areas that may need touch-ups or corrections. Use a fine-grit sandpaper to smooth out any imperfections or rough spots. If desired, apply a clear protective coat to enhance the durability and shine of the paint job.
By following these step-by-step instructions, you can successfully prepare your Sunfish for repainting and achieve a professional-looking finish. Remember to take your time, work carefully, and consult the manufacturer's instructions for any specific products or techniques you may be using. Happy painting!
Unraveling the Myth: Can Sunfish Really Bite?
You may want to see also
When it comes to painting a sunfish, selecting the right type of paint is crucial for achieving the best results. The type of paint you choose will determine the durability, appearance, and overall longevity of the paint job. In this article, we will explore the different types of paint that can be used on a sunfish and discuss the factors to consider in order to make an informed decision.
Types of paint:
A. Marine-grade paint: Marine-grade paint is specifically designed for use on boats and other watercraft. It is highly durable and resistant to water, UV rays, and other harsh elements. Marine-grade paints are available in both single-part and two-part formulations. Single-part marine paints are easier to apply and more forgiving, while two-part marine paints offer superior durability and finish.
B. Epoxy-based paint: Epoxy-based paints provide excellent adhesion and protection for surfaces that are exposed to water and weather. They are known for their high gloss, chemical resistance, and long-lasting finish. Epoxy-based paints are available in various colors, making them suitable for sunfish sailboats.
C. Polyurethane paint: Polyurethane paint is a popular choice for both aesthetic and functional reasons. It provides a hard, glossy finish and excellent UV protection. Polyurethane paints are resistant to chipping, scratching, and fading, making them highly suitable for sunfish sailboats that are frequently exposed to the sun.
Factors to consider:
A. Application method: Consider the application method you prefer or are comfortable with. Some paints are designed for brush application, while others can be sprayed or rolled onto the surface. Ensure that the paint you choose can be applied using your desired method.
B. Environment: Consider the environment in which your sunfish will be used. If you often sail in saltwater, a marine-grade paint that is resistant to corrosion is recommended. If you sail in freshwater or a mixture of both, epoxy-based or polyurethane paint can provide adequate protection.
C. Budget: Your budget may also be a determining factor in the type of paint you choose. Marine-grade paints and two-part epoxy paints tend to be more expensive than single-part marine paints or polyurethane paints.
Step-by-step process:
A. Preparation: Before painting your sunfish, ensure that the surface is clean, dry, and free of any debris or contaminants. Sand the surface lightly to create a rough texture for better paint adhesion.
B. Priming: Apply a suitable primer to the surface for enhanced adhesion and to create a smooth base for the paint. Follow the manufacturer's instructions for the specific primer you choose.
C. Painting: Apply the chosen paint using the recommended application method. Start with a thin coat and allow it to dry before applying subsequent coats. Follow the manufacturer's instructions for the recommended number of coats and drying time between coats.
D. Finishing: Once the final coat is applied, allow the paint to cure fully according to the manufacturer's instructions. This may require several days or even weeks, depending on the type of paint.
Example 1: "I have been using a marine-grade paint for my sunfish sailboat for the past five years, and it still looks as good as new. It has withstood the harsh Florida sun and saltwater exposure without any signs of fading or deterioration."
Example 2: "I recently painted my sunfish sailboat with a two-part epoxy-based paint, and I am thrilled with the results. The finish is smooth and glossy, and the paint has held up exceptionally well in both freshwater and saltwater conditions."
In conclusion, choosing the right type of paint for your sunfish sailboat is essential for achieving the best results. Consider factors such as application method, environment, and budget when making your decision. Whether you opt for a marine-grade paint, epoxy-based paint, or polyurethane paint, following the recommended preparation and application steps will help you achieve a professional-looking and long-lasting paint job.
Protecting the Bluebarred Pygmy Sunfish: A Conservation Effort
If you are considering repainting your sunfish, you may be wondering whether you can simply apply a new coat of paint over the existing one or if it is necessary to remove the old paint first. While it is technically possible to repaint a sunfish without removing the old paint, it is generally recommended to take the extra step of removing the old paint for a longer-lasting and more professional finish.
When it comes to repainting any surface, proper preparation is key. This includes ensuring that the surface is clean, smooth, and free of any loose or flaking paint. By painting over old, damaged paint, you may be creating an uneven surface that can compromise the quality and longevity of the new paint job.
Here are some reasons why it is beneficial to remove the old paint before repainting a sunfish:
- Adhesion: The new coat of paint will adhere much better to a clean, bare surface. By removing the old paint, you are creating a smooth and stable base for the new paint to bond to. This will help prevent peeling or flaking of the new paint in the future.
- Durability: Removing the old paint allows you to inspect the surface for any underlying damage or imperfections that may need to be addressed before repainting. By fixing these issues beforehand, you can ensure that the new paint job will be durable and long-lasting.
- Appearance: Removing the old paint gives you the opportunity to start with a clean canvas. It allows you to achieve a smoother and more aesthetically pleasing finish, especially if the previous paint job had any imperfections or inconsistencies.
Now that we understand the importance of removing the old paint, let's explore the step-by-step process of repainting a sunfish:
Step 1: Gather the necessary tools and materials. This may include paint scraper or sandpaper, a power sander, putty knife, masking tape, primer, paint, brushes or rollers, and protective gear.
Step 2: Prepare the surface. If the old paint is peeling or flaking, use a paint scraper or sandpaper to remove as much of it as possible. For stubborn areas, a power sander can be used. Be sure to wear protective gear such as goggles and a mask to avoid inhaling any dust or debris.
Step 3: Smooth out any imperfections. Use a putty knife to fill in any holes or cracks in the surface with an appropriate filler or putty. Allow it to dry and then sand it down to create a smooth, even surface.
Step 4: Clean the surface. Use a mild detergent and water solution to remove any dirt, grease, or contaminants from the sunfish. Rinse thoroughly and allow it to dry completely.
Step 5: Apply primer. Priming the surface is crucial as it helps the new paint adhere better and provides an extra layer of protection. Follow the manufacturer's instructions for the specific primer you are using.
Step 6: Apply the new paint. Once the primer has dried, apply the new paint using a brush or roller. Follow the manufacturer's instructions for the recommended number of coats and drying times. Be sure to apply thin, even layers for the best results.
By following these steps and taking the time to properly prepare the surface, you can achieve a professional-looking paint job that will withstand the elements and enhance the appearance of your sunfish. Remember, while it may be tempting to take shortcuts, investing the extra effort in removing the old paint will yield better and longer-lasting results.
Are Older AMF Sunfish Sailboats Still a Good Option for Sailing Enthusiasts?
Repainting a Sunfish sailboat can be a rewarding and exciting project for boat owners and enthusiasts. It allows for personalization and restoration, enhancing both the appearance and longevity of the boat. However, proper planning and execution are crucial to ensure optimal results. One common question among Sunfish owners is how long it typically takes to repaint a Sunfish from start to finish.
The time it takes to repaint a Sunfish can vary depending on a few factors such as the condition of the boat, the desired finish, and the experience of the person undertaking the project. On average, it can take anywhere from a few days to a couple of weeks to complete the entire repainting process.
The first step in repainting a Sunfish is preparing the boat's surface. This typically involves sanding the existing paint or gel coat to create a smooth and clean surface for the new paint to adhere to. The time required for this step can vary depending on the size of the boat and the condition of the existing paint. In some cases, extensive sanding and preparation may be necessary, which can add to the overall time.
Once the surface is properly prepared, the next step is applying the primer. Primer helps to create a strong bond between the boat's surface and the new paint. The time required for primer application and drying can vary depending on the type of primer used and the weather conditions. It is essential to follow the manufacturer's instructions regarding drying times and application techniques to ensure the best results.
After the primer has dried, it is time to apply the new paint. The choice of paint can have a significant impact on the overall time required for this step. Some paints require multiple coats with drying time in between, while others may require fewer coats. Additionally, the drying time between each coat can vary depending on the paint type and ambient temperature.
Once the final coat of paint has been applied, it is crucial to allow sufficient drying time before using or launching the boat. This curing period can range from a few days to a couple of weeks, depending on the paint type and the environmental conditions.
It is important to note that the above time frames are approximate and can vary based on individual circumstances. Factors such as weather conditions, the availability of proper tools and equipment, and personal experience can significantly impact the overall time required.
To provide a real-life example, let's consider a scenario where a Sunfish sailboat owner with moderate experience undertakes the repainting process. Assuming the boat is in average condition and using a paint system that requires two coats, the entire repainting process can take approximately 10-14 days. This includes the time required for surface preparation, primer application, paint application, and drying/curing. However, it is crucial to allocate additional time for unexpected delays or complications that may arise during the process.
In conclusion, repainting a Sunfish sailboat can take anywhere from a few days to a couple of weeks, depending on various factors. Proper planning, preparation, and execution are key to achieving a successful and aesthetically pleasing result. It is recommended to consult with professionals or experienced individuals in order to ensure optimal results and to make the most of this exciting DIY project.
Examining the Presence of a Black Dot on the Dorsal of Green Sunfish
Repainting a Sunfish sailboat can be a fun and rewarding project that can bring new life to your vessel. However, there are some special techniques and tools that are required to ensure a successful and long-lasting paint job. In this article, we will explore these techniques and tools in detail, providing step-by-step instructions and examples along the way.
Preparation:
Before you begin repainting your Sunfish, it is important to prepare the surface properly. Start by removing any old paint or varnish using a paint stripper or sandpaper. This will ensure that the new paint adheres properly. Next, clean the surface thoroughly using a mild detergent and water, removing any dirt, grease, or contaminants. Once the surface is clean and dry, you can move on to the next step.
Choosing the right paint:
Selecting the right type of paint for your Sunfish is crucial for a successful job. Marine-grade paints are recommended as they are designed to withstand exposure to water and UV rays. Look for paints that are specifically formulated for use on fiberglass or similar materials. These paints often have added UV protection and are resistant to fading and peeling.
Priming the surface before painting is important as it provides a smooth and even base for the top coat. Apply a high-quality primer that is compatible with the paint you have chosen. Use a brush or roller to apply the primer evenly, following the manufacturer's instructions. Allow the primer to dry completely before moving on to the next step.
Applying the top coat:
When applying the top coat, it is important to work in a well-ventilated area to ensure proper drying and to avoid inhaling any fumes. Use a brush or roller to apply the paint, using long, even strokes. Avoid applying the paint too thickly as this can lead to runs or drips. Multiple thin coats are preferred over one thick coat. Allow each coat to dry completely before applying the next one. Depending on the paint you are using, you may need to sand lightly between coats to ensure good adhesion.
Finishing touches:
Once the final coat of paint has dried completely, inspect the surface for any imperfections. If necessary, lightly sand any rough spots or drips and touch-up the paint as needed. For added protection and a polished finish, consider applying a clear topcoat or a marine wax designed for fiberglass surfaces.
As for the tools required for repainting a Sunfish, here are the essentials:
- Paintbrushes or rollers: Choose brushes or rollers that are suitable for the type of paint you are using. Synthetic brushes and foam rollers are often recommended for a smoother finish.
- Sandpaper: Different grits of sandpaper will be needed for surface preparation and for sanding between coats. Start with a coarse grit for removing old paint or varnish and use progressively finer grits for sanding between coats.
- Paint striper: This is optional but can be useful for removing old paint or varnish from the surface.
- Primer: Use a high-quality marine-grade primer that is compatible with the paint you have chosen.
- Paint: Select a marine-grade paint that is specifically formulated for use on fiberglass or similar materials.
- Protective gear: Wear appropriate protective gear such as gloves, goggles, and a mask to protect yourself from chemicals, fumes, and any potential hazards.
In conclusion, repainting a Sunfish sailboat requires proper preparation, selection of the right paint, and the use of suitable tools. By following the steps outlined in this article and using the recommended techniques and tools, you can achieve a professional-looking paint job that will not only enhance the appearance of your sailboat but also provide long-lasting protection against the elements.
The Surprising Rate at Which Sunfish Grow Revealed
Frequently asked questions.
To repaint a Sunfish, you will need several materials and tools. These include sandpaper, a paint scraper, a primer, marine-grade paint that is suitable for fiberglass, a paint roller or brush, masking tape, and a clear coat sealant. It is also a good idea to have some rags and a bucket of soapy water for cleaning.
Before you can begin repainting the Sunfish, you need to adequately prepare the surface. Start by using a paint scraper to remove any old paint that is loose or peeling. Then, use sandpaper to smooth out any rough areas or imperfections. Once the surface is smooth, clean it thoroughly with soapy water to remove any dirt, grease, or contaminants. Finally, use masking tape to protect any areas that you do not want to paint.
The number of coats of paint you should apply to the Sunfish will depend on personal preference and the condition of the boat. In general, it is recommended to apply at least two to three coats of paint for optimal coverage and durability. However, if the existing paint is in good condition and you are simply looking to refresh the color, you may be able to get away with just one or two coats.
The lifespan of the paint on a Sunfish will vary depending on several factors, including the quality of the paint, how well it was applied, and how the boat is used and maintained. Generally, a well-applied and maintained paint job can last several years before needing to be repainted. However, it is important to regularly inspect the paint for any signs of damage or wear, and touch up or repaint as needed to ensure the boat stays protected and looking its best.

- Mark Terry Author Editor Reviewer

- Hadwin Blanton Author Editor Reviewer
It is awesome. Thank you for your feedback!
We are sorry. Plesae let us know what went wrong?
We will update our content. Thank you for your feedback!
Leave a comment
Sunfish photos, related posts.

Uncover the Diet of Sunfish: Do Fish Consume Sunfish Minnows?
- Dec 09, 2023

Does Monterey Bay Aquarium Have Sunfish?

Discovering the Perfect Guidebook for Sunfish Casserole Recipes

Understanding the Purpose and Uses of a Sunfish Knife

Finding the Perfect Temperature and Depth for Sunfish: A Guide for Anglers

The Ultimate Guide to Selling a Sunfish and Maximizing Your Profit
- Sports & Outdoors
- Water Sports
Enjoy fast, free delivery, exclusive deals, and award-winning movies & TV shows with Prime Try Prime and start saving today with fast, free delivery
Amazon Prime includes:
Fast, FREE Delivery is available to Prime members. To join, select "Try Amazon Prime and start saving today with Fast, FREE Delivery" below the Add to Cart button.
- Cardmembers earn 5% Back at Amazon.com with a Prime Credit Card.
- Unlimited Free Two-Day Delivery
- Streaming of thousands of movies and TV shows with limited ads on Prime Video.
- A Kindle book to borrow for free each month - with no due dates
- Listen to over 2 million songs and hundreds of playlists
- Unlimited photo storage with anywhere access
Important: Your credit card will NOT be charged when you start your free trial or if you cancel during the trial period. If you're happy with Amazon Prime, do nothing. At the end of the free trial, your membership will automatically upgrade to a monthly membership.
Buy new: $39.95 $39.95 FREE delivery: Tuesday, April 2 Ships from: Amazon.com Sold by: Amazon.com
Return this item for free.
Free returns are available for the shipping address you chose. You can return the item for any reason in new and unused condition: no shipping charges
- Go to your orders and start the return
- Select the return method
Buy used: $35.49
Fulfillment by Amazon (FBA) is a service we offer sellers that lets them store their products in Amazon's fulfillment centers, and we directly pack, ship, and provide customer service for these products. Something we hope you'll especially enjoy: FBA items qualify for FREE Shipping and Amazon Prime.
If you're a seller, Fulfillment by Amazon can help you grow your business. Learn more about the program.
Other Sellers on Amazon
Download the free Kindle app and start reading Kindle books instantly on your smartphone, tablet, or computer - no Kindle device required .
Read instantly on your browser with Kindle for Web.
Using your mobile phone camera - scan the code below and download the Kindle app.

Image Unavailable

- To view this video download Flash Player
Follow the author

Sunfish Owners Manual: Buy, Sail, Maintain, Repair and Sell your Sunfish Paperback – December 17, 2013
Purchase options and add-ons.
- Print length 146 pages
- Language English
- Publication date December 17, 2013
- Dimensions 8 x 0.35 x 10 inches
- ISBN-10 1484987217
- ISBN-13 978-1484987216
- See all details

Frequently bought together

Customers who viewed this item also viewed

Editorial Reviews
About the author, product details.
- Publisher : CreateSpace Independent Publishing Platform (December 17, 2013)
- Language : English
- Paperback : 146 pages
- ISBN-10 : 1484987217
- ISBN-13 : 978-1484987216
- Item Weight : 10.7 ounces
- Dimensions : 8 x 0.35 x 10 inches
- #54 in Instructional Sailing
- #58,888 in Reference (Books)
About the author
Kent enjoys flying and has been involved in aviation for 40 years. He is a certificated Airline Transport Pilot and is a graduate of the Naval Postgraduate School Aviation Safety Officer's course. In 2010 he attained a Master of Library Science degree and uses those skills to maintain signalcharlie.blogspot.com to share aerospace safety information.
Kent and the Skipper also enjoy messing about in small boats, and keep a log of their hobby adventures on smallboatrestoration.blogspot.com. Their Alcort/AMF collection includes a wooden Sunfish, Standard Sailfish, Super Sailfish and Catfish to keep their fiberglass Sunfish company. They published The Sunfish Owner's Manual in 2013, recently built a Penobscot 14 sailboat and in 2016 restored the 1880s Mississippi River Yawl BARBASHELA.
Customer reviews
Customer Reviews, including Product Star Ratings help customers to learn more about the product and decide whether it is the right product for them.
To calculate the overall star rating and percentage breakdown by star, we don’t use a simple average. Instead, our system considers things like how recent a review is and if the reviewer bought the item on Amazon. It also analyzed reviews to verify trustworthiness.
- Sort reviews by Top reviews Most recent Top reviews
Top reviews from the United States
There was a problem filtering reviews right now. please try again later..

- Amazon Newsletter
- About Amazon
- Accessibility
- Sustainability
- Press Center
- Investor Relations
- Amazon Devices
- Amazon Science
- Start Selling with Amazon
- Sell apps on Amazon
- Supply to Amazon
- Protect & Build Your Brand
- Become an Affiliate
- Become a Delivery Driver
- Start a Package Delivery Business
- Advertise Your Products
- Self-Publish with Us
- Host an Amazon Hub
- › See More Ways to Make Money
- Amazon Visa
- Amazon Store Card
- Amazon Secured Card
- Amazon Business Card
- Shop with Points
- Credit Card Marketplace
- Reload Your Balance
- Amazon Currency Converter
- Your Account
- Your Orders
- Shipping Rates & Policies
- Amazon Prime
- Returns & Replacements
- Manage Your Content and Devices
- Recalls and Product Safety Alerts
- Conditions of Use
- Privacy Notice
- Your Ads Privacy Choices
- CREATE AN ACCOUNT
- Boat Cover Finder
- Bimini Top Finder
- Boat Propeller Finder
- Engine Parts Finder
- Anchor & Dock
- Watersports
- Clothing and Footwear
- Engine Parts
- Cabin and Galley
- Covers and Biminis
- Electronics
- Paint and Maintenance
- Pumps and Plumbing
- Anchor Chains & Ropes
- Boat Fenders
- Boat Mooring
- Boat Protection
- Dock Storage & Protection
- Ladders, Steps, & Platforms
- Top Sellers

- Fishing Rods
- Fishing Reels
- Fishing Rod & Reel Combos
- Fishing Tools & Tackle Boxes
- Fishing Line
- Fly Fishing
- Fishing Bait & Fishing Lures
- Fishing Rod Holders & Storage Racks
- Fish Finders, Sounders & Sonar
- Trolling Motors
- Fishing Nets
- Fishing Downriggers & Acessories
- Fishing Outriggers & Acessories
- Fishing Kayaks
- Fish Cleaning Tables

- Inflatable Rafts
- Paddle Boarding
- Paddles & Oars
- Wakeboard, Wakesurf & Ski
- Wakeboard Towers
- Tow Ropes & Handles
- Life Jackets & PFDs
- Snow Sports
- Roof Racks, Carriers, Dollies

Men's Clothing
- Accessories
Men's Footwear
- Atheltic Shoes
- Water Shoes
Women's Clothing
- Dresses & Skirts
Women's Footwear
- Fuel Systems
- Sacrificial Anodes & Zincs
- Generator Parts
- Inflatable Boats
- Propeller Parts & Accessories
- Boat Manuals
- PWC Parts & Accessories

- Fishing Boat Seats
- Offshore Boat Seats
- Ski Boat Seats
- Pontoon Boat Seats & Furniture
- Boat Seat Pedestals & Hardware
- Boat Seats by Manufacturer
- Boat Tables & Hardware
- Boat Seat Covers
- Boat Seat Vinyl
- Floating Boat Cushions

- Barbeque Grills
- Boat Drink Holders
- Cabin Accessories & Hardware
- Boat Ventilation
- Interior & Cabin Lighting
- Marine Teak Products
- Carbon Monoxide & Smoke Detectors
- Binoculars & Telescopes

Boat Bimini Tops
- Bimini Top Accessories
- Pontoon Bimini Tops
- Other Biminis
- RV & Trailer Covers
- Boat Shrink Wrap & Accessories
- Boat Shelters
Boat Covers
- Boat Cover Accessories
- Boat Lift Canopy Covers
- Other Covers
- Boat Wiring & Cable
- Marine Batteries & Accessories
- Marine DC Power Plugs & Sockets
- Marine Electrical Meters
- Boat Lights
- Marine Electrical Panels & Circuit Breakers
- Power Packs & Jump Starters
- Marine Solar Power Accessories
- Marine Electrical Terminals
- Marine Fuse Blocks & Terminal Blocks
- Marine Switches
- Shore Power & AC Distribution

- Marine Audio & Video
- GPS Chartplotters & Accessories
- Electronic Navigation Charts & Software
- Digital Instruments
- Display Mounts
- VHF Radios & Communication
- Marine Radar
- Auto Pilot Systems
- Action Cameras

- Fiberglass & Epoxy Boat Repair
- Boat Paint & Varnish
- Marine Adhesives, Sealant, & Caulking
- Marine Engine Maintenance
- Boat Cleaners & Waxes
- Boat Cleaning Supplies

- Fresh Water Boat Systems
- Bilge Pumps
- Marine Plumbing Parts
- Wash Down Pumps
- Livewell Aerator Pumps & Live Bait Wells
- Toilet & Waste Pumps
- Marine Pump Replacement Parts

- Tires, Rims, & Hub Kits
- Boat Trailer Winches
- Boat Motor Supports & Transom Savers
- Boat Trailer Guides & Rollers
- Boat Trailer Fenders
- Boat Trailer Lights
- Boat Trailer Hardware
- Boat Trailer Jacks
- Boat Trailer Brakes & Axles
- Boat Trailer Tie Downs
- Couplers, Mounts, Hitches, & Locks

- Boat Deck Harware
- Marine Nuts, Bolts, & Screws
- Boat Handles, Pulls, & Rings
- Prop Nut Kits & Hardware
- Boat Cabin Hardware
- Marine Fasteners
- Boat Windshield Parts
- Boat Tubing & Rails
- Boat Mirrors
- Marine Tools & Tool Kits
- Boat Lettering

- Women's Clothing Deals
- Men's Clothing Deals
- Fishing Deals
- Anchor & Dock Deals
- Electrical Deals
- Electronics Deals
- Paint & Maintenance Deals
- Pumps & Plumbing Deals
- Boat Seats Deals
- Trailering Deals
- Camping & RV Deals
- Dealer Login

- Forums Login

- Search forums
- Boat Repair and Restoration
- Boat Restoration, Building, and Hull Repair
Refinishing a old Sunfish sailboat
- Thread starter RickM101
- Start date Jun 27, 2011
- Jun 27, 2011
Hi All, new to the forum... I looked but could not find an answer in the forum. I have an old sunfish with some good nicks in the gel coat down to the fiber glass and lots of stress cracks in the finish. My question is can I just prep and paint with Imron or do I need to repair the deep nicks? I just want to increase the integrity of the hull and protect it from further damage. Not concerned with a perfect look, just want a quick fix to get it in the water soon. Thanks!

Woodonglass
Supreme mariner.
Re: Refinishing a old Sunfish sailboat For the BIG nicks I get some acetone and Gelcoat repair kit and wash em down with acetone an mix up a gel coat paste and fill em, and sand em smooth. the rest I'd sand, Prime with a high build primer and shoot it with Imron. She'll look great.

RickM101 said: I just want to increase the integrity of the hull and protect it from further damage. Not concerned with a perfect look, just want a quick fix to get it in the water soon. Thanks! Click to expand...
- Jun 28, 2011
Woodonglass said: For the BIG nicks I get some acetone and Gelcoat repair kit and wash em down with acetone an mix up a gel coat paste and fill em, and sand em smooth. the rest I'd sand, Prime with a high build primer and shoot it with Imron. She'll look great. Click to expand...
ondarvr said: If the only thing you're concerned with is further damage, then you don't need to do anything at all, what you plan to do is only cosmetic, it won't do any thing to increase the integrity of the hull, or protect it from further damage. If you do want it to look better, then it?s a little more work because any cracks in the gel coat that aren?t fixed correctly will show up again very soon. Click to expand...
Jay's Technical Talk
My external memory, 1977 amf alcort sunfish sailboat restoration.

I purchased an old (1977 manufacture date) AMF Alcort Sunfish 14 foot sailing dinghy. It was mostly complete and almost “ready-to-sail”, except for the broken auto-bailer, and cracked rudder, but the price was right.
Since I had to repair the crack in the rudder, I decided to go overboard and completely restore the entire rudder and tiller assembly. And once the rudder looked nice, I had left-over varnish and decided to go ahead and re-surface the daggerboard as well.
After the first sail I drained all of the water out of the hull (which MIGHT have already been in there…..maybe….) and purchased a better drain plug and rigged up a solar powered fan to dry things out. If I find water inside after the second sail, I’ll probably be doing some fiberglass hull repair.
You can see all of the details by watching the (multiple!) videos in this YouTube playlist: https://www.youtube.com/playlist?list=PLmHP4lUqxKmv13lkNpPqG2FbnV9L4aaL0
I’ve found that the Better Boat Mini-Paddle fits perfectly into the rear cubbyhole on my 1977 boat.
Related posts:
- Philips Norelco QT4085 beard trimmer disassembly and battery replacement
- Using Cloudflare to speed up webpage loading speeds
- Nissan Leaf 12 volt accessory battery replacement
Leave a Reply Cancel reply
Your email address will not be published. Required fields are marked *
Building, restoration, and repair with epoxy

Sunfish Wood Restoration
By don gutzmer – gbi technical advisor.
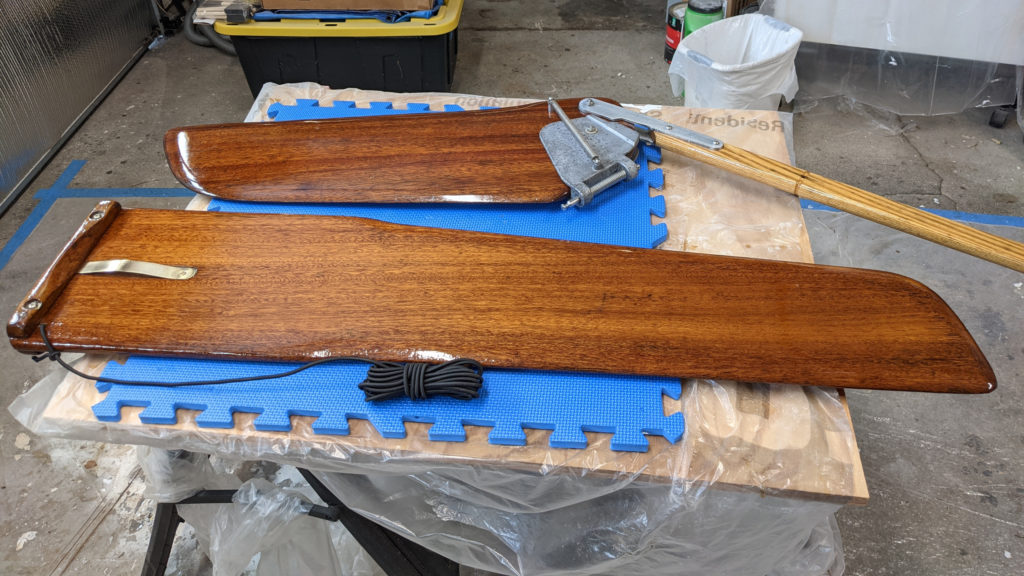
During the fall of 2016, I took a technical call from a customer who owned a Sunfish Sailboat. He lived in the area and was looking for help repairing a few minor gel coat cracks and restoring his wooden daggerboard and rudder. I told him I would be happy to help because this would be a good opportunity to write an article about using WEST SYSTEM 105 Resin and 207 Special Clear Hardener for the wood restoration part of his project. The mahogany daggerboard and rudder had weathered over the years because of only being varnished.
Rudder before work began
To remove all the varnish I used 100-grit sandpaper on an orbital sander, then sanded by hand with 120-grit sandpaper parallel to the grain. After everything was sanded a shop vacuum helped remove any remaining sanding dust.
WEST SYSTEM 105 Resin and 207 Special Clear Hardener were used to provide the clear, natural wood finish. The epoxy was rolled on the surface with an 800 Roller Cover and tipped off by dragging a section of roller cover over the wet epoxy to remove air bubbles and roller marks; this method is called rolling and tipping.
The Sunfish’s rudder and daggerboard sanded and the first coat of epoxy was applied.
The epoxy was re-coated every three to four hours to build-up three coats on each side. One side was done each day. To make sure the epoxy coating was smooth and flat, a single-edged razor blade was used at a slight angle to scrape the surface. The razor blade would only remove the high spots of the epoxy. Then the epoxy coating was sanded dull with 220-grit sandpaper. Two coats of Captain’s Varnish 1015 provided the final finish.
After 3 coats of epoxy were applied
The customer was very pleased with the results of the finished boards.
The finished Sunfish rudder and daggerboard
- Forums New posts Unanswered threads Register Top Posts Email
- What's new New posts New Posts (legacy) Latest activity New media
- Media New media New comments
- Boat Info Downloads Weekly Quiz Topic FAQ 10000boatnames.com
- Classifieds Sell Your Boat Used Gear for Sale
- Parts General Marine Parts Hunter Beneteau Catalina MacGregor Oday
- Help Terms of Use Monday Mail Subscribe Monday Mail Unsubscribe
Sunfish Deck Paint?
- Thread starter Simon Sexton
- Start date Feb 6, 2018
- Forums for All Owners
- Ask All Sailors

Simon Sexton
Hey Everyone, Good morning! As some of you know, I'm working on a couple restoration projects, and I'm glad to say that things are coming along nicely! The AMF Sunbird is very close to being finished; only the swing keel and line need to be serviced. As for the Sunfish racing overhaul, I finished it just last night after school, and I'm selling it to a close friend for $1,600 (trailer and cover included). Thus, since one is done and the other is on halt for a little while, I finally have time to work on my own sunfish! The original rudder was the pathetic little round one from the 1970s models (as she is a 1970, hull #14) and it broke in half when I was sailing her in the neighborhood lakes in a rainstorm with heavy winds. I made a new rudder out of solid oak, and also made it a bit larger than a normal one; this being said, she isn't class legal, but that's okay with me, because I'm only interested in setting speed records of my own! The fiberglass inside the cockpit needs help; the previous owner saw there was some cracking on the floor inside, and decided, "Oh, I'm too lazy to sand this down and do it properly, so I'll just take a foot-long, six-inch-wide strip of fiberglass and smother it with resin." So now I've got this nasty looking strip of fiberglass peeling up against the forward cockpit wall. First, however, before I begin working on that, I plan on sanding and repainting the deck; she was originally painted blue, but over time the paint has been chipped and scraped and abused, and she's looking pretty beat up. So, I was digging in the garage refrigerator yesterday, and found about a quart of leftover anti-foul paint. It isn't enough to be used on another hull job for Valiant, and it's been sitting in there for almost six months now, so I figured I might as well just use it for repainting the deck on the Sunfish. Is this a good idea? I want to get some feedback before I just go to town making a potential mistake ;P . God Bless, S.S.

Charlie Jones s/v Tehani
I sure wouldn't put antifouling paint on a deck
Charlie Jones s/v Tehani said: I sure wouldn't put antifouling paint on a deck Click to expand

Brightside. Nice and shiny and won't wear off when you walk on it.
Bottom paint is a biocide, not good for living things
Irrespective of the biocide content, you want a hard coating on the deck. Most bottom paints are not exactly known for their abrasion resistance qualities and the first time you walk across it, it'll come off, or start to come off. Bottom paint doesn't usually require UV stabilizers, and it's probably in the category of the worst possible choice for the talk at hand.
Okay, so, bad idea; I'm glad I asked! So what do y'all recommend for deck paint? It doesn't have to be fancy, because, I mean, it's a Sunfish, but I would like it to look better than it does. When I get home I'll get a picture of it so y'all can see how she looks now; not too pretty. The fiberglass is actually showing in lots of places from chips in the paint. All the rest is just erosion from booms being dropped and the deck being dinged by just anything.
Have a look at post#4 in this thread. If you're going to do it, do it right. Fill the dings, sand it smooth and coat it with Brightside so it looks like new. Just because "it's a Sunfish" doesn't require it to be lathered in exterior acrylic that should be on a fence in the back yard. My first boat was a Sunfish, and it had a nicer shine on it when I sold it than it did the day it was made. But then, your boat, your choice I guess.
Meriachee said: Have a look at post#4 in this thread. If you're going to do it, do it right. Fill the dings, sand it smooth and coat it with Brightside so it looks like new. Just because "it's a Sunfish" doesn't require it to be lathered in exterior acrylic that should be on a fence in the back yard. My first boat was a Sunfish, and it had a nicer shine on it when I sold it than it did the day it was made. But then, your boat, your choice I guess. Click to expand

Google "topside paint" and find the least expensive one-part epoxy, then go from there. Interlux Brightside is a good choice, so is Petit EasyPoxy... but you'll need to invest in a primer and some additional thinners and cleaning agents to do the job right. Otherwise, just slap some "rustoleum" on it.
Take a look at Jamestown Distributors and their in-house products, either Total Boat or Wet Edge, they will be of comparable quality to the name brands for a few bucks less. Even though its only a Sunfish, take a little time and do the job right. Sand it down, fill any nicks and dents and then epoxy primer and a one part polyurethane paint on top. If you are going to be flipping boats, every boat you work on is advertising for the next. Take the time to do it right and build your skills and reputation.
dlochner said: Take a look at Jamestown Distributors and their in-house products, either Total Boat or Wet Edge, they will be of comparable quality to the name brands for a few bucks less. Even though its only a Sunfish, take a little time and do the job right. Sand it down, fill any nicks and dents and then epoxy primer and a one part polyurethane paint on top. If you are going to be flipping boats, every boat you work on is advertising for the next. Take the time to do it right and build your skills and reputation. Click to expand
Simon Sexton said: so I didn't think I could get it looking that good with just basic paints, but I'm looking forward to seeing what I can do! Click to expand
dlochner said: With proper preparation and a little practice with roll and tip, you'll have a first class job. The Sunfish is a good starter, the top is flat and relatively small. The conversation goes like this: Innocent Sunfish Owner: "Whoa, dude, look at that top-notch Sunfish" Simon: "Thanks Dude. It was pretty old and beat up, took some time and refinished it." Innocent Sunfish Owner "Could you make mine look like yours?" Simon: "No problemo, mon. And it cost you less than 10 Benjamins." Innocent Sunfish Owner: "Way cool. Here's the boat." Simon: :::whistling "we're in the money":::::: and off to the bank he goes. Click to expand
Simon Sexton said: so I just needed some pointers Click to expand
Crazy Dave Condon
Simon; As a retired dealer, I have spent time repairing Sunfish and Aqua Finn daysailors at Boy Scout Camps which they have a tenacity to tear up. If you want to talk about this in detail, feel free to send me a private message and we can go from there. There is a lot and too much to write but wanted to share some ideas. As for parts, those on the Aqua Finn are interchangeable and the company who builds the Aqua Finn is American Sail in Charleston, SC. The Aqua Finn was designed by a Scout for Boy Scouts and in many ways close to a sunfish. Sunfish has changed owners over the years and now are being built in China but a new daysailor by American Sail even with a roller furler mainsail is cheaper than the Sunfish in China and for less money built in the good old USA. If you want my help, I will be glad to talk with you,. crazy dave condon

Dave Groshong
I like KiwiGrip, non toxic, you can roll it out as thick or as thin as you want, $40/qt: https://shop.sailboatowners.com/prod.php?3723
- This site uses cookies to help personalise content, tailor your experience and to keep you logged in if you register. By continuing to use this site, you are consenting to our use of cookies. Accept Learn more…
Small Boat Restoration
Tuesday, january 30, 2018, sunfish rudder conversion.

21 comments:
Found you today as I pondered the fate of a pair of Sunfish hulls. Rigging is gone, so I thought about using a kite to pull instead. Plenty of kiteboarders out here moving gear. Also considered modifying to be a stand up paddle board........We'll see! Nice work, well documented. I appreciate your details. Would love to see more photos of the boat in action.

Clark, Great post! I'm looking to replace my rudder assembly with the newer style using your guidance here. I'd also love to repaint the hull. Painting is my least favorite chore, though. What paint do you recommend? My hull is white all around, with the blue and red stripe on the bow. Thanks!
Did you keep the old parts? Swany Dswanwick at mtsports.com

You're welcome. I prefer Pettit Easypoxy, but also have had luck with Interlux Brightside and Rustoleum Topside
Trying to post again Looking for an old brass pin for the old style rudder Swany Dswanwick at Mtsports.com
Try The Sunfish Forum

Thanks Clark! Great post, with so many helpful details. My 1969 Alcort Sunfish will eventually need a rudder modernization, and I appreciated the run-down.
i have a question, how long would it take for the suspension springs to wear off?
Yury, We've had our new style rudder with the springs since the mid-90's. No signs of the springs wearing out. I have also used "stock" hardware store springs to hold a latch on our boarding ladder (different boat) that rusted completely after a few weeks. Materials matter.
Sorry for the late reply. We've only had one break, after owning old and new boats for 25 years and restoring over 20 boats.
Is the old rudder blade and tiller reused in the new conversion just reshaped? Cost of conversion parts please? Until then, I need to buy the tension bold, any one have one?
The old rudder blade and tiller are not reused. Last I checked the cost of new plastic or wood rudder and parts for a conversion was over $500 USD, if you could find them in stock. Yankee Boating Center used to sell a conversion kit. Used wooden parts are available on ebay and The Sunfish Forum or Craigslist. A complete rudder assembly with tiller runs from $150 on the very low side and up to over $300, plus you need the gudgeon, hump shaped backer plate, inspection port, sealant, hardware etc... You could check The Sunfish Forum or Yahoo Sunfish Sailor for the carriage bolt, but make sure you get the correct one. There is a shorter 4 inch bolt that goes to the Sailfish series boats and wooden Sunfish, and a longer 7+ inch bolt that goes to the fiberglass Sunfish. You could get a similar 7 inch long bronze 1/4-20 carriage bolt from Jamestown Distributors and see if they have a brass wing nut with the same thread pattern (I have yet to find a bronze wing nut to fit). https://www.jamestowndistributors.com/userportal/show_product.do?pid=1937 Good luck, Clark
What blade did you use in jigsaw? Any recommendations? Thanks
We use a blade designed for metal or laminate, they have more teeth than a wood cutting blade. Our advice for the jigsaw, make sure you have a dust mask rated for fiberglass, wear goggles and a long sleeve shirt. Have a small brush handy so you can stop the blade and brush dust away to better see your circle. Tape over the entire area first and draw your circle on the tape. Any marine sealant will work, most hardware stores carry the 3M brand. #8x1 screws should work, buy som 1 1/2 just in case and buy washers and nuts as well. Buy a few extra of each in case you drop one inside the hull and it disappears. You may also want to buy a deep socket and handle that fits the #8 nut, that is the best and easiest way to hold the nut while you tighten it. a regular small socket may not be deep enough as the nut tightens over the screw. Good luck!

Just acquired a 1964 hull. Thank you for posting this thread. Very helpful
This comment has been removed by a blog administrator.
Boa noite! Gostaria muito de construir um. Será que poderia usar compensado de 10mm. Para as laterais ? (Costados) Sou fã desse clássico lindo e elegante... Abração...

In the picture under "picture of some of the parts needed", what is the pin inserted in the rudder that the tension springs connect to called? Also, what is it's length?
We call it a rudder tension spring pin. I'll have to measure it.
How did you seal the deck/hull seam just above the gudgeon? Mine was converted by a previous owner, and has the same gap in the aluminum trim in that spot. Caulk seems to fail and allow water to leak in.
The seam needs adhesive, not sealant. You can inject thickened epoxy into any gaps in the seam. We use a small syringe with Pettit Flexpoxy or TotalBoat THIXO.
Great choice! Your favorites are temporarily saved for this session. Sign in to save them permanently, access them on any device, and receive relevant alerts.
- Sailboat Guide
1968 AMF Alcort Sunfish
- Description
Seller's Description
This is a vintage, 1960’s Sunfish Sailboat Project. Some TLC and basic restoration skills will have this puppy happily sailing again. I began restoring it, purchasing a professionally restored mahogany rudder, tiller and daggerboard in 2021 and fiberglassing one of two small punctures sustained from a falling branch during a winter storm. The boat was sailed as recently as 2020. The sail is functional but word. I halted the project when I lost patience and had the opportunity to buy a fully restored, more recent model.
Rig and Sails
Auxilary power, accomodations, calculations.
The theoretical maximum speed that a displacement hull can move efficiently through the water is determined by it's waterline length and displacement. It may be unable to reach this speed if the boat is underpowered or heavily loaded, though it may exceed this speed given enough power. Read more.
Classic hull speed formula:
Hull Speed = 1.34 x √LWL
Max Speed/Length ratio = 8.26 ÷ Displacement/Length ratio .311 Hull Speed = Max Speed/Length ratio x √LWL
Sail Area / Displacement Ratio
A measure of the power of the sails relative to the weight of the boat. The higher the number, the higher the performance, but the harder the boat will be to handle. This ratio is a "non-dimensional" value that facilitates comparisons between boats of different types and sizes. Read more.
SA/D = SA ÷ (D ÷ 64) 2/3
- SA : Sail area in square feet, derived by adding the mainsail area to 100% of the foretriangle area (the lateral area above the deck between the mast and the forestay).
- D : Displacement in pounds.
Ballast / Displacement Ratio
A measure of the stability of a boat's hull that suggests how well a monohull will stand up to its sails. The ballast displacement ratio indicates how much of the weight of a boat is placed for maximum stability against capsizing and is an indicator of stiffness and resistance to capsize.
Ballast / Displacement * 100
Displacement / Length Ratio
A measure of the weight of the boat relative to it's length at the waterline. The higher a boat’s D/L ratio, the more easily it will carry a load and the more comfortable its motion will be. The lower a boat's ratio is, the less power it takes to drive the boat to its nominal hull speed or beyond. Read more.
D/L = (D ÷ 2240) ÷ (0.01 x LWL)³
- D: Displacement of the boat in pounds.
- LWL: Waterline length in feet
Comfort Ratio
This ratio assess how quickly and abruptly a boat’s hull reacts to waves in a significant seaway, these being the elements of a boat’s motion most likely to cause seasickness. Read more.
Comfort ratio = D ÷ (.65 x (.7 LWL + .3 LOA) x Beam 1.33 )
- D: Displacement of the boat in pounds
- LOA: Length overall in feet
- Beam: Width of boat at the widest point in feet
Capsize Screening Formula
This formula attempts to indicate whether a given boat might be too wide and light to readily right itself after being overturned in extreme conditions. Read more.
CSV = Beam ÷ ³√(D / 64)
Although the earliest models were built of wood and offered as kits, the fiberglass version, first introduced in 1960, became the most popular recreational sailboat in history. As a result, there were many imitators.
Sunfish Builder Chronology 1952 - 1969 Alcort, Inc. (founded 1945) 1969 - 1986 AMF 1986 - 1988 Loveless & DeGarmo, dba, Alcort Sailboats Inc. 1988 - 1991 Pearson Yacht Co. 1991 - 1997 Sunfish/Laser, Inc. 1997 - 2007 Vanguard 2007 - Laser Performance Change in class rules permitted a new, slightly deeper daggerboard in the mid-1990’s.
This listing is presented by SailboatListings.com . Visit their website for more information or to contact the seller.
View on SailboatListings.com
Embed this page on your own website by copying and pasting this code.
- About Sailboat Guide
©2024 Sea Time Tech, LLC
This site is protected by reCAPTCHA and the Google Privacy Policy and Terms of Service apply.

Learn How To Sail A Sunfish Like a Pro: Essential Tips and Techniques
Alex Morgan

Sailing a Sunfish sailboat can be an exhilarating and rewarding experience for water enthusiasts. Whether you’re a beginner or a seasoned sailor, mastering the art of sailing a Sunfish requires knowledge, practice, and a little bit of adventure. In this comprehensive guide, we will take you through the essential steps and techniques involved in sailing a Sunfish.
The Sunfish sailboat is a popular recreational single-handed dinghy known for its simplicity, maneuverability, and versatility. Before getting on the water, it is crucial to understand the key features of the Sunfish sailboat, such as its design, hull construction, and rigging components.
To ensure a safe and enjoyable sailing experience, proper preparation is essential. This includes checking the equipment and safety gear to ensure they are in good condition and preparing the Sunfish sailboat by inspecting the hull, mast, sail, and rudder.
Mastering the basic sailing techniques is the foundation of sailing a Sunfish. This involves rigging the sailboat, understanding wind direction, adjusting sail trim, and effectively steering and controlling the rudder.
For those looking to take their sailing skills to the next level, advanced techniques such as sail positioning and shaping, tacking and jibing, and harnessing the power of the wind will be explored. These skills allow for greater control, speed, and maneuverability while sailing.
Safety should always be a top priority when sailing. We will provide important safety tips and precautions to ensure your well-being on the water, including proper use of personal flotation devices and understanding weather conditions.
We will discuss common mistakes to avoid while sailing a Sunfish, such as improper weight distribution, overestimating wind conditions, and neglecting maintenance and equipment checks.
By following this comprehensive guide, both novice and experienced sailors can enhance their Sunfish sailing skills, gain confidence on the water, and enjoy the thrill of sailing a Sunfish to the fullest. So, get ready to set sail and embark on an exciting journey with your Sunfish sailboat.
Key takeaway:
- Understanding the Sunfish Sailboat: Familiarize yourself with the key features of a Sunfish sailboat to ensure a safe and enjoyable sailing experience.
- Master the basics: Learn how to properly rig the Sunfish sailboat, understand wind direction and sail trim, and control the rudder for basic sailing techniques.
- Advance your skills: Explore sail positioning and shaping, practice tacking and jibing, and harness the power of the wind to enhance your sailing abilities.
Understanding the Sunfish Sailboat
Get ready to embark on an exciting journey into the world of sunfish sailboats ! In this section, we’ll dive deep into understanding the ins and outs of these magnificent vessels. From exploring the key features that make the sunfish sailboat a true marvel, to discovering the secrets of its exceptional performance, we’ll uncover everything you need to know to become a knowledgeable sailor. So buckle up and get ready to set sail with us!
Key Features of a Sunfish Sailboat
The hull of a Sunfish sailboat is fiberglass, making it lightweight and easy to maneuver. It has a triangular lateen sail that can be easily raised and lowered. The mast is aluminum, providing durability and stability. A daggerboard is used for lateral resistance and can be easily raised or lowered to adjust direction. The cockpit is spacious enough for one or two people to sit or move around comfortably. It has a simple rigging system, allowing for quick and easy setup and takedown. The Sunfish sailboat has a self-bailing cockpit, meaning water automatically drains out for enhanced safety. It has a kick-up rudder, which can be lifted out of the water to avoid obstacles or shallow areas. Known for stability and ease of handling, the Sunfish sailboat is suitable for beginners and experienced sailors. It can be easily transported on top of a car or trailer, making it convenient for sailing in different locations.
The Sunfish sailboat was introduced in 1952 by Alex Bryan and Cortlandt Heyniger . They aimed to create a small, affordable, and versatile sailboat for recreational sailing. The design quickly gained popularity, and millions have been sold worldwide since then. Its accessibility, simplicity, and reliability have made it a favorite choice for beginners and seasoned sailors. Over the years, the Sunfish sailboat has undergone minor design modifications but has remained true to its principles of stability, easy handling, and fun on the water. Today, it continues to be a beloved sailboat for individuals and families looking to enjoy the thrill of sailing in a compact and budget-friendly vessel.
Preparing for Sailing
Want to set sail on a Sunfish ? In this section, we’ll cover all the essential steps to get you ready for a smooth sailing experience. From checking your equipment and safety gear to preparing the Sunfish sailboat , we’ve got you covered. So, grab your sunscreen and let’s dive into the preparations that will ensure a fantastic time out on the water!
Checking Equipment and Safety Gear
Checking Equipment and Safety Gear is essential before setting sail on a Sunfish sailboat. Here is a comprehensive list of steps to follow:
1. Inspect life jackets: Ensure enough life jackets onboard for each person in good condition with no tears or damages.
2. Check safety lines: Verify securely attached and in good working condition.
3. Examine anchor and rope: Make sure anchor securely fastened and rope in good condition, free from fraying or knots.
4. Test horn or whistle: Ensure functioning properly and can produce a loud sound to signal for help if needed.
5. Inspect first aid kit: Check fully stocked with essential items such as bandages, antiseptic wipes, and pain relievers.
6. Verify presence of fire extinguisher: Confirm readily available on the boat and within expiry date.
7. Check communication devices: Test VHF radio or other communication devices onboard to ensure proper working order.
8. Ensure navigation lights are functional: Confirm working correctly, especially if planning to sail at night.
9. Check for any leaks: Inspect boat’s hull for any leaks or damages that could affect buoyancy.
10. Examine rigging and sails: Inspect for signs of wear, tear, or damage. Replace or repair as necessary.
True story: Once, while preparing to sail on a Sunfish, a sailor discovered a tear in their life jacket during the equipment check. Thanks to their thorough inspection, they promptly replaced the damaged life jacket and ensured everyone’s safety on the water. Remember, checking equipment and safety gear is crucial for a safe and enjoyable sailing experience.
Preparing the Sunfish Sailboat
To prepare the Sunfish sailboat, follow these steps:
1. Inspect the hull for damage or cracks. Repair or replace damaged parts.
2. Check the mast and boom for wear or damage. Ensure they are securely attached.
3. Attach the main sail to the halyard and raise it up the mast. Properly tension the sail.
4. Attach the boom to the mast and secure the mainsail to the boom using sail ties.
5. Check the daggerboard and rudder to ensure they are securely in place.
6. Attach the rudder to the stern of the boat and ensure it moves freely.
7. Inspect the lines and rigging to ensure they are in good condition and properly rigged.
8. Check the bailer and mast flotation to ensure they are functioning properly.
9. Attach any necessary safety equipment, such as a life jacket or whistle.
10. Double-check that all equipment is secure and properly fastened.
The Sunfish sailboat , known for its simplicity, affordability, and ease of use, can be prepared by following these steps. It was designed by Alcort, Inc. in the United States during the early 1950s and has gained popularity ever since. The design of the Sunfish sailboat has remained largely unchanged, with minor modifications made for better performance. It is a popular choice among sailors of all skill levels due to its lightweight design and stable hull, which make it suitable for racing, recreational sailing, and teaching sailing techniques. With its timeless design and versatility on the water, the Sunfish is a beloved classic in the world of sailboats.
Basic Sailing Techniques
Mastering the art of sailing a Sunfish requires a deep understanding of basic sailing techniques. From rigging the Sunfish sailboat to navigating wind direction and sail trim, and even mastering the art of steering and controlling the rudder , each sub-section in this voyage of discovery will unlock the essential skills needed to glide smoothly across the water. So grab your lifejacket and let’s embark on this thrilling adventure of Sunfish sailing mastery .
Rigging the Sunfish Sailboat
Rigging the Sunfish Sailboat is necessary before sailing. Follow these steps:
- Attach the mast to the mast step at the front of the Sunfish sailboat.
- Secure the sail to the halyard and hoist it up the mast, ensuring proper attachment.
- Connect the boom to the gooseneck at the bottom of the mast.
- Attach the mainsheet to the rear of the boom and thread it through the blocks on the Sunfish.
- Connect the mainsheet to the traveler, a sliding bar at the back of the boat.
- Attach the rudder to the back of the Sunfish, making sure it is securely in place.
- Check all the lines and rigging to ensure proper tightening and securing.
Once the Sunfish sailboat is rigged, you can start your sailing adventure. Always double-check your rigging before going on the water and familiarize yourself with the boat’s operation. Remember that weather conditions can impact sailing, so adjust the sail trim accordingly. Happy sailing!
Understanding Wind Direction and Sail Trim
Understanding wind direction and sail trim is crucial for successful sailing of a Sunfish sailboat. Adjusting the sail trim based on wind direction is key to optimizing the boat’s performance.
To determine wind direction, look for visual cues such as flags, water ripples, or movement of tree branches. It’s important to remember that wind can change direction, so regularly assess its angle relative to your boat.
Once wind direction is identified, adjust the sail trim accordingly. For effective upwind sailing, tightly trim the sail to catch more wind, creating lift and propelling the boat forward. Conversely, when sailing downwind, ease the sail to maximize the catching area and take advantage of the force of the wind pushing from behind.
Sail trim requires continuous monitoring and adjustment as the wind changes. Experimenting with different trim settings will help you find the optimal balance between speed and control .
Understanding wind direction and sail trim improves with practice and experience. Sailing and observing wind behavior will enhance your ability to instinctively trim the sail and enjoy a smooth and exhilarating sailing experience.
Steering and Controlling the Rudder
- 1. Check rudder position: Before steering the Sunfish sailboat, ensure that the rudder is centered, aligned with the boat’s keel, and straight.
- 2. Hold tiller extension: Firmly grasp the tiller extension, a long handle connected to the rudder. Maintain a comfortable grip while allowing for movement and flexibility.
- 3. Understand tiller and rudder relationship: The tiller is connected to the rudder, and any tiller movement directly affects the rudder’s position. Moving the tiller to the right turns the rudder right, and moving the tiller to the left turns the rudder left.
- 4. Adjust rudder angle: To steer the Sunfish sailboat, adjust the rudder angle. Push the tiller extension to the left to turn right, and push it to the right to turn left.
- 5. Maintain balance and stability: When steering and controlling the rudder, maintain balance and stability on the sailboat. Distribute weight evenly, stay centered in the boat, and make subtle adjustments for control.
Practice steering and controlling the rudder in different weather conditions and sailboat speeds to enhance proficiency. Through practice, you will develop a better understanding of effectively maneuvering the Sunfish sailboat.
Advanced Sailing Skills
Mastering the art of sailing a Sunfish requires more than just the basics. In this section, we’ll dive into advanced sailing skills that will take your Sunfish adventures to the next level. Discover the secrets of effective sail positioning and shaping , the art of tacking and jibing with finesse, and how to truly harness the power of the wind . Get ready to elevate your sailing game and navigate the waters with confidence.
Sail Positioning and Shaping
When sailing a Sunfish, proper sail positioning and shaping are key to efficient sailing. Consider the following factors:
– Wind direction: Position the sail perpendicular to the wind for maximum power.
– Sail shape: Adjust the sail’s shape using the cunningham, outhaul, and boomvang control lines.
– Cunningham: Tighten the cunningham to flatten the sail and reduce draft, especially in strong winds or for better upwind performance.
– Outhaul: Adjust the outhaul to control tension on the foot of the sail. Tightening it flattens the sail for increased speed and control in stronger winds.
– Boomvang: Properly adjust the boomvang to control tension on the leech of the sail and achieve optimal sail shape and control.
– Weight distribution: Positioning your body weight correctly on the boat is crucial for stability and performance. Adjust your position to maintain control and balance.
– Foot position: Properly position your feet on the hiking straps to balance and stabilize the boat. This allows for necessary sail adjustments and effective boat control.
– Continuously observe the sail and make necessary adjustments to adapt to changing wind conditions and optimize performance.
Mastering sail positioning and shaping in Sunfish sailing can greatly enhance your sailing experience and improve overall performance on the water.
Tacking and Jibing
– Prepare the Sunfish sailboat for tacking or jibing by trimming the sail and maintaining a steady speed. Begin the maneuver by turning the bow of the boat into the wind and crossing to the other side. Release the sail as the boat turns to make the turn smoother. Change sides on the boat to balance the weight and aid in the turn. Quickly switch the sail to the new side as the boat completes the turn and the wind fills the sail. Pull in the sail and adjust the trim for the desired speed and direction.
For jibing , turn the stern of the boat through the wind to change the direction. Prepare to release the sail as the boat turns and let it swing across. Cross over to the opposite side of the boat for balance during the turn. Guide the sail smoothly to the new side and adjust the trim accordingly. Continuously monitor the wind and make minor adjustments to maintain control and maximize efficiency.
Harnessing the Power of the Wind
Harnessing the Power of the Wind is crucial for successful Sunfish sailing. Here are some key points to consider:
1. Positioning the sail: Properly position the sail to catch the wind and propel the boat forward. Adjust the sail based on the wind direction and intensity.
2. Sail trim: Maintain proper sail trim to optimize wind capture. Adjust the sheet to keep it taut but not too tight. Watch for signs of luffing or flapping, which indicate insufficient use of wind power.
3. Using the telltales: Utilize the telltales on the sail to determine wind flow across its surface. The position and direction of the telltales help gauge proper sail trim. Adjust the sail to maximize wind efficiency.
4. Feathering: Reduce wind resistance and maintain forward momentum in strong winds by angling the sail away from the wind. This technique prevents excessive heeling and maintains control over the boat.
5. Understanding gusts and lulls: Be aware of changes in wind intensity. In gusts, loosen the sail to prevent overpowering. In lulls, adjust the sail to catch any available wind. Adapting to changing wind conditions improves overall sailing performance.
By implementing these techniques, you can effectively harness the power of the wind during your Sunfish sailing adventures. Practice and experience will improve your understanding of wind dynamics and enhance your sailing skills. Enjoy the exhilaration of harnessing nature’s force and explore the open water with confidence.
Safety Tips and Precautions
- Always prioritize safety when sailing a Sunfish by following these safety tips and precautions.
- Check the weather forecast before setting sail to ensure a safe and enjoyable experience.
- Before launching your Sunfish, inspect it for damages or leaks to prevent any potential accidents.
- To stay within the rules and regulations , familiarize yourself with the sailing rules of your location.
- Be mindful of your surroundings and keep an eye out for other boats or obstacles in the water to maintain a safe voyage.
- Keep a whistle or horn on board so you can easily signal for help in case of emergencies.
- Stay hydrated during your sailing trip by bringing enough water for your journey.
- Protect yourself from the sun’s harmful rays by wearing sunscreen and a hat.
Always prioritize safety when sailing a Sunfish and follow these precautions for a pleasant and secure sailing experience.
Common Mistakes to Avoid
- Not wearing a life jacket: Avoid not wearing a life jacket while sailing a Sunfish. Prioritize safety on the water and always wear a properly fitted life jacket to prevent accidents or drowning.
- Ignoring weather conditions: Avoid ignoring weather conditions. Check the weather forecast before sailing. Strong winds, storms, or other adverse conditions can make sailing difficult and dangerous.
- Overlooking proper rigging: Properly rigging the Sunfish is essential for a successful sail. Don’t overlook the rigging process. Ensure the mast, boom, and sail are correctly attached and tensioned for optimal sailing.
- Not understanding the centerboard: The centerboard plays a crucial role in maneuvering the Sunfish. Understand how to use it correctly for control and stability. Learn how to adjust it based on wind and water conditions.
- Forgetting to secure the mainsheet: The mainsheet controls the sail’s position and power. Avoid forgetting to secure it properly to prevent accidental jibes and loss of control.
Some Facts About How To Sail A Sunfish:
- ✅ The Sunfish is a small, one-person sailboat that has been popular for generations. (Source: Our Team)
- ✅ It is a personal-size, beach-launched sailing dinghy with a flat hull and a crab claw sail. (Source: Our Team)
- ✅ The Sunfish was developed by Alcort, Inc. in the 1950s and has since become the most popular fiberglass boat ever designed, with a quarter million sold worldwide. (Source: Our Team)
- ✅ Setting up a Sunfish takes less than 10 minutes and requires no special knowledge or fancy sailor’s knots. (Source: Our Team)
- ✅ There are resources available, such as YouTube videos and sailing classes, to help beginners learn to sail a Sunfish. (Source: Our Team)
Frequently Asked Questions
1. how long does it take to set up a sunfish sailboat.
Setting up a Sunfish takes less than 10 minutes and requires no special knowledge or fancy sailor’s knots.
2. Can a Sunfish sailboat be launched from anywhere?
Yes, a Sunfish sailboat can be launched from the beach, dock, or anywhere with water access.
3. Are there resources available to help beginners learn to sail a Sunfish?
Yes, there are resources available such as YouTube videos and sailing classes that can help beginners learn to sail a Sunfish.
4. What is the sail plan and hull of a sailboat?
The sail plan and hull of a sailboat create lift forces in 3 dimensions as they react to wind and water.
5. How can I achieve balance and control while sailing a Sunfish?
Balancing the forces of the sail and hull is key to maintaining control and speed. Experimentation and practice are necessary to find the best settings and achieve comfort and control while sailing.
6. What are some tips for adjusting the sail’s center of effort and improving control?
Lowering the sail on the mast can help reduce heeling and allow for better control through hiking. Adjusting the gooseneck on the boom can reduce weather helm and improve control. Other controls like the vang, outhaul, and cunningham can further tweak the sail’s center of effort and de-power the sail.
About the author

Leave a Reply Cancel reply
Your email address will not be published. Required fields are marked *
Save my name, email, and website in this browser for the next time I comment.
Latest posts

The history of sailing – from ancient times to modern adventures
History of Sailing Sailing is a time-honored tradition that has evolved over millennia, from its humble beginnings as a means of transportation to a beloved modern-day recreational activity. The history of sailing is a fascinating journey that spans cultures and centuries, rich in innovation and adventure. In this article, we’ll explore the remarkable evolution of…

Sailing Solo: Adventures and Challenges of Single-Handed Sailing
Solo Sailing Sailing has always been a pursuit of freedom, adventure, and self-discovery. While sailing with a crew is a fantastic experience, there’s a unique allure to sailing solo – just you, the wind, and the open sea. Single-handed sailing, as it’s often called, is a journey of self-reliance, resilience, and the ultimate test of…

Sustainable Sailing: Eco-Friendly Practices on the boat
Eco Friendly Sailing Sailing is an exhilarating and timeless way to explore the beauty of the open water, but it’s important to remember that our oceans and environment need our protection. Sustainable sailing, which involves eco-friendly practices and mindful decision-making, allows sailors to enjoy their adventures while minimizing their impact on the environment. In this…
- Vessel Reviews
- Passenger Vessel World
- Offshore World
- Tug and Salvage World
- Maritime Security World
- Specialised Fields
- Marine Projects World
- Small Craft World
- Tanker World
- Dry Cargo World
- Boxship World
- Aquaculture World
- Trawling World
- Longlining World
- Seining World
- Potting World
- Other Fishing Methods
- Regulation & Enforcement
- Feature Weeks
- Classifieds
- Book Reviews
VESSEL REVIEW | Sinichka – Electric commuter boats designed for Russia’s Moskva River

A series of three new electric monohull commuter ferries have already begun operational sailings on the Moskva River in the Russian capital Moscow.
Built by Russian shipyard Emperium, sister vessels Sinichka , Filka , and Presnya – all named after rivers in Moscow – are being operated by the Moscow Department of Transport and Road Infrastructure Development (Moscow Deptrans). They are the first units of a planned fleet of 20 vessels that will serve the capital city and other nearby communities. The new ferry system will be the water transport system to be operated on the Moskva River in 16 years.
Each vessel has a welded aluminium hull, an LOA of 21 metres, a beam of 6.2 metres, a draught of only 1.4 metres, a displacement of 40 tonnes, and capacity for 80 passengers plus two crewmembers. Seating is available for 42 passengers on each ferry, and the main cabins are also fitted with USB charging ports, wifi connectivity, tables, toilets, and space for bicycles and scooters. The cabin layout can be rearranged to allow the operator to adjust the distances between the seats and to install armrests of varying widths.
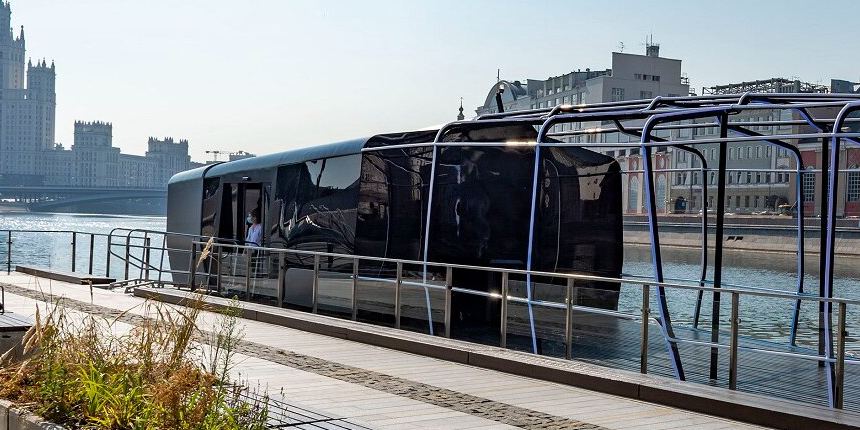
An open upper deck is also accessible to passengers and is the only area on each ferry where smoking is allowed.
The ferries are all of modular construction with each ferry’s wheelhouse, main cabin, and other structural elements being built as complete, separate components. This enables the ferries to be easily dismantled for transport to anywhere in Russia by rail and then quickly re-assembled within seven days.
The ferries are also ice-capable. Recently completed operational trials on the Moskva showed that the vessels can also easily navigate under mild winter conditions with broken surface ice, though year-round operations are planned for the entire fleet.
The ferries are each fitted with 500kWh lithium iron phosphate battery packs that supply power to two 134kW motors. This configuration can deliver a maximum speed of 11.8 knots, a cruising speed of just under 10 knots, and a range of 150 kilometres.
Emperium said the transfer of rotation of electric motors to the propeller is carried out by direct drive. As a propulsion installation, a pulling rotary propeller-steering column with double screws is used. The installation of double pulling screws, with similar power, allows an operator to increase the efficiency of the propulsion system to deliver a slightly higher speed or to reduce energy consumption. This arrangement also provides the ferries with enhanced manoeuvrability necessary for navigating in close quarters.
The batteries themselves have projected service lives of 10 to 12 years and are fitted with safety features such as built-in fire extinguishers and gas vents. Quick-disconnect features allow the batteries to be easily removed for replacement or maintenance.
Some of our readers have expressed disquiet at our publication of reviews and articles describing new vessels from Russia. We at Baird Maritime can understand and sympathise with those views. However, despite the behaviour of the country’s leaders, we believe that the maritime world needs to learn of the latest developments in vessel design and construction there.
Click here to read other news stories, features, opinion articles, and vessel reviews as part of this month’s Passenger Vessel Week.
Related Posts

Baird Maritime
Tags: Emperium Filka Moscow Moscow Department of Transport and Road Infrastructure Development Moskva River Presnya Russia Sinichka WBW newbuild
- Previous VESSEL REVIEW | Ferry Rokko – Second 194m Ro-Pax for Miyazaki Car Ferry
- Next Brighton man to be charged for illegal abalone haul
Baird Maritime , launched in 1978, is one of the world's premier maritime publishing houses.
The company produces the leading maritime new portal BairdMaritime.com , home of the world famous Work Boat World, Fishing Boat World, Ship World, Ausmarine, and Commercial Mariner sub-sites, and the industry-leading ship brokerage platforms WorkBoatWorld.com and ShipWorld.com .
Contact us: [email protected]
© Copyright - Baird Maritime
- Terms & Conditions
- Advertise with Baird Maritime
- Submit News/Leads

The Comprehensive Guide to Moscow Nightlife
- Posted on April 14, 2018 July 26, 2018
- by Kings of Russia
- 8 minute read

Moscow’s nightlife scene is thriving, and arguably one of the best the world has to offer – top-notch Russian women, coupled with a never-ending list of venues, Moscow has a little bit of something for everyone’s taste. Moscow nightlife is not for the faint of heart – and if you’re coming, you better be ready to go Friday and Saturday night into the early morning.
This comprehensive guide to Moscow nightlife will run you through the nuts and bolts of all you need to know about Moscow’s nightclubs and give you a solid blueprint to operate with during your time in Moscow.
What you need to know before hitting Moscow nightclubs
Prices in moscow nightlife.
Before you head out and start gaming all the sexy Moscow girls , we have to talk money first. Bring plenty because in Moscow you can never bring a big enough bankroll. Remember, you’re the man so making a fuzz of not paying a drink here or there will not go down well.
Luckily most Moscow clubs don’t do cover fees. Some electro clubs will charge 15-20$, depending on their lineup. There’s the odd club with a minimum spend of 20-30$, which you’ll drop on drinks easily. By and large, you can scope out the venues for free, which is a big plus.
Bottle service is a great deal in Moscow. At top-tier clubs, it starts at 1,000$. That’ll go a long way with premium vodka at 250$, especially if you have three or four guys chipping in. Not to mention that it’s a massive status boost for getting girls, especially at high-end clubs.
Without bottle service, you should estimate a budget of 100-150$ per night. That is if you drink a lot and hit the top clubs with the hottest girls. Scale down for less alcohol and more basic places.
Dress code & Face control
Door policy in Moscow is called “face control” and it’s always the guy behind the two gorillas that gives the green light if you’re in or out.
In Moscow nightlife there’s only one rule when it comes to dress codes:
You can never be underdressed.
People dress A LOT sharper than, say, in the US and that goes for both sexes. For high-end clubs, you definitely want to roll with a sharp blazer and a pocket square, not to mention dress shoes in tip-top condition. Those are the minimum requirements to level the playing field vis a vis with other sharply dressed guys that have a lot more money than you do. Unless you plan to hit explicit electro or underground clubs, which have their own dress code, you are always on the money with that style.
Getting in a Moscow club isn’t as hard as it seems: dress sharp, speak English at the door and look like you’re in the mood to spend all that money that you supposedly have (even if you don’t). That will open almost any door in Moscow’s nightlife for you.
Types of Moscow Nightclubs
In Moscow there are four types of clubs with the accompanying female clientele:
High-end clubs:
These are often crossovers between restaurants and clubs with lots of tables and very little space to dance. Heavy accent on bottle service most of the time but you can work the room from the bar as well. The hottest and most expensive girls in Moscow go there. Bring deep pockets and lots of self-confidence and you have a shot at swooping them.
Regular Mid-level clubs:
They probably resemble more what you’re used to in a nightclub: big dancefloors, stages and more space to roam around. Bottle service will make you stand out more but you can also do well without. You can find all types of girls but most will be in the 6-8 range. Your targets should always be the girls drinking and ideally in pairs. It’s impossible not to swoop if your game is at least half-decent.
Basic clubs/dive bars:
Usually spots with very cheap booze and lax face control. If you’re dressed too sharp and speak no Russian, you might attract the wrong type of attention so be vigilant. If you know the local scene you can swoop 6s and 7s almost at will. Usually students and girls from the suburbs.
Electro/underground clubs:
Home of the hipsters and creatives. Parties there don’t mean meeting girls and getting drunk but doing pills and spacing out to the music. Lots of attractive hipster girls if that is your niche. That is its own scene with a different dress code as well.

What time to go out in Moscow
Moscow nightlife starts late. Don’t show up at bars and preparty spots before 11pm because you’ll feel fairly alone. Peak time is between 1am and 3am. That is also the time of Moscow nightlife’s biggest nuisance: concerts by artists you won’t know and who only distract your girls from drinking and being gamed. From 4am to 6am the regular clubs are emptying out but plenty of people, women included, still hit up one of the many afterparty clubs. Those last till well past 10am.
As far as days go: Fridays and Saturdays are peak days. Thursday is an OK day, all other days are fairly weak and you have to know the right venues.
The Ultimate Moscow Nightclub List
Short disclaimer: I didn’t add basic and electro clubs since you’re coming for the girls, not for the music. This list will give you more options than you’ll be able to handle on a weekend.
Preparty – start here at 11PM
Classic restaurant club with lots of tables and a smallish bar and dancefloor. Come here between 11pm and 12am when the concert is over and they start with the actual party. Even early in the night tons of sexy women here, who lean slightly older (25 and up).
The second floor of the Ugolek restaurant is an extra bar with dim lights and house music tunes. Very small and cozy with a slight hipster vibe but generally draws plenty of attractive women too. A bit slower vibe than Valenok.
Very cool, spread-out venue that has a modern library theme. Not always full with people but when it is, it’s brimming with top-tier women. Slow vibe here and better for grabbing contacts and moving on.

High-end: err on the side of being too early rather than too late because of face control.
Secret Room
Probably the top venue at the moment in Moscow . Very small but wildly popular club, which is crammed with tables but always packed. They do parties on Thursdays and Sundays as well. This club has a hip-hop/high-end theme, meaning most girls are gold diggers, IG models, and tattooed hip hop chicks. Very unfavorable logistics because there is almost no room no move inside the club but the party vibe makes it worth it. Strict face control.
Close to Secret Room and with a much more favorable and spacious three-part layout. This place attracts very hot women but also lots of ball busters and fakes that will leave you blue-balled. Come early because after 4am it starts getting empty fast. Electronic music.
A slightly kitsch restaurant club that plays Russian pop and is full of gold diggers, semi-pros, and men from the Caucasus republics. Thursday is the strongest night but that dynamic might be changing since Secret Room opened its doors. You can swoop here but it will be a struggle.

Mid-level: your sweet spot in terms of ease and attractiveness of girls for an average budget.
Started going downwards in 2018 due to lax face control and this might get even worse with the World Cup. In terms of layout one of the best Moscow nightclubs because it’s very big and bottle service gives you a good edge here. Still attracts lots of cute girls with loose morals but plenty of provincial girls (and guys) as well. Swooping is fairly easy here.
I haven’t been at this place in over a year, ever since it started becoming ground zero for drunken teenagers. Similar clientele to Icon but less chic, younger and drunker. Decent mainstream music that attracts plenty of tourists. Girls are easy here as well.
Sort of a Coyote Ugly (the real one in Moscow sucks) with party music and lots of drunken people licking each others’ faces. Very entertaining with the right amount of alcohol and very easy to pull in there. Don’t think about staying sober in here, you’ll hate it.
Artel Bessonitsa/Shakti Terrace
Electronic music club that is sort of a high-end place with an underground clientele and located between the teenager clubs Icon and Gipsy. Very good music but a bit all over the place with their vibe and their branding. You can swoop almost any type of girl here from high-heeled beauty to coked-up hipsters, provided they’re not too sober.
Afterparty: if by 5AM you haven’t pulled, it’s time to move here.
Best afterparty spot in terms of trying to get girls. Pretty much no one is sober in there and savage gorilla game goes a long way. Lots of very hot and slutty-looking girls but it can be hard to tell apart who is looking for dick and who is just on drugs but not interested. If by 9-10am you haven’t pulled, it is probably better to surrender.
The hipster alternative for afterparties, where even more drugs are in play. Plenty of attractive girls there but you have to know how to work this type of club. A nicer atmosphere and better music but if you’re desperate to pull, you’ll probably go to Miks.
Weekday jokers: if you’re on the hunt for some sexy Russian girls during the week, here are two tips to make your life easier.
Chesterfield
Ladies night on Wednesdays means this place gets pretty packed with smashed teenagers and 6s and 7s. Don’t pull out the three-piece suit in here because it’s a “simpler” crowd. Definitely your best shot on Wednesdays.
If you haven’t pulled at Chesterfield, you can throw a Hail Mary and hit up Garage’s Black Music Wednesdays. Fills up really late but there are some cute Black Music groupies in here. Very small club. Thursday through Saturday they do afterparties and you have an excellent shot and swooping girls that are probably high.
Shishas Sferum
This is pretty much your only shot on Mondays and Tuesdays because they offer free or almost free drinks for women. A fairly low-class club where you should watch your drinks. As always the case in Moscow, there will be cute girls here on any day of the week but it’s nowhere near as good as on the weekend.

In a nutshell, that is all you need to know about where to meet Moscow girls in nightlife. There are tons of options, and it all depends on what best fits your style, based on the type of girls that you’re looking for.
Related Topics
- moscow girls
- moscow nightlife

The Top 3 Cities in Ukraine for First Timers
- Posted on July 7, 2018 August 4, 2019
You May Also Like

- Uncategorized
The Best Expat Blogs for Moscow
- Posted on May 31, 2020 June 1, 2020

Finding a Russian Bride: How and Where to Meet Her
- Posted on August 9, 2019 August 9, 2019

Meeting Women in Moscow: Dating Perspectives on the World’s Most Beautiful Women
- Posted on August 5, 2019 August 9, 2019

Meeting Russian Women: Top 5 Locations
- Posted on August 3, 2019 June 1, 2020

Moscow vs St. Petersburg – Which One to Visit?
- Posted on July 31, 2019 August 3, 2019

Hot Russian Girls – Where to Find & Date Them
- Posted on March 30, 2019 March 30, 2019
A Guide to Teaching English in Russia
- Posted on August 11, 2018 October 9, 2019

How to Attract Russian Girls
- Posted on July 15, 2018 August 4, 2019
Leave a Reply Cancel reply
Your email address will not be published. Required fields are marked *
Input your search keywords and press Enter.
IMAGES
VIDEO
COMMENTS
Keep em' Sailing. These Iconic and colorful sailboats have been around for over 60 years putting wet smiles on both young and old alike. Every Sunfish has a story and my restorations rekindle many lost memories of sailing adventures in just about every body of water world wide. As a kid I was fortunate to have learned how to sail a sunfish in ...
Recently Mass Audubon hired me to restore 8 sunfish sailboats they use at summer camp. I figured this would be the perfect opportunity to sho you all how to ...
This summer I have restored a 1981 Force Five, a 1985 Laser and two mid-1980s Sunfish. The Force Five had some trailer roller damage and required a few hours of WEST epoxy work, but the other three boats were barn finds that were very dirty, stained, mildewed and, in one case, covered in lichens but virtually undamaged.
MUST WATCH TOPIC: I get asked many times a week what the proper way to sand freshly applied gelcoat without sanding through. If you think I've never sanded t...
Use a putty knife to fill in any holes or cracks in the surface with an appropriate filler or putty. Allow it to dry and then sand it down to create a smooth, even surface. Step 4: Clean the surface. Use a mild detergent and water solution to remove any dirt, grease, or contaminants from the sunfish.
My first sunfish acquired from a friend. Ready to jump in, learn, and get on the water this coming spring. Follow my journey to the first sail!
Kent is the Owner of the 3000+ member Yahoo Sunfish_Sailor Group as well as a Moderator on the Sunfish Forum. He also created the facebook page and companion blog Small Boat Restoration. Their focus is on classic restoration, with the mission being to return as many vintage Sunfish as possible to their natural habitat.
Jun 28, 2011. #4. Re: Refinishing a old Sunfish sailboat. Woodonglass said: For the BIG nicks I get some acetone and Gelcoat repair kit and wash em down with acetone an mix up a gel coat paste and fill em, and sand em smooth. the rest I'd sand, Prime with a high build primer and shoot it with Imron. She'll look great. Thanks Woodonglass.
1977 AMF Alcort Sunfish Sailboat Restoration. I purchased an old (1977 manufacture date) AMF Alcort Sunfish 14 foot sailing dinghy. It was mostly complete and almost "ready-to-sail", except for the broken auto-bailer, and cracked rudder, but the price was right. Since I had to repair the crack in the rudder, I decided to go overboard and ...
The Sunfish's rudder and daggerboard sanded and the first coat of epoxy was applied. The epoxy was re-coated every three to four hours to build-up three coats on each side. One side was done each day. To make sure the epoxy coating was smooth and flat, a single-edged razor blade was used at a slight angle to scrape the surface.
Small Boat Restoration, Suffolk, Virginia. 3,545 likes · 30 talking about this. Small Boat Restoration, Sunfish Sailboat Restoration
The Aqua Finn was designed by a Scout for Boy Scouts and in many ways close to a sunfish. Sunfish has changed owners over the years and now are being built in China but a new daysailor by American Sail even with a roller furler mainsail is cheaper than the Sunfish in China and for less money built in the good old USA.
Restoration of our 60s Sunfish - Spring 2020. Our "mule" used for testing new ideas is an aging Sunfish with the old-style rudder and hollow spruce spar. It leaked water and weighed significantly more than the 130 pounds suggested in Kent Lewis' great book, "The Sunfish Owner's Manual". It was missing a bow handle, the coaming was damaged, the ...
It ships fast from Amazon! The Sunfish has been built since 1953, first in wood and then in fiberglass. The original rudder releasing mechanism was made of bronze, and had a shorter height vertical plates for the wooden boat compared to the fiberglass boat. Here is 1953 Alcort Sunfish ZIP, number 13 of the first 20 pre-production Sunfish built.
In this video we sand the hull and start prepping the dings, nicks, and other blemishes in the hull for fairing and fiberglass. Comment below if you have any...
This is a vintage, 1960's Sunfish Sailboat Project. Some TLC and basic restoration skills will have this puppy happily sailing again. I began restoring it, purchasing a professionally restored mahogany rudder, tiller and daggerboard in 2021 and fiberglassing one of two small punctures sustained from a falling branch during a winter storm.
The Sunfish sailboat, known for its simplicity, affordability, and ease of use, can be prepared by following these steps. It was designed by Alcort, Inc. in the United States during the early 1950s and has gained popularity ever since. The design of the Sunfish sailboat has remained largely unchanged, with minor modifications made for better ...
I made this group for owners who are trying to repair their Sunfish and Sailfish boats. Please post pics and give explanations of your project boats. I seek to help people find parts, and make...
Restoration artists spent about three years on it. It was not just an old building they were restoring; it was the only 18th century building in Russia with interior decorations made of shells and mother-of-pearl. ... On top of that, the restored boat station offers marriage registration services: a wedding there would be unusual and memorable ...
The renovated GES-2 will be decorated with chimneys of a rich blue colour, which are currently being installed. In the near future, Muscovites will be able to watch them gradually rising above the city. Each of the four 74-metre-high stacks will carry out both air intake and filtration.
Here's an easy and cheap way to dry out waterlogged flotation foam in a Sunfish or Minifish sailboat. For this project I used a couple "muffin fans" such as...
A series of three new electric monohull commuter ferries have already begun operational sailings on the Moskva River in the Russian capital Moscow. Built by Russian shipyard Emperium, sister vessels Sinichka, Filka, and Presnya - all named after rivers in Moscow - are being operated by the Moscow Department of Transport and Road Infrastructure Development […]
Dress code & Face control. Door policy in Moscow is called "face control" and it's always the guy behind the two gorillas that gives the green light if you're in or out. In Moscow nightlife there's only one rule when it comes to dress codes: You can never be underdressed. People dress A LOT sharper than, say, in the US and that goes ...