RC Sailboat


Introduction: RC Sailboat

This instructable was created in fulfillment of the project requirement of the Makecourse at the University of South Florida (www.makecourse.com).
My passion for sailing is what inspired me to make an RC sailboat for my project. I wanted control the main aspects of sailing: raising the sails, trimming the sails and steering, in order to make it as authentic as possible but to also make it easy to sail. I based the design around a ketch style sailboat but modified it to incorporate the Makecourse required box.
Step 1: Components

Below is a list of the material used to construct the RC sailboat, most of the items can be sourced on Amazon or a hobby website like Hobby King .
Electronic Components
- Qty. 1 - Arduino Uno
- Qty. 1 - Arduino Nano
- Qty. 1 set - RF Transceivers .
- Qty. 4 - Continuous rotation servos
- Qty. 1 - 180 Degree metal gear servo
- Qty. 2 - XY Dual axis joystick
- Qty. 1 - LiFePo4 Battery
- Qty. 1 - AA Battery pack (controller power)
- Qty. 2 - PCB Prototype boards (on board servo power)
- Qty.1 - 9v Battery & plug (on board arduino power)
Hull Material
- Qty. 1 - 4'x4' 5mm sanded plywood
- Qty. 1 pack - Maple veneer (would have used ash but local wood shop didn't have it)
- Qty. 1 - 1/2"x3' wood dowel
- Qty. 1 - 3/8"x3' wood dowel
- Qty. 1 bottle - Titebond III Ultimate wood glue
- Qty. 1 bottle - Superglue
- Soldering Iron
- Wire cutter
- Sandpaper/Dremel
- Needle Nose Pliers
- Screwdriver
- Painters Tape
- Fishing Line or Equivalent
Step 2: Design

The design was based off of a ketch style sailboat which was scaled and modified to incorporate the Makecouse required box. I took technical drawings that were found online and modeled a skin on spar design with a 2" spar spacing. I chose a skin on spar design because it would be the lightest, provide mounting locations for servos and the easiest to manufacture with my resources.
I sourced continuous rotation servos for the sail halyards (lines to raise the sail) and sail trim which allowed me to have an infinite range of sail heights and trim while also providing enough torque to accomplish the tasks. The rudder servo is a 180 degree metal gear servo because it has exceptional torque and won't strip out like the plastic gear servos. I attached a 3D printed spool to each of the continuous rotation servos so I could wrap line around them to control the halyards and sail trim.
I originally planned to attach a lead keel for counter balance put as of right now it is fairly heavy and it may add to much weight. One design flaw I found after assembling the sailboat was that the line used to control the sail trim will jump off the servo spool unless there is constant tension on the line. I would suggest redesigning it so there is a direct or mechanical linkage controlling the sail trim.
All of the Solidworks 3D files are also attached.
Attachments
Step 3: program.

I used the Arduino IDE software to write both the transmitter program and receiver program. The majority of the program was focused around the nRF24L0I RF transceivers which I found most of the necessary code on the numerous helpful forums .
For the transmitter code I assigned the joystick inputs to array which was then sent as one packet via the transceiver. For the receiver code I took the array of joystick inputs and assigned one axis of one joystick to the rudder servo and one axis of the other joystick to the sail trim servos. The push buttons of each joystick were used to control the sail halyards.
A few issues I found while programming was that the center of the continuous rotation servos was not exactly 90 degrees. The centers were off by approximately one degree so I had to adjust and map accordingly.
The two Arduino program sketches are attached.
Step 4: Fabrication (Hull)

This was my first time building a sailboat of this complexity so it didn't turn out perfect but I learned a lot along the way.
After I carefully removed the laser cut pieces from the work piece I sanded down any rough edges and began by gluing together the appropriate sets of spars making sure to clamp the pieces per the glue directions. After I had spar sets glued together I clamped them to a make shift jig where I could file the notches to accept the spine. Once the glue on the spine had set I began sanding the spine and the spars to achieve a smooth curve along the entire boat so that the skin would lay properly without any nasty bends.
Now that the skeleton of the sailboat was finished I focused on skinning it. I took a ~4" strip of veneer and traced the profile of the boat on it. I then cut this profile out, over sizing it quite a bit at first and then slowly cutting away material until I achieved the desired fit. I continued this process working my way from the keel to the deck.
Once I had my skin pieces trimmed I began gluing them to the skeleton by clamping and taping them where I could. I used two bags of dirt, rice would have been better, to apply pressure so that the skin stayed contoured to the spars while the glue dried. Again, I started at the keel and worked my way up to the deck. When I got to the last piece where the deck was I had to prop up the sailboat so that the veneer would clear the jig.
A few things I learned that would be helpful when building, use more and smaller strips of veneer to skin the boat, they're easier to work with. I tried only using two pieces of veneer to cover each side but they did not want to contour to the spars, so I ended up using three pieces. A big help when trying to glue the skin pieces to the spars is to clamp them to the skeleton first; once you have it where you want it spray the skin piece with glass cleaner which will soften the wood. When it dries after a few minutes remove the clamps and glue the now formed piece to the skeleton reducing the panic and effort required when the glue is tacking up. Be careful not to wait too long though because the wood will eventually flatten to its original state if left sitting.
Step 5: Fabrication (Electronics)

I started out by prototyping both the transmitter and receiver circuits on a breadboard. I did this to make changes and diagnosing easier. Once I had both circuits completely programmed and working properly I moved on to making a shield for each circuit.
By simplifying the circuit it freed up more room and made the system look much cleaner. I started by laying out the locations of my components making sure to eliminate wiring jumping as much as possible. Once I had the components routed on the prototype PCB board I began soldering the appropriate headers for the pins I would be using on the Arduino. When all of the headers were soldered I began connecting the Arduino input and output pins to the correct component and power pins. Since this was a prototyping PCB board I used solid wire to bridge the gaps. As I went along I checked continuity between adjacent pins to make sure nothing was going to short. After I finished a board I would power the board with just the Arduino to double check that I was receiving the proper voltages. Lastly, I completely assembled both circuits and made sure everything was working properly.
Step 6: Assembly

For final assembly I started with assembling both masts minus the sails, since the the bolts to hold the mast to the spars were the lowest thing in the sailboat. After that I bolted the rudder and servos to the spars starting from the outside working my way in, so the rudder and main sail halyard followed by the mizzen sail trim servo. I then bolted the two servos inside the required Makecourse box. I then attached the required box to the spars using screws.
From here I plugged in all of the components to the shield and Arduino to make sure everything was functional. The rudder was attached to the servo using two pieces of solid wire, the sails were then attached to the mast and boom using paper clips and fishing line. I used fishing line routed around the servo, up through the paper clips and over the mast topper. Note that looped the fishing line around the sail halyard spools and back up to where I connected the line to the head of the sail. This allowed me to lower the sails using the same halyard servos.
That was for the sailboat assembly, for the controller, I zip tied the AA battery pack to the back of the controller plate. The PCB board and joysticks were just screwed to the controller plate. It is a very crude but functional controller.
Some of the difficulties I ran into include: PCB board to big for Arduino location, tight space to run the fishing line and the sail trim system was poorly designed. For the PCB shield in the sailboat, the Arduino was mounted in the corner of the required box which didn't leave enough room for the shield, so I cut off the corner of the PCB shield. For the tight spaces needle nose pliers are very useful but I would revise the design to make it bigger so assembly would be easier. As for the sail trim system, what I found was that when using fishing line you had to keep constant tension on the line otherwise it would unravel. Keeping constant tension is almost impossible while sailing because of wind strength and direction changes. I would revise the system to use a mechanical connection whether it be a direct connection to the boom or a linkage system.
Overall, the final assembly was much easier than I thought considering the tight spaces.
Step 7: Go Sailing!
Go enjoy your new RC sailboat, preferably on a small lake when the winds are light otherwise you'll be fishing it off the bottom!
Recommendations

Water Contest

Woodworking Contest

Outdoor Life Contest


How to Sail an RC Sailboat – Step by Step Instructions – 5 Minute Read

Affiliate Disclaimer
As an affiliate, we may earn a commission from qualifying purchases. We get commissions for purchases made through links on this website from Amazon, the Ebay Partner Network (EPN) and other third parties.
Sailing an RC sailboat is fun, but it takes some practice before you get good at it. I certainly needed it when I started! If you want to take your interest in RC model boats to another level, then you should consider learning how to sail an RC sailboat.
However, learning how to sail RC sailboats requires patience and perseverance. There are several things that you need to master before you can begin sailing. This article will teach you how to sail a radio-controlled sailboat.
Read on below to discover tips that will avoid failure in learning how to sail model sailboats, that apply to all size boats.
Step by step Instructions
How does a yacht sail, how are the sails and rudder of an rc sailboat moved, moving forward in a straight line, sailing into the wind, sailing away from the wind, final thoughts.
First, here’s a summary step by step approach to learning how to sail an RC sailboat:
- Consider joining a local club ( USA UK ) where you’ll find lots of helpful RC sailors and RC sailing events that will help you learn. You may even be tempted to get into RC sailboat racing.
- In any event, choose a day with a gentle, consistent, light wind, preferably with the wind direction towards you, just in case you lose control of your boat.
- Find a medium-sized lake or pond, and avoid rivers or the sea, where there may be strong undercurrents. A local club will have a safe sailing area. Look out for areas that may have weeds or reeds, or shallows that could strand your boat. Remember to factor in the depth of the keel, which, on most model sailing boats, is significant.
- Check you are able to sail in your chosen area – ie no prohibitions – and keep clear of swimmers, people fishing, full sized boat traffic, and wildlife.
- Avoid days when it’s busy in your sailing area with other modelers until your sailing skills are such that you can feel confident.
- Set up your RC sailboat on its stand, and check the rigging is as it should be according to the boat’s instructions. Ensure you have brought the boat battery pack charger, the batteries are charged, and you have spare AA batteries for transmitter. Turn on the transmitter, and test that the rudder control and sail servos are all working properly.
- Ensure you understand the basics of sailing, set out below, before launching your RC sailboat. Keep a keen eye on how your boat reacts to the wind, and be ready to react in turn by altering the sail angle to maintain the boat speed as far as possible.
The first thing you’ll need to know is how does a yacht sail? An rc sailboat sails just like a full size yacht. The wind energy pushes against the sails and flows over them, creating a difference in wind pressure on each side of the sail, which is translated to forward movement by the keel of the boat. Without the keel, the boat would be pushed in the direction of the wind.
To keep the yacht moving forward, the sail angle to the wind is adjusted depending on the position of the boat. Paradoxically, a sailing boat can sail into the wind, as well as with the wind. The only direction that can’t be sailed is with the wind directly in front.
The direction of the boat is adjusted by the rudder, which is at the back of the boat.
The following diagram shows the sail angles at different points of the wind:

As a beginner RC sailing boat helmsman, many of these terms will be confusing to you, but they will soon become familiar.
The controls of an RC boat are explained in more detail in t his article , but basically, the hull (body) of the boat contains batteries that power servos which in turn move the rudder, the main sail, and the fore sail (the “jib”). The servos are controlled by a receiver, that takes commands from the RC transmitter which you hold in your hand. Here’s a short video that explains the transmitter controls:
How to sail an RC sailing boat
First, the basic skills. With the boat in the water, start with the wind half way between the front (bow) of the boat, and the side (beam). Keeping the rudder straight, trim (move) the sails so that they are close to the hull (close hauled) and the boat should move forward. If the wind is gusty, or very strong, move your transmitter control to let out the sails, spilling the wind, to keep the boat from keeling over.
If you’re sailing into the general wind direction, you’ll need to learn to “tack”, which involves turning the boat from a position where the wind is coming on one side of the bow, through the head-on wind, to end with the wind on its other side. This is achieved by moving the rudder to turn the yacht, whilst changing the angle of the sails to the wind – see the diagram above.
So the boat moves forward via a zig zag course.
As the boat turns into the wind, it slows, so this maneuver should be completed as quickly as possible, otherwise, the boat could get stuck with the sails flapping – this is called being “in irons”.
If the direction you wish to sail in means the wind is behind the boat, it is called running before the wind. In this case, turning the boat involves “jibing”, which is the opposite of tacking.
To change direction whilst running with the wind, move the rudder so the wind goes around the back (stern) of the boat and haul the sails in. As the boat comes round, the wind will move from one side of the sails to the other.
If this is not done smoothly, it could cause the sails to violently move in the opposite direction, possibly causing damage and maybe even capsizing the boat.
So those are the basics of learning how to sail an RC sailboat. As I’ve said above, the best way to refine your skills is to get out on the water and practice.
if you have any interest in remote control sailing but aren’t sure where to begin, use the step-by-step guide above to learn how to sail an RC sailboat. Once you’ve mastered the basics, you can move on to the exciting world of racing sailboats.
If you’re still considering your first RC beginner sailboat, take a look at our article on beginner RC sailboats , or for the more adventurous, consider building your own RC sailboat from a kit. More about that here .
Image credit Nick Kinkaid
About the author
It all started with a line controlled spitfire 50 years ago….
That turned into a life long interest in models, in particular radio controlled models, but I’ve only got back into it since I’ve been retired. As a result a lot has changed, and I’ve been happily starting afresh, researching into the hobby and finding answers to the questions all beginners have when starting out.
I hope you find some answers to the queries you have, and go on to enjoy all aspects of this fascinating hobby.
Latest posts

VOLANTEXRC P51 Mustang RC Plane Review: A Beginner’s Dream?
I was thrilled when I discovered the VOLANTEXRC RC Plane. This 4-channel WWII RC Airplane, specifically the P51 Mustang model, is truly a beginner’s dream come true. With its ultra-stable Xpilot gyro stabilizer system and 3-level flight control system, it’s incredibly easy to fly, whether you’re a novice or an experienced flyer. The impressive 2.4…

RTF RC planes with SAFE technology: No More Crashes?
RTF RC planes with SAFE technology have revolutionized the world of remote control aviation, offering a new level of ease, control, and safety for both beginners and experienced hobbyists. What a change from my early days of flying RC planes, when you fully expected to come home with your plane in bits! These innovative aircraft…

Top Race RC Plane TR-C385 Review: Stunt Flying Delight
I recently had the chance to test out the Top Race 4 Channel RC Plane TR-C385. It surpassed all my expectations. Designed for adults and older kids, this ready-to-fly airplane offers an exhilarating stunt flying experience. With precise control and maneuverability, thanks to its 4-channel system, this RC plane is a great starter or intermediate…
|
| ||||||||||||||||||||||||||||||||||||||||||||||||||||||||||||||||||||||||||||||||||||||||||||||||||||||||||||||||||||||||||||||||||||||||||||||||||||||||||||||||||||||||||||||||||||||||||||||||||||||||||||||||||||||||||||||||||
| I have rearranged the information into separate web pages. The one page was getting too large was slow to load and difficult then to navigate. Hopefully by dividing the information into separate areas navigation will be easier. There are many resources which offer all sorts of assistance to the beginner model sail maker. I have used as many as I could find including the following and would like to share some of my findings. I'm sure some will find fault with my ideas and I am only too happy to receive feedback. E-mail me on [email protected] Lester Gilbert's one metre site Larry Robinson's book on 'How To' make sails advertised in Radio Yacht Supplies Australia ; Radio Sailing Shop While not specifically for models this program the ' SailCut CAD ' program allows plotting of panels etc for sails. Its discussions and examples are very useful. This is a free download but does require some computer knowledge to set up An excellent article by Paul Bogataj on " How do sails work " - essential reading! In all of this literature there appears to be two common themes 1. To achieve a truly efficient sail it must be constructed with separate panels with built in shape or curvature. 2. Some means has to be used to hold the edges of the panels to the correct shape while joining them. JavaScript seems to be disabled in your browser. You must have JavaScript enabled in your browser to utilize the functionality of this website. Simply Designed Better
Making Model Yacht Sails - Larry Robinson's method of building in shape
Quick OverviewProduct code. BK-38 Availability: In stock

Larry Robinson - Making Model Yacht Sails - how to build in their shape, a master class in sail making for modern rc model yachts. Around 700 copies sold by mid 2015 and still going strong. If you want to know how to make well shaped rc model yacht sails, and make them efficiently and consistently, this contains all you need to know. The method used by the top sail makers for putting the 3D shape into the sails, as well as the luff shaping, is described in some detail. The design and construction of the all important moulds themselves is also dealt with at some length. Packed with other hints and tips and very well illustrated. A thorough master class in sail making for modern model yachts. "Even those sail makers who have advanced to higher levels of their craft will find thought provoking ideas. Anyone thinking of testing the waters should be greatly helped and inspired by what they find here. In short it’s a master class in high precision sail making for R/C yachts."
Building and Tuning Guides and Tips
Check out the links below, plus all the online resources available in our links page!Tuning tips, the following link is a very nice video on tuning the df65. make by patrick rynne of the miami rc sailing squadron it will be a big help to all df65 skippers.. Here is a PDF created by Zach Kelchner to summarize the video above:Df65-tuning. ———————————————————————————————————————————- Tuning Your DragonForce 65 – DF65 Sail Tuning Guide by Soch Sails with measurements and procedure for getting your DF65 going fast!———————————————————————————————————————————– Next is a very handy printable Tuning Guide provided by Phil Burgess the President of the Australia DF Radio Sailing Assn.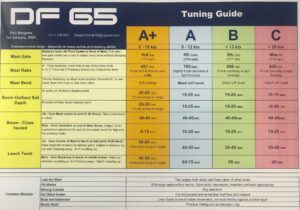 ================================================================================= Sail MakingThe files that follow are pdf’s of df65 a, a+, b, c sails that can be printed full size. the drawings are made from data in the class rules and mainsail luff curve reflects measurements from production sails., df65a+ templ, df65a templ , df65 b templ, df65 c templ, class rules sail numbering diagram pdf below, sail number diagram, if you need the proper sized numbers for putting numbers on your sails per the above diagram, the pdf below prints out accurately on most printers to comply with the rules v1.8, sail#temp v1.8. ——————————————————————————————– Assembly GuidesDf65 v6 rigging instructions v1., chucks_df65 a+ assembly guide_rev_1, df65 rig kit assembly guide – nice instructions df65 rig building guide, bought a b or c rig and need some helpful tips on building it up correctly, then look no further, ———————————————————————-, other useful hints and tips.
© 2024 DragonForce 65 USA Class Owners Association Theme by Anders Noren — Up ↑
Rig building   How Do You Sail An RC Sailboat? (11 Essential Steps!)To make the most of your time on the water, it’s crucial to understand the art of navigation. We’ll focus on the essential aspects of navigating an RC sailboat, from selecting the right location to mastering advanced maneuvers. Push the rudder joystick left and right to steer the RC sailboat. Open and close the sails to tighten and loosen the sails, this will increase or decrease your speed. If there are strong winds, tighten the sails so that they don’t flop around. Partially close the sails in low wind conditions.  It’s all about working with the wind and keeping an eye on the sails to make sure that they are catching the wind from the correct direction. Steering the boat required you to position the rudder and sails correctly. So let’s go into every aspect of sailing an RC sailboat along with a whole lot of advice. Steps For Sailing An RC Sailboat
By the way, have you ever wondered how to size an RC boat motor ? Choosing the right motor size can significantly improve your boat’s performance, especially if you’re looking to get into more competitive sailing. Sailing an RC boat takes practice. Pay attention to how your boat responds to wind and control inputs. Experiment with different sail and rudder positions to get the most out of your boat. When you’re finished sailing, bring your boat back to shore while avoiding running into the ground or colliding with obstacles. Disconnect the boat’s battery pack and turn the transmitter off. Just starting out with RC sailboats? Don’t get overwhelmed! We’ve rounded up the best beginner-friendly RC sailboat models that are easy to operate. Select The Right LocationSail on water like lakes or calm ponds to ensure to avoid interruptions while you’re sailing. Avoid busy, crowded locations with heavy boat traffic to avoid bumpy and difficult-to-navigate waters. Tranquil waters provide a peaceful backdrop for you to focus on refining your sailing skills and enjoying the beauty of RC sailing. Crowded areas increase the risk of collisions, making it challenging to maneuver your RC sailboat effectively. To maximize your enjoyment and safety, prioritize the selection of the right location. This is the best way to do things while you’re learning. Then later on once you’ve gained enough skill to sail around other boats and obstacles, you can do so with confidence. Assessing Wind ConditionsThe wind is what’s going to move you around on the water so an understanding the its direction and strength will help you plan your sailing route effectively and avoid problems. Adjusting the angle of your sails and reading wind shifts will help you navigate smoothly. Note the strength of the wind, whether it’s gentle and steady or strong and gusty so that you make appropriate sail adjustments. This will enable you to sail safely, avoiding collisions with obstacles or other boats. You can tell that the sails aren’t catching the wind by checking if they’re flopping around like flags. If the wind is blowing strong and the sails aren’t catching it, you need to turn the sails slightly to fill them up with air. You need to start learning about how the wind interacts with your boat to assist you in charting an efficient sailing route. Preparing Your RC SailboatCarefully assemble your RC sailboat according to the manufacturer’s instructions. Ensure all components are securely in place, and check for any loose or damaged parts before launching. Proper preparation is the foundation of a successful RC sailboat journey. It ensures that your sailboat is in optimal condition and minimizes the risk of in-water mishaps. Of course, things don’t always go as planned. If you’re facing issues with your boat not responding, it might be good to know why your RC boat is not working . A quick troubleshoot could save your sailing day. Sail AdjustmentsCorrectly adjusting the mainsail is essential for maximizing your sailboat’s performance. It directly impacts how your sailboat responds to the wind and steers through the water. I’ll go over advanced techniques in a moment, but for now, you should focus on making small adjustments to the sails so that you can get a feel of how they interact with the wind. Sail adjustments are like the controls of your RC sailboat, allowing you to fine-tune its behavior to your commands. By the way, if you’re new to this whole RC sailing thing, it’s crucial to know what you need for an RC boat . This guide will ensure you’re not missing out on any key items before you hit the waters. Safety PrecautionsEven though there isn’t much that can go terribly bad with sail boating, you need to be cautious of anything else in the water for an enjoyable RC sailboat adventure. Besides that, check to verify that your RC sailboat is in perfect working condition. This includes examining all components, ensuring secure connections, and confirming proper functionality. Make sure that all the openings on your boat are closed up before setting off on the water. If you have an open window at the top, tape it up! Also, make sure any drain plugs are securely pressed into the boat to stop any water from getting in. Lubricate the bearings, like those at the top of the “gooseneck” and underneath, located at the bottom of the sails. On large bodies of water, make sure you have certain backup plans in mind, like retrieving your boat if it gets stuck or floats out of range. Props matter too, you know! When considering performance, you might also want to check out the difference between a 2-blade and a 3-blade prop for RC boats . The type of propeller you choose can influence how efficiently your sailboat glides through the water. Adjusting the JibMake sure to adjust the jib, the smaller sail at the front of your sailboat, to work together with the bigger sail and enhance its performance. It will help you find a balance between stability and fast sailing and help your boat float smoothly through the water. Basic ManeuversAlthough the movements aren’t as sudden as cars and planes, steering is still paramount to navigating your RC sailboat effectively. Turning the rudder in the water allows you to turn the boat as it cuts through the water. It controls your sailboat’s direction and maintains precision on the water, whether it’s upwind or down. Learning how to control the rudder skillfully will help you move in any direction, as long as you have the same amount of skill with the sails. Be patient and allow some time to pass when you controlling the boat. The sails will react quickly with any wind but the rudder takes a few seconds to impact the direction of the boat. Whether you’re adjusting your course or responding to wind shifts. There’s not much advice I can give you other than to practice in calm environments until you feel comfortable with it. Sailing UpwindSailing against the wind requires certain sail adjustments and precise steering. It can be challenging because of the wind resistance, but you can overcome this by using certain maneuvers. To sail upwind, use techniques like tacking. Tacking and JibingTacking and jibing are fundamental maneuvers for efficiently changing your sailboat’s direction. These skills are essential for navigating complex routes and racing competitively. Use tacking to move into the wind. Tacking is when you turn the front of the boat towards the wind while slightly steering from left to right through the water. In this way, the wind should hit the sails on one side and then the other as you’re steering into the wind. Jibing works in the opposite direction of tacking and is a technique for moving very quickly with the wind. Tacking and jibing will help you to navigate intricate paths, especially when competing in races with demanding courses. In conclusionThe controls of an RC sailboat transmitter aren’t too complicated. As for the sailing, remember to use the wind and the water in harmony. Keep all the components of the boat in mind when navigating through the water. Start out slow with smaller sails and work your way up. Practice is key for getting to know the behaviors of your sailboat. This awesome hobby has something for everyone, whether you like to build your RC from scratch and keep modifying till you've got it to just how you want it, to track racing. You might be out with a boat, or perfecting your skills with a plane. Are you taking some cool pics with your drone? I'm sure my site will help you on your journey. Recent PostsIs Your RC Car Faster In Reverse? This Might Be Why (Solved) It's a nice weekend, and you’re outdoors pursuing your RC racing hobby. You miss a turn and go off the track. You reverse back to the track and notice that your car is faster in reverse. You may... Most Common Reasons Why RC Car Blinks Red (And Fixes) Red light blinking on the RC car, and the steering–working, but the throttle not working, sounds familiar? Then you’ve landed at the right place. In this guide, we’ll explain in detail why an... 
Radio-Controlled Sailboat Kits: The Ultimate Guide
Radio-controlled sailboat kits are a popular hobby for both beginners and experienced enthusiasts. These kits allow hobbyists to build their sailboats from scratch and control them remotely using a radio transmitter. The idea of radio-controlled sailboats dates back to the 1930s and has since become a popular hobby worldwide. Radio-controlled sailboat kits come in different shapes and sizes. They contain all the components necessary to build a functional sailboat, including the hull, sails, rigging, motor, and radio transmitter. RC sailboats are available in different types, including racing sailboats, yachts, and schooners. When choosing a kit, hobbyists need to consider the price, difficulty level, design, and additional features such as GPS capabilities. Building and owning a radio-controlled sailboat has many benefits. Firstly, it is an excellent way to learn new skills and gain knowledge about sailing. Secondly, it allows hobbyists to spend time outdoors and experience the joy of sailing. Lastly, it is a social hobby, and sailing with others is an excellent way to meet new people and make new friends. Building and sailing radio-controlled sailboats can present some challenges, especially for beginners. Some of the common challenges include understanding the complex instructions, setting up the radio transmitter, and navigating the boat. However, with practice and patience, these challenges can be overcome. Beginner-friendly kits are available, and YouTube tutorials can help with the setup and sailing of the boat. Choosing the perfect RC sailboat kit for your needs.Radio-controlled sailboat kits come in different shapes and sizes. They allow hobbyists to build their sailboats from scratch and control them remotely using a radio transmitter. These kits contain all the components necessary to build a functional sailboat, including the hull, sails, rigging, motor, and radio transmitter. RC sailboats are available in different types, including racing sailboats, yachts, and schooners. When choosing a kit, hobbyists need to consider different factors such as price , difficulty level , design , and additional features such as GPS capabilities . Kits are available for all levels of expertise, from beginners to experts , and there are various brands that specialize in producing high-quality kits. Websites such as Amazon, eBay , and Banggood offer a wide range of radio-controlled sailboat kits that cater to different hobbyist needs. There are different factors to consider when choosing a radio-controlled sailboat kit. One of the most important is price . Kits can range from a few hundred to several thousand dollars depending on the complexity and size of the boat. Another important factor is difficulty level , as some kits are more appropriate for advanced hobbyists, while others are suitable for beginners. Hobbyists should also consider the design of the boat and the type of sailing they are interested in, such as racing or leisure sailing. Some kits even offer additional features such as GPS capabilities for location tracking and weather information. There are different types of sailboats available in the market, including racing sailboats, yachts, catamarans, and schooners. Racing sailboats are specifically designed for high speeds and maneuverability, while yachts are ideal for leisure sailing and relaxation. Catamarans are known for their stability and efficiency, making them popular for longer voyages. Schooners are classic sailboats with two or more masts, making them ideal for those who want a traditional sailing experience.  What are the different types of sailboats available in the market?The different types of sailboats available in the market include dinghies, daysailers, keelboats, cruisers, racing sailboats, and catamarans. Benefits, Skills and Social Aspects of Radio-Controlled Sailboat KitsBuilding and owning a radio-controlled sailboat has many benefits. Firstly, it is an excellent way to learn new skills and gain knowledge about sailing. Secondly, it allows hobbyists to spend time outdoors and experience the joy of sailing. Thirdly, it is a social hobby, and sailing with others is an excellent way to meet new people and make new friends. Some interesting facts about RC sailboats are that the World Sailing Model Competition happens every two years and has been held since 1972. The most recent competition was held in 2019 and saw participants from 13 countries. A table comparing different RC sailboat kits and their features can be found below.
 What are some popular websites to purchase radio-controlled sailboat kits and compare different products?Some popular websites to purchase radio-controlled sailboat kits and compare different products are Amazon, HobbyKing, Tower Hobbies, and Horizon Hobby. Overcoming Challenges in RC Sailboat KitsBuilding and sailing radio-controlled sailboats can present some challenges, especially for beginners . One of the biggest challenges is understanding the complex instructions. Moreover, setting up the radio transmitter can also be daunting as it requires technical skills. Additionally, navigating the boat can be difficult as the wind and water conditions can affect its movement. However, with practice and patience, these challenges can be overcome.  What are some resources for beginners to learn about building and sailing radio-controlled sailboats?Some resources for beginners to learn about building and sailing radio-controlled sailboats are online forums such as RC Groups, sailboat kit manufacturers like Dumas Products, and instructional videos on YouTube. Radio-controlled sailboat kits are a fantastic way to combine the creativity of building with the thrill of remote control. They allow hobbyists to learn new skills while enjoying the fresh air and gentle breeze. With radio-controlled sailboat kits, enthusiasts can create their own sailboats from scratch with the freedom to customize the design and features according to their preference. Furthermore, sailing with others adds to the social aspect of the hobby and can be a great way to make new friends. In conclusion, radio-controlled sailboat kits offer a unique and exciting hobby option for individuals of all ages. While there are inherent challenges in building and sailing the boats, the potential rewards are well worth the effort. The creativity and knowledge gained from creating and operating these boats are invaluable. With various resources, including online forums, tutorials, and classes, beginners can overcome the challenges and become skilled radio-controlled sailboat enthusiasts. If you are interested in this hobby, start by researching the different types of radio-controlled sailboat kits available and find one that suits your skill level and budget. Once you have your kit, get building and enjoy the serene and thrilling experience of radio-controlled sailboat sailing.  Previous ArticleNext article.  How to make a rc sailboatMake a rc sailboat. After two weeks at the Wooden Boat school I had finished the ruff-in of the hull, mast, electronics and sub deck ready to start the final assembly. Here you see the 1/16 inch plywood sub-deck has been removed. I have added ribs to help support the shape of the sides. Here you see, that all the ribs are in place, I have added epoxy to unify and strengthen the hull. Fair the hull but don't spend a lot of time on it right now. Establish the center lines this is when I shape the keel and ballast. Take pictures and use the black & white mode to help see any fluctuations in the keel. Try different exposures A PVC pipe building support makes a big difference for accurate work. It's important to have complete & easy access to the hull at this point. I use epoxy to seal the underside of the deck, two coats, while it's tacky I apply thickened epoxy to the deck beams and sheer. Lay the decking from the outside toward the king plank. To get a deck to look right do not only look at where the points meet but also the trailing edge of the plank. You may need to trim each side of a deck plank to keep both sides of the deck even. Don't rush! The design of the deck is completely up to you;-) You may like contrasting wood or a reproduction look like this? Finished deck ready for three coats of epoxy. I put the epoxy finish on before the hatch combing. I think it makes it easer to get a smooth finish. Three coats of epoxy ready to complete hatches. Needs buffing to improve the look and feel. Plywood mold to glue hatch frames together with. Plywood jig in use Plug removed and windows fitted to the frame.  Occasional ruminations, experimentations, and observations on the art and nonsense of building wooden radio control sailboats. Thanks for visiting! Search This BlogHow to get started making wooden rc sailboats.  Post a CommentPopular posts from this blog, iom sailboat stand, iom alignment and measuring jig (updated), a wooden "alternative" iom rc sailboat, iom rig box (iom sail box) plans.  Return to RC Sailboats RC Sailboat Controls – Radio Layout, Radio SetupRC Sailboat Controls are rather different then your typical Radio Control. We will first look at what channels on the radio control transmitter, control which part of the RC Sailboat and then we will look at the specific setup concerning the radio gear on an RC Sailboat. Transmitter Channels and Controls – RC Sailboat ControlsThe most common type of transmitter for RC Sailboats are the stick type transmitters . The stick type transmitter allows the ease of use over the sail control. On a stick type transmitter referring to the image below, the left  RC Sailboat Controls side channel, typically throttle on an airplane controls the Sails. Moving the left side stick up or down would draw the sail in or let the sail out. Motion on the stick is vertically. The stick on the right hand side controls the rudder on the RC Sailboat. The rudder channel operates as like any other rudder channel. Motion on the stick is horizontally. These two channels are the required minimum for RC Sailboat Controls. You can see all the extra switches and controls on the radio to the right. These may be used for controlling those fancy features on your RC Sailboat. In some cases these extra features include alternate lighting, winches, or anything else to make the sailboat appear and operate more scale like. Radio System Controls – RC Sailboat Controls RC Radio Receiver Now that we have talked about the transmitter we will look at the rest of the components that are required in order to run an RC Sailboat. The component that is responsible for talking to the transmitter is the receiver. The receiver is what talks to the transmitter and then converts the radio signal to an electrical signal that can be used to control the rudder and sails of a sailboat. The reciver can be purchased with the transmitter if you choose to take that route. Purchasing a transmitter/receiver combination is more common when building your own boats. Receiver Battery – RC Sailboat ControlsTo power the radio equipment a standard receiver battery is required. This is a battery that operates on 4.8-6.0v. Although a 4 cell disposable AA case can be used, it is highly recommended for an RC sailboat to use a rechargeable battery . The main reason is to ensure the battery pack can supply a sufficient amount of current to the servos. For larger RC sailboats a rechargeable battery is a requirement. The average user would use a 4.8-6.0v NiMh pack however LiFE, Li-ion, LiPo packs are available but be certain to include a Voltage Regulator in your system to limit the voltage. Sail Servo – RC Sailboat ControlsThe most important servo for an RC Sailboat is of course the Sail Servo. The sail servo comes in two different styles that are most common. Each style has its own specific set of advantages and disadvantages. The first style of sail servo that we will talk about is the sail winch servo. The sail winch servo as pictured on the right hand side uses a drum like wheel to house the sail line. When the drum rotates the line is either let out or brought in. The Sail winch servo typically allows for 3 rotations of the drum with  Sail Servo Winch – Sail Servo – RC Sailboat Controls torque specs around the 150 oz-in / 11 kg-cm. The biggest difference is that these torque specs are at a relatively short distance from the center point of the drum. This small distance increases the amount of torque relative to the next sail servo type that we will be looking at. Sail Winch Servo Advantages:
Sail Winch Servo Disadvantages:
 Sail Arm Servo – RC Sailboat Controls The other Sail Servo style is the arm type . The arm type sail servo uses quite a long arm in order to get an acceptable amount of line draw. As you may expect this operates nearly the same as a standard servo where the only difference is the servo arm itself. For a typical one meter Sailboat, you would require a servo of this style that has at least 150 oz-in / 11 kg-cm of torque as a minimum. This style servo requires more torque then a winch servo as the amount of force produced at the end of the arm is reduces due to the length of the arm. Sail Arm Servo Advantages:
Sail Arm Servo Disadvantages:
Steering Servo – RC Sailboat ControlsRadio Control Info Articles
Recent Articles
 Popular Mechanics Race Your Friends With These Remote-Control Sailing and Speed BoatsPosted: July 11, 2024 | Last updated: July 12, 2024  If you’ve ever seen a remote-control boat skate across the water—or controlled one yourself—you know it’s a good time. These toys can accelerate up to 50 miles per hour, tearing up the waters in your favorite lakes, pools , rivers, and, if you like risk, seas. RC boats come in lots of shapes, sizes, and styles, but the best models can shred water from afar without becoming sinking ships. We’ve rounded up the best remote-control boats for beach visits, lakefront races, poolside entertainment, and some advice on picking the best RC boat for you. Stay in play and check out our picks for the best magnetic toys , remote-control trucks , and remote-control planes . The Best RC Boats
What to ConsiderWhile you can likely get away with using a larger RC boat on a pond or lake, you may want to stick to a smaller model if you’ll be floating yours in a backyard swimming pool or need to pack something tiny. RC boats can be up to two feet long, so make sure to consider the journey to the water, too, especially if the boat you’re eyeing doesn’t come with a carrying case. Weight and SpeedThe RC boat’s weight helps determine how fast it can move. Heavier boats are better equipped to move at high speeds without capsizing, whereas lighter boats can be speedy using less power, a.k.a., slower acceleration. Think of it like torque on a car (or a full-sized boat, for that matter)—the more power the boat gets from the battery, electric, or gas motor, the faster it can accelerate. Speed is also dependent on the type of hull—some boats are shaped for optimal turning and curves, while others are built for picking up speed while driving in a straight line. The priciest models can reach speeds of up to 50 miles per hour. We mostly recommend recreational, battery-powered RC boats that reach speeds up to 30 miles per hour, since the more powerful, expensive models are meant for hardcore hobbyists and professional racers. Capsize RecoveryMany RC boats have anti-capsize, or capsize recovery, functionality to prevent them from flipping over (and staying overturned). Flipping an RC boat is extremely easy, especially if you lack experience, and can lead to a sinking ship. If you’re new to RC boating, consider grabbing one with capsize recovery, making your boat rebalance and flip back over if it tips. How We SelectedWe researched each model’s speed, customer rating, durability, and unique features. We also consulted buying guides from several top hobbyist publications. We’ve picked options for every type of RC boat customer, whether you’re a casual hobbyist, buying a first boat for your kids, or you’re a dedicated RC enthusiast.  RC Boat with Case R308") 1) RC Boat with Case R308This boat features capsize recovery, so if it tips over or gets hit by a wave, it’ll flip back over to recover. It also has LED lights installed to make it easy to see when it’s dark. Thanks to the autopilot mode that loops the boat into a figure-eight shape, children can easily use it, too. The R308 comes with two batteries and a charger, with users reporting approximately 20 minutes of power (counting both batteries) when operating the boat at full speed. It has a 400-foot signal range for distance driving and tops at 20 miles per hour. With its carry case, the R308 is a solid RC boat for most users.  RC Boat with LED Light") 2) RC Boat with LED LightThis is an excellent option for anyone eager to get into RC boating but unsure of their prowess on the water. It features two autopilot modes, so there’s plenty of opportunity to learn how to use it. It also has an extended playtime of 30 minutes, giving you plenty of time to practice. With features like capsize recovery, double hatch design, and low-battery and signal alarms, this boat is pretty much goof proof, making it the perfect boat for beginners on their way to becoming enthusiasts.  Altair AA102 RED RC Boat for Pools or Lakes [Ultra Fast Pro Caliber] Free Priority Shipping | Water Safety Propeller & Self Righting System | 2 Batteries Included | 30 km/h (Lincoln, NE Company)") 3) AA102 RC BoatIf you need a well-rounded RC boat, this one has ample protection, zippy speeds, and excellent customer service, all in one attractive package. Its anti-capsize feature prevents it from tipping over, while several users say its nose bumper saved their boats from getting totaled through crashing. It has an extra battery for more playtime, and several users say it provides up to 20 minutes of action after swapping it. Users who experienced issues with their boats were able to find replacement parts and products thanks to the company’s customer service help. Others say that it’s a terrific value, though the lack of a carry case is disappointing.  Velocity H102") 4) Velocity H102This boat reaches speeds of 20-plus miles per hour, making it great for anyone who wants their toy to fly on the water. This boat features a capsize recovery mode, a water-cooled engine, and a double-hatched body, making it easier to control on waves. The charge time is a little long, three to four hours, but it can ride for up to 15 minutes at full power. Customers say this boat reaches top speed fairly quickly, though some report that the controller is difficult to use and not very responsive. Still, it handles well on the water and is a super speedy boat.  PLAYSTEAM Voyager400 2.4GHz RC Motor Powered Sailboat in Red - 26\" Tall") 5) Voyager 400 RC SailboatIf sailing is your preference, the Voyager 400 is the way to go. Rather than rely on an electric motor to push it forward, the Voyager 400 can sail in any body of water via wind power. Its remote controls the rudder and the propulsion, and just in case wind isn’t in the forecast, it comes with a detachable motor to help propel it. Customers say it’s easy to use, and everything is sealed to keep interior components dry when it tips over. Its rechargeable remote battery can work for up to one hour, which puts most RC speedboats to shame. A drawback, however, is that if it gets stuck at sea without the motor attached, you’ll have to wait for it to wash ashore.  RC Racing Boat") 6) RC Racing BoatCheerwing RC boats are fantastic if you’re looking for an affordable toy to race with your friends. This boat can hit up to 15 miles per hour and has some great features, including capsize recovery and automatic yaw correction, which rebalances your boat. It also signals when the battery is low or starts to lose signal, giving you peace of mind. If you want to try RC boating without spending much, this is a solid buy. Its biggest downside is in its battery life—just six to eight minutes per charge—and it doesn’t come with the option to buy a second battery, so it requires frequent recharging.  Brushless RC Boat") 7) Brushless RC BoatIf you need speed and don’t mind investing more money into your hobby, this boat is fantastic. The fastest model on this list, this boat has a top speed of 40 miles per hour, a range of up to 656 feet, and a water-cooled system that prevents the motor from overheating. It also has safety features to prevent damage from the high speeds, like waterproofing and a one-piece hull to prevent cracks. The biggest flaw is its lack of capsize recovery, and several users say their boats flipped in action, causing them to swim out to retrieve their toys. It also only comes with one battery. More for YouManchester United leave behind hundreds of worried staff as they prepare for their pre-season tour in Los Angeles... with Sir Jim Ratcliffe's Ineos set to make up to 250 job cuts at Old Trafford Brains and beauty fuel success of China performing sensation Zhu Zhu Don’t forget to support your parents: Concerned Singaporean urges generosity toward elderly tissue sellers Indonesian President to start working in new capital Nusantara in July Beautiful barns around the world with a stylish modern finish Outbreak of new virus causes panic Archaeologists uncover 'monumental' structure in Israel from the Bible Is Michelle Obama the best candidate the Democrats can run against Trump in November? China philosophy students trade grilled sausages, highbrow theories at street food stall EV driver billed S$20 “idle fee” for leaving her car at charging point over 30 minutes after it was fully charged The 17 Most Upsetting Movies Of All Time 24 incredible shipping container homes around the world NASA discovers a 'super-Earth' planet - and it could harbour life Ederson out: Man City set their sights on an expensive world-class replacement Mona Lisa background's real-life location thought to be pinpointed for the first time SIA flash sales will take you around Asia starting from S$268! Dark Tourism: The Island Of The Dolls Detroit Lions fans won't like USA TODAY's record predictions for 2024 PCs are spontaneously crashing because of Intel problem, company says Mysterious structures discovered near Egypt's Great Pyramid of Giza Home News Event Recap: US Open Sailing Series – 2024 Long Beach Olympic Classes Regatta Event Recap: US Open Sailing Series – 2024 Long Beach Olympic Classes RegattaThe 2024 US Open Sailing Series for the Long Beach Olympic Classes Regatta at Los Alamitos Bay Yacht Club in Long Beach, California, delivered an exhilarating week of competitive racing, featuring a diverse fleet of sailors across multiple classes. This event, an integral part of the sailing calendar, showcased both seasoned competitors and promising young talents. The event brought in a combination of Olympic, Invitational, and Youth World Classes for competitive racing in Southern California waters. The Long Beach venue, renowned for its challenging conditions and scenic backdrop, provided the perfect setting for this prestigious regatta. As the sailing community looks ahead, it’s worth noting that Long Beach will serve as the sailing venue for the 2028 Summer Olympics, promising more thrilling races and showcasing the world’s best sailors. “Extremely competitive classes showed up to race in stellar Long Beach conditions providing 12-17 knots on Friday and Saturday and 8-10 knots on Sunday,” shared Regatta Co-Chair and Long Beach Yacht Club Vice Commodore, Lisa Meier. “Coaches and competitors were at the highest levels. One just had to look at the ILCA 6 course to world class competition to see Charlotte Rose/USA, Lillian Meyers/USA, and Wiktoria Golebiowska/Poland battling it out in world class conditions! All classes provided stiff competition with lead changes throughout the regatta.” Class winners:
*Denotes international competitor Five of the seven class winners hail from California, representing the West Coast at the event. “The Long Beach Olympic Classes Regatta is designed to run during the Olympic window,” noted Mike Van Dyke, Chair of US Sailing Board of Directors and Staff Commodore of both Long Beach Yacht Club and Los Alamitos Bay Yacht Club. “It’s a preview of the day of how the sailing will look for LA28. Next year, we expand the number of classes as we welcome back the 49er, FX, Nacra 17, and iQFOiL. The Format expands to 9 days with each class racing 4 days. We’re partners with the City of Long Beach, welcoming and hosting visiting athletes as they move from Paris to Long Beach.” The 2024 US Open Sailing Series not only highlighted the current elite sailors but also served as a critical platform for emerging talents to make their mark. The event reaffirmed the vibrant and competitive spirit of sailing, setting a high bar for future regattas. For regatta highlights, visit: https://www.youtube.com/playlist?list=PLtc1xG1KHqw4_8z6lpeAKRrpuaRImJf58 For photos, visit: https://www.flickr.com/photos/195842591@N03/albums/72177720318964487/ For full results, visit: https://raceoffice.usopen.ussailing.org/en/default/races/race-resultsall/text/2024LongBeachOlympicClassesRegatta-en And check out this interview with Southern California American Magic Sailors, Riley Gibbs and Michael Menninger about the conditions in Long Beach and well wishes for the Long Beach Olympic Classes Regatta competitors: https://www.youtube.com/watch?v=MlPZRx683Io Copyright ©2018-2024 United States Sailing Association. All rights reserved. US Sailing is a 501(c)3 organization. Website designed & developed by Design Principles, Inc. --> | ||||||||||||||||||||||||||||||||||||||||||||||||||||||||||||||||||||||||||||||||||||||||||||||||||||||||||||||||||||||||||||||||||||||||||||||||||||||||||||||||||||||||||||||||||||||||||||||||||||||||||||||||||||||||||||||||||
COMMENTS
Three-part video on how to make paneled sails for radio-controlled sailboats.
Sails are the only means to propel a RC yacht that's why a lot of attention is needed building the sails. Anyway it is not difficult to build well cut and working sails. The more experienced the sail maker gets the better the sails work. This guide is intended to help newbies to cut heir own sails and build their own rigs.
this is a video that shows you some of the basics to build a sail for a modellboat.if you are interested in more information or tips and tricks let me know!b...
Tips to help you make your own soft cotton sails that really work. If you are not inclined to DIY, contact Rod Carr at: http://www.carrsails.com He is a Re...
The recut seam looked better, wrinkle-wise. I have 2 seams in the sail, at about 1/3 luff and 2/3 luff, trying to get draft into the sail (and some practice with the gadget). I did not recut the upper seam - the wrinkles don't seem to hurt the performance. The Tyvek sail, with 1 gadget seam, looks very nice, and sailed well too.
Step 1: Components. Below is a list of the material used to construct the RC sailboat, most of the items can be sourced on Amazon or a hobby website like Hobby King. Electronic Components. Qty. 1 - Arduino Uno. Qty. 1 - Arduino Nano. Qty. 1 set - RF Transceivers.
Moving forward in a straight line. First, the basic skills. With the boat in the water, start with the wind half way between the front (bow) of the boat, and the side (beam). Keeping the rudder straight, trim (move) the sails so that they are close to the hull (close hauled) and the boat should move forward.
to learn how to make competitive rc yacht sails - it describes the mould method of shaping sails used by the top sailmakers and is a contemporary masterclass in its own right. It is stocked by SAILSetc, item BK-38 Sail making materials are listed in the SAILSetc catalogue and in our list of additional and surplus sail
An excellent article by Paul Bogataj on " How do sails work " - essential reading! 1. To achieve a truly efficient sail it must be constructed with separate panels with built in shape or curvature. 2. Some means has to be used to hold the edges of the panels to the correct shape while joining them.
Larry Robinson - Making Model Yacht Sails - how to build in their shape, a master class in sail making for modern rc model yachts. Around 700 copies sold by mid 2015 and still going strong. If you want to know how to make well shaped rc model yacht sails, and make them efficiently and consistently, this contains all you need to know.
Make by Patrick Rynne of the Miami RC Sailing Squadron it will be a big help to all DF65 skippers. Here is a PDF created by Zach Kelchner to summarize the video above: ... Sail Making The files that follow are PDF's of DF65 A, A+, B, C sails that can be printed full size. The drawings are made from data in the Class Rules and Mainsail Luff ...
Close both ends of the tube with 2mm long cuts from the 5mm brass tube and solder in place. Use 8mm OD aluminum tube or anything similar for the booms. Find an aluminum rod whose OD fits the ID of the aluminum boom tube. Using a hack saw, cut a slot and make a snug fit with the flattened end of brass rod.
Received 2 Likes on 2 Posts. RE: how to make masts and sails etc. to post pics click on where it says image above your reply and then go to underneath where it says click here to upload images and then click browse ,then go to your pic files click on the pic you want then click ok and thats it youve posted a pic. Reply Like. 06-13-2006, 01:42 PM.
Push the rudder joystick left and right to steer the RC sailboat. Open and close the sails to tighten and loosen the sails, this will increase or decrease your speed. If there are strong winds, tighten the sails so that they don't flop around. Partially close the sails in low wind conditions. It's all about working with the wind and keeping ...
This is a basic demonstration on how to make rc sailboat sails without going to a lot of effort.
Tapering the batten width from the forward end to the after end, such as 1/8" to 3/8" over the length of a 4" batten, will make the leech stiffer at the after end, and ease the transition at the front of the sail. If the sail has been stretched in the leech area by too much either from age, or flogging in strong winds, or having stored the rig ...
The simplest solution is to offset the trailing edge in our software a few millimeters. The mold will then have a smooth taper at the trailing edge that is easy to finish off. Once the part is popped out, the sharp trailing edge can be cut back with a hobby knife, leaving a thin, but durable edge.
An RC Sailboat works by either capturing or redirecting wind energy to propel the boat forward. This is accomplished by the Sailor of the boat placing the sail in the proper direction to catch the wind and at the same time providing a constant heading for the boat to travel in. Steering on the hull is accomplished by controlling the rudder.
Radio-controlled sailboat kits come in different shapes and sizes. They allow hobbyists to build their sailboats from scratch and control them remotely using a radio transmitter. These kits contain all the components necessary to build a functional sailboat, including the hull, sails, rigging, motor, and radio transmitter.
I think it makes it easer to get a smooth finish. Three coats of epoxy ready to complete hatches. Needs buffing to improve the look and feel. Plywood mold to glue hatch frames together with. Plywood jig in use. Plug removed and windows fitted to the frame. Make a RC Sailboat.
TOOLS needed: If you need an excuse to buy tools, then making classic, wooden RC sailboats might be reason enough to get an entire woodshop! But in reality you really only need a few tools, some of which you may already have. Ignoring the smaller hand tools that many already have, you'll probably need to stock up on a few "hobby" tools like a ...
RC Sailboat Controls. side channel, typically throttle on an airplane controls the Sails. Moving the left side stick up or down would draw the sail in or let the sail out. Motion on the stick is vertically. The stick on the right hand side controls the rudder on the RC Sailboat. The rudder channel operates as like any other rudder channel.
Here's how I built the sail winch system in my RC (48" schooner) sailboat. I use a HiTec radio and operate the winch servo with the throttle channel. I also ...
The RC boat's weight helps determine how fast it can move. Heavier boats are better equipped to move at high speeds without capsizing, whereas lighter boats can be speedy using less power, a.k.a ...
The 2024 US Open Sailing Series for the Long Beach Olympic Classes Regatta at Los Alamitos Bay Yacht Club in Long Beach, California, delivered an exhilarating week of competitive racing, featuring a diverse fleet of sailors across multiple classes. This event, an integral part of the sailing calendar, showcased both seasoned competitors and promising young […]