

Beginner’s Guide: How To Rig A Sailboat – Step By Step Tutorial
Alex Morgan
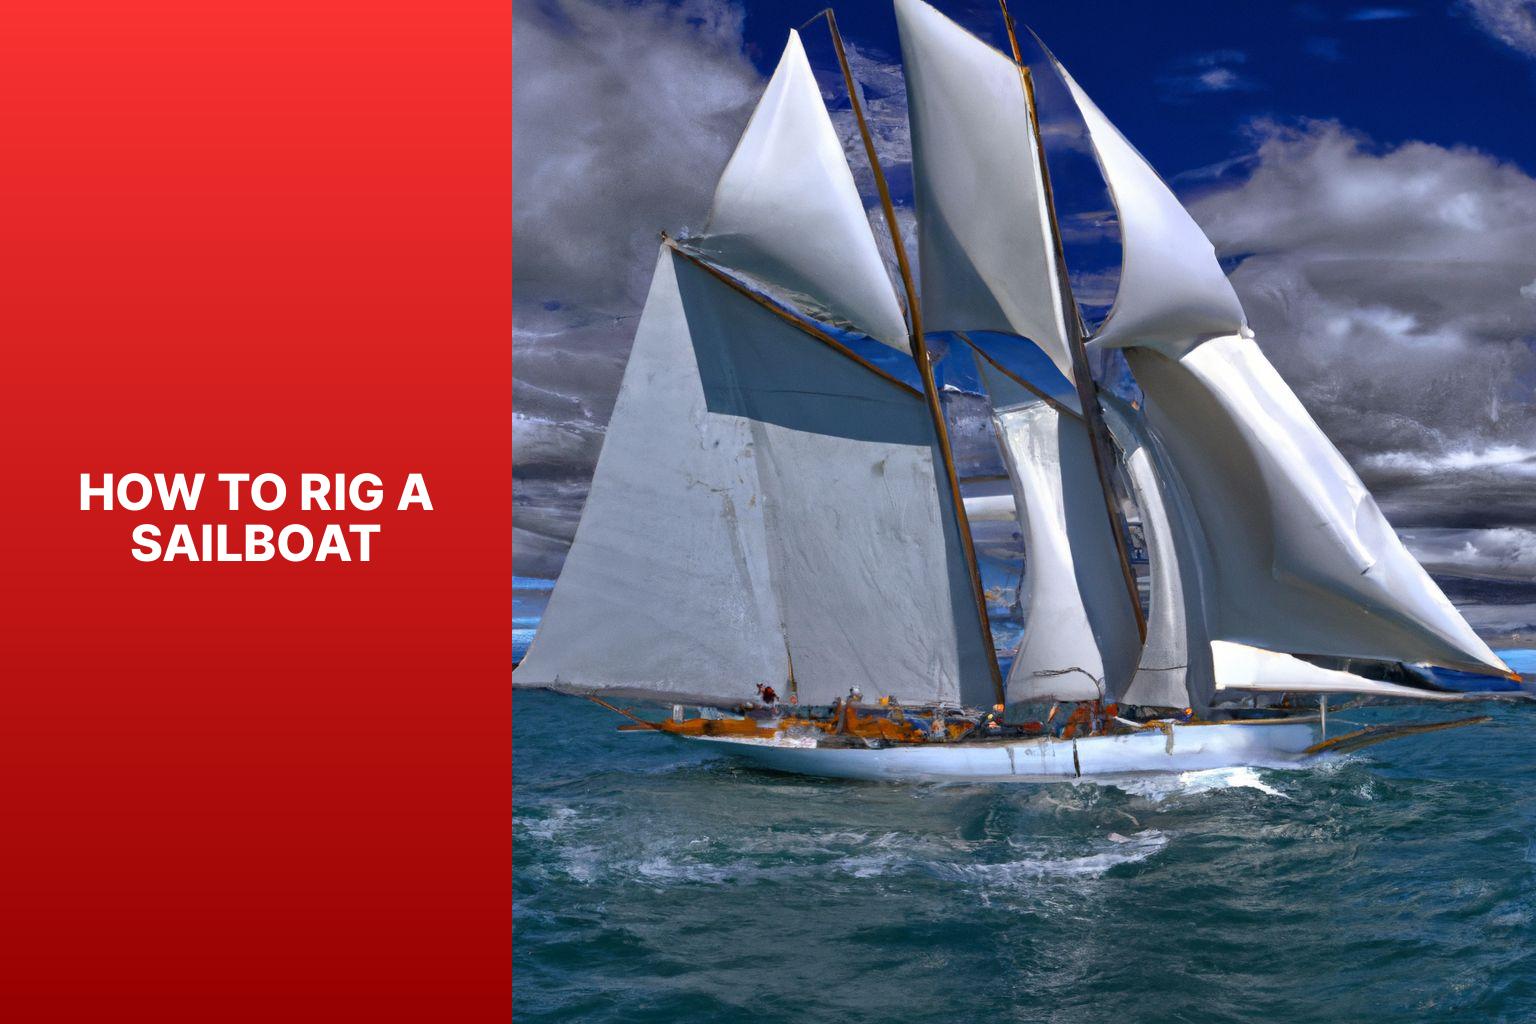
Rigging a sailboat is a crucial process that ensures the proper setup and functioning of a sailboat’s various components. Understanding the process and components involved in rigging is essential for any sailor or boat enthusiast. In this article, we will provide a comprehensive guide on how to rig a sailboat.
Introduction to Rigging a Sailboat
Rigging a sailboat refers to the process of setting up the components that enable the sailboat to navigate through the water using wind power. This includes assembling and positioning various parts such as the mast, boom, standing rigging, running rigging, and sails.
Understanding the Components of a Sailboat Rigging
Before diving into the rigging process, it is important to have a good understanding of the key components involved. These components include:
The mast is the tall vertical spar that provides vertical support to the sails and holds them in place.
The boom is the horizontal spar that runs along the bottom edge of the sail and helps control the shape and position of the sail.
- Standing Rigging:
Standing rigging consists of the wires and cables that support and stabilize the mast, keeping it upright.
- Running Rigging:
Running rigging refers to the lines and ropes used to control the sails, such as halyards, sheets, and control lines.
Preparing to Rig a Sailboat
Before rigging a sailboat, there are a few important steps to take. These include:
- Checking the Weather Conditions:
It is crucial to assess the weather conditions before rigging a sailboat. Unfavorable weather, such as high winds or storms, can make rigging unsafe.
- Gathering the Necessary Tools and Equipment:
Make sure to have all the necessary tools and equipment readily available before starting the rigging process. This may include wrenches, hammers, tape, and other common tools.
- Inspecting the Rigging Components:
In the upcoming sections of this article, we will provide a step-by-step guide on how to rig a sailboat, as well as important safety considerations and tips to keep in mind. By following these guidelines, you will be able to rig your sailboat correctly and safely, allowing for a smooth and enjoyable sailing experience.
Key takeaway:
- Rigging a sailboat maximizes efficiency: Proper rigging allows for optimized sailing performance, ensuring the boat moves smoothly through the water.
- Understanding sailboat rigging components: Familiarity with the various parts of a sailboat rigging, such as the mast, boom, and standing and running riggings, is essential for effective rigging setup.
- Importance of safety in sailboat rigging: Ensuring safety is crucial during the rigging process, including wearing a personal flotation device, securing loose ends and lines, and being mindful of overhead power lines.
Get ready to set sail and dive into the fascinating world of sailboat rigging! We’ll embark on a journey to understand the various components that make up a sailboat’s rigging. From the majestic mast to the nimble boom , and the intricate standing rigging to the dynamic running rigging , we’ll explore the crucial elements that ensure smooth sailing. Not forgetting the magnificent sail, which catches the wind and propels us forward. So grab your sea legs and let’s uncover the secrets of sailboat rigging together.
Understanding the mast is crucial when rigging a sailboat. Here are the key components and steps to consider:
1. The mast supports the sails and rigging of the sailboat. It is made of aluminum or carbon fiber .
2. Before stepping the mast , ensure that the area is clear and the boat is stable. Have all necessary tools and equipment ready.
3. Inspect the mast for damage or wear. Check for corrosion , loose fittings , and cracks . Address any issues before proceeding.
4. To step the mast , carefully lift it into an upright position and insert the base into the mast step on the deck of the sailboat.
5. Secure the mast using the appropriate rigging and fasteners . Attach the standing rigging , such as shrouds and stays , to the mast and the boat’s hull .
Fact: The mast of a sailboat is designed to withstand wind resistance and the tension of the rigging for stability and safe sailing.
The boom is an essential part of sailboat rigging. It is a horizontal spar that stretches from the mast to the aft of the boat. Constructed with durable yet lightweight materials like aluminum or carbon fiber, the boom provides crucial support and has control over the shape and position of the sail. It is connected to the mast through a boom gooseneck , allowing it to pivot. One end of the boom is attached to the mainsail, while the other end is equipped with a boom vang or kicker, which manages the tension and angle of the boom. When the sail is raised, the boom is also lifted and positioned horizontally by using the topping lift or lazy jacks.
An incident serves as a warning that emphasizes the significance of properly securing the boom. In strong winds, an improperly fastened boom swung across the deck, resulting in damage to the boat and creating a safety hazard. This incident highlights the importance of correctly installing and securely fastening all rigging components, including the boom, to prevent accidents and damage.
3. Standing Rigging
When rigging a sailboat, the standing rigging plays a vital role in providing stability and support to the mast . It consists of several key components, including the mast itself, along with the shrouds , forestay , backstay , and intermediate shrouds .
The mast, a vertical pole , acts as the primary support structure for the sails and the standing rigging. Connected to the top of the mast are the shrouds , which are cables or wires that extend to the sides of the boat, providing essential lateral support .
The forestay is another vital piece of the standing rigging. It is a cable or wire that runs from the top of the mast to the bow of the boat, ensuring forward support . Similarly, the backstay , also a cable or wire, runs from the mast’s top to the stern of the boat, providing important backward support .
To further enhance the rig’s stability , intermediate shrouds are installed. These additional cables or wires are positioned between the main shrouds, as well as the forestay or backstay. They offer extra support , strengthening the standing rigging system.
Regular inspections of the standing rigging are essential to detect any signs of wear, such as fraying or corrosion . It is crucial to ensure that all connections within the rig are tight and secure, to uphold its integrity. Should any issues be identified, immediate attention must be given to prevent accidents or damage to the boat. Prioritizing safety is of utmost importance when rigging a sailboat, thereby necessitating proper maintenance of the standing rigging. This ensures a safe and enjoyable sailing experience.
Note: <p> tags have been kept intact.
4. Running Rigging
Running Rigging
When rigging a sailboat, the running rigging is essential for controlling the sails and adjusting their position. It is important to consider several aspects when dealing with the running rigging.
1. Choose the right rope: The running rigging typically consists of ropes with varying properties such as strength, stretch, and durability. Weather conditions and sailboat size should be considered when selecting the appropriate rope.
2. Inspect and maintain the running rigging: Regularly check for signs of wear, fraying, or damage. To ensure safety and efficiency, replace worn-out ropes.
3. Learn essential knot tying techniques: Having knowledge of knots like the bowline, cleat hitch, and reef knot is crucial for securing the running rigging and adjusting sails.
4. Understand different controls: The running rigging includes controls such as halyards, sheets, and control lines. Familiarize yourself with their functions and proper usage to effectively control sail position and tension.
5. Practice proper sail trimming: Adjusting the tension of the running rigging significantly affects sailboat performance. Mastering sail trimming techniques will help optimize sail shape and maximize speed.
By considering these factors and mastering running rigging techniques, you can enhance your sailing experience and ensure the safe operation of your sailboat.
The sail is the central component of sailboat rigging as it effectively harnesses the power of the wind to propel the boat.
When considering the sail, there are several key aspects to keep in mind:
– Material: Sails are typically constructed from durable and lightweight materials such as Dacron or polyester. These materials provide strength and resistance to various weather conditions.
– Shape: The shape of the sail plays a critical role in its overall performance. A well-shaped sail should have a smooth and aerodynamic profile, which allows for maximum efficiency in capturing wind power.
– Size: The size of the sail is determined by its sail area, which is measured in square feet or square meters. Larger sails have the ability to generate more power, but they require greater skill and experience to handle effectively.
– Reefing: Reefing is the process of reducing the sail’s size to adapt to strong winds. Sails equipped with reefing points allow sailors to decrease the sail area, providing better control in challenging weather conditions.
– Types: There are various types of sails, each specifically designed for different purposes. Common sail types include mainsails, jibs, genoas, spinnakers, and storm sails. Each type possesses its own unique characteristics and is utilized under specific wind conditions.
Understanding the sail and its characteristics is vital for sailors, as it directly influences the boat’s speed, maneuverability, and overall safety on the water.
Getting ready to rig a sailboat requires careful preparation and attention to detail. In this section, we’ll dive into the essential steps you need to take before setting sail. From checking the weather conditions to gathering the necessary tools and equipment, and inspecting the rigging components, we’ll ensure that you’re fully equipped to navigate the open waters with confidence. So, let’s get started on our journey to successfully rigging a sailboat!
1. Checking the Weather Conditions
Checking the weather conditions is crucial before rigging a sailboat for a safe and enjoyable sailing experience. Monitoring the wind speed is important in order to assess the ideal sailing conditions . By checking the wind speed forecast , you can determine if the wind is strong or light . Strong winds can make sailboat control difficult, while very light winds can result in slow progress.
Another important factor to consider is the wind direction . Assessing the wind direction is crucial for route planning and sail adjustment. Favorable wind direction helps propel the sailboat efficiently, making your sailing experience more enjoyable.
In addition to wind speed and direction, it is also important to consider weather patterns . Keep an eye out for impending storms or heavy rain. It is best to avoid sailing in severe weather conditions that may pose a safety risk. Safety should always be a top priority when venturing out on a sailboat.
Another aspect to consider is visibility . Ensure good visibility by checking for fog, haze, or any other conditions that may hinder navigation. Clear visibility is important for being aware of other boats and potential obstacles that may come your way.
Be aware of the local conditions . Take into account factors such as sea breezes, coastal influences, or tidal currents. These local factors greatly affect sailboat performance and safety. By considering all of these elements, you can have a successful and enjoyable sailing experience.
Here’s a true story to emphasize the importance of checking the weather conditions. One sunny afternoon, a group of friends decided to go sailing. Before heading out, they took the time to check the weather conditions. They noticed that the wind speed was expected to be around 10 knots, which was perfect for their sailboat. The wind direction was coming from the northwest, allowing for a pleasant upwind journey. With clear visibility and no approaching storms, they set out confidently, enjoying a smooth and exhilarating sail. This positive experience was made possible by their careful attention to checking the weather conditions beforehand.
2. Gathering the Necessary Tools and Equipment
To efficiently gather all of the necessary tools and equipment for rigging a sailboat, follow these simple steps:
- First and foremost, carefully inspect your toolbox to ensure that you have all of the basic tools such as wrenches, screwdrivers, and pliers.
- Make sure to check if you have a tape measure or ruler available as they are essential for precise measurements of ropes or cables.
- Don’t forget to include a sharp knife or rope cutter in your arsenal as they will come in handy for cutting ropes or cables to the desired lengths.
- Gather all the required rigging hardware including shackles, pulleys, cleats, and turnbuckles.
- It is always prudent to check for spare ropes or cables in case replacements are needed during the rigging process.
- If needed, consider having a sailing knife or marlinspike tool for splicing ropes or cables.
- For rigging a larger sailboat, it is crucial to have a mast crane or hoist to assist with stepping the mast.
- Ensure that you have a ladder or some other means of reaching higher parts of the sailboat, such as the top of the mast.
Once, during the preparation of rigging my sailboat, I had a moment of realization when I discovered that I had forgotten to bring a screwdriver . This unfortunate predicament occurred while I was in a remote location with no nearby stores. Being resourceful, I improvised by utilizing a multipurpose tool with a small knife blade, which served as a makeshift screwdriver. Although it was not the ideal solution, it allowed me to accomplish the task. Since that incident, I have learned the importance of double-checking my toolbox before commencing any rigging endeavor. This practice ensures that I have all of the necessary tools and equipment, preventing any unexpected surprises along the way.
3. Inspecting the Rigging Components
Inspecting the rigging components is essential for rigging a sailboat safely. Here is a step-by-step guide on inspecting the rigging components:
1. Visually inspect the mast, boom, and standing rigging for damage, such as corrosion, cracks, or loose fittings.
2. Check the tension of the standing rigging using a tension gauge. It should be within the recommended range from the manufacturer.
3. Examine the turnbuckles, clevis pins, and shackles for wear or deformation. Replace any damaged or worn-out hardware.
4. Inspect the running rigging, including halyards and sheets, for fraying, signs of wear, or weak spots. Replace any worn-out lines.
5. Check the sail for tears, wear, or missing hardware such as grommets or luff tape.
6. Pay attention to the connections between the standing rigging and the mast. Ensure secure connections without any loose or missing cotter pins or rigging screws.
7. Inspect all fittings, such as mast steps, spreader brackets, and tangs, to ensure they are securely fastened and in good condition.
8. Conduct a sea trial to assess the rigging’s performance and make necessary adjustments.
Regularly inspecting the rigging components is crucial for maintaining the sailboat’s rigging system’s integrity, ensuring safe sailing conditions, and preventing accidents or failures at sea.
Once, I went sailing on a friend’s boat without inspecting the rigging components beforehand. While at sea, a sudden gust of wind caused one of the shrouds to snap. Fortunately, no one was hurt, but we had to cut the sail loose and carefully return to the marina. This incident taught me the importance of inspecting the rigging components before sailing to avoid unforeseen dangers.
Step-by-Step Guide on How to Rig a Sailboat
Get ready to set sail with our step-by-step guide on rigging a sailboat ! We’ll take you through the process from start to finish, covering everything from stepping the mast to setting up the running rigging . Learn the essential techniques and tips for each sub-section, including attaching the standing rigging and installing the boom and sails . Whether you’re a seasoned sailor or a beginner, this guide will have you ready to navigate the open waters with confidence .
1. Stepping the Mast
To step the mast of a sailboat, follow these steps:
1. Prepare the mast: Position the mast near the base of the boat.
2. Attach the base plate: Securely fasten the base plate to the designated area on the boat.
3. Insert the mast step: Lower the mast step into the base plate and align it with the holes or slots.
4. Secure the mast step: Use fastening screws or bolts to fix the mast step in place.
5. Raise the mast: Lift the mast upright with the help of one or more crew members.
6. Align the mast: Adjust the mast so that it is straight and aligned with the boat’s centerline.
7. Attach the shrouds: Connect the shrouds to the upper section of the mast, ensuring proper tension.
8. Secure the forestay: Attach the forestay to the bow of the boat, ensuring it is securely fastened.
9. Final adjustments: Check the tension of the shrouds and forestay, making any necessary rigging adjustments.
Following these steps ensures that the mast is properly stepped and securely in place, allowing for a safe and efficient rigging process. Always prioritize safety precautions and follow manufacturer guidelines for your specific sailboat model.
2. Attaching the Standing Rigging
To attach the standing rigging on a sailboat, commence by preparing the essential tools and equipment, including wire cutters, crimping tools, and turnbuckles.
Next, carefully inspect the standing rigging components for any indications of wear or damage.
After inspection, fasten the bottom ends of the shrouds and stays to the chainplates on the deck.
Then, securely affix the top ends of the shrouds and stays to the mast using adjustable turnbuckles .
To ensure proper tension, adjust the turnbuckles accordingly until the mast is upright and centered.
Utilize a tension gauge to measure the tension in the standing rigging, aiming for around 15-20% of the breaking strength of the rigging wire.
Double-check all connections and fittings to verify their security and proper tightness.
It is crucial to regularly inspect the standing rigging for any signs of wear or fatigue and make any necessary adjustments or replacements.
By diligently following these steps, you can effectively attach the standing rigging on your sailboat, ensuring its stability and safety while on the water.
3. Installing the Boom and Sails
To successfully complete the installation of the boom and sails on a sailboat, follow these steps:
1. Begin by securely attaching the boom to the mast. Slide it into the gooseneck fitting and ensure it is firmly fastened using a boom vang or another appropriate mechanism.
2. Next, attach the main sail to the boom. Slide the luff of the sail into the mast track and securely fix it in place using sail slides or cars.
3. Connect the mainsheet to the boom. One end should be attached to the boom while the other end is connected to a block or cleat on the boat.
4. Proceed to attach the jib or genoa. Make sure to securely attach the hanks or furler line to the forestay to ensure stability.
5. Connect the jib sheets. One end of each jib sheet should be attached to the clew of the jib or genoa, while the other end is connected to a block or winch on the boat.
6. Before setting sail, it is essential to thoroughly inspect all lines and connections. Ensure that they are properly tensioned and that all connections are securely fastened.
During my own experience of installing the boom and sails on my sailboat, I unexpectedly encountered a strong gust of wind. As a result, the boom began swinging uncontrollably, requiring me to quickly secure it to prevent any damage. This particular incident served as a vital reminder of the significance of properly attaching and securing the boom, as well as the importance of being prepared for unforeseen weather conditions while rigging a sailboat.
4. Setting Up the Running Rigging
Setting up the running rigging on a sailboat involves several important steps. First, attach the halyard securely to the head of the sail. Then, connect the sheets to the clew of the sail. If necessary, make sure to secure the reefing lines . Attach the outhaul line to the clew of the sail and connect the downhaul line to the tack of the sail. It is crucial to ensure that all lines are properly cleated and organized. Take a moment to double-check the tension and alignment of each line. If you are using a roller furling system, carefully wrap the line around the furling drum and securely fasten it. Perform a thorough visual inspection of the running rigging to check for any signs of wear or damage. Properly setting up the running rigging is essential for safe and efficient sailing. It allows for precise control of the sail’s position and shape, ultimately optimizing the boat’s performance on the water.
Safety Considerations and Tips
When it comes to rigging a sailboat, safety should always be our top priority. In this section, we’ll explore essential safety considerations and share some valuable tips to ensure smooth sailing. From the importance of wearing a personal flotation device to securing loose ends and lines, and being cautious around overhead power lines, we’ll equip you with the knowledge and awareness needed for a safe and enjoyable sailing experience. So, let’s set sail and dive into the world of safety on the water!
1. Always Wear a Personal Flotation Device
When rigging a sailboat, it is crucial to prioritize safety and always wear a personal flotation device ( PFD ). Follow these steps to properly use a PFD:
- Select the appropriate Coast Guard-approved PFD that fits your size and weight.
- Put on the PFD correctly by placing your arms through the armholes and securing all the straps for a snug fit .
- Adjust the PFD for comfort , ensuring it is neither too tight nor too loose, allowing freedom of movement and adequate buoyancy .
- Regularly inspect the PFD for any signs of wear or damage, such as tears or broken straps, and replace any damaged PFDs immediately .
- Always wear your PFD when on or near the water, even if you are a strong swimmer .
By always wearing a personal flotation device and following these steps, you will ensure your safety and reduce the risk of accidents while rigging a sailboat. Remember, prioritize safety when enjoying water activities.
2. Secure Loose Ends and Lines
Inspect lines and ropes for frayed or damaged areas. Secure loose ends and lines with knots or appropriate cleats or clamps. Ensure all lines are properly tensioned to prevent loosening during sailing. Double-check all connections and attachments for security. Use additional safety measures like extra knots or stopper knots to prevent line slippage.
To ensure a safe sailing experience , it is crucial to secure loose ends and lines properly . Neglecting this important step can lead to accidents or damage to the sailboat. By inspecting, securing, and tensioning lines , you can have peace of mind knowing that everything is in place. Replace or repair any compromised lines or ropes promptly. Securing loose ends and lines allows for worry-free sailing trips .
3. Be Mindful of Overhead Power Lines
When rigging a sailboat, it is crucial to be mindful of overhead power lines for safety. It is important to survey the area for power lines before rigging the sailboat. Maintain a safe distance of at least 10 feet from power lines. It is crucial to avoid hoisting tall masts or long antenna systems near power lines to prevent contact. Lower the mast and tall structures when passing under a power line to minimize the risk of contact. It is also essential to be cautious in areas where power lines run over the water and steer clear to prevent accidents.
A true story emphasizes the importance of being mindful of overhead power lines. In this case, a group of sailors disregarded safety precautions and their sailboat’s mast made contact with a low-hanging power line, resulting in a dangerous electrical shock. Fortunately, no serious injuries occurred, but it serves as a stark reminder of the need to be aware of power lines while rigging a sailboat.
Some Facts About How To Rig A Sailboat:
- ✅ Small sailboat rigging projects can improve sailing performance and save money. (Source: stingysailor.com)
- ✅ Rigging guides are available for small sailboats, providing instructions and tips for rigging. (Source: westcoastsailing.net)
- ✅ Running rigging includes lines used to control and trim the sails, such as halyards and sheets. (Source: sailingellidah.com)
- ✅ Hardware used in sailboat rigging includes winches, blocks, and furling systems. (Source: sailingellidah.com)
- ✅ A step-by-step guide can help beginners rig a small sailboat for sailing. (Source: tripsavvy.com)
Frequently Asked Questions
1. how do i rig a small sailboat.
To rig a small sailboat, follow these steps: – Install or check the rudder, ensuring it is firmly attached. – Attach or check the tiller, the long steering arm mounted to the rudder. – Attach the jib halyard by connecting the halyard shackle to the head of the sail and the grommet in the tack to the bottom of the forestay. – Hank on the jib by attaching the hanks of the sail to the forestay one at a time. – Run the jib sheets by tying or shackling them to the clew of the sail and running them back to the cockpit. – Attach the mainsail by spreading it out and attaching the halyard shackle to the head of the sail. – Secure the tack, clew, and foot of the mainsail to the boom using various lines and mechanisms. – Insert the mainsail slugs into the mast groove, gradually raising the mainsail as the slugs are inserted. – Cleat the main halyard and lower the centerboard into the water. – Raise the jib by pulling down on the jib halyard and cleating it on the other side of the mast. – Tighten the mainsheet and one jibsheet to adjust the sails and start moving forward.
2. What are the different types of sailboat rigs?
Sailboat rigs can be classified into three main types: – Sloop rig: This rig has a single mast with a mainsail and a headsail, typically a jib or genoa. – Cutter rig: This rig has two headsails, a smaller jib or staysail closer to the mast, and a larger headsail, usually a genoa, forward of it, alongside a mainsail. – Ketch rig: This rig has two masts, with the main mast taller than the mizzen mast. It usually has a mainsail, headsail, and a mizzen sail. Each rig has distinct characteristics and is suitable for different sailing conditions and preferences.
3. What are the essential parts of a sailboat?
The essential parts of a sailboat include: – Mast: The tall vertical spar that supports the sails. – Boom: The horizontal spar connected to the mast, which extends outward and supports the foot of the mainsail. – Rudder: The underwater appendage that steers the boat. – Centerboard or keel: A retractable or fixed fin-like structure that provides stability and prevents sideways drift. – Sails: The fabric structures that capture the wind’s energy to propel the boat. – Running rigging: The lines or ropes used to control the sails and sailing equipment. – Standing rigging: The wires and cables that support the mast and reinforce the spars. These are the basic components necessary for the functioning of a sailboat.
4. What is a spinnaker halyard?
A spinnaker halyard is a line used to hoist and control a spinnaker sail. The spinnaker is a large, lightweight sail that is used for downwind sailing or reaching in moderate to strong winds. The halyard attaches to the head of the spinnaker and is used to raise it to the top of the mast. Once hoisted, the spinnaker halyard can be adjusted to control the tension and shape of the sail.
5. Why is it important to maintain and replace worn running rigging?
It is important to maintain and replace worn running rigging for several reasons: – Safety: Worn or damaged rigging can compromise the integrity and stability of the boat, posing a safety risk to both crew and vessel. – Performance: Worn rigging can affect the efficiency and performance of the sails, diminishing the boat’s speed and maneuverability. – Reliability: Aging or worn rigging is more prone to failure, which can lead to unexpected problems and breakdowns. Regular inspection and replacement of worn running rigging is essential to ensure the safe and efficient operation of a sailboat.
6. Where can I find sailboat rigging books or guides?
There are several sources where you can find sailboat rigging books or guides: – Online: Websites such as West Coast Sailing and Stingy Sailor offer downloadable rigging guides for different sailboat models. – Bookstores: Many bookstores carry a wide selection of boating and sailing books, including those specifically focused on sailboat rigging. – Sailing schools and clubs: Local sailing schools or yacht clubs often have resources available for learning about sailboat rigging. – Manufacturers: Some sailboat manufacturers, like Hobie Cat and RS Sailing, provide rigging guides for their specific sailboat models. Consulting these resources can provide valuable information and instructions for rigging your sailboat properly.
About the author

Leave a Reply Cancel reply
Your email address will not be published. Required fields are marked *
Save my name, email, and website in this browser for the next time I comment.
Latest posts

The history of sailing – from ancient times to modern adventures
History of Sailing Sailing is a time-honored tradition that has evolved over millennia, from its humble beginnings as a means of transportation to a beloved modern-day recreational activity. The history of sailing is a fascinating journey that spans cultures and centuries, rich in innovation and adventure. In this article, we’ll explore the remarkable evolution of…

Sailing Solo: Adventures and Challenges of Single-Handed Sailing
Solo Sailing Sailing has always been a pursuit of freedom, adventure, and self-discovery. While sailing with a crew is a fantastic experience, there’s a unique allure to sailing solo – just you, the wind, and the open sea. Single-handed sailing, as it’s often called, is a journey of self-reliance, resilience, and the ultimate test of…

Sustainable Sailing: Eco-Friendly Practices on the boat
Eco Friendly Sailing Sailing is an exhilarating and timeless way to explore the beauty of the open water, but it’s important to remember that our oceans and environment need our protection. Sustainable sailing, which involves eco-friendly practices and mindful decision-making, allows sailors to enjoy their adventures while minimizing their impact on the environment. In this…
Sail Rigs And Types - The Only Guide You Need

Last Updated by
Daniel Wade
June 15, 2022
A well-designed sailboat is a thing of pure beauty. Whether you're a proud owner of one, a guest on one, or a shore-side admirer, you'll fall in love with the gliding sails, the excitement of a race, and the eco-friendly nature of these sophisticated yet magnificent vessels. With good sails, great design, and regular maintenance, sails and rigs are an important part of a sailboat.
If you’re thinking about going sailing, one of the first things you have to understand is the variety of modern sail plans. Unlike old sailboats, modern sailboats don't need huge, overlapping headsails and multiple masts just to get moving. In the past, when sailboats were heavy, keels were long, the only way to get the boat moving was with a massive relative sail area. You needed as much square footage as you could just to get your sailboat moving. But with the invention of fiberglass hulls, aluminum or composite masts, high-tensile but low diameter lines and stats, and more efficient sails, sailboats no longer need to plan for such large sail plans.. Still, there are various rig styles, from the common sloop, to the comfortable cat-rig, to the dual masted ketch and schooner, there are various sail types and rigs to choose from. The most important thing is to know the different types of sails and rigs and how they can make your sailing even more enjoyable.
There are different types of sails and rigs. Most sailboats have one mainsail and one headsail. The mainsail is generally fore-and-aft rigged and is triangular shaped. Various conditions and courses require adjustments to the sails on the boats, and, other than the mainsail, most boats can switch out their secondary sail depending on various conditions.. Do you want to sail upwind or go downwind? You cannot hoist just any sail and use it. It's, therefore, of great importance to understand how and when to use each sail type.
In this in-depth article, we'll look at various sail types and rigs, and how to use them to make your sailing more enjoyable.
Table of contents
Different Sail Types
It is perhaps worth noting that a sailboat is only as good as its sails. The very heart of sailing comes in capturing the wind using artfully trimmed sails and turning that into motion. . Ask any good sailor and he'll tell you that knowing how and when to trim the sails efficiently will not only improve the overall performance of your boat but will elevate your sailing experience. In short, sails are the driving force of sailboats.
As such, it's only natural that you should know the different types of sails and how they work. Let's first highlight different sail types before going into the details.
- Jib - triangular staysail
- Spinnaker - huge balloon-shaped downwind sail for light airs
- Genoa - huge jib that overlaps the mainsail
- Gennaker - a combination of a spinnaker and genoa
- Code zero - reaching genoa for light air
- Windseeker - tall, narrow, high-clewed, and lightweight jib
- Drifter - versatile light air genoa made from particularly lightweight cloth
- Storm jib - a smaller jib meant for stormy conditions
- Trysail - This is a smaller front-and-aft sail for heavy weather
The mainsail is the principal sail on a boat. It's generally set aft of the mainmast. Working together with the jib, the mainsail is designed to create the lift that drives the sailboat windward. That being said, the mainsail is a very powerful component that must always be kept under control.
As the largest sail, and the geometric center of effort on the boat, the mainsail is tasked with capturing the bulk of the wind that's required to propel the sailboat. The foot, the term for the bottom of any sail, secures to the boom, which allows you to trim the sail to your heading. The luff, the leading edge of the sail, is attached to the mast. An idealized mainsail would be able to swing through trim range of 180°, the full semi-circle aft of the mast, though in reality, most larger boats don’t support this full range of motion, as a fully eased sail can occasionally be unstable in heavy breeze.
. As fully controlling the shape of the mainsail is crucial to sailing performance, there are many different basic mainsail configurations. For instance, you can get a full-batten mainsail, a regular mainsail with short battens, or a two-plus-two mainsail with two full-length battens. Hyper-high performance boats have even begun experimenting with winged sails which are essentially trimmable airplane wings! Moreover, there are numerous sail controls that change the shape by pulling at different points on the sail, boom, or mast. Reefing, for instance, allows you to shorten the sail vertically, reducing the amount of sail area when the boat is overpowered.
Features of a Mainsail
Several features will affect how a particular sail works and performs. Some features will, of course, affect the cost of the sail while others may affect its longevity. All in all, it's essential to decide the type of mainsail that's right for you and your sailing application.
Sail Battens, the Roach, and the Leech
The most difficult part of the sail to control, but also the most important, are the areas we refer to as the leech and the roach. The roach is the part of the sail that extends backwards past the shortest line between the clew, at the end of the boom, and the top of the mast. It makes up roughly the back third of the sail. The leech is the trailing edge of the sail, the backmost curve of the roach. Together, these two components control the flow of the air off the back of the sail, which greatly affects the overall sail performance. If the air stalls off the backside of the sail, you will find a great loss in performance. Many sail controls, including the boom vang, backstay, main halyard, and even the cunningham, to name a few, focus on keeping this curve perfect.
As for parts of the sail itself, battens control the overall horizontal shape of the sail. Battens are typically made from fiberglass or wood and are built into batten pockets. They're meant to offer support and tension to maintain the sail shape Depending on the sail technology you want to use, you may find that full battens, which extend from luff to leech, or short battens, just on the trailing edge, are the way to go. Fully battened sails tend to be more expensive, but also higher performance.
Fully Battened Mainsails
They're generally popular on racing multihulls as they give you a nice solid sail shape which is crucial at high speeds. In cruising sailboats , fully battened mainsails have a few benefits such as:
- They prevent the mainsail from ragging. This extends the life of the sail, and makes maneuvers and trimming easier for the crew.
- It provides shape and lift in light-air conditions where short-battened mainsails would collapse.
On the other hand, fully-battened mainsails are often heavier, made out of thicker material, and can chafe against the standing rigging with more force when sailing off the wind.
Short Battens
On the other hand, you can choose a mainsail design that relies mostly on short battens, towards the leech of the sail. This tends to work for lighter cloth sails, as the breeze, the headsail, and the rigging help to shape the sail simply by the tension of the rig and the flow of the wind. The battens on the leech help to preserve the shape of the sail in the crucial area where the air is flowing off the back of the sail, keeping you from stalling out the entire rig.
The only potential downside is that these short battens deal with a little bit of chafe and tension in their pockets, and the sail cloth around these areas ought to be reinforced. If your sails do not have sufficient reinforcement here, or you run into any issues related to batten chafe, a good sail maker should be able to help you extend the life of your sails for much less than the price of a new set.
How to Hoist the Mainsail
Here's how to hoist the mainsail, assuming that it relies on a slab reefing system and lazy jacks and doesn't have an in-mast or in-boom furling system.
- Maintain enough speed for steeragewhile heading up into the wind
- Slacken the mainsheet, boom vang, and cunningham
- Make sure that the lazy jacks do not catch the ends on the battens by pulling the lazy jacks forward.
- Ensure that the reefing runs are free to run and the proper reefs are set if necessary.
- Raise the halyard as far as you can depending on pre-set reefs.
- Tension the halyard to a point where a crease begins to form along the front edge
- Re-set the lazy jacks
- Trim the mainsail properly while heading off to your desired course
So what's Right for You?
Your mainsail will depend on how you like sailing your boat and what you expect in terms of convenience and performance. That being said, first consult the options that the boatbuilder or sailmakers suggest for your rig. When choosing among the various options, consider what you want from the sail, how you like to sail, and how much you're willing to spend on the mainsail.
The headsail is principally the front sail in a fore-and-aft rig. They're commonly triangular and are attached to or serve as the boat’s forestay. They include a jib and a genoa.
A jib is a triangular sail that is set ahead of the foremost sail. For large boats, the roto-furling jib has become a common and convenient way to rig and store the jib. Often working in shifts with spinnakers, jibs are the main type of headsails on modern sailboats. Jibs take advantage of Bournoulli’s Principle to break the incoming breeze for the mainsail, greatly increasing the speed and point of any boat. By breaking the incoming wind and channeling it through what we call the ‘slot,’ the horizontal gap between the leech of the jib and the luff of the mainsail, the jib drastically increases the efficiency of your mainsail. It additionally balances the helm on your rudder by pulling the bow down, as the mainsail tends to pull the stern down. .
The main aim of the jib is to increase the sail area for a given mast size. It improves the aerodynamics of the mainsails so that your sailboat can catch more wind and thereby sail faster, especially in light air
Using Jibs on Modern Sailboats
In the modern contexts, jib’s mainly serve increase the performance and overall stability of the mainsail. The jib can also reduce the turbulence of the mainsail on the leeward side.
On Traditional Vessels
Traditional vessels such as schooners have about three jibs. The topmast carried a jib topsail, the main foresail is called the jib, while the innermost jib is known as the staysail. The first two were employed almost exclusively by clipper ships.
How to Rig the Jibs
There are three basic ways to rig the jib.
Track Sheets - A relatively modern approach to the self-tacking jib, this entails placing all the trimming hardware on a sliding track forward of the mast. This means that on each tack, the hardware slides from one side of the boat to the other. This alleviates the need to switch sheets and preserves the trim angle on both sides, though it can be finnicky and introduce friction.
Sheet up the Mast - This is a very popular approach and for a good reason. Hoist the jib sheet up the mast high enough to ensure that there's the right tension through the tack. Whether internally or externally, the sheet returnsto the deck and then back to the cockpit just like the rest of the mast baselines. The fact the hardware doesn't move through the tacks is essential in reducing friction.
Sheet Forward - This method revolves around ensuring that the jib sheet stays under constant pressure so that it does not move through the blocks in the tacks. This is possible if the through-deck block is extremely close to the jib tack. Your only challenge will only be to return the sheet to the cockpit. This is, however, quite challenging and can cause significant friction.
Dual Sheeting - The traditional method, especially on smaller dinghies, though it is not self-tacking. This requires a two ended or two separate sheet system, where one sheet runs to a block on starboard, and the other to port. Whenever you tack or gybe, this means you have to switch which sheet is active and which is slack, which is ok for well crewed boats, but a potential issue on under-crewed boats.
Another important headsail, a genoa is essentially a large jib that usually overlaps the mainsail or extends past the mast, especially when viewed from the other side. In the past, a genoa was known as the overlapping jib and is technically used on twin-mast boats and single-mast sloops such as ketches and yawls. A genoa has a large surface area, which is integral in increasing the speed of the vessel both in moderate and light winds.
Genoas are generally characterized by the percentage they cover. In most cases, sail racing classes stipulate the limit of a genoa size. In other words, genoas are usually classified by coverage.
Top-quality genoa trim is of great importance, especially if the wind is forward of the beam. This is because the wind will first pass over the genoa before the mainsail. As such, a wrongly sheeted genoa can erroneously direct the wind over the mainsail,spelling doom to your sailing escapades. While you can perfectly adjust the shape of a genoa using the mast rake, halyard tension, sheet tension, genoa car positioning, and backstay tension, furling and unfurling a genoa can be very challenging, especially in higher winds.
That being said, here are the crucial steps to always keep in mind.
- Unload and ease the loaded genoa sheet by going to a broad reach
- Do not use the winch; just pull on the furling line
- Keep a very small amount of pressure or tension on the loaded genoa sheet
- Secure the furling line and tighten the genoa sheets
- Get on the proper point of sail
- Have the crew help you and release the lazy genoa sheets
- Maintain a small tension while easing out the furling line
- Pull-on a loaded genoa sheet
- Close or cleat off the rope clutch when the genoa is unfurled
- Trim the genoa
To this end, it's important to note that genoas are popular in some racing classes. This is because they only categorize genoas based on the fore-triangle area covered, which essentially allows a genoa to significantly increase the actual sail area. On the contrary, keep in mind that tacking a genoa is quite a bit harder than a jib, as the overlapping area can get tangled with the mast and shrouds. It's, therefore, important to make sure that the genoa is carefully tended, particularly when tacking.
Downwind Sails
Modern sailboats are a lot easier to maneuver thanks to the fore-and-aft rig. Unfortunately, when sailing downwind they catch less wind, and downwind sails are a great way of reducing this problem. They include the spinnaker and the gennaker.
A spinnaker will, without a doubt, increase your sailing enjoyment. But why are they often buried in the cabin of cruising boats? Well, the first few attempts to rig and set a spinnaker can be difficult without enough help and guidance. Provided a solid background, however, spinnakers are quite straightforward and easy to use and handle with teamwork and enough practice. More importantly, spinnakers can bring a light wind passage to life and can save your engine.
Spinnakers are purposely designed for sailing off the wind; they fill with wind and balloon out in front of your sailboat. Structured with a lightweight fabric such as nylon, the spinnaker is also known as a kite or chute, as they look like parachutes both in structure and appearance.
A perfectly designed spinnaker should have taut leading edges when filled. This mitigates the risk of lifting and collapsing. A spinnaker should have a smooth curve when filled and devoid of depressions and bubbles that might be caused by the inconsistent stretching of the fabric. The idea here is that anything other than a smooth curve may reduce the lift and thereby reduce performance.
Types of Spinnakers
There are two main types of spinnakers: symmetric spinnakers and asymmetric spinnakers.
Asymmetric Spinnakers
Flown from a spinnaker pole or bowsprit fitted to the bow of the boat, asymmetric spinnakers resemble large jibs and have been around since the 19th century. The concept of asymmetric spinnaker revolves around attaching the tack of the spinnaker at the bow and pulling it around during a gybe.
Asymmetric spinnakers have two sheets just like a jib., These sheets are attached at the clew and never interact directly with the spinnaker pole. This is because the other corner of the spinnaker is fixed to the bowsprit. The asymmetric spinnaker works when you pull in one sheet while releasing the other. This makes it a lot easier to gybe but is less suited to sailing directly downwind. There is the loophole of having the asymmetric spinnaker gybed to the side opposite of the boom, so that the boat is sailing ‘wing-on-wing,’ though this is a more advanced maneuver, generally reserved for certain conditions and tactical racing situations.
On the contrary, the asymmetric spinnaker is perfect for fast planing dinghies. This is because such vessels have speeds that generate apparent wind forward. Because asymmetrics, by nature, prefer to sail shallower downwind angles, this apparent wind at high speeds makes the boat think that it is sailing higher than it really is, allowing you to drive a little lower off the breeze than normal. . In essence, the asymmetric spinnaker is vital if you're looking for easy handling.
Symmetric Spinnakers
Symmetric spinnakers are a classic sail type that has been used for centuries for controlling boats by lines known as a guy and a sheet. The guy, which is a windward line, is attached to the tack of the sail and stabilized by a spinnaker pole. The sheet, which is the leeward line, is attached to the clew of the spinnaker and is essential in controlling the shape of the spinnaker sail.
When set correctly, the leading edges of the symmetric spinnaker should be almost parallel to the wind. This is to ensure that the airflow over the leading edge remains attached. Generally, the spinnaker pole should be at the right angles to the apparent wind and requires a lot of care when packing.
The main disadvantage of this rig is the need to gybe the spinnaker pole whenever you gybe the boat. This is a complicated maneuver, and is one of the most common places for spinnakers to rip or get twisted. If, however, you can master this maneuver, you can sail at almost any angle downwind!
How to Use Spinnaker Effectively
If you decide to include the spinnakers to your sailboat, the sailmaker will want to know the type of boat you have, what kind of sailing you do, and where you sail. As such, the spinnaker that you end up with should be an excellent and all-round sail and should perform effectively off the breeze
The type of boat and where you'll be sailing will hugely influence the weight of your spinnaker cloth. In most cases, cruising spinnakers should be very light, so if you've decided to buy a spinnaker, make sure that it's designed per the type of your sailboat and where you will be sailing. Again, you can choose to go for something lighter and easier to set if you'll be sailing alone or with kids who are too young to help.
Setting up Spinnakers
One of the main reasons why sailors distrust spinnakers is because they don't know how to set them up. That being said, a perfectly working spinnaker starts with how you set it up and this revolves around how you carefully pack it and properly hook it up. You can do this by running the luff tapes and ensuring that the sails are not twisted when packed into the bag. If you are using large spinnakers, the best thing to do is make sure that they're set in stops to prevent the spinnakers from filling up with air before you even hoist them fully.
But even with that, you cannot fully set the spinnaker while sailing upwind. Make sure to bear away and have your pole ready to go as you turn downwind. You should then bear away to a reach before hoisting. Just don't hoist the spinnakers from the bow as this can move the weight of the crew and equipment forward.
Used when sailing downwind, a gennaker is asymmetric sail somewhere between a genoa and a spinnaker. It sets itself apart because it gennaker is a free-flying asymmetric spinnaker but it is tacked to the bowsprit like the jib.
Let's put it into perspective. Even though the genoa is a great sail for racing and cruising, sailors realized that it was too small to be used in a race or for downwind sail and this is the main reason why the spinnaker was invented. While the spinnakers are large sails that can be used for downwind sail, they are quite difficult to handle especially if you're sailing shorthanded. As such, this is how a gennaker came to be: it gives you the best of both worlds.
Gennakers are stable and easy to fly and will add to your enjoyment and downwind performance.
The Shape of a Gennaker
As we've just noted, the gennaker is asymmetrical. It doesn't attach to the forestay like the genoa but has a permanent fitting from the mast to bow. It is rigged exactly like a spinnaker but its tack is fastened to the bowsprit. This is fundamentally an essential sail if you're looking for something to bridge the gap between a genoa and a spinnaker.
Setting a Gennaker
When cruising, the gennaker is set with the tack line from the bow, a halyard, and a sheet that's led to the aft quarter. Attach the tack to a furling unit and attach it to a fitting on the hull near the very front of the sailboat. You can then attach the halyard that will help in pulling it up to the top of the mast before attaching it to the clew. The halyard can then run back to the winches to make the controlling of the sail shape easier, just like when using the genoa sail.
In essence, a gennaker is a superb sail that will give you the maximum versatility of achieving the best of both a genoa and a spinnaker, especially when sailing downwind. This is particularly of great importance if you're cruising by autopilot or at night.
Light Air Sails
Even though downwind sails can be used as light air sails, not all light air sails can be used for downwind sailing. In other words, there's a level of difference between downwind sails and light air sails. Light air sails include code zero, windseeker, and drifter reacher.
A cross between an asymmetrical spinnaker and a genoa, a code zero is a highly modern sail type that's generally used when sailing close to the wind in light air. Although the initial idea of code zero was to make a larger genoa, it settled on a narrow and flat spinnaker while upholding the shape of a genoa.
Modern boats come with code zero sails that can be used as soon as the sailboat bears off close-hauled even a little bit. It has a nearly straight luff and is designed to be very flat for close reaching. This sail is designed to give your boat extra performance in light winds, especially in boats that do not have overlapping genoas. It also mitigates the problem of loss of power when you are reaching with a non-overlapping headsail. Really, it is closer to a light air jib that sacrifices a little angle for speed.
In many conditions, a code zero sail can go as high as a sailboat with just a jib. By hoisting a code zero, you'll initially have to foot off about 15 degrees to fill it and get the power that you require to heel and move the boat. The boat will not only speed up but will also allow you to put the bow up while also doing the same course as before you set the zero. In essence, code zero can be an efficient way of giving your boat about 30% more speed and this is exactly why it's a vital inventory item in racing sailboats.
When it comes to furling code zero, the best way to do it is through a top-down furling system as this will ensure that you never get a twist in the system.
Generally used when a full size and heavier sail doesn't stay stable or pressurized, a windseeker is a very light sail that's designed for drifting conditions. This is exactly why they're designed with a forgiving cloth to allow them to handle these challenging conditions.
The windseeker should be tacked at the headstay with two sheets on the clew. To help this sail fill in the doldrums, you can heel the boat to whatever the apparent leeward side is and let gravity help you maintain a good sail shape while reaching.The ideal angle of a windseeker should be about 60 degrees.
Though only used in very specific conditions, the windseeker is so good at this one job that it is worth the investment if you plan on a long cruise. Still, you can substitute most off the breeze sails for this in a pinch, with slightly less performance gain, likely with more sacrifices in angle to the breeze.
Drifter Reacher
Many cruising sailors often get intimidated by the idea of setting and trimming a drifter if it's attached to the rig at only three corners or if it's free-flying. But whether or not a drifter is appropriate for your boat will hugely depend on your boat's rig, as well as other specific details such as your crew's ability to furl and unfurl the drifter and, of course, your intended cruising grounds.
But even with that, the drifter remains a time-honored sail that's handy and very versatile. Unlike other light air sails, the drifter perfectly carries on all points of sails as it allows the boat to sail close-hauled and to tack. It is also very easy to control when it's set and struck. In simpler terms, a drifter is principally a genoa that's built of lightweight fabric such as nylon. Regardless of the material, the drifter is a superb sail if you want to sail off a lee shore without using the genoa.
Generally stronger than other regular sails, stormsails are designed to handle winds of over 45 knots and are great when sailing in stormy conditions. They include a storm jib and a trysail.
If you sail long and far enough, chances are you have or will soon be caught in stormy conditions. Under such conditions, storm jibs can be your insurance and you'll be better off if you have a storm jib that has the following features:
- Robustly constructed using heavyweight sailcloth
- Sized suitably for the boat
- Highly visible even in grey and white seas
That's not all; you should never go out there without a storm jib as this, together with the trysail, is the only sails that will be capable of weathering some of nature's most testing situations.
Storm jibs typically have high clews to give you the flexibility of sheet location. You can raise the sail with a spare halyard until its lead position is closed-hauled in the right position. In essence, storm jib is your insurance policy when out there sailing: you should always have it but always hope that you never have to use it.
Also known as a spencer, a trysail is a small, bright orange, veritably bullet-proof, and triangular sail that's designed to save the boat's mainsail from winds over 45 knots and works in the same way as a storm jib. It is designed to enable you to make progress to windward even in strong and stormy winds.
Trysails generally use the same mast track as the mainsail but you have to introduce the slides into the gate from the head of the trysail.
There are two main types of rigs: the fore-and-aft rig and the square rigg.
Fore-and-aft Rig
This is a sailing rig that chiefly has the sails set along the lines of the keel and not perpendicular to it. It can be divided into three categories: Bermuda rig, Gaff rig, and Lateen rig.
Bermuda Rig - Also known as a Marconi rig, this is the typical configuration of most modern sailboats. It has been used since the 17th century and remains one of the most efficient types of rigs. The rig revolves around setting a triangular sail aft of the mast with the head raised to the top of the mast. The luff should run down the mast and be attached to the entire length.
Gaff Rig - This is the most popular fore-and-aft rig on vessels such as the schooner and barquentine. It revolves around having the sail four-cornered and controlled at its peak. In other words, the head of the mainsail is guided by a gaff.
Lateen Rig - This is a triangular fore-and-aft rig whereby a triangular sail is configured on a long yard that's mounted at a given angle of the mast while running in a fore-and-aft direction. Lateen rig is commonly used in the Indian Ocean and the Mediterranean.
Square Rigged
This is a rig whereby the mainsails are arranged in a horizontal spar so that they're square or vertical to the mast and the keel of the boat. The square rig is highly efficient when sailing downwind and was once very popular with ocean-going sailboats.
Unquestionably, sailing is always pleasurable. Imagine turning off the engine of your boat, hoisting the sails, and filling them with air! This is, without a doubt, a priceless moment that will make your boat keel and jump forward!
But being propelled by the noiseless motion of the wind and against the mighty currents and pounding waves of the seas require that you know various sail types and how to use them not just in propelling your boat but also in ensuring that you enjoy sailing and stay safe. Sails are a gorgeous way of getting forward. They remain the main fascination of sailboats and sea cruising. If anything, sails and boats are inseparable and are your true friends when out there on the water. As such, getting to know different types of sails and how to use them properly is of great importance.
All in all, let's wish you calm seas, fine winds, and a sturdy mast!
Related Articles
I've personally had thousands of questions about sailing and sailboats over the years. As I learn and experience sailing, and the community, I share the answers that work and make sense to me, here on Life of Sailing.
by this author
Learn About Sailboats
Sailboat Parts
Most Recent

What Does "Sailing By The Lee" Mean?
October 3, 2023

The Best Sailing Schools And Programs: Reviews & Ratings
September 26, 2023
Important Legal Info
Lifeofsailing.com is a participant in the Amazon Services LLC Associates Program, an affiliate advertising program designed to provide a means for sites to earn advertising fees by advertising and linking to Amazon. This site also participates in other affiliate programs and is compensated for referring traffic and business to these companies.
Similar Posts

Affordable Sailboats You Can Build at Home
September 13, 2023

Best Small Sailboat Ornaments
September 12, 2023

Discover the Magic of Hydrofoil Sailboats
December 11, 2023
Popular Posts

Best Liveaboard Catamaran Sailboats
December 28, 2023

Can a Novice Sail Around the World?
Elizabeth O'Malley

4 Best Electric Outboard Motors

How Long Did It Take The Vikings To Sail To England?

10 Best Sailboat Brands (And Why)
December 20, 2023

7 Best Places To Liveaboard A Sailboat
Get the best sailing content.
Top Rated Posts
Lifeofsailing.com is a participant in the Amazon Services LLC Associates Program, an affiliate advertising program designed to provide a means for sites to earn advertising fees by advertising and linking to Amazon. This site also participates in other affiliate programs and is compensated for referring traffic and business to these companies. (866) 342-SAIL
© 2024 Life of Sailing Email: [email protected] Address: 11816 Inwood Rd #3024 Dallas, TX 75244 Disclaimer Privacy Policy
Guide to Understanding Sail Rig Types (with Pictures)
There are a lot of different sail rig types and it can be difficult to remember what's what. So I've come up with a system. Let me explain it in this article.
What are the different types of sail rig? The sail rig is determined by the number of masts and the layout and shape of sails. Most modern ships are fore-and-aft rigged, while old ships are square-rigged. Rigs with one mast are sloops and cutters. Ketches, yawls, brigs, and schooners have two masts. Barques have three masts. Rigs can contain up to seven masts.
'Yeah, that's a gaff brig, and that a Bermuda cutter' - If you don't know what this means (neither did I) and want to know what to call a two-masted ship with a square-rigged mainsail, this article is definitely for you.

On this page:
More info on sail rig types, mast configurations and rig types, rigs with one mast, rigs with two masts, rigs with three masts, related questions.
This article is part 2 of my series on sails and rig types. Part 1 is all about the different types of sails. If you want to know everything there is to know about sails once and for all, I really recommend you read it. It gives a good overview of sail types and is easy to understand.

The Ultimate Guide to Sail Types and Rigs (with Pictures)
First of all, what is a sail rig? A sail rig is the way in which the sails are attached to the mast(s). In other words, it's the setup or configuration of the sailboat. The rig consists of the sail and mast hardware. The sail rig and sail type are both part of the sail plan. We usually use the sail rig type to refer to the type of boat.
Let's start by taking a look at the most commonly used modern sail rigs. Don't worry if you don't exactly understand what's going on. At the end of this article, you'll understand everything about rig types.

The sail rig and sail plan are often used interchangeably. When we talk of the sail rig we usually mean the sail plan . Although they are not quite the same. A sail plan is the set of drawings by the naval architect that shows the different combinations of sails and how they are set up for different weather conditions. For example a light air sail plan, storm sail plan, and the working sail plan (which is used most of the time).
So let's take a look at the three things that make up the sail plan.
The 3 things that make up the sail plan
I want to do a quick recap of my previous article. A sail plan is made up of:
- Mast configuration - refers to the number of masts and where they are placed
- Sail type - refers to the sail shape and functionality
- Rig type - refers to the way these sails are set up on your boat
I'll explore the most common rig types in detail later in this post. I've also added pictures to learn to recognize them more easily. ( Click here to skip to the section with pictures ).
How to recognize the sail plan?
So how do you know what kind of boat you're dealing with? If you want to determine what the rig type of a boat is, you need to look at these three things:
- Check the number of masts, and how they are set up.
- You look at the type of sails used (the shape of the sails, how many there are, and what functionality they have).
- And you have to determine the rig type, which means the way the sails are set up.
Below I'll explain each of these factors in more detail.
The most common rig types on sailboats
To give you an idea of the most-used sail rigs, I'll quickly summarize some sail plans below and mention the three things that make up their sail plan.
- Bermuda sloop - one mast, one mainsail, one headsail, fore-and-aft rigged
- Gaff cutter - one mast, one mainsail, two staysails, fore-and-aft rigged
- Gaff schooner - two-masted (foremast), two mainsails, staysails, fore-and-aft rigged
- Gaff ketch - two-masted (mizzen), two mainsails, staysails, fore-and-aft rigged
- Full-rigged ship or tall ship - three or more masts, mainsail on each mast, staysails, square-rigged
The first word is the shape and rigging of the mainsail. So this is the way the sail is attached to the mast. I'll go into this later on. The second word refers to the mast setup and amount of sails used.
Most sailboats are Bermuda sloops. Gaff-rigged sails are mostly found on older, classic boats. Square-rigged sails are generally not used anymore.
But first I want to discuss the three factors that make up the sail plan in more detail.
Ways to rig sails
There are basically two ways to rig sails:
- From side to side, called Square-rigged sails - the classic pirate sails
- From front to back, called Fore-and-aft rigged sails - the modern sail rig
Almost all boats are fore-and-aft rigged nowadays.
Square sails are good for running downwind, but they're pretty useless when you're on an upwind tack. These sails were used on Viking longships, for example. Their boats were quicker downwind than the boats with fore-and-aft rigged sails, but they didn't handle as well.
The Arabs first used fore-and-aft rigged sails, making them quicker in difficult wind conditions.
Quick recap from part 1: the reason most boats are fore-and-aft rigged today is the increased maneuverability of this configuration. A square-rigged ship is only good for downwind runs, but a fore-and-aft rigged ship can sail close to the wind, using the lift to move forward.
The way the sails are attached to the mast determines the shape of the sail. The square-rigged sails are always attached the same way to the mast. The fore-and-aft rig, however, has a lot of variations.
The three main sail rigs are:
- Bermuda rig - most used - has a three-sided (triangular) mainsail
- Gaff rig - has a four-sided mainsail, the head of the mainsail is guided by a gaff
- Lateen rig - has a three-sided (triangular) mainsail on a long yard
The Bermuda is the most used, the gaff is a bit old-fashioned, and the lateen rig is outdated (about a thousand years). Lateen rigs were used by the Moors. The Bermuda rig is actually based on the Lateen rig (the Dutch got inspired by the Moors).

Other rig types that are not very common anymore are:
- Junk rig - has horizontal battens to control the sail
- Settee rig - Lateen with the front corner cut off
- Crabclaw rig
Mast configuration
Okay, we know the shape of the mainsail. Now it's time to take a look at the mast configuration. The first thing is the number of masts:
- one-masted boats
- two-masted boats
- three-masted boats
- four masts or up
- full or ship-rigged boats - also called 'ships' or 'tall ships'
I've briefly mentioned the one and two mast configurations in part 1 of this article. In this part, I'll also go over the three-masted configurations, and the tall ships as well.
A boat with one mast has a straightforward configuration because there's just one mast. You can choose to carry more sails or less, but that's about it.
A boat with two masts or more gets interesting. When you add a mast, it means you have to decide where to put the extra mast: in front, or in back of the mainmast. You can also choose whether or not the extra mast will carry an extra mainsail. The placement and size of the extra mast are important in determining what kind of boat we're dealing with. So you start by locating the largest mast, which is always the mainmast.
From front to back: the first mast is called the foremast. The middle mast is called the mainmast. And the rear mast is called the mizzenmast.

What is the mizzenmast? The mizzenmast is the aft-most (rear) mast on a sailboat with three or more masts or the mast behind the mainmast on a boat with two masts. The mizzenmast carries the mizzen sail. On a two-masted boat, the mizzenmast is always (slightly) smaller than the mainmast. What is the purpose of the mizzen sail? The mizzen sail provides more sail area and flexibility in sail plan. It can be used as a big wind rudder, helping the sailor to have more control over the stern of the ship. It pushes the stern away from the wind and forces the bow in the opposite way. This may help to bring the bow into the wind when at anchor.
I always look at the number of masts first, because this is the easiest to spot. So to make this stuff more easy to understand, I've divided up the rig types based on the number of masts below.
Why would you want more masts and sail anyways?
Good question. The biggest advantage of two masts compared to one (let's say a ketch compared to a sloop), is that it allows you to use multiple smaller sails to get the same sail area. It also allows for shorter masts.
This means you reduce the stress on the rigging and the masts, which makes the ketch rig safer and less prone to wear and tear. It also doesn't capsize as quickly. So there are a couple of real advantages of a ketch rig over a sloop rig.
In the case of one mast, we look at the number of sails it carries.
Boats with one mast can have either one sail, two sails, or three or more sails.
Most single-masted boats are sloops, which means one mast with two sails (mainsail + headsail). The extra sail increases maneuverability. The mainsail gives you control over the stern, while the headsail gives you control over the bow.
Sailor tip: you steer a boat using its sails, not using its rudder.
The one-masted rigs are:
- Cat - one mast, one sail
- Sloop - one mast, two sails
- Cutter - one mast, three or more sails

The cat is the simplest sail plan and has one mast with one sail. It's easy to handle alone, so it's very popular as a fishing boat. Most (very) small sailboats are catboats, like the Sunfish, and many Laser varieties. But it has a limited sail area and doesn't give you the control and options you have with more sails.
The most common sail plan is the sloop. It has one mast and two sails: the main and headsail. Most sloops have a Bermuda mainsail. It's one of the best racing rigs because it's able to sail very close to the wind (also called 'weatherly'). It's one of the fastest rig types for upwind sailing.
It's a simple sail plan that allows for high performance, and you can sail it short-handed. That's why most sailboats you see today are (Bermuda) sloops.
This rig is also called the Marconi rig, and it was developed by a Dutch Bermudian (or a Bermudian Dutchman) - someone from Holland who lived on Bermuda.
A cutter has three or more sails. Usually, the sail plan looks a lot like the sloop, but it has three headsails instead of one. Naval cutters can carry up to 6 sails.
Cutters have larger sail area, so they are better in light air. The partition of the sail area into more smaller sails give you more control in heavier winds as well. Cutters are considered better for bluewater sailing than sloops (although sloops will do fine also). But the additional sails just give you a bit more to play with.
Two-masted boats can have an extra mast in front or behind the mainmast. If the extra mast is behind (aft of) the mainmast, it's called a mizzenmast . If it's in front of the mainmast, it's called a foremast .
If you look at a boat with two masts and it has a foremast, it's most likely either a schooner or a brig. It's easy to recognize a foremast: the foremast is smaller than the aft mast.
If the aft mast is smaller than the front mast, it is a sail plan with a mizzenmast. That means the extra mast has been placed at the back of the boat. In this case, the front mast isn't the foremast, but the mainmast. Boats with two masts that have a mizzenmast are most likely a yawl or ketch.
The two-masted rigs are:
- Lugger - two masts (mizzen), with lugsail (a cross between gaff rig and lateen rig) on both masts
- Yawl - two masts (mizzen), fore-and-aft rigged on both masts. Main mast is much taller than mizzen. Mizzen without a mainsail.
- Ketch - two masts (mizzen), fore-and-aft rigged on both masts. Main mast with only slightly smaller mizzen. Mizzen has mainsail.
- Schooner - two masts (foremast), generally gaff rig on both masts. Main mast with only slightly smaller foremast. Sometimes build with three masts, up to seven in the age of sail.
- Bilander - two masts (foremast). Has a lateen-rigged mainsail and square-rigged sails on the foremast and topsails.
- Brig - two masts (foremast), partially square-rigged. The main mast carries small lateen-rigged sail.

The yawl has two masts that are fore-and-aft rigged and a mizzenmast. The mizzenmast is much shorter than the mainmast, and it doesn't carry a mainsail. The mizzenmast is located aft of the rudder and is mainly used to increase helm balance.
A ketch has two masts that are fore-and-aft rigged. The extra mast is a mizzenmast. It's nearly as tall as the mainmast and carries a mainsail. Usually, the mainsails of the ketch are gaff-rigged, but there are Bermuda-rigged ketches too. The mizzenmast is located in front of the rudder instead of aft, as on the yawl.
The function of the ketch's mizzen sail is different from that of the yawl. It's actually used to drive the boat forward, and the mizzen sail, together with the headsail, are sufficient to sail the ketch. The mizzen sail on a yawl can't really drive the boat forward.
Schooners have two masts that are fore-and-aft rigged. The extra mast is a foremast which is generally smaller than the mainmast, but it does carry a mainsail. Schooners are also built with a lot more masts, up to seven (not anymore). The schooner's mainsails are generally gaff-rigged.
The schooner is easy to sail but not very fast. It handles easier than a sloop, except for upwind, and it's only because of better technology that sloops are now more popular than the schooner.
The brig has two masts. The foremast is always square-rigged. The mainmast can be square-rigged or is partially square-rigged. Some brigs carry a lateen mainsail on the mainmast, with square-rigged topsails.
Some variations on the brig are:
Brigantine - two masts (foremast), partially square-rigged. Mainmast carries no square-rigged mainsail.
Hermaphrodite brig - also called half brig or schooner brig. Has two masts (foremast), partially square-rigged. Mainmast carries a gaff rig mainsail and topsail, making it half schooner.
Three-masted boats are mostly barques or schooners. Sometimes sail plans with two masts are used with more masts.
The three-masted rigs are:
- Barque - three masts, fore, and mainmast are square-rigged, the mizzenmast is usually gaff-rigged. All masts carry mainsail.
- Barquentine - three masts, foremast is square-rigged, the main and mizzenmast are fore-and-aft rigged. Also called the schooner barque.
- Polacca - three masts, foremast is square-rigged, the main and mizzenmast are lateen-rigged.
- Xebec - three masts, all masts are lateen-rigged.

A barque has three or four masts. The fore and mainmast are square-rigged, and the mizzen fore-and-aft, usually gaff-rigged. Carries a mainsail on each mast, but the mainsail shape differs per mast (square or gaff). Barques were built with up to five masts. Four-masted barques were quite common.
Barques were a good alternative to full-rigged ships because they require a lot fewer sailors. But they were also slower. Very popular rig for ocean crossings, so a great rig for merchants who travel long distances and don't want 30 - 50 sailors to run their ship.
Barquentine
The barquentine usually has three masts. The foremast is square-rigged and the main and mizzenmast fore-and-aft. The rear masts are usually gaff-rigged.
Faster than a barque or a schooner, but the performance is worse than both.
The polacca or polacre rig has three masts with a square-rigged foremast. The main and mizzenmast are lateen-rigged. Beautiful boat to see. Polacca literally means 'Polish' (it's Italian). It was a popular rig type in the Mediterranean in the 17th century. It looks like the xebec, which has three lateen-rigged masts.
Fun fact: polaccas were used by a Dutch sailor-turned-Turkish-pirate (called Murat Reis).
The xebec is a Mediterranean trading ship with three masts. All masts are lateen-rigged. I couldn't find any surviving xebecs, only models and paintings. So I guess this rig is outdated a long time.
A boat with three or more masts that all carry square-rigged sails is called a ship, a tall ship, or a full-rigged ship. So it's at this point that we start calling boats 'ships'. It has nothing to do with size but with the type of rigging.
More sails mean less stress on all of them. These ships use a lot of sails to distribute the forces, which reduces the stress on the rigging and the masts. Square sails mean double the sail area in comparison to triangular sails.
They are quite fast for their size, and they could outrun most sloops and schooners (schooners were relatively a lot heavier). The reason is that tall ships could be a lot longer than sloops, giving them a lot of extra hull speed. Sloops couldn't be as large because there weren't strong enough materials available. Try making a single triangular sail with a sail area of over 500 sq. ft. from linen.
So a lot of smaller sails made sense. You could have a large ship with a good maximum hull speed, without your sails ripping apart with every gust of wind.
But you need A LOT of sailors to sail a tall ship: about 30 sailors in total to ie. reef down sails and operate the ship. That's really a lot.
Tall ships are used nowadays for racing, with the popular tall ship races traveling the world. Every four years I go and check them out when they are at Harlingen (which is very close to where I live).
Check out the amazing ships in this video of the tall ship races last year near my hometown. (The event was organized by friends of mine).
What is the difference between a schooner and a sloop? A schooner has two masts, whereas the sloop only has one. The schooner carries more sails, with a mainsail on both masts. Also, sloops are usually Bermuda-rigged, whereas schooners are usually gaff-rigged. Most schooners also carry one or two additional headsails, in contrast to the single jib of the sloop.
What do you call a two-masted sailboat? A two-masted sailboat is most likely a yawl, ketch, schooner, or brig. To determine which one it is you have to locate the mainmast (the tallest). At the rear: schooner or brig. In front: yawl or ketch. Brigs have a square-rigged foremast, schooners don't. Ketches carry a mainsail on the rear mast; yawls don't.
What is a sloop rig? A sloop rig is a sailboat with one mast and two sails: a mainsail and headsail. It's a simple sail plan that handles well and offers good upwind performance. The sloop rig can be sailed shorthanded and is able to sail very close to the wind, making it very popular. Most recreational sailboats use a sloop rig.
What is the difference between a ketch and a yawl? The most important difference between a ketch and a yawl are the position and height of the mizzenmast. The mizzenmast on a yawl is located aft of the rudder, is shorter than the mainmast and doesn't carry a mainsail. On a ketch, it's nearly as long as the mainmast and carries a mainsail.

There are a wonderful lots of DIY changeability shows on the cable airwaves these days.
Rick the rigger
There are SO many errors on this site it really should be taken down.
First major mistake is to say you are no longer afraid of the sea.
One that truly gets up my nose is the term ‘fully’ rigged ship. It’s a FULL rigged ship!! Your mast names are the wrong way round and just because there may be 3 it doesn’t automatically mean the one in the middle is the main.
I could go on and totally destroy your over inflated but fragile ego but I won’t. All I will say is go learn a lot more before posting.
Shawn Buckles
Thanks for your feedback. If you like to point out anything more specific, please let me know and I will update the articles. I’ve changed fully-rigged to full-rigged ship - which is a typo on my part. I try to be as concise as I can, but, obviously, we all make mistakes every now and then. The great thing about the internet is that we can learn from each other and update our knowledge together.
If you want to write yourself and share your knowledge, please consider applying as a writer for my blog by clicking on the top banner.
Thanks, Shawn
Well, I feel that I’ve learned a bit from this. The information is clear and well laid out. Is it accurate? I can’t see anything at odds with the little I knew before, except that I understood a xebec has a square rigged centre mainmast, such as the Pelican ( https://www.adventureundersail.com/ )
Hi, Shawn, You forgot (failed) to mention another type of rig? The oldest type of rig known and still functions today JUNK RIG!
Why are so many of the comments here negative. I think it is wonderful to share knowledge and learn together. I knew a little about the subject (I’m an Aubrey-Maturin fan!) but still found this clarified some things for me. I can’t comment therefore on the accuracy of the article, but it seems clear to me that the spirit of the author is positive. We owe you some more bonhomme I suggest Shawn.
As they say in the Navy: “BZ” - for a good article.
Been reading S.M. Stirling and wanted to understand the ship types he references. Thank you, very helpful.
This site is an awesome starting point for anyone who would like to get an overview of the subject. I am gratefull to Shawn for sharing - Thanks & Kudos to you! If the negative reviewers want to get a deeper technical knowledge that is accurate to the n-th then go study the appropriate material. Contribute rather than destroy another’s good work. Well done Shawn. Great job!
Good stuff Shawn - very helpful. As a novice, it’s too confusing to figure out in bits and pieces. Thanks for laying it out.
First of all I have to say that Rick ‘the rigger’ is obviously the one with the “over inflated but fragile ego” and I laughed when you suggested he share his knowledge on your blog, well played!
As for the content it’s great, hope to read more soon!
Alec Lowenthal
Shawn, I have a painting of a Spanish vessel, two masted, with. Lateen sails on both masts and a jib. The mainsail is ahead of the main mast (fore) and the other is aft of the mizzen mast. Would this be what you call lugger rig? I have not seen a similar picture. Thanks, Alec.
Thank you for your article I found easy to read and understand, and more importantly remember, which emphasises the well written.. Pity about the negative comments, but love your proactive responses!
This vessel, “SEBASTIAN” out of Garrucha, Almería, España, was painted by Gustave Gillman in 1899.
Sorry, picture not accepted!
Thank you for a very informative article. I sail a bit and am always looking for more knowledge. I like the way you put forth your info and I feel if you can’t say anything positive, then that person should have their own blog or keep their opinions to their-self. I will be looking for more from you. I salute your way of dealing with negative comments.
Thank you for a great intro to sailing boats! I searched different sailboats because I use old sails tp make bags and wanted to learn the difference. Way more than I ever expected. Thanks for all the work put in to teach the rest of us.
Your description of a cutter is lacking, and your illustrations of “cutters” are actually cutter-rigged sloops. On a true cutter, the mast is moved further aft (with more than 40% of the ship forward of the mast). A sloop uses tension in the backstay to tension the luff of the foresail. The cutter can’t do this.
Also, a bermuda-rigged ketch will have a line running from the top of the mainmast to the top of the mizzenmast.
wow great guide to rig types! thanks
Interesting guide, however I am confused about the description of the brig. You say the main mast on a brig can have a lateen sail, but in your picture it looks like a gaff sail to me. How is it a lateen sail?
Hi Shawn, thank you for taking the time to share this information. It is clear and very helpful. I am new to sailing and thinking of buying my own blue water yacht. The information you have supplied is very useful. I still am seeking more information on performance and safety. Please keep up the good work. Best Regards
mickey fanelli
I’m starting to repair a model sailboat used in the lake I have three masts that have long been broken off and the sails need replacement. So my question is there a special relationship between the three masts I do have reminents of where the masts should go. they all broke off the boat along with the sails I can figure out where they go because of the old glue marks but it makes no sense. or does it really matter on a model thank you mickey
Cool, total novice here. I have learnt a lot. Thanks for sharing - the diagrams along with the text make it really easy to understand, especially for a beginner who hasn’t even stepped on a sailing boat.
Daryl Beatt
Thank you. Cleared up quite a few things for me. For example, I was familiar with the names “Xebecs” and “Polaccas” from recent reading about the Barbary War. I had gathered that the two Barbary types were better suited to sailing in the Med, but perhaps they were less able to be adaptable to military uses,(but one might assume that would be ok if one plans to board and fight, as opposed to fight a running gun duel). Specifically, the strangely one sided August 1, 1801 battle between the USS Enterprise under Lt. John Sterett and the Polacca cruiser Tripoli under Admiral Rais Mahomet Rous. On paper both ships seemed nearly equal in size, guns and crew, but pictures of the battle are confusing. While the Enterprise is usually rendered as the familiar schooner, the polacca Tripoli has been pictured in radically different ways. Thus the Wikipedia picture by Hoff in 1878 used to illustrate the Battle shows a Brig design for Tripoli, indicating 77 years later, polaccas were no longer common.
Lee Christiansen
I am curious as to what you would call a modern race boat with a fractional jib,not equipped for full masthead hoist? Thanks Lee
Thanks Guy: The information and pictures really eliminate a lot of the mystery of the terminology and the meanings. Also appreciate the insight of the handling idiosyncrasies “hand” (staff) requirements to manage a vessel for one that has not been on the water much. I long to spend significant time afloat, but have concern about the ability to handle a vessel due to advancing age. The Significant Other prefers to sit (in AC comfort)and be entertained by parties of cruise line employees. Thanks again for the information.
Gordon Smith
Your discussion made no mention of the galleon, a vessel with either square-rigged Fore and Main masts and a shorter lateen-rigged Mizzen, or, on larger galleons, square-rigged Fore and Main masts, with a lateen-rigged Mizzen and a lateen-rigged Bonaventure mast, both shorter than either the Fore or Main masts. Also, it was not uncommon for a galleon to hoist a square-rigged bowsprit topsail in addition to the usual square-rigged spritsail.
Leave a comment
You may also like.
What's that sail for? Generally, I don't know. So I've come up with a system. I'll explain you everything there is to know about sails and rigs in this article.

17 Sailboat Types Explained: How To Recognize Them

Different Types of Sailing and Racing Explained

How Are Sail Numbers Assigned? (And how to pick yours)
IMAGES
VIDEO
COMMENTS
A beginners guide to sailboat rigging, including standing rigging and running rigging. This animated tutorial is the first in a series and covers sails, lines, jammers, winches and all other ...
Rigging a sailboat maximizes efficiency: Proper rigging allows for optimized sailing performance, ensuring the boat moves smoothly through the water. Understanding sailboat rigging components: Familiarity with the various parts of a sailboat rigging, such as the mast, boom, and standing and running riggings, is essential for effective rigging ...
A beginners guide to sailboat rigging, including standing rigging and running rigging. This tutorial is the first in a series and covers sails, lines, jammers, winches and all other aspects of...
With good sails, great design, and regular maintenance, sails and rigs are an important part of a sailboat.
Mast configuration - refers to the number of masts and where they are placed. Sail type - refers to the sail shape and functionality. Rig type - refers to the way these sails are set up on your boat. I'll explore the most common rig types in detail later in this post.
Rigging can be a complex process with a variety of ropes and lines and hooks. It is a basic process to understand as you learn how to sail. Understanding what they all do is important because...