Refastening a Wooden Hull - Season 4, Episode 1 Now Available!

How to Build a Wooden Mast
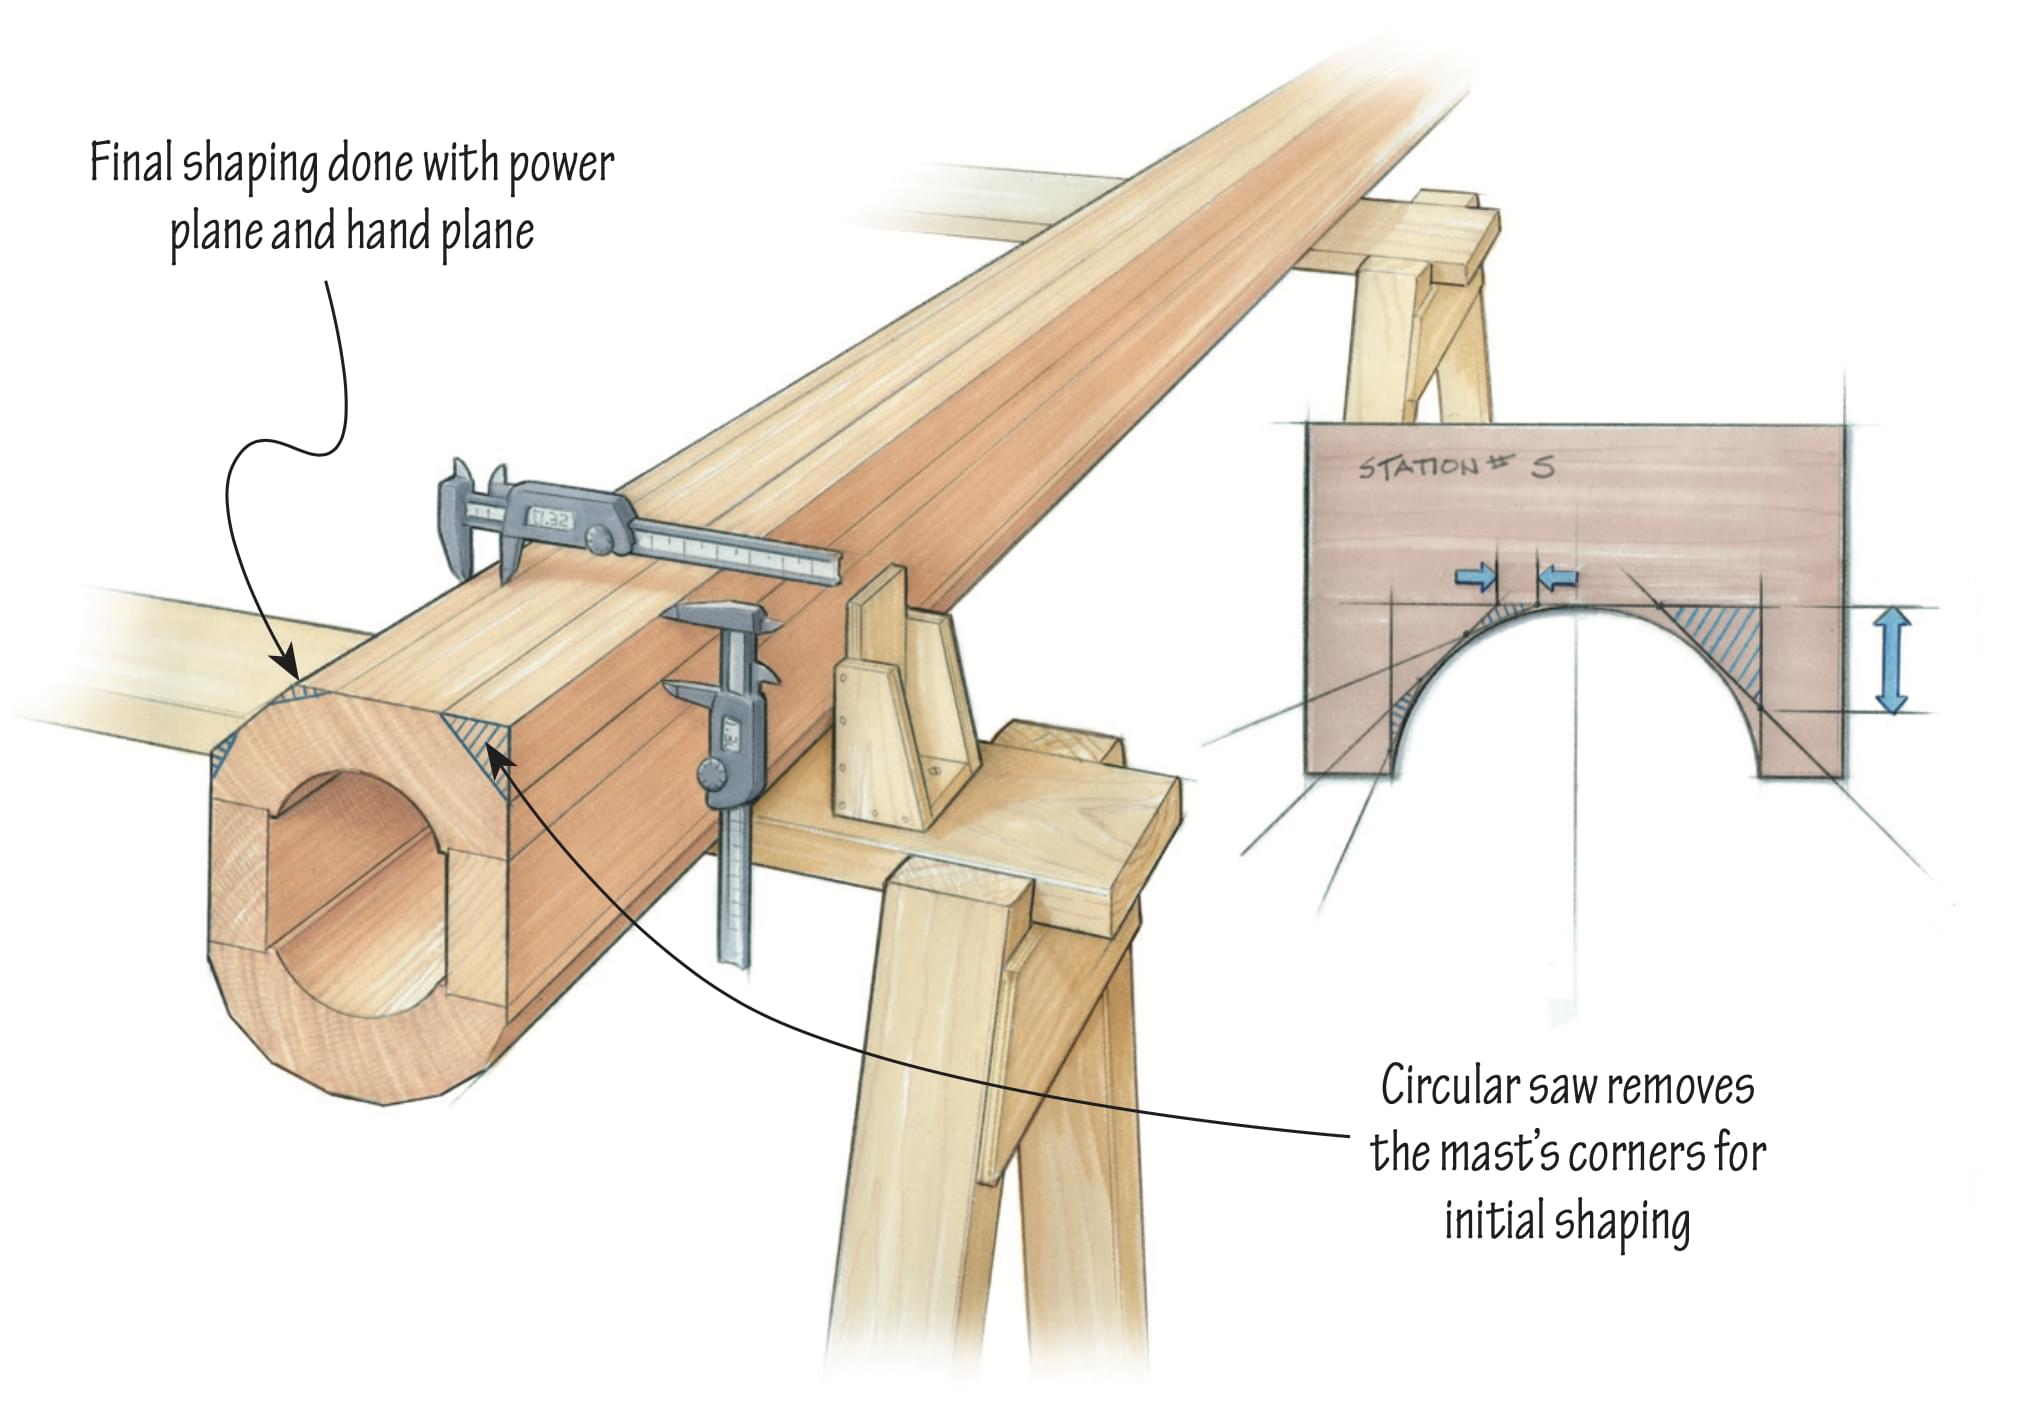
A tapered, oval new york 32 spar from the original plans.
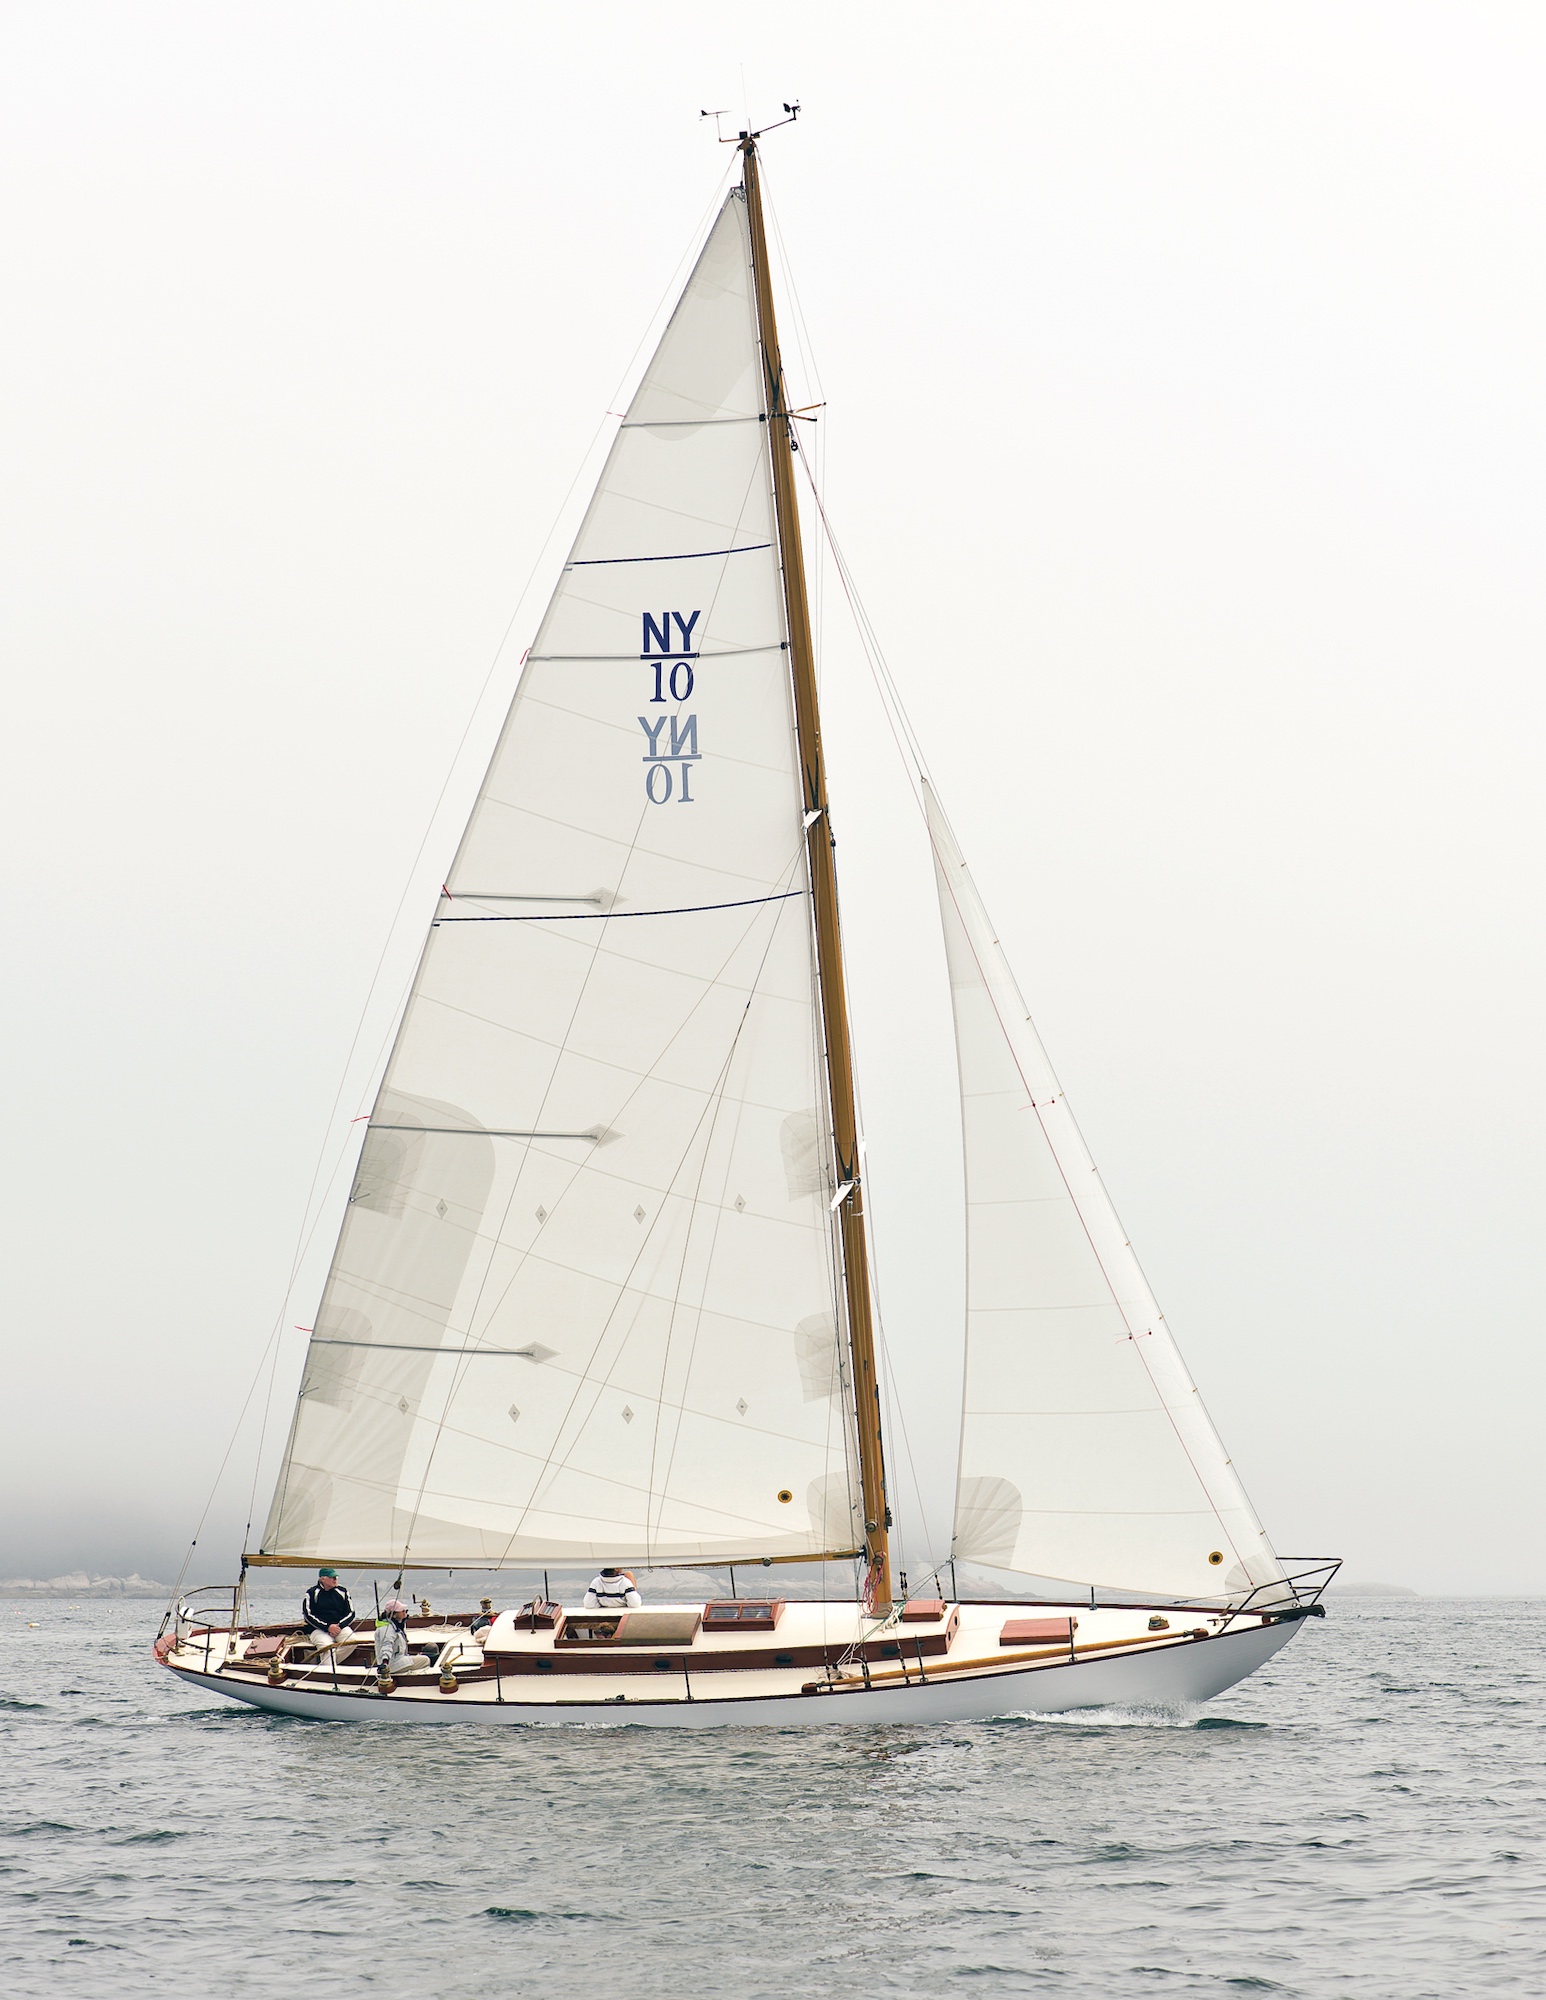
ISLA, New York 32 No.10 (of a total of 20), was thoroughly rebuilt last year by Buzzards Bay Yacht Services of Mattapoisett, Massachusetts. The job included a new mast, whose construction is detailed on the following pages.
W hen my company was hired to restore New York 32 No. 10, ISLA, in 2008, the boat had been out of service for over 25 years. The 20-boat New York 32 fleet was designed by Sparkman & Stephens in 1935 and built over the winter of 1935–36 by Henry B. Nevins of City Island, New York. When we found her, ISLA was a virtual time capsule, with an intact original interior and a complete set of original hardware. But the hull and deck were tired, to say the least, and the spars were beyond repair. So, included in the work list were a new mast and boom.
The New York 32 carries a hollow, oval mast measuring 63′ 5″. The owners were committed to maintaining ISLA’s originality, so we acquired the original spar drawings from the S&S plan collection at Mystic Seaport. These included ample detail: spreaders, tangs, boom, and masthead, along with the overall mast plan. The following steps describe how we turned those drawings into a new mast for ISLA.
Ordering and Preparing Lumber ISLA’s mast is built of Sitka spruce, which has long been prized by sparmakers for its long, clear lengths, light weight, and impressive strength for that weight. From the plans we developed a lumber list for the mast, boom, and spreaders. While it is still possible to acquire excellent-quality Sitka spruce, it takes some searching and a keen eye for defects. We required at least 12/4 stock to fashion the forward and after staves.
For spars, it’s imperative that the wood be dry (below 15 percent moisture content) and free of defects. The grain must be vertical. Our first attempt to procure lumber for this mast resulted in us receiving a batch of 12/4 Sitka spruce that was case-hardened. It was dry to both the touch and to the moisture meter, but once milled and its center exposed, its moisture content went off the scale. When we tried to rip it on the tablesaw, it pinched the saw’s blade and stopped the saw. We replaced that batch of wood with properly dried material, and learned a lesson in the process.
We ran the rough-sawn boards we had purchased through the thickness planer to take “fur” off of each one, allowing for a better inspection of the surface of the wood. When doing so, we kept in mind the minimum thickness of the staves, so we wouldn’t carelessly plane off too much. With this done, we examined each board, measuring its usable portion, marking visible defects, and labeling each piece for its intended location in the mast. A board with tight grain is slightly denser and thus heavier than one with wider ring spacing; we strived to locate these heavier pieces toward the bottom of the spar. If another board had slight grain runout, we’d consider using it in the mast’s heel where it is under less stress and is backed by solid blocking. It’s also important to keep in mind the locations of the scarfs when selecting the lengths of stock that will compose each stave, for the scarfs must be staggered.
Utilizing the Drawing
The drawing shown here is an illustration of the original Sparkman & Stephens mast plan for the New York 32, whose vertical scale was compressed in order to fit the mast’s dimensions onto a single sheet of paper. From the drawing we created a table of offsets for the mast. To do this we drew a series of stations, 5′ apart, perpendicular to the mast’s centerline. We did this for both the side and forward views of the mast.
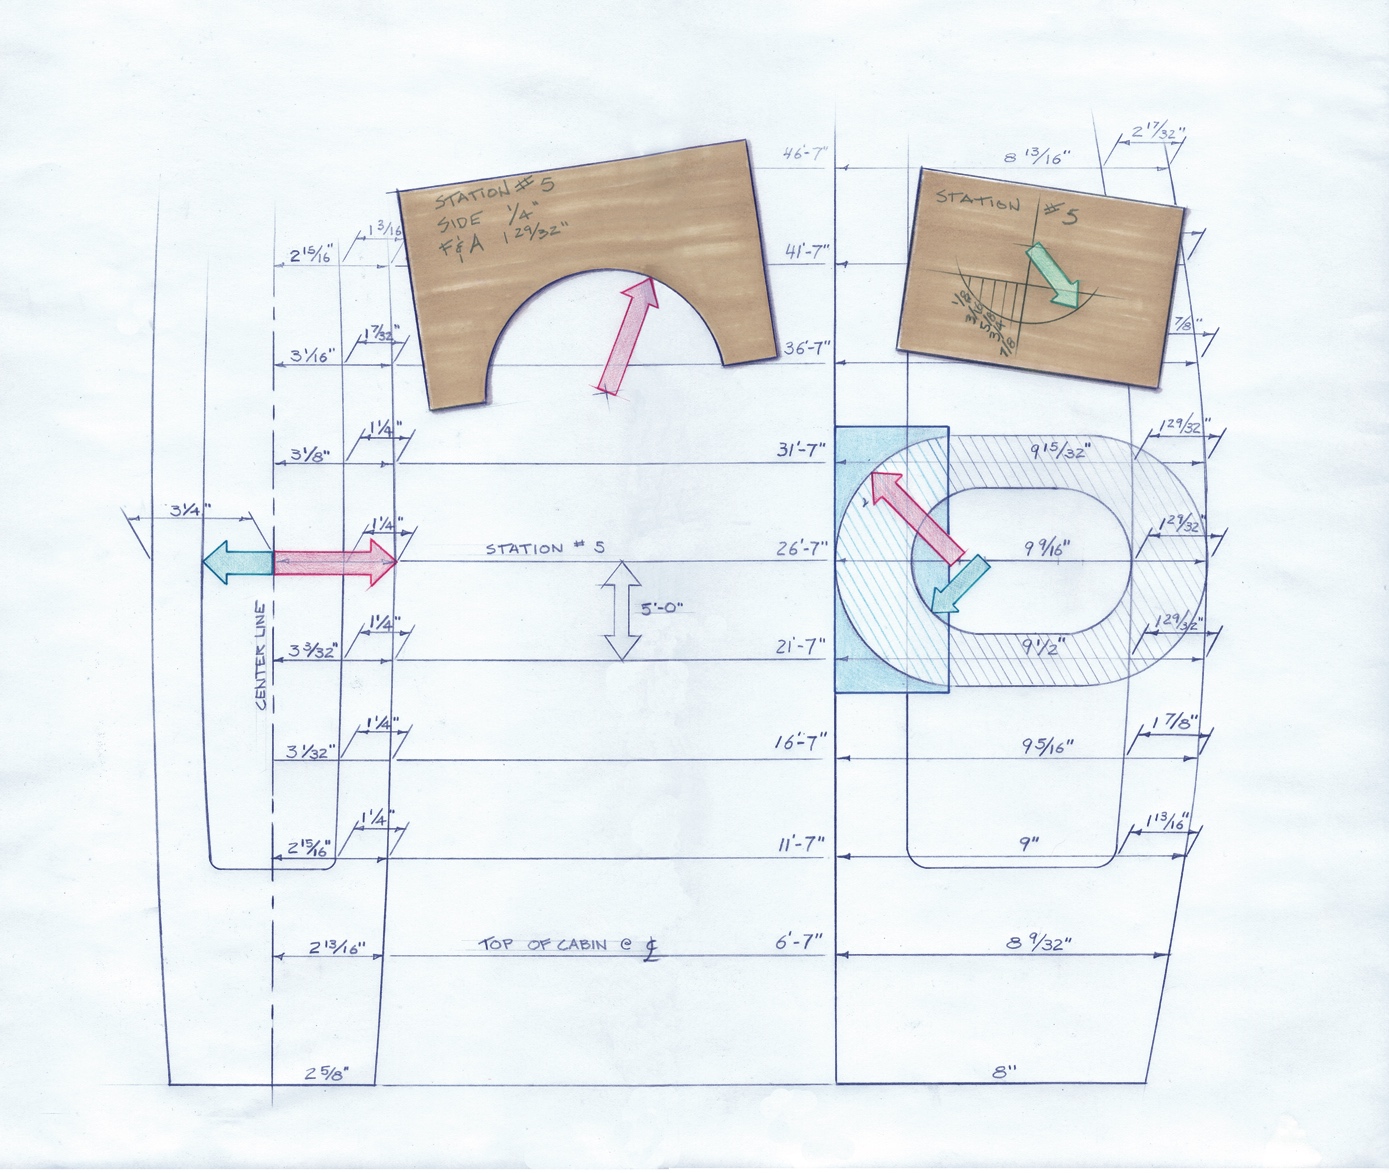
The drawing shown here is an illustration of the original Sparkman & Stephens mast plan for the New York 32
For the forward and after staves, we recorded the overall thickness of the stave (that is, its thickness before hollowing) and its half width. For the side staves, we recorded the thickness and width at each station. We converted the mast plan drawing from 32nds of an inch to decimal units, which I find best when working to close tolerances using digital calipers. We then made up 10″ × 10″ lauan templates on which to draw the sectional shape of the mast at each station. Since the forward and after profiles are arcs of a circle, we transferred these shapes from the drawing to the lauan with the aid of a compass. After each shape was transferred we cut out these lauan templates with a bandsaw. On each template, we also recorded the sidewall thickness, forward and after wall thicknesses, and distance from the heel of the mast. Building this New York 32 mast as was done originally requires hollowing out the thick forward and after staves in order to lighten their weight. So, once again using the mast plan, we made templates for the mast’s inside shape at each section.
The Spar Bench
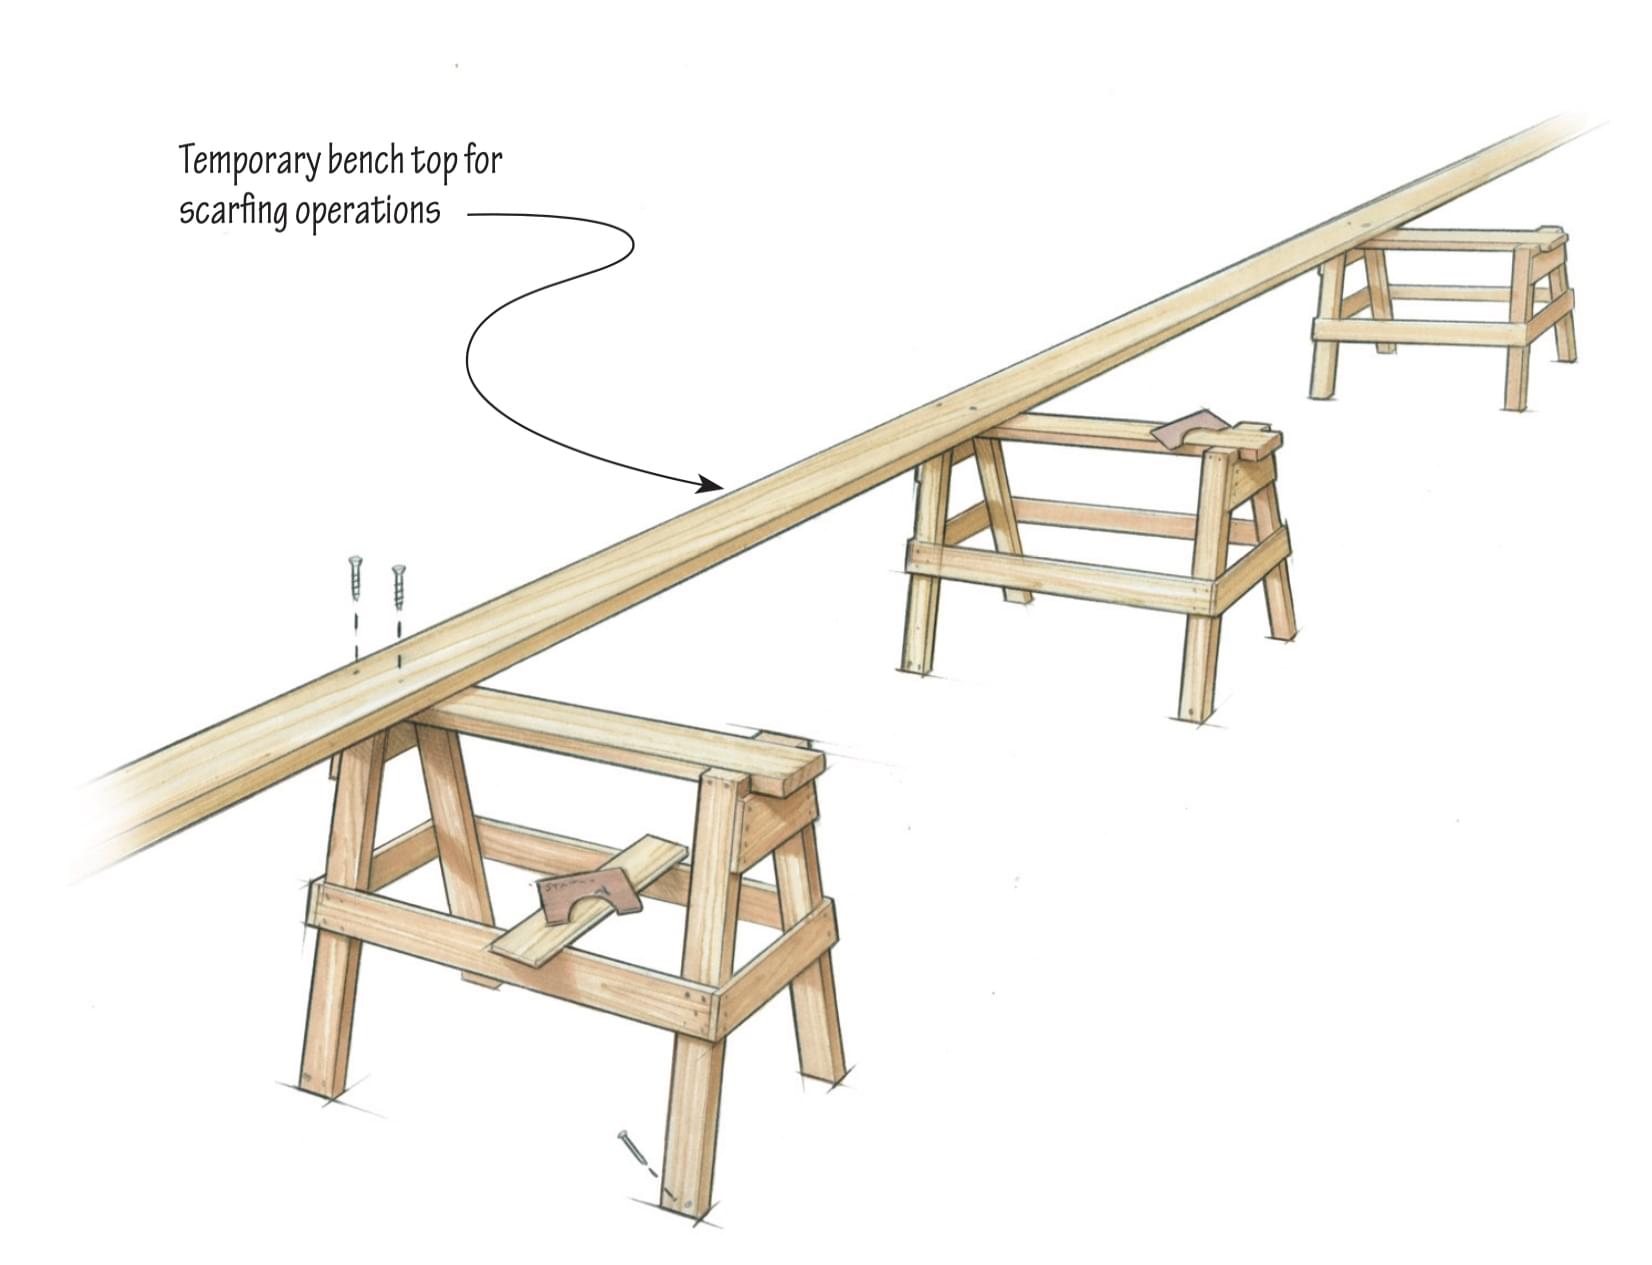
The first step in building the mast is to construct a spar bench. We wanted a sturdy bench that was straight and set at a good working height. Typically, a spar bench comprises a series of sturdy sawhorses spaced 5′ apart and fastened securely to the shop floor. Identical wooden sawhorses work well for this; once they were secured to the floor, a mason’s string was run to assure that the tops were all in the same plane; the tops were then shimmed as needed to achieve this. The 2 × 10 plank seen here being screwed to the sawhorses is to support the staves during the scarfing operation, and will later be removed.
Gluing Up Full-Length Staves
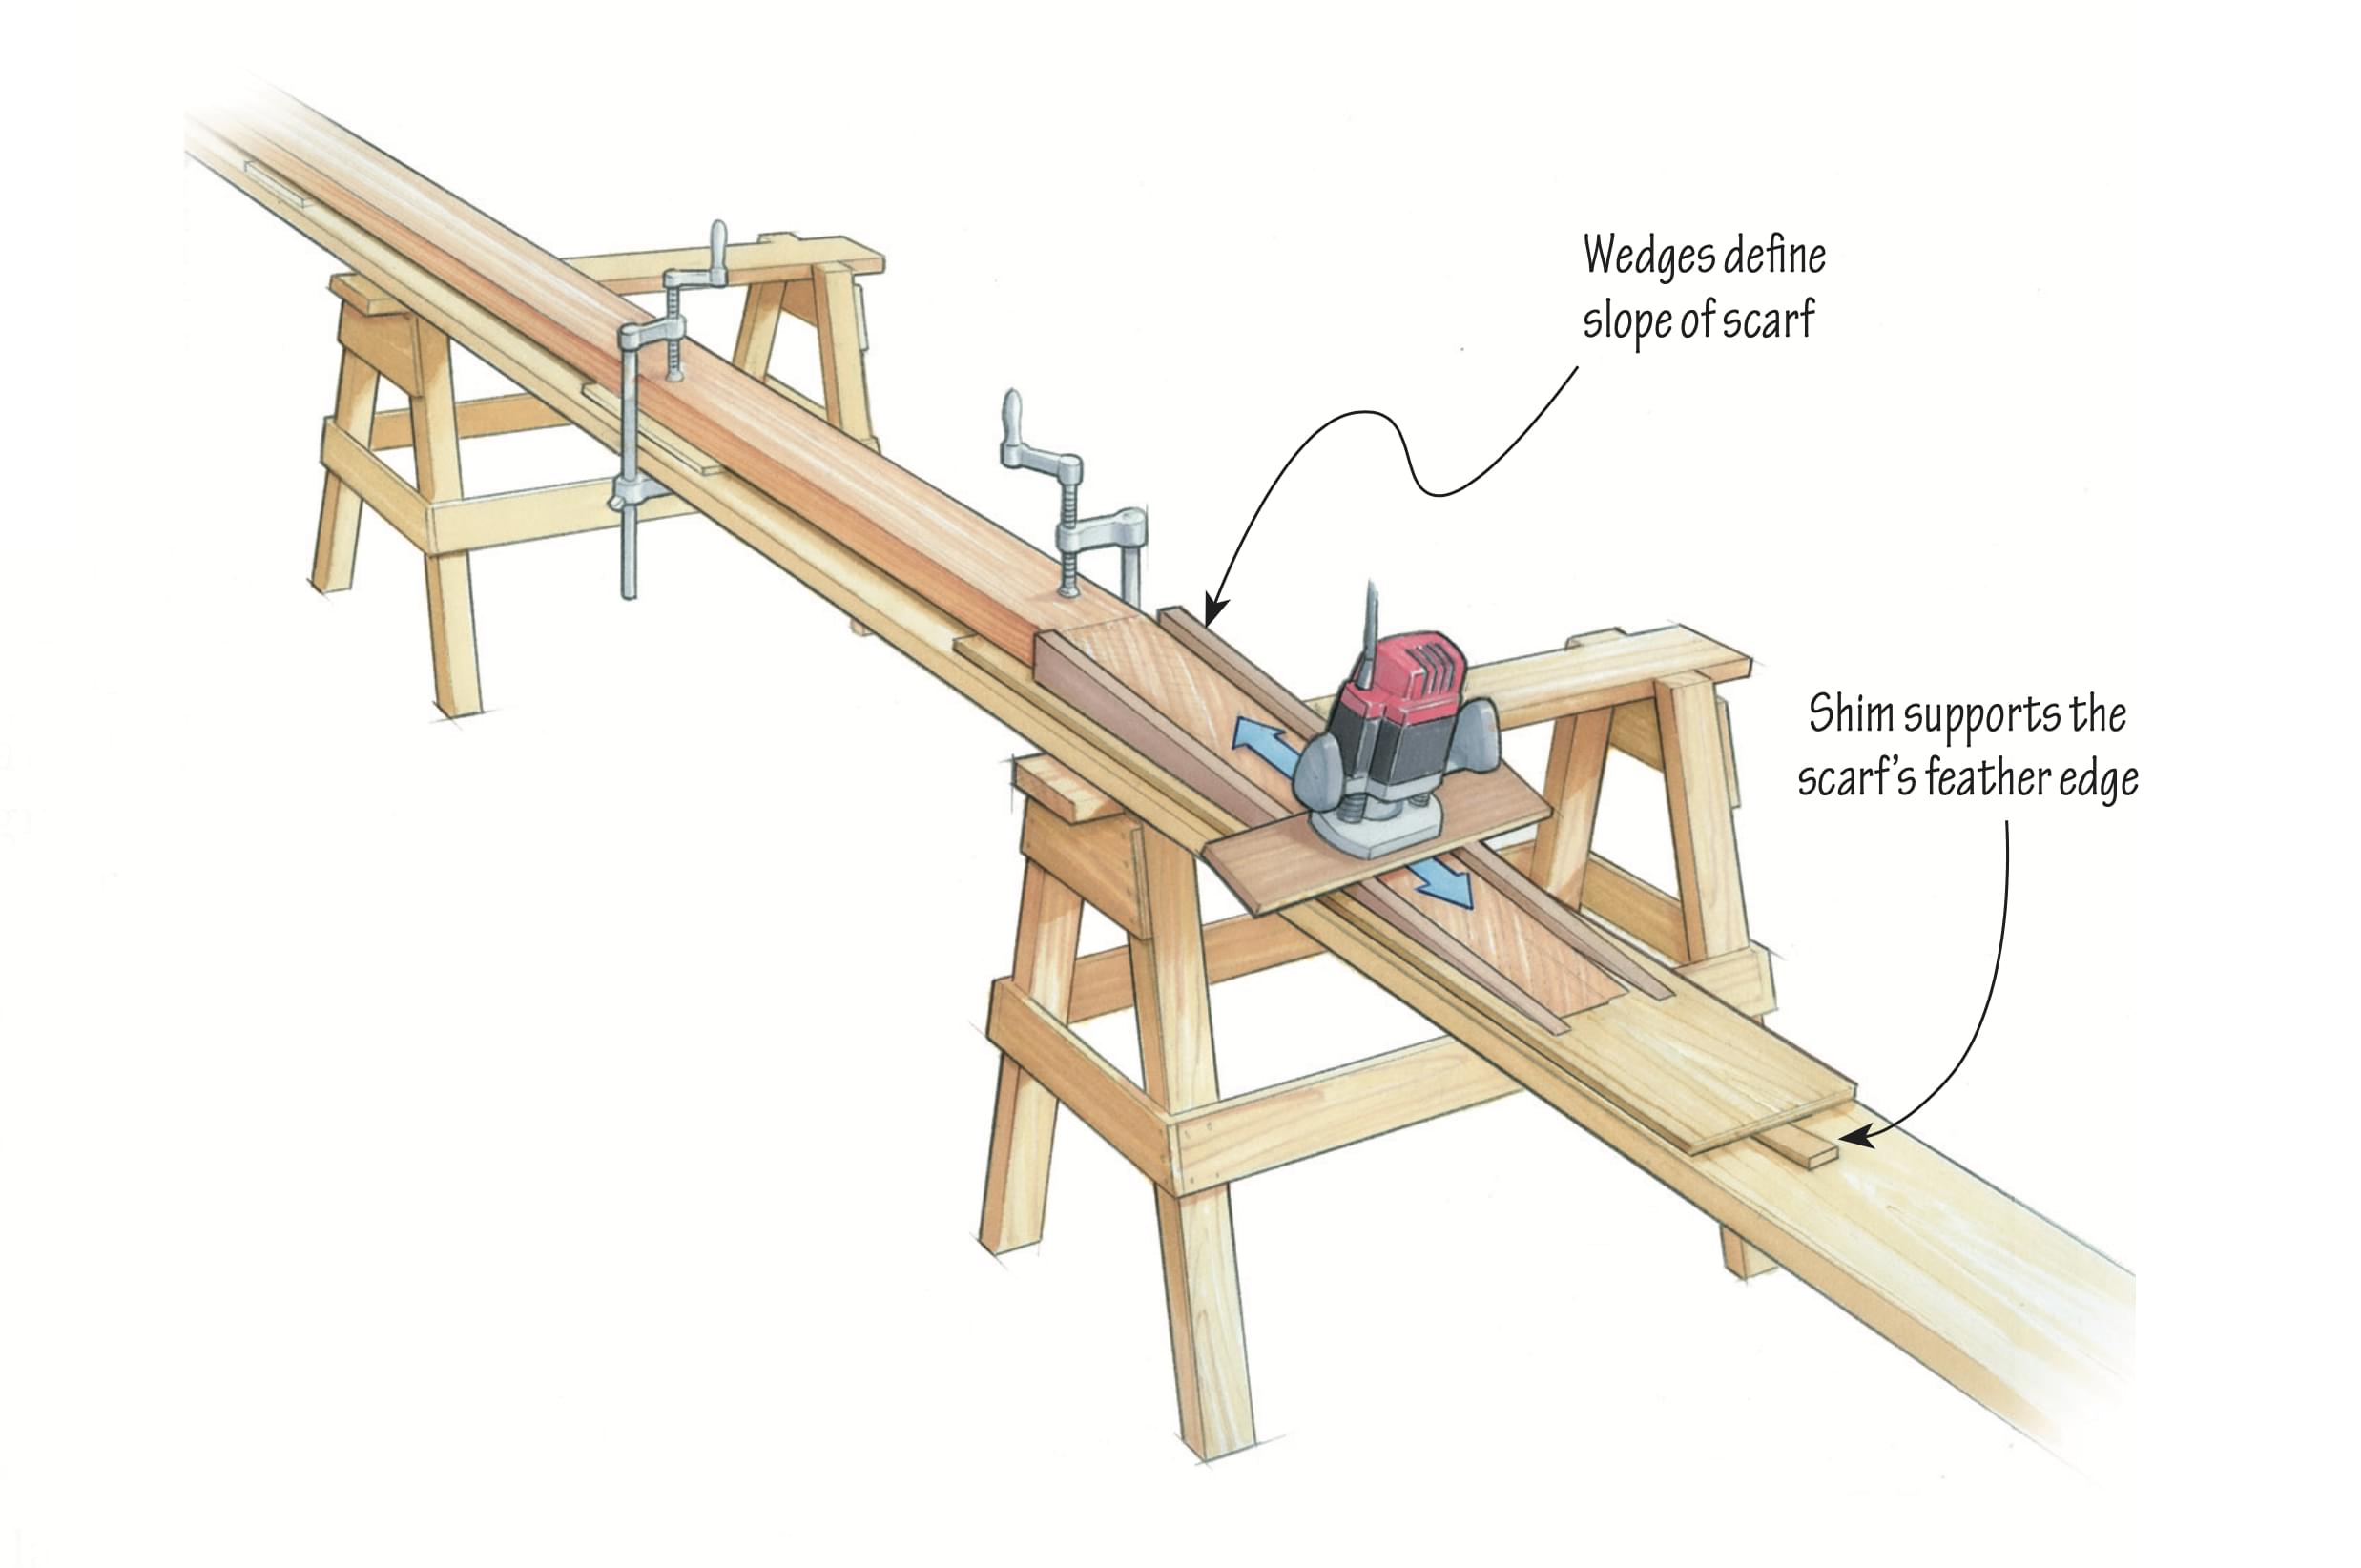
On our nice, solid bench, we laid out the wood for each of the mast’s four staves end-to-end and developed a final scarf plan. We planed the stock to the maximum designed thickness for the forward and after staves (2.875″) and for the side staves (1.25″). Then we scarfed the stock together to create the full-length staves. Careful layout and labeling were required for this step. We examined the stock and put the most visually pleasing sides facing out, and we spread out the scarf locations to avoid clustering them. Scarfs were cut to a slope of 12 to 1, with their lines drawn onto the edges of each piece. They were rough-cut on the bandsaw, and then finished with a jig and a router. With the scarfs cut, we assembled the pieces dry and ran a string down each of their centerlines to confirm that each of the four full-length staves, once glued, would be straight.
When we were certain that the staves would be straight and true, we screwed blocks to the spar bench to chock them in place. The individual pieces could then be removed from the bench, turned over for gluing, and placed back in their precise positions. The final step in preparing the scarf for epoxy glue was to rough up the surface of the glue joint. Eighty-grit sandpaper backed by a long block works well for this, as does the technique we used: a Japanese pull saw drawn across the grain so its teeth combed the surface. (This process is for epoxy gluing only; resorcinol and other glues rely on smooth mating surfaces.)
Once the surface was roughed up, we vacuumed both faces of the joint and then wiped them with a clean rag and denatured alcohol until the rags came up clean. We then wet out both gluing surfaces with straight epoxy and allowed that to stand for several minutes while it penetrated the wood. Dry spots were wetted a second time. We then applied epoxy thickened with colloidal silica to one face of the joint. Using large bar clamps and modest pressure, we clamped the joints, making sure we had a nice, even glue squeeze-out.
Tapering the Staves
Once the staves were glued full-length, we selected the aft stave, blocked it straight on the spar bench, and snapped a centerline. Then, using the information from the lauan templates and the offset table, the points representing the stave’s profile were laid out and connected with a long, limber batten. One of the side staves was marked similarly.
We rough-cut the profiles with a worm-drive circular saw being careful to leave the lines intact. We then cut closer with a power plane, and then shaved precisely to the lines with an appropriate hand plane, making sure that the edges stayed perfectly square. With one stave of each profile now complete, we used each as a template for its mirroring stave, making the final cuts with a router and bearing bit to complete the second pair of staves.
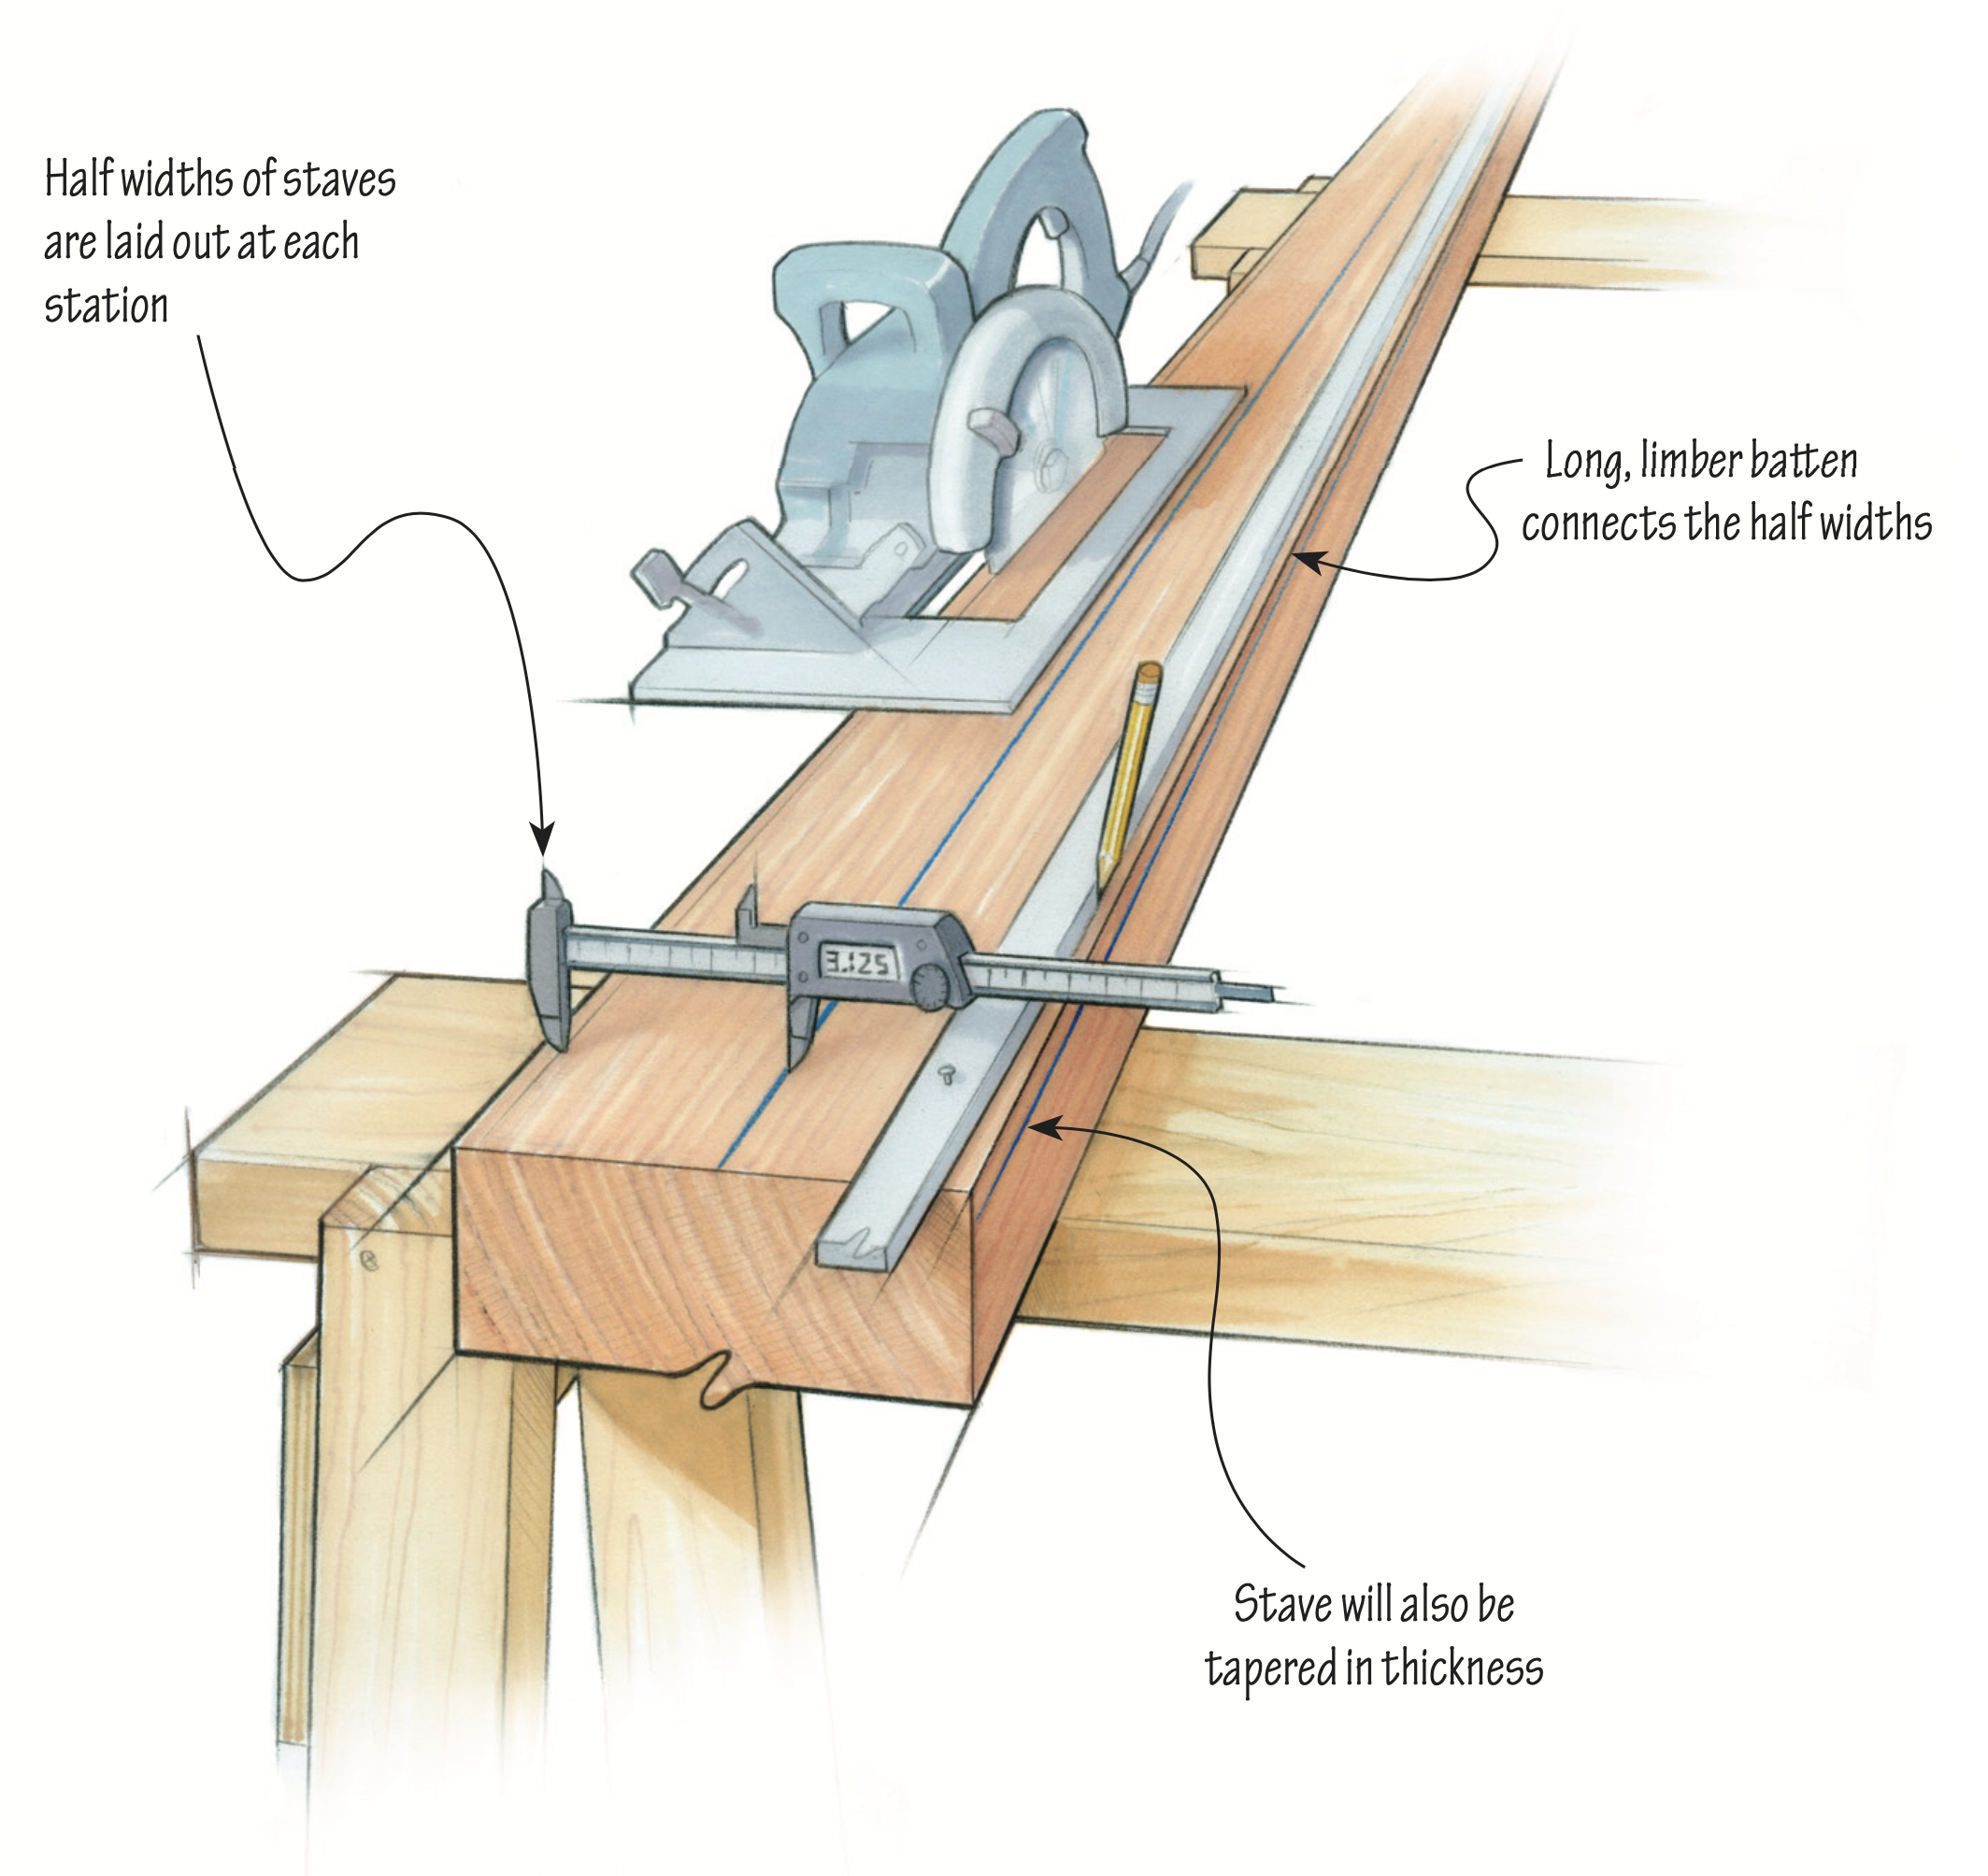
To minimize weight aloft, the wall thickness diminishes as we progress up the mast. Once again we turned to the lauan templates on which we’d recorded the wall thickness at each station. Using digital calipers, we recorded on both edges of each stave the wall thickness at each station and connected the dots with our long batten.
This line, yet to be cut, is shown in the drawing. The stock was removed from the outside faces of the staves, the bulk of it with a power plane. The final cleanup was completed with a bench plane.
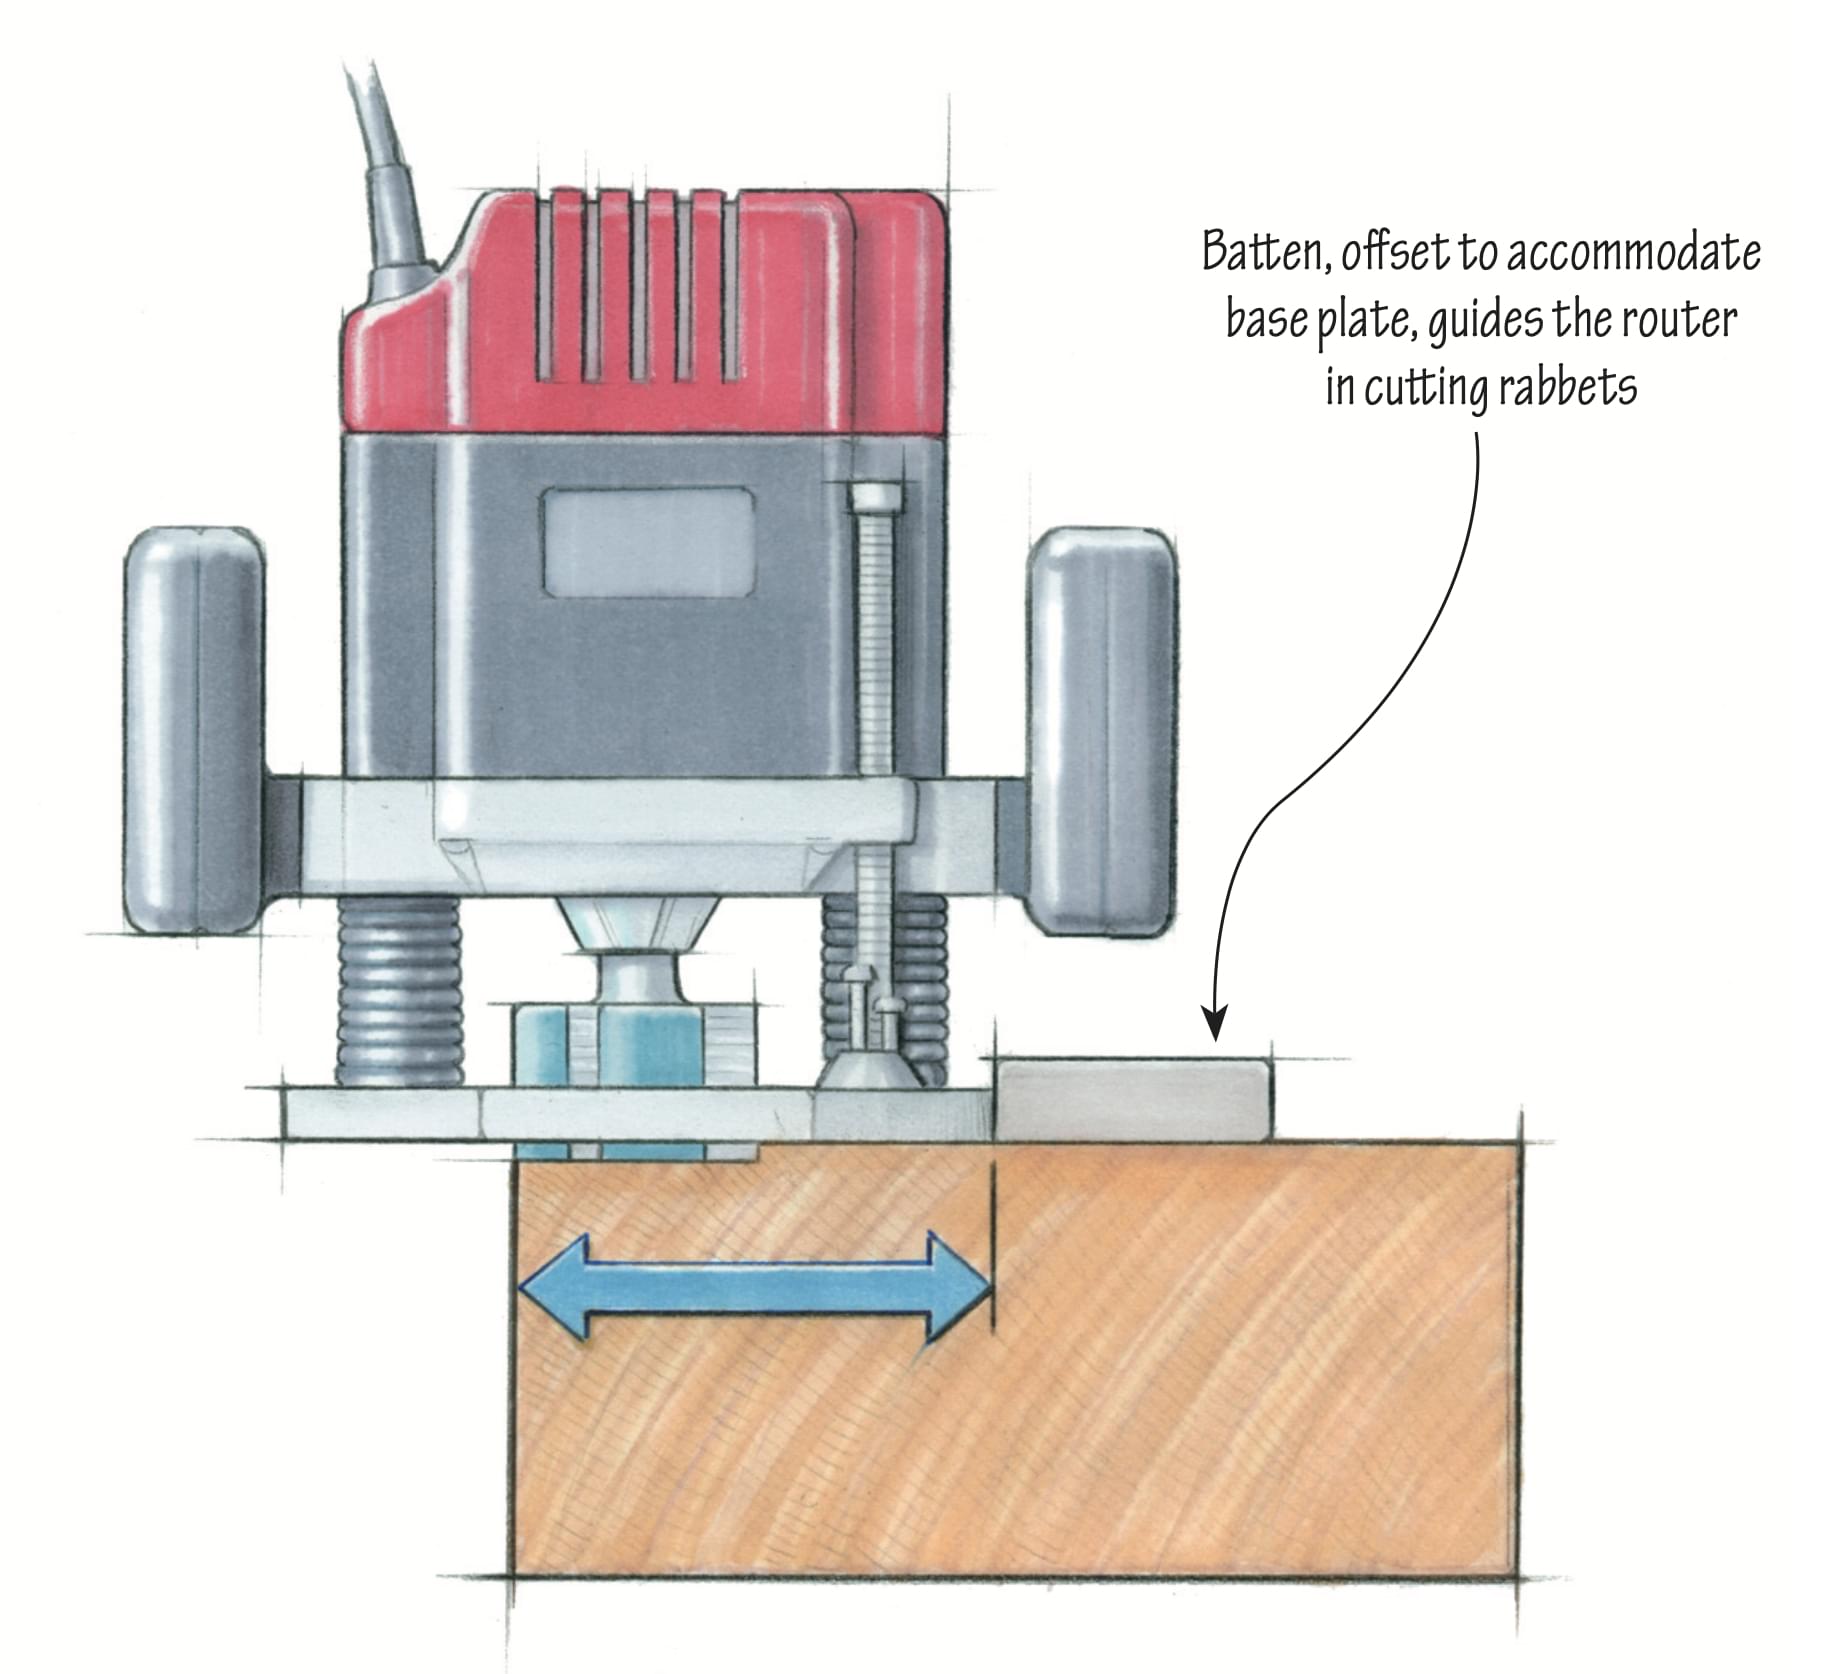
Rabbeting the Forward and After Staves
Hollowing the Forward and After Stave
The final step before gluing the staves together was to hollow out the forward and after staves. On the lauan templates we referred to the inside profile shapes we had recorded from the mast drawing. Dividing the inside profile into 1⁄4″ sections, we measured and recorded the depth at each section. We did this at each station. The inside face of the stave was thus lined off in 1⁄4″ increments.
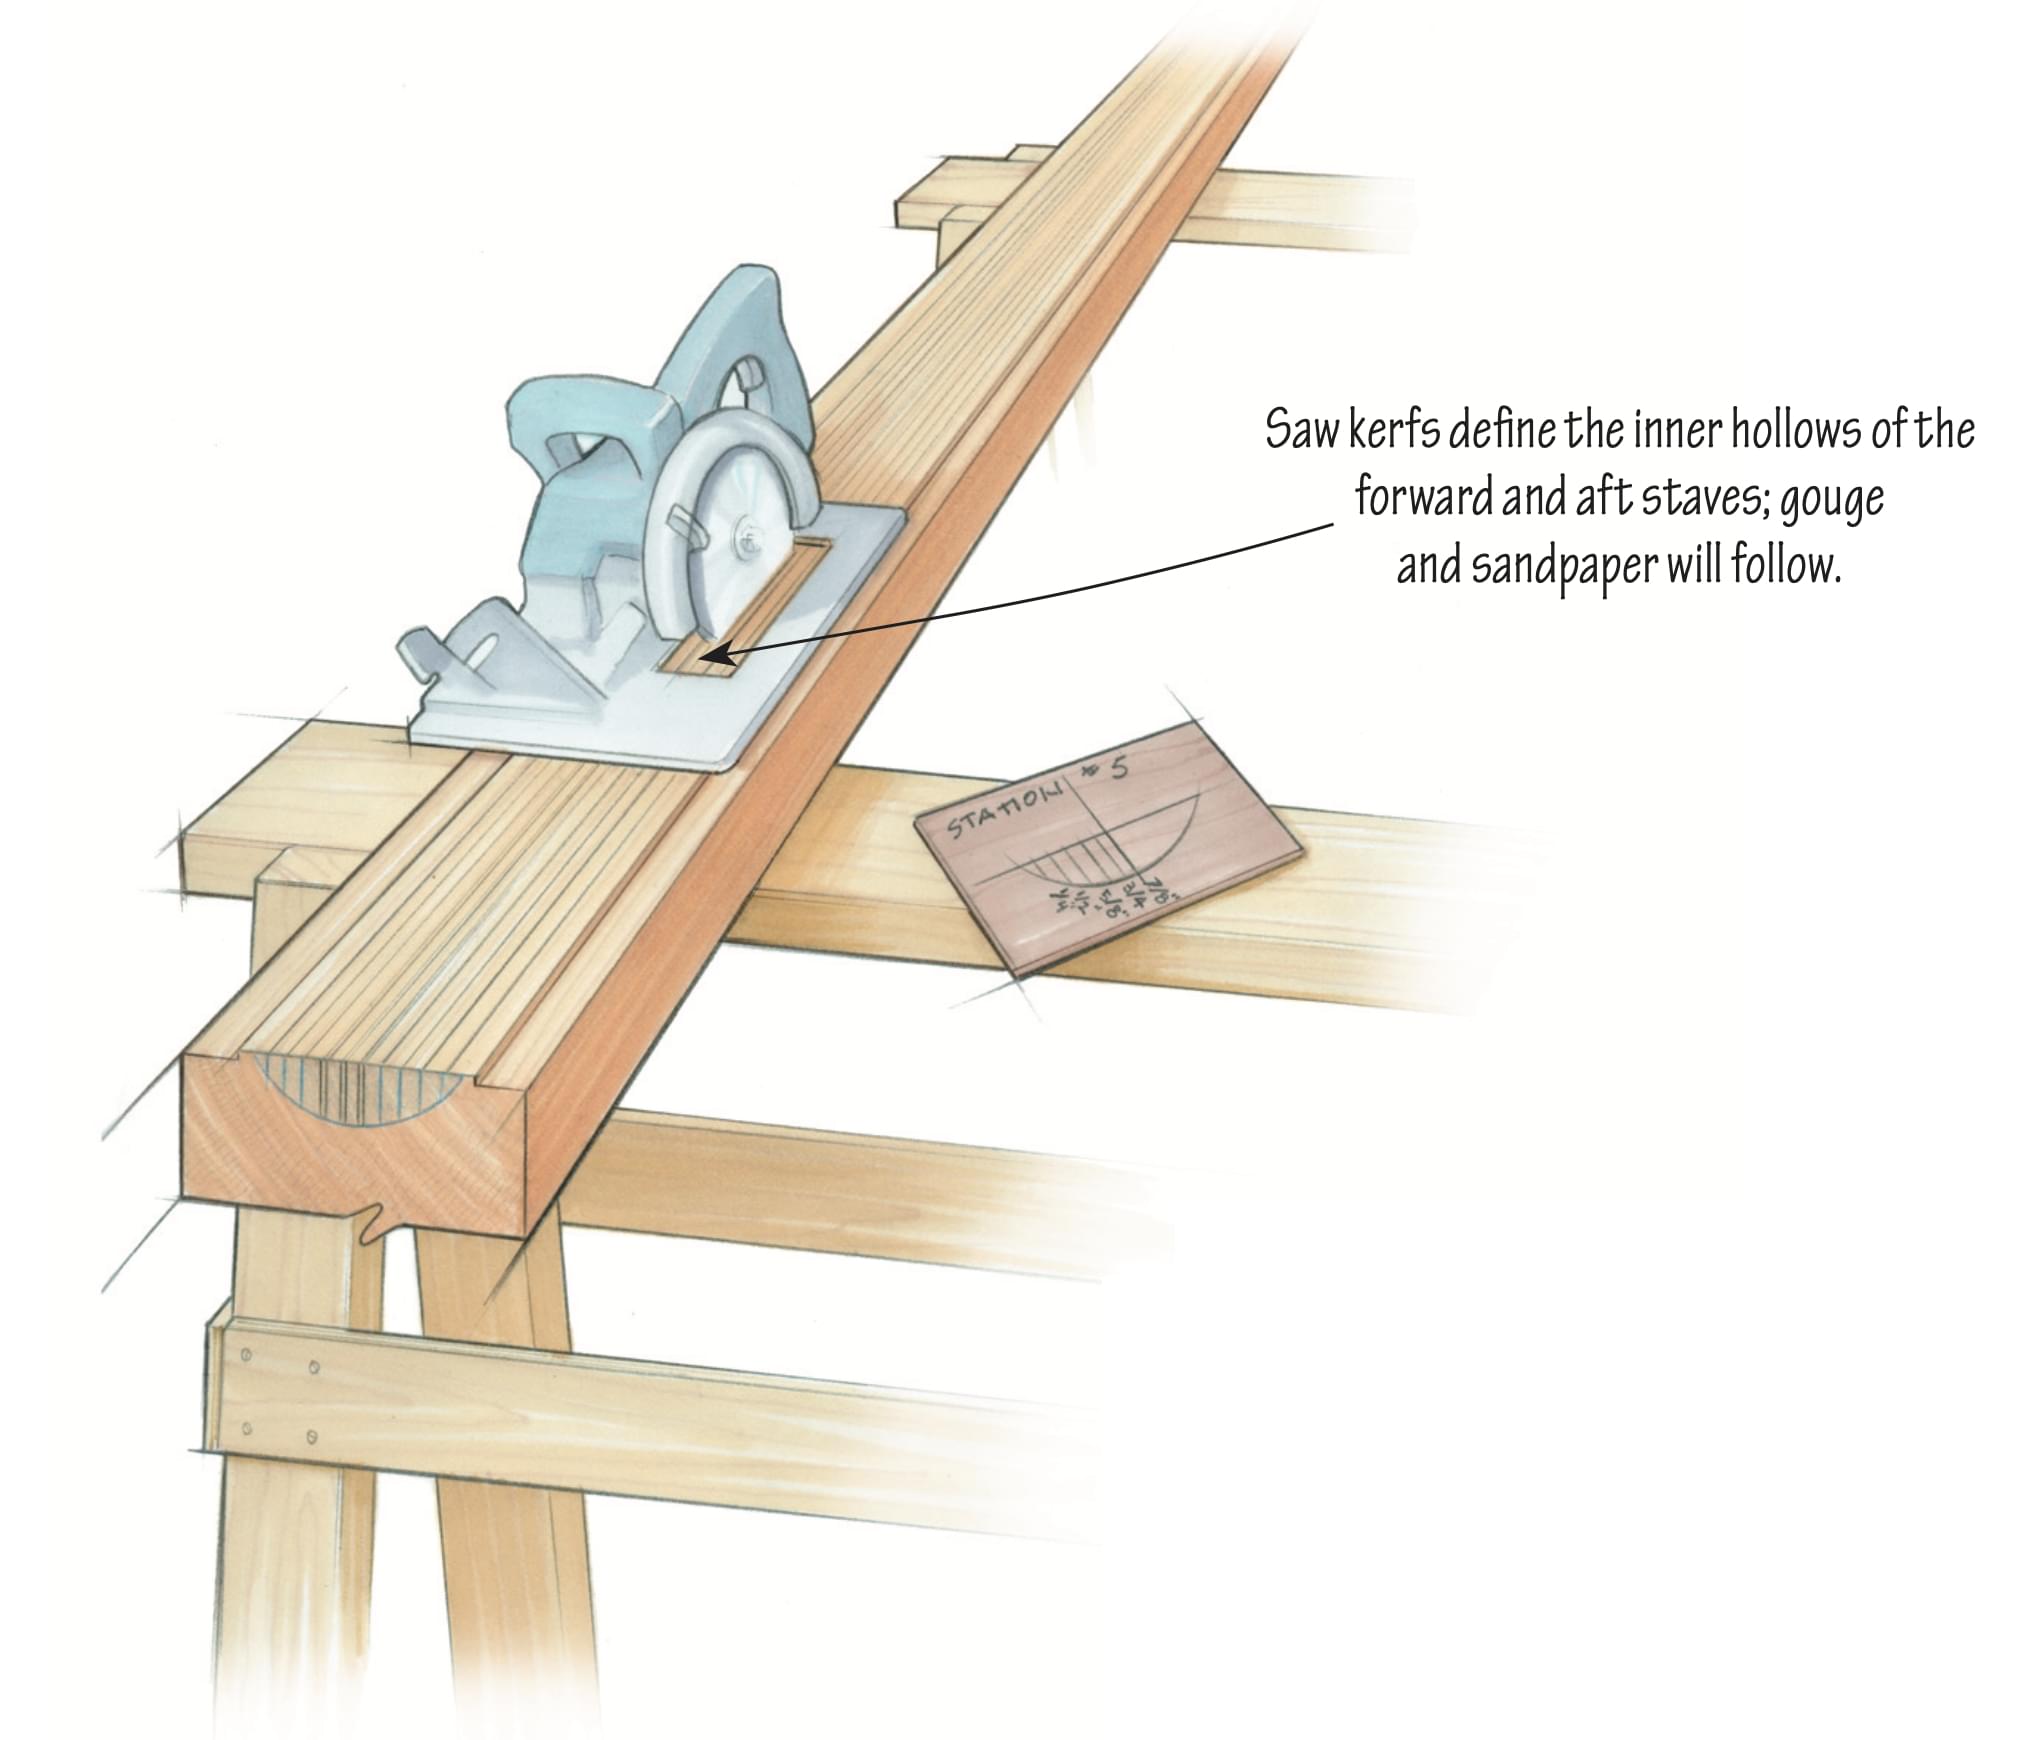
Then, using a circular saw set at the depth indicated by the lauan template, we cut kerfs in the inside face of the stave. With each pass of the saw, we reduced the depth of the cut as we moved toward the masthead and farther from the center of the stave. With the kerfs completed, we used a gouge to scoop out the waste. We arrived at the final shape by using a backing-out plane followed by 80-grit sandpaper on a round sanding block.
With the staves cut to their profiles and tapered in thickness, and the forward and after staves rabbeted and hollowed, we double checked that the spar bench was still straight. The next step was to lay the after stave on the bench, sail-track side down, and hold it straight with blocks screwed to the bench so the spar could not move. We then did a final dry-fit of the three remaining staves to make sure all joints were tight.
When satisfied with the bench and the joints, we began mixing glue. A large spar such as this takes about four people to glue up; any fewer, and panic would certainly ensue. The glue-up seems to work best as a two-step process. The first step was to glue the side staves to the after stave, using the forward stave as a dry-fitted guide to ensure that the side staves remained parallel. We clamped the spar in 1′ increments, checking that it remained square along its entire length. Using the two-step process allows ample time to fit and install the solid blocking at the head and heel of the mast. The drawing calls for blocking in the bottom 11′ of the spar and in the top 2′ 6″.
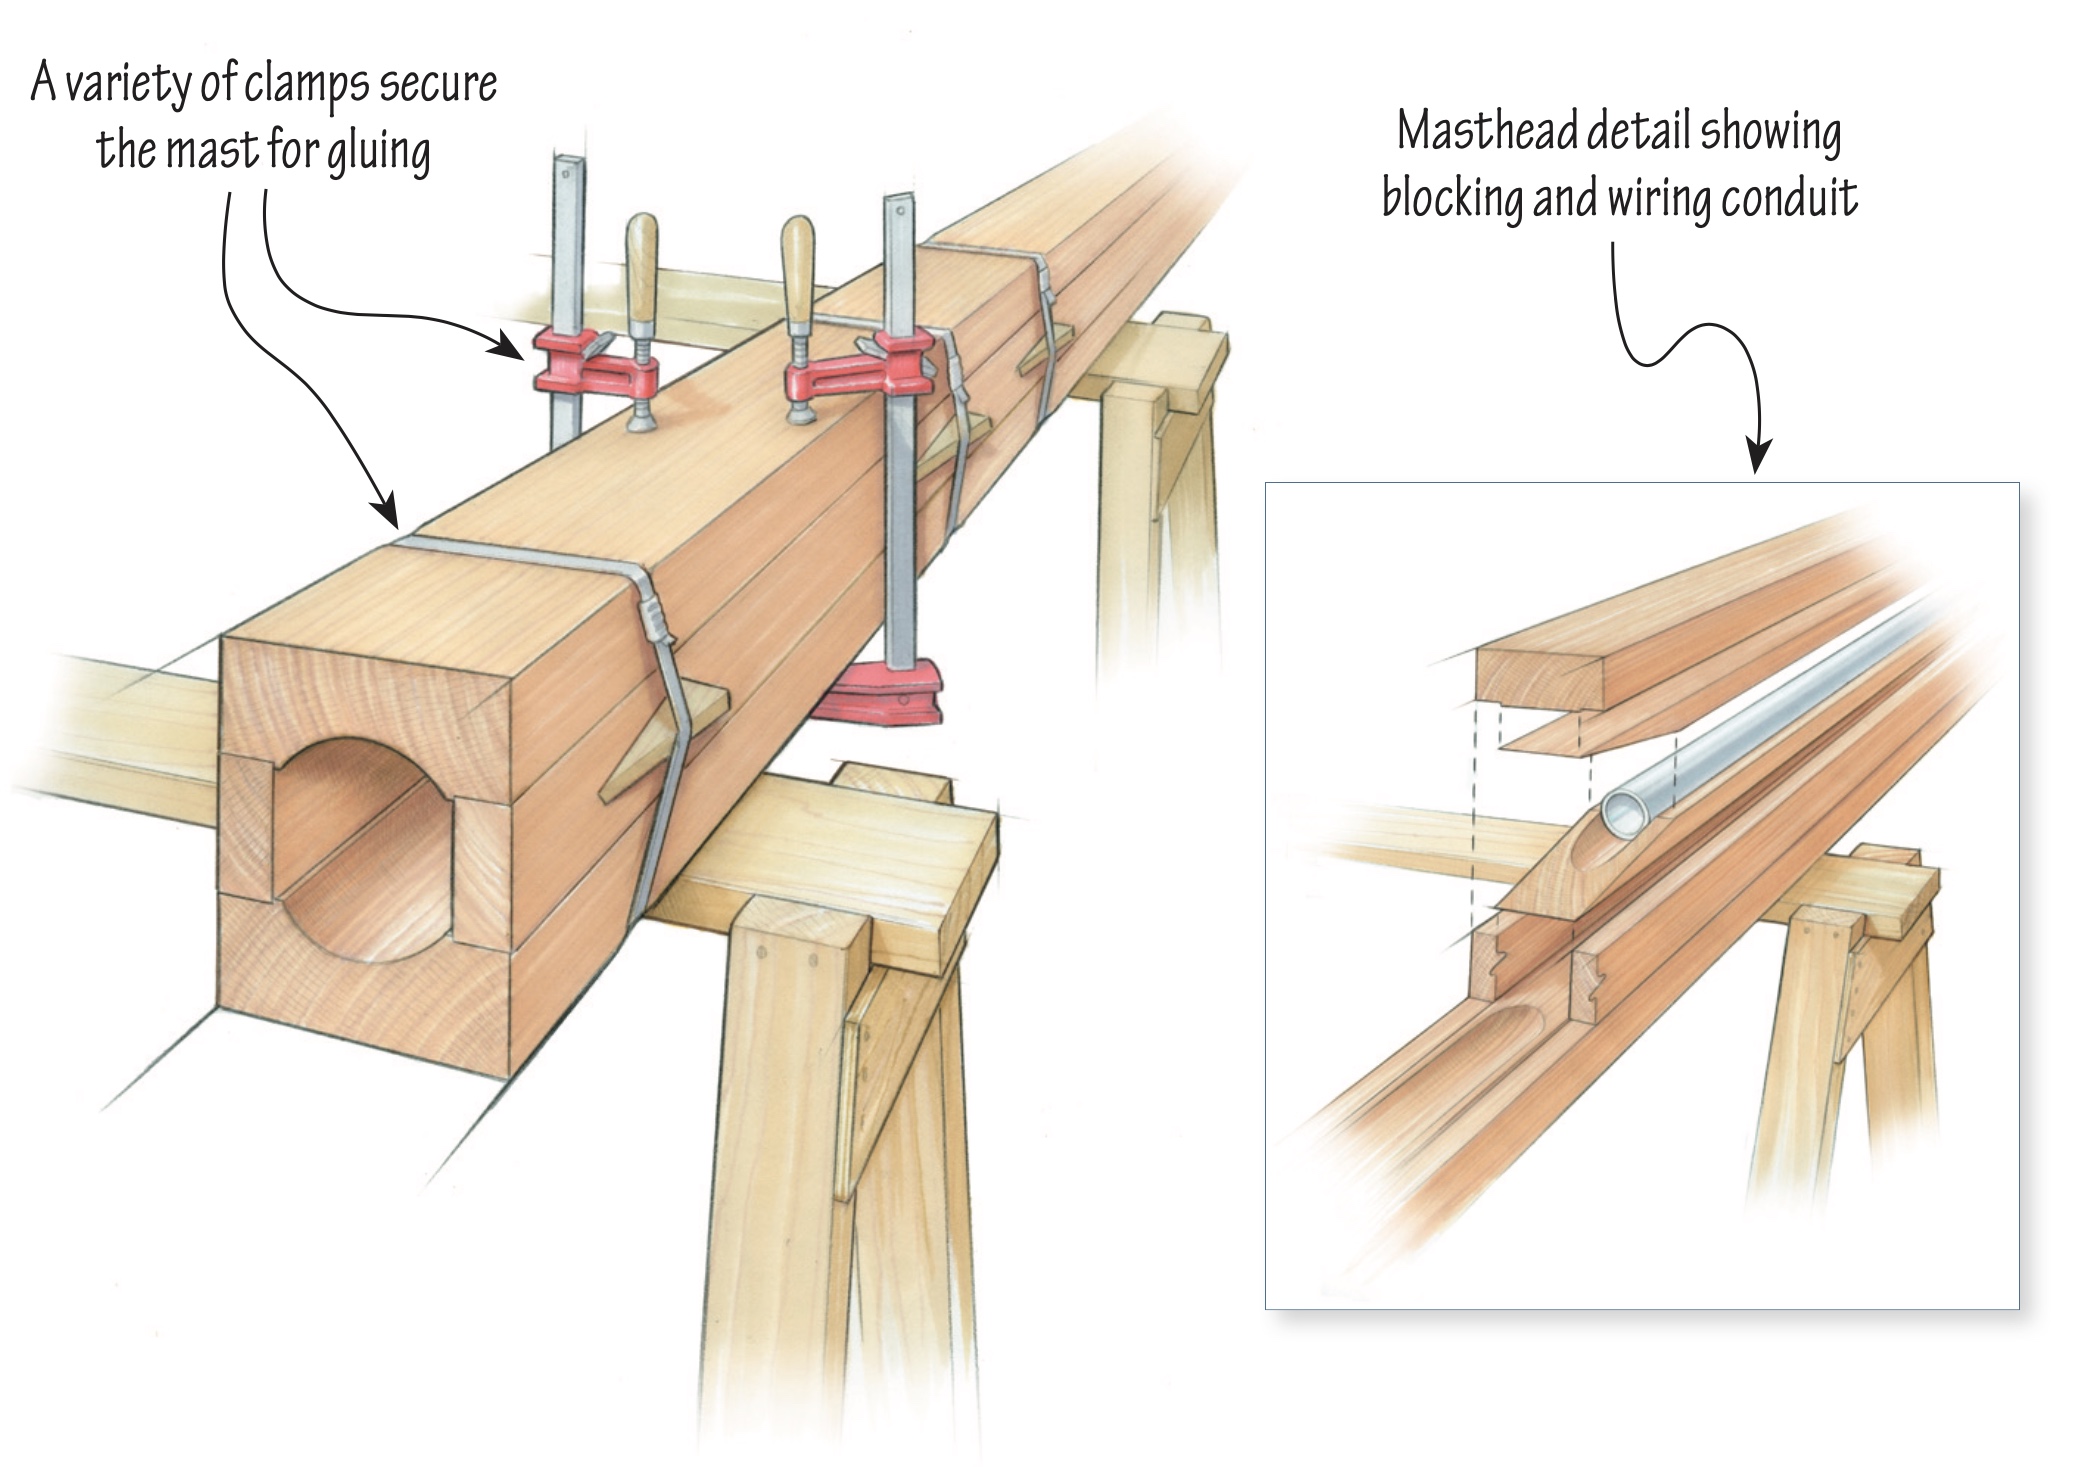
The blocking is solid until about the final foot, where it tapers to a feather edge on either side of the spar, forming a swallow-tail shape to avoid a hard spot. This heel blocking has a drain hole, in case of water intrusion. There is no blocking at the spreaders; instead, the spreaders have an external bracket and blocking system that transfers the load evenly to the spar.
We coated all interior surfaces with epoxy. At this stage, we also ran all of the wires inside the mast, securing them with large cable clamps. (Conduit fastened securely along the interior of the spar—and through the blocking—works well for this, too.) When everything was satisfactory inside the mast, the forward stave was glued to the side staves to cap the assembly. Several varieties of clamps can be used when gluing up a spar: spar clamps, bar clamps, C-clamps, or a banding tool. We used a combination of clamps and a banding tool supplemented with wedges to further tension the plastic band.
With the glue cured and the clamps off, it was time to begin the shaping process. The first step was to plane off the excess glue. With that done, we again turned to our handy lauan templates and began the process of eight-siding the spar. Using the exterior cross-section drawn on each template, we found where a 45-degree line would be tangent to the mast’s outside surface at each station. We transferred these points to the spar, and with the long batten connected them with fair lines.
We then set our circular saw to 45 degrees and made a cut, just leaving the line. Repeating this on all four sides of the mast, and then fairing up the saw cuts with a power plane followed by a hand plane, yielded an eight-sided spar. We then lined the spar off again to 16 sides, but this time we omitted the circular saw and removed the waste with only a power plane. When we had the spar 16-sided, we finished the rounding and fairing with hand planes and a custom-built concave fairing board. Once again our lauan templates came into play, as we used them to confirm the correct shape at each station. Two other details that had to be considered at this stage were the shape of the heel of the spar, and the masthead detail.
With the mast now shaped and sanded, we broke out the varnish and applied 10 coats before installing the track and hardware. We were fortunate to have all of the original tangs and other fittings for this spar, because fabricating them would have required quite a bit more work. With the spar varnished the hardware was installed, carefully bedded in soft compound. We were very careful in fastening into the Sitka spruce, as it is quite soft. We chose machine screws rather than wood screws for mounting the winches and the boom gooseneck track—after testing these fastenings on offcuts to find the best pilot-hole diameters.
This article was originally published in WoodenBoat No. 214, May/June 2010.
Related Articles
Marine plywood – a consumers guide, applying gold leaf to lettering, sheathing a plywood deck, building a classically inspired ship’s wheel, related videos, making a bird’s mouth hollow spar , the abcs of wooden spar construction, making a stem, reading boat plans, related book chapters, fitting bulkheads, laying down, subscribe for full access.
Flipbooks are available to paid subscribers only. Subscribe now or log in for access.
- For Sale/Wanted
- Readers Tips
- Your Yarns.
- Restoration
- Miscellaneous
- DIY Boat Yards
- Boat Building
- Cabin Cruisers
- Free Boat Plans
- Begin Boating
- Boating Terms
- Ropes and Rigs
- Just for Fun
- Celestial Navigation
- Passage Planning
- VHF Marine Radio
- Sailing Rigs
Wooden Mast and Spar Building
A mast or spar made from wood not only looks and feels good but it also takes advantage of the naturally ability that trees have developed over the centuries for creating a tall, strong, flexible pole.
Those tall straight pine and fir trees are able to grow to such heights and survive in wind storms because their natural elasticity absorbs the shock loads caused by gusting winds.
Structural Considerations
Solid/grown spars, rounding the square.
- Built Spars
- Your comments and suggestions

There are several reasons why soft woods are the chosen type of timber used in the making of masts and spars.
The first and most obvious is that so any soft wood trees grow exceedingly tall and straight.
And because they have grown so tall and straight they have developed the ‘elasticity’ to withstand all that the elements can throw at them.
Soft woods are also more likely to be lighter in weight.
Sitka Spruce (Silver, Tideland or Menzies Spruce) has long been the top choice for mast builders.
However many other spars have been built using whatever light, straight-grained wood was available, such as those shown below.
- Douglas fir (British Columbian, Oregon, Idaho, Red, pine also known as Red or Yellow fir)
- Scots pine (European redwood, Northern pine, Red pine, Redwood, Scots fir, Norway fir, Swedish fir, Finish fir)
- Port Orford cedar (Oregon cedar, White cedar, Ginger pine, Lawson’s cypress)
When choosing a timber look for one that is as light and straight grained as possible with, hopefully few knots.
However, a few small ones knots can be acceptable.
The timber should ideally be seasoned, especially if you are building a hollow spar.
I have heard of solid masts being made from green poles.
But green timber is more likely to develop shakes and will be less able to absorb any preservative, oil, varnish or whatever you use as a finish.
A mast/spar needs both strength and stiffness and be able to resist fatigue.
Sometimes these characteristics can be conflicting.
Strength or resistance to breaking in wood involves its elasticity which allows the wood to bend to absorb stresses.
Whereas stiffness is the resistance to bending.
All spars need to be able to absorb the shock of a gust which the wood absorbs by bending but too much bend will spoil the sail shape so a happy compromise is needed.
And stresses will differ depending on the types of rig and whether the mast keel stepped, deck stepped or in a tabernacle.
Another consideration is weight aloft.
Keeping weight within reasonable bounds is just one of the reasons for using soft woods.
It is also one reason for building a hollow mast.
However, most spars taper towards the top, as the diameter becomes smaller so the weight becomes less.
For the average cruising yacht the weight differences between a solid and a hollow spar are hardly significant.
The other advantage of the hollow, built spar is that it can be made from easily available timber sizes, and with a minimum of waste.
The simplest, easiest and least wasteful spars are produced from ‘grown’ timbers.
I theory it should be possible to acquire a trunk which has the length and taper needed for your spar.
In practice you will have to do some shaping, tapering and rounding.
While traditionally masts and spars were spherical, they don’t have to be.
However, in my opinion a spherical mast will produce the least turbulence to the air passing over the rig.

It is possible to make a spherical spar from one piece of square cross-section timber.
However, it will be much easier to source timers of smaller cross-section and then build the spar up from them.
And the advantage is that the grain can then be arranged in a radial fashion.
Building a spar from separate parts does require very careful attention to the gluing surfaces, they must be closely mating and the actual gluing must be precise.
If you are confident in your carpentry and gluing skills, short lengths can be scarffed to produce the required length.
Scarf joints are best at least ten times the thickness of the piece and when the various pieces are assembled the joints should be staggered.
And remember to never ever cut a piece of wood to its exact length until you absolutely have to.
First determine the required diameter of your spar and then where you want your it to taper and by how much.
This will depend on the design of you rig.
You may want the spar to have no taper for some of its length/height, to just above the partners, then have a slight taper, perhaps as far as the spreaders, then a bit more of a taper up to the truck.
Always best to start with the wood a little wider, thicker, and longer than the finished dimensions.
Plane one surface flat and level with your longest plane, preferably a jointer.
Then mark the center line on this planed face.
Use a string stretched between tacks in the middle of each end, use this to make several center marks on the timber.
Then join the marks using a long, straight batten.
Repeat on the opposite face.
Now use the centreline as the datum from which to mark the width of your mast at intervals along its length.
Then back to the batten to connect these marks.
You can now cut the outline of your mast to this drawn profile but cut it oversized as you still need to plane the timer square.
Now plane these two sawn, tapered faces flat and square to the original planed surface.
Repeat the steps for marking the center line and profile on these two new faces.
Cut this outline and plane these sides flat and square to their adjacent sides.
You now have a spar tapered to your requirement but it is still square in cross-section.
Now you need to start rounding the square.
So now you’ve got a nicely tapered, planed but square, four sided spar.
Next job is to plane off the four corners to give you an eight sided spar.
Then plane off those eight corners to give you a sixteen sided spar, which can then easily be rounded using sandpaper.
But before you start taking off the corners you need to mark the depth of the bevels.
The simple way is to draw a circle on the face of the timber with a compass.
The center of the circle will be on the centreline and the edge of the circle right on the edge of the face.
Then draw a line from the center of the circle, at 45 degree to the centreline and mark where it crosses the circle.
This mark is the edge of the bevel.
Do this for every transition point and as many points in between as possible, the more the merrier and do it foe both sides of the circle.
These marks can then be joined using your batten.
One you have planed the spar down to eight sides you can use the same method to mark it up for reducing it to sixteen sides.
But now the line from the center of the circle to the circumference needs to be 67 ½ degrees.
Now unless you are building a massive spar getting from 16 sides to 32 sides using the above measuring technique is going to become fiddly.
At this stage it is quicker to use your eye and your judgment to plane off the remaining corners.
Then the final rounding can be done by sanding.
Start with 60 or 80 grit paper for the initial shaping, then work the grits for finishing.
Use long strips of sandpaper wrapped around the spar and pull it backwards and forwards in a long, spiralling motion.
Occasionally sand along the length of the mast to help fair out any uneven spots.
Here is an easy way to mark out a tapered octagon using only one setting of your compass.
Building a spar is obviously much more difficult than simply shaping a solid pole.
However, if a pole of the required dimensions is not available building the spar might be the only option.
Built spars can be either solid or hollow.

But if you are building one it is relatively simple to make it hollow and thus save weight aloft and create a central channel for masthead wiring.

Building a simple cylindrical spar as those shown above from ‘square’ timbers does require wasting quite a lot of that expensive wood when 'rounding the square'.
One can build an almost waste free hollow spar which would suit a conventional bermudan rig.
However, a ‘square’ section with rounded corners such as this would be unsuitable for any rig which uses mast hoops or parrel beads or a lug rig where the spar turns against the mast.

The next problem when creating a hollow spar is that unlike the solid mast the taper cannot be created afterwards.
Any taper to the finished spar needs to be cut from the staves before they are assembled.
There have been several configurations used to increase the gluing areas across the width of built staves.

And several configurations which attempt to reduce wastage and at the same time produce large gluing surfaces.

Unfortunately while they will produce superb, strong spars they call for increasingly complex carpentry.

The ‘Birdsmouth’ technique developed by Nobles of Bristol UK is perhaps one of the most successful of these techniques.

However, it is a technique which really requires access to woodworking machinery, such as profiling and planing machines.
Setting up your standing rigging can be greatly simplified by using ‘Spectra’.
‘Spectra’ is virtually stretch free and can be tied off without much weakening.
It offers a real alternative to expensive swaged fittings, can be easily maintained and it is corrosion-free.
Previous posts
See What Others Have Posted
Recent Articles
Wooden Boat Events 2024
Apr 14, 24 05:15 AM
You might like these

Plywood and Veneer Guide for Marine use.
A guide to plywood for boat building and why you should use the best marine grade you can afford.

DIY Woodboat Building Questions
Woodboat building questions a Forum for wooden boat building, plans, lumber, caulking compounds and other boat building problems.

Boat Books for Wooden Boat Builders
Boat Books a series of boat books based on some of the 1960's, classic, Free Boat Plans that were published in magazines such as "Popular Mechanics", "Popular Science" and the "Boat Builder Handbook".

Build a Boat, tips for the DIY Wooden Boat Builder.
How to Build a Boat, Wooden Boat Building methods for the DIY, backyard, self-builders explained, carvel, lapstrake and plywood

Clench Nails, Fastening for Small Wooden Boats.
How to use Clench Nails, these provide a fast reliable method for fastening small wooden boats.

Wood Screws for Boat Building and Repair.
Wood Screws are the most widely used and versatile fasteners used on wooden boats. Which type to use and how to use them

Timber, Lumber for Boat Building.
A brief description of the most common Timber used for building Wooden Boats how to choose wood for your project boat

Timber Properties
A brief guide to timber properties and wood, characteristics such as strength, stiffness and elasticity for choosing lumber for wooden boat building and restoration.

Rivets and Copper Rove Wood Boat Fastenings.
How to use Copper Rivets and Roves construction guide to fasteners on your wooden boat.
Ring Nails for Marine Fastening.
Ring Nails sometimes call Gripfast or ring shank, silicon bronze boat nails are renowned for their holding power. but how to get them out?
14’ 1956 Chris Craft, side rail how should it be attached?
Apr 12, 24 03:38 AM

How to laminate plywood on the hull
Apr 10, 24 03:46 AM

The Dipping Lug Sail
The dipping lug sail, is perhaps the most efficient and cheapest, type of sailing rig especially for small sailboats however it isn't as handy as the standing lugger or the balanced lugsail.

UV Strip for Furling Sails
UV Strip, notes on repairing, fitting and replacing a sacrificial UV protection strip on furling sails using acrylic or UV protected Dacron.

Sailing Rigs, a Guide to Sail Shapes.
The basic shape of the Sailing Rigs most commonly found on wooden sailing boats of every size.

About sail cloth and the different materials for DIY sail making and the average leisure sailor.

Sail Balance
Notes on Sail Balance, designing a sailing rig, how set the relationship between the center of effort and the center of lateral resistance.
Lug Rigs for large and small sailboats.
Sailors have been using Lug Rigs for centuries because of their unique sailing abilities.

Junk Rig the ideal cruising sail.
How to rig a western version of the Chinese Junk Rig the basic lines and controls.

Junk Rig, How I Made My Own.
Junk Rig Sails How I built and rigged Mignonne with a Juk Sail

Junk Rig Conversion
Structural considerations for a Junk rig conversion of a wooden boat from bermudan rig to junk sail, where and how to site the mast.
Chinese Junk, the perfect cruising rig.
Chinese junk sail, why I rigged Mignonne with a Jukn Sail

Ropes and Rigs for Boating.
Boating ropes and rigs, knots, sailing, line handling and line care, what all boaters need to know.

Whipping Boat Ropes
Whipping marine ropes to prevent the ends fraying, how to use whipping twine to prevent rigging and yacht ropes from untwisting.

Splicing Three Strand Rope.
Splicing, tips and techniques, three strand eyes and rope ends, make your own dock lines why pay for something you can easily do yourself.

Rope types, what types, construction and materials to use on your boat when to use three strand and braided marine lines.

Knots for Sailors.
A brief description of and how to tie some of the most useful boating knots. Including some that every boater should know.

Handy Billy a traditional rope and sheave rig.
A Handy Billy made with two blocks and tackle can be used to give mechanical advantage wherever needed.

Blocks and Tackle lines and sheaves.
How Blocks and Tackle work to give mechanical advantage and how best to rig them.

Privacy Policy
Advertising Policy
Cookie Policy

I am perfectly aware that the majority of Wooden Boat aficionados are sensible folk. However, I need to point out that I am an amateur wooden boat enthusiast simply writing in order to try to help other amateur wooden boat enthusiasts. And while I take every care to ensure that the information in DIY Wood Boat.com is correct, anyone acting on the information on this website does so at their own risk.
May / June Issue No. 298 Preview Now
A “New” Method for Hollow Wooden Mast Construction
By reuel parker.

I have developed a “new” mast construction method for use on light- to moderate-displacement sailboats having a Marconi rig, and for motorsailers. I put “new” in quotes because I am sure it has been thought of before now.

Mast Section from step to spreaders, 9 1/2″ x 7 1/2″ outside dimensions.
The four corners of the new construction sequence are all made identical in section, from Douglas fir or Sitka spruce 3″ x 3″ lumber. The corner pieces are rounded to a 2 1/2″ diameter radius, the inner corner is cut to a 45-degree bevel (to lighten the mast), and 1/2″ x 3/4″ rabbets are cut onto two corners to receive 1/2″ marine plywood front, back and sides. The corners are epoxy scarfed (8:1) full-height. They are identical in every location, greatly simplifying construction, as all corners are cut using a table saw set to the same settings. All mast taper is made on the plywood sides, back and front.
Construction uses epoxy glue and monel or stainless steel fasteners (staples, nails or screws) 6″ on center. With proper clamping, fasteners may be eliminated altogether.
The mast section is uniform from step to spreaders (as shown above). Above the spreaders, mast section tapers parabolically to 5 1/2″ x 7 1/2″. If so desired, for further weight-savings aloft, the inside corners may be cut deeper, removing more material. Doing so will weaken the mast only very slightly.

Mast Section at Head is 5 1/2″ x 7 1/2″—taper is parabolic above spreaders.
All fore & aft mast taper is on the front only—the back of the mast is perfectly straight for its entire height unless built-in “pre-curve” is desired. [The purpose of pre-curve is to automatically flatten the sail chord for windward work as the sail is sheeted in.] A 1/2″ plywood backup block is installed inside the mast back to receive fasteners for the #1808 Harken track shown.
Plywood panels from step to spreaders are ripped on the table saw to uniform dimensions. Panels above the spreaders are ripped for parabolic taper (back edge straight for the sides). Front and back panels above the spreaders are ripped along both edges for taper. Plywood panels are scarfed 8::1. If desired, for greater durability, the mast may be wrapped in 4 oz Xynole-polyester fabric saturated with epoxy, with the seam located under the mast track (this will add weight). The inside of the mast is epoxy sealed. Wires (including lightning ground) are pulled in PVC pipe attached to a side panel prior to lay-up.
Note that in my drawings, the edges of the plywood are affected by the radii of the mast corners. When finishing shaping, the outer laminate will be abraded along the edges. Masts finished in this fashion will definitely require fabric/epoxy covering. You can avoid this by making the radius 2″ instead of 2 ½″, at the expense of a more “square” looking spar section.
For the nut-cases (I have been one) who insist on having varnished spars—make the corners (use the 2″ radius) and plywood from the same species wood; epoxy seal and apply 12 coats of varnish that has a good UV filter—I recommend using Douglas fir for the species. I generally prefer using epoxy primers covered with linear polyurethane topcoats—very durable—and almost no maintenance.
The Harken #1808 track shown uses “Battcars” designed to receive the forward ends of solid fiberglass full-length battens. The only sail cars necessary are one for each batten, and reef points are located immediately below each of the lowest three battens. This simplifies sail construction and cost, and simplifies reefing, especially when used in concert with my Basket Boom, which contains the reefed portion of the sail. Said boom (my wishbone-style Basket Boom), also uses Battcars located at the base of the track (see Boom Detail drawing below).

Spreader details.
Spreaders are made from polished 1″ stainless steel thin-wall tubing (or 3/4″ aluminum pipe) welded to 1/8″ stainless steel side and back plates. The plates are attached to the mast with 1″ x #14 flat head self-tapping screws, and are bedded with polysulfide rubber. Spreader lift angle should bisect the angle the upper shrouds make at the wingtips.

Detail of a masthead—the SS top plate is configured fore & aft for application (shown is the foremast for a schooner with equal height masts).
The masthead is made by adding solid wood sections fore & aft with a 1/2″ plywood cap to support two stainless steel straps, drilled and bent at their ends to receive shackles for stays and shrouds. Delrin sheaves (3″ Schaefer) are used for internal halyards as shown above. Sheave pins are 7/16″ SS. Dimensions shown are for masts on a 45’ motorsailer using 5/16″ shrouds, triatic stay and twin backstays, and 3/8″ forestay and main stay.
The mast construction, as drawn, is much stronger than necessary for the specific application intended (Motorsailer 45), and the solid corners could be made from 2x4s (as described below), in lieu of the 3x3s shown. This would save materials costs, and to a lesser extent, labor. I would stress, however, that air-dried wood is much preferable to kiln-dried wood for durability and rot-resistance. If using kiln-dried wood, I would be very thorough in epoxy sealing the mast interior, and I would cover the finished mast with Xynole-polyester fabric and epoxy. As always, great care should be taken with bedding compounds (these days I mostly use Bostik #920, above and below the waterline).

Basket Boom details.
I developed a new type of boom several years ago to utilize the Harken track. The upper portion is a “wishbone” boom, which clears both sides of the sail. The lower portion eliminates the need for a vang. When the sail is dropped, it falls inside the “basket”, which may have lacing on each side (not shown) to contain the sail and battens. A sail cover may be placed inside the basket boom with a top covering panel secured by Velcro. The boom could alternately be fabricated from polished stainless steel, using 1-1/2″ thin-wall tubing.
The basket boom uses two Harken Battcars at each attachment point (upper & lower), and should incorporate a downhaul to increase luff tension. In adapting this boom to other vessels, note that the wishbone must be designed to contact the after shroud (when reaching or running) before it touches the mast to prevent damaging the track and fasteners.

The new mast construction is intended for the Motorsailer 45 shown above, but may be employed on any light- to moderate-displacement vessel in this size range using the Marconi rig and single (or double) spreaders.
The new masts may be tabernacled, deck-stepped (over compression posts), or keel stepped. The overall weight of these masts will be as light or lighter than that for aluminum masts of equivalent strength .
For lighter loads or for even lighter-weight masts, corners may be made from 2x4s (on the flat at 45 degrees); and sides, front and back may be made from 3/8″ 5-ply marine plywood (such as Shelman or Joubert). Smaller masts and spars can use the same construction, with scantlings down-sized appropriately. Fabric/epoxy covering will prolong mast life, but is not particularly necessary structurally. All fasteners penetrating the finished mast should be either sleeved (bolts for shroud attachment) or carefully bedded using flexible, UV-resistant compound.
I know carbon-fiber masts are all the rage now, but I still firmly believe that well-designed and –made wood/epoxy masts are the overall best in terms of light-weight, strength, durability and low cost. A mast made using the above method will cost a fraction of an equivalent mast in carbon fiber or aluminum, and it will be more durable. As I keep telling people, aluminum is good for beer cans!
4/2/2014 St. Lucie Village, FL
ACCESS TO EXPERIENCE
Subscribe today.
Publishing dynamic editorial content on boat design construction, and repair for more than 40 years.
1 YEAR SUBSCRIPTION (6 ISSUES)
Print $39.95, digital $28.00, print+digital $42.95, from online exclusives, extended content.

Restoring Rambler

WoodenBoat Live with Reuben Smith

Antarktische Wildnis: Südgeorgien

Restoring KATIE MACK
From the community, boat launchings.

SHADOW of Gig Harbor, Wa USA. Maiden voyage April 14th, 2024.

1915 Stephens Brothers lake union
DEATH IN FAMILY. MUST SELL !

1942 copy of a Herreshoff Buzzards Bay Boat
Built on Deer Isle in 1942 , it has an 800 pound steel keel, 4 foot draft.

1956 39' Concordia Masthead Yawl $10,500
This vessel received a complete refit in 2007-2008 including re-powering, new decks, new standing
WOODEN BOW TIES
How to build a wooden sailboat: a beginner's guide.
Are you interested in building your own sailboat? If so, building a wooden sailboat can be a rewarding and fulfilling experience. Not only will you have a unique vessel to call your own, but you’ll also learn valuable woodworking skills along the way.
To get started, you’ll need to gather the necessary materials and tools. This may include oak plywood, epoxy resin and hardener, thickener, brad nails, masking tape, a pull-saw, and a table saw. Once you have everything you need, you can begin the process of building your sailboat. From creating a jig and frame assembly to making the mast, there are many steps involved in building a wooden sailboat. But with patience and attention to detail, you can create a beautiful and functional vessel that will bring you joy for years to come.
Understanding the Basics of a Wooden Sailboat
If you are interested in building a wooden sailboat, it’s important to understand the basics of how a sailboat is constructed. In this section, we’ll cover the parts of a wooden sailboat and the different types of wooden sailboats.
Parts of a Wooden Sailboat
A wooden sailboat is made up of several parts, each with its own unique function. Here are some of the most important parts:
- Hull : The hull is the main body of the boat. It is the part of the boat that sits in the water and provides buoyancy.
- Keel : The keel is a long, narrow fin that extends down from the bottom of the hull. It helps to keep the boat from capsizing by providing stability.
- Rudder : The rudder is a flat piece of wood or metal that is attached to the back of the boat. It helps to steer the boat.
- Mast : The mast is a tall, vertical pole that supports the sails.
- Sails : The sails are large pieces of fabric that are attached to the mast and other parts of the boat. They catch the wind and propel the boat forward.
- Boom : The boom is a horizontal pole that is attached to the bottom of the mast. It helps to control the shape of the sail.
Types of Wooden Sailboats
There are many different types of wooden sailboats, each with its own unique characteristics. Here are some of the most common types:
- Dinghy : A dinghy is a small sailboat that is typically used for recreational sailing or racing.
- Sloop : A sloop is a sailboat with a single mast and a fore-and-aft rig.
- Ketch : A ketch is a sailboat with two masts, with the main mast taller than the mizzen mast.
- Yawl : A yawl is a sailboat with two masts, with the mizzen mast located aft of the rudder post.
When choosing a type of wooden sailboat to build, it’s important to consider your needs and experience level. A dinghy is a good choice for beginners, while a ketch or yawl may be more suitable for experienced sailors.
By understanding the basics of a wooden sailboat and the different types available, you can make an informed decision about which type of boat to build.
Choosing the Right Materials
When building a wooden sailboat, choosing the right materials is crucial to ensure the boat’s durability and performance. In this section, we will discuss the two most important materials you’ll need to choose: wood and sails/rigging materials.
Selecting the Right Wood
Choosing the right type of wood for your sailboat is critical. You want a wood that is strong, lightweight, and resistant to rot and decay. Some of the most popular types of wood used in sailboat building include:
- Cedar: Lightweight and easy to work with, cedar is an excellent choice for planking and decking.
- Mahogany: Strong and durable, mahogany is often used for building frames and keels.
- Oak: A dense and hard wood, oak is commonly used for building frames and planking.
When selecting your wood, make sure it is free of knots, cracks, and other defects that could weaken the boat’s structure. You should also consider the wood’s grain pattern, as this can affect the boat’s strength and appearance.
Choosing Sails and Rigging Materials
The type of sails and rigging materials you choose will depend on the type of sailboat you’re building and your sailing needs. Some of the most common materials used in sail and rigging construction include:
- Dacron: A strong and durable synthetic material, dacron is commonly used for sailcloth.
- Nylon: Lightweight and flexible, nylon is often used for spinnaker sails.
- Stainless Steel: Strong and corrosion-resistant, stainless steel is commonly used for rigging hardware.
When selecting your sails and rigging materials, consider the conditions you’ll be sailing in and the type of sailing you’ll be doing. For example, if you’ll be racing, you may want to choose lightweight sails and rigging materials that will help you achieve maximum speed. On the other hand, if you’ll be cruising, you may want to choose more durable materials that can withstand rougher conditions.
By choosing the right materials for your wooden sailboat, you can ensure that your boat is strong, durable, and performs well on the water.
Designing Your Sailboat
Before you start building your wooden sailboat, you need to design it. This will involve creating a blueprint and determining the size and shape of your boat.
Creating a Blueprint
Creating a blueprint is an essential step in designing your sailboat. It will help you visualize your boat and ensure that you have all the necessary components in place. You can create a blueprint using software such as AutoCAD or SketchUp, or you can draw it by hand.
When creating your blueprint, consider the following:
- The length, width, and height of your boat
- The position of the mast and sails
- The location of the rudder and keel
- The number of cabins and their layout
- The placement of any storage compartments or equipment
Determining the Size and Shape
The size and shape of your sailboat will depend on several factors, including your budget, the type of sailing you plan to do, and the number of people who will be on board.
Consider the following when determining the size and shape of your sailboat:
- The type of sailing you plan to do (coastal cruising, racing, etc.)
- The number of people who will be on board
- The amount of storage space you will need
- The amount of deck space you will need
- Your budget
Once you have determined the size and shape of your sailboat, you can start gathering materials and building your boat.
Building the Hull
When building a wooden sailboat, the hull is the most important part of the boat. It is the main structure that holds everything together and keeps the boat afloat. Building the hull requires cutting and assembling the wooden frame.
Cutting the Wood
To begin building the hull, you will need to cut the wood into the appropriate sizes and shapes. The wood should be cut according to the plans or blueprints that you have created. You can use a saw or a jigsaw to make the cuts.
It is important to use high-quality wood that is free of knots or other defects. The wood should be strong enough to withstand the pressure and weight of the water. Common types of wood used for building a wooden sailboat include cedar, oak, and mahogany.
Assembling the Frame
Once you have cut the wood, you can begin assembling the frame of the hull. The frame is made up of vertical pieces of wood called frames, which hold the shape of the boat. The frames are attached to the keel, which is the main structure that runs down the center of the boat.
To assemble the frame, you will need to use a sawhorse or other support to hold the lumber in place. You can then use screws or bolts to attach the frames to the keel. It is important to ensure that the frames are level and straight.
After the frames are attached to the keel, you can add the planks to the hull. The planks are attached to the frames and keel using screws or nails. It is important to ensure that the planks are properly aligned and spaced.
Once the planks are attached, you can sand and finish the hull to give it a smooth and polished look. This will also help to protect the wood from the elements.
Building the hull of a wooden sailboat requires patience and attention to detail. With the right tools and materials, you can create a strong and beautiful hull that will last for years to come.
Installing the Deck and Cabin
Installing the deck and cabin of your wooden sailboat is a crucial step in the construction process. It not only adds to the aesthetics of your boat but also provides structural support. Here are some tips to help you through the process.
Deck Installation
The deck of your wooden sailboat should be installed after the hull has been completed and before the cabin is built. It is important to ensure that the deck is watertight to prevent any leaks. Here are the steps to follow when installing the deck:
- Cut the deck to fit the hull and sand the edges to ensure a tight fit.
- Apply a layer of epoxy to the hull and deck joint to seal it.
- Secure the deck to the hull using screws or bolts.
- Apply a layer of fiberglass cloth and epoxy to the deck to make it watertight.
- Sand the surface of the deck to prepare it for painting or varnishing.
Cabin Installation
The cabin of your wooden sailboat provides shelter and storage space. It is important to ensure that it is properly installed to prevent any leaks. Here are the steps to follow when installing the cabin:
- Build the cabin on a flat surface using marine-grade plywood.
- Cut the cabin to fit the deck and hull and sand the edges to ensure a tight fit.
- Apply a layer of epoxy to the cabin and deck joint to seal it.
- Secure the cabin to the deck using screws or bolts.
- Apply a layer of fiberglass cloth and epoxy to the cabin to make it watertight.
- Install any windows, hatches, or doors in the cabin.
- Sand the surface of the cabin to prepare it for painting or varnishing.
By following these steps, you can ensure that your wooden sailboat’s deck and cabin are properly installed and watertight. This will not only make your boat look great but also ensure that you have a safe and enjoyable sailing experience.
Setting Up the Mast and Sails
Now that you have built your wooden sailboat, it is time to set up the mast and sails. This process may seem daunting, but with a little patience and attention to detail, you can have your boat ready to sail in no time.
Step 1: Install the Mast
The first step is to install the mast. Depending on the design of your boat, the mast may be a single piece or assembled from multiple sections. Make sure the mast is secured properly and is straight. Use a level to ensure the mast is vertical in both directions.
Step 2: Prepare the Sails
Next, prepare the sails. Make sure the sails are clean and free of any debris or damage. Attach the sail to the mast using the halyard, which is a rope used to raise and lower the sail. Make sure the sail is hoisted all the way to the top of the mast.
Step 3: Attach the Boom
Attach the boom to the mast and secure it with a boom vang, which is a rope used to control the angle of the boom. The boom is the horizontal spar that holds the bottom edge of the sail.
Step 4: Set the Sail
Once the boom is attached, set the sail. Adjust the angle of the boom and the sail to catch the wind and start moving. You can use the main sheet to control the angle of the sail and the boat’s speed.
Step 5: Trim the Sail
Finally, trim the sail to optimize its performance. This involves adjusting the sail’s shape and position to maximize its power and minimize drag. Use the sail controls, such as the cunningham and outhaul, to adjust the sail’s shape. Use the main sheet to control the sail’s position relative to the wind.
Congratulations! You have successfully set up the mast and sails of your wooden sailboat. Now it’s time to hit the water and enjoy the thrill of sailing.
Applying Finishing Touches
When it comes to building a wooden sailboat, applying the finishing touches is a crucial step that can make all the difference in the final product. Here are some tips and tricks to help you get the perfect finish.
Sanding and Finishing
Before you can apply any finish, you need to make sure the surface is smooth and free of imperfections. This means sanding the wood with progressively finer grits of sandpaper until you achieve the desired smoothness. Once you’ve finished sanding, you can apply a wood conditioner to help the wood absorb the finish more evenly.
When it comes to choosing a finish, you have several options. Some popular choices include varnish, paint, and oil. Varnish is a popular choice for wooden boats because it provides a durable, glossy finish that can withstand the harsh marine environment. Paint is another option, but it requires more maintenance than varnish and may not provide as much protection against the elements. Oil is a good choice if you want a more natural look, but it may not provide as much protection as varnish or paint.
Painting and Varnishing
If you decide to go with paint or varnish, there are a few things to keep in mind. First, make sure you apply the finish in a well-ventilated area to avoid inhaling fumes. Second, make sure you apply thin, even coats and allow each coat to dry completely before applying the next. This will help prevent drips and ensure a smooth finish.
When it comes to varnishing, it’s important to use a high-quality brush and work quickly to avoid brush marks. You may also want to consider using a foam brush for hard-to-reach areas. Once you’ve applied the final coat of varnish, you can buff the surface with a soft cloth to achieve a high-gloss finish.
Painting requires a different approach. You’ll need to choose the right type of paint for your boat and make sure you apply it evenly. If you’re painting a large area, you may want to consider using a paint sprayer to achieve a smooth, even finish. Once the paint has dried, you can apply a clear coat to protect the paint and give it a glossy finish.
In conclusion, applying the finishing touches to your wooden sailboat is an important step that requires careful attention to detail. By following these tips and using the right tools and materials, you can achieve a beautiful, long-lasting finish that will protect your boat and make it stand out on the water.
Safety Measures
When building a wooden sailboat, safety should always be your top priority. Here are some safety measures you should take to ensure a safe and successful build.
Installing Safety Equipment
Before you start building, make sure you have all the necessary safety equipment installed in your workshop. This includes fire extinguishers, smoke detectors, and first aid kits. You should also have a clear and unobstructed path to the exit in case of an emergency.
When working with power tools, always wear eye and ear protection, as well as a dust mask to protect your lungs. If you are using chemicals, make sure you are working in a well-ventilated area and wear gloves and a respirator if necessary.
Conducting a Safety Check
Before you start working on your sailboat, conduct a safety check to make sure everything is in order. Check that all tools and equipment are in good working order and that there are no loose or damaged parts. Make sure your work area is clean and free of clutter, and that all cords and cables are properly secured.
When working with wood, be aware of any knots or cracks in the wood that could weaken the structure of your sailboat. Use only high-quality marine-grade wood and be sure to follow the plans carefully to ensure a strong and safe boat.
By following these safety measures, you can ensure that your wooden sailboat build is a safe and enjoyable experience.
Maintaining Your Wooden Sailboat
Congratulations on building your own wooden sailboat! Now that you have a beautiful vessel, it’s important to keep it well-maintained to ensure its longevity and safety on the water.
Regular Maintenance
Regular maintenance is essential to keep your wooden sailboat in top condition. Here are some tips to keep in mind:
- Clean your boat regularly with a mild soap and water to prevent dirt and grime buildup.
- Check for any signs of damage, such as cracks, rot, or loose fittings, and address them promptly.
- Apply a fresh coat of varnish or paint every few years to protect the wood from the elements.
- Keep your boat covered when not in use to protect it from the sun and rain.
Seasonal Maintenance
In addition to regular maintenance, there are also some seasonal tasks that you should perform to keep your wooden sailboat in top condition:
- At the beginning of the season, inspect the hull for any damage or wear and make any necessary repairs.
- Check the rigging and sails to make sure they are in good condition and make any necessary repairs or replacements.
- Before storing your boat for the winter, make sure to properly winterize it to protect it from the cold and moisture.
Additional Tips
Here are some additional tips to keep in mind when maintaining your wooden sailboat:
- Use high-quality marine-grade products when cleaning and maintaining your boat.
- Avoid using harsh chemicals or abrasive materials that can damage the wood.
- Regularly check the bilge for any water buildup and pump it out as needed.
- Keep your boat well-ventilated to prevent moisture buildup and mold growth.
By following these tips, you can keep your wooden sailboat in top condition and enjoy many years of safe and fun sailing.
Leave a Reply Cancel reply
You must be logged in to post a comment.
- Navigating the High Seas: A Comprehensive Guide to Sailboat Masts
Sailboat masts are the unsung heroes of the sailing world, silently supporting the sails and ensuring a smooth journey across the open waters. Whether you're a seasoned sailor or a novice, understanding the intricacies of sailboat masts is essential for a safe and enjoyable voyage. In this comprehensive guide, we will delve into the world of sailboat masts, discussing their types, maintenance, and everything in between.
Types of Sailboat Masts
Sailboat masts come in various configurations, each with its advantages and drawbacks. The two primary types are keel-stepped and deck-stepped masts.
Keel-Stepped Masts
Keel-stepped masts are the most common type, extending through the deck and resting on the boat's keel. They provide excellent stability and are suitable for larger sailboats. However, they require careful maintenance to prevent water intrusion into the boat's cabin.
Deck-Stepped Masts
Deck-stepped masts rest on the deck of the boat, making them easier to install and remove. They are commonly found on smaller sailboats and are more forgiving in terms of maintenance. However, they may offer slightly less stability than keel-stepped masts.
Components of a Sailboat Mast
To understand mast maintenance better, it's essential to know the various components of a sailboat mast. The key parts include the masthead, spreaders, shrouds, and halyard sheaves.
The masthead is the topmost section of the mast, where the halyards are attached to raise and lower the sails. It also often houses instruments such as wind indicators and lights.
Spreaders and Shrouds
Spreaders are horizontal supports attached to the mast to help maintain the proper angle of the shrouds (cables or rods that provide lateral support to the mast). Properly adjusted spreaders and shrouds are crucial for mast stability and sail performance.
Mast Materials: Choosing the Right One
Sailboat masts are typically constructed from three primary materials: aluminum, wood, and carbon fiber. Each material has its unique characteristics and is suited to different sailing preferences.
Aluminum Masts
Aluminum masts are lightweight, durable, and relatively easy to maintain. They are commonly used in modern sailboats due to their cost-effectiveness and longevity.
Wooden Masts
Wooden masts, while classic and beautiful, require more maintenance than other materials. They are best suited for traditional or vintage sailboats, where aesthetics outweigh convenience.
Carbon Fiber Masts
Carbon fiber masts are the pinnacle of mast technology. They are incredibly lightweight and strong, enhancing a sailboat's performance. However, they come at a premium price.
Mast Maintenance
Proper mast maintenance is essential for safety and longevity. Regular cleaning, inspection, and addressing minor issues promptly can prevent costly repairs down the line.
Cleaning and Inspection
Regularly clean your mast to remove salt, dirt, and grime. Inspect it for signs of corrosion, wear, or damage, paying close attention to the masthead, spreaders, and shrouds.
Common Repairs and Their Costs
Common mast repairs include fixing corroded areas, replacing damaged spreaders, or repairing shrouds. The cost of repairs can vary widely, depending on the extent of the damage and the materials used.
Extending the Lifespan of Your Mast
Taking steps to prevent damage is essential. Avoid over-tightening halyards, protect your mast from UV radiation, and keep an eye on corrosion-prone areas.
Read our top notch articles on topics such as sailing , sailing tips and destinations in our Magazine .
Stepping and Unstepping a Mast
Stepping and unstepping a mast is a crucial skill for any sailboat owner. This process involves removing or installing the mast on your boat. Here's a step-by-step guide for safe mast handling.
Step-by-Step Guide for Safe Mast Handling
- Gather the necessary tools and equipment.
- Disconnect all electrical and rigging connections.
- Use a crane or mast-stepping system to safely lower or raise the mast.
- Secure the mast in its proper place.
- Reconnect all electrical and rigging connections.
When and Why to Unstep a Mast
You may need to unstep your mast for various reasons, such as transporting your sailboat or performing extensive maintenance. It's crucial to follow the manufacturer's recommendations and ensure a safe unstepping process.
Sailboat Mast Boot: Protecting Your Mast
A mast boot is a simple yet effective way to protect your mast from water intrusion and damage caused by the elements. Here's what you need to know.
The Purpose of a Mast Boot
A mast boot is a flexible material that wraps around the mast at the deck level. It prevents water from entering the cabin through the mast opening, keeping your boat dry and comfortable.
Installing and Maintaining a Mast Boot
Installing a mast boot is a straightforward DIY task. Regularly inspect and replace it if you notice any signs of wear or damage.
Replacing a Sailboat Mast
Despite your best efforts in maintenance, there may come a time when you need to replace your sailboat mast. Here's what you should consider.
Signs That Your Mast Needs Replacement
Common signs include severe corrosion, structural damage, or fatigue cracks. If your mast is beyond repair, it's essential to invest in a replacement promptly.
The Cost of Mast Replacement
The cost of mast replacement can vary significantly depending on the type of mast, materials, and additional rigging needed. It's advisable to obtain multiple quotes from reputable marine professionals.
Yacht Masts: Sailing in Style
For those looking to take their sailing experience to the next level, upgrading to a yacht mast can be a game-changer.
Differences Between Sailboat and Yacht Masts
Yacht masts are typically taller and offer enhanced sail performance. They are often equipped with advanced rigging systems and technology for a more luxurious sailing experience.
Upgrading to a Yacht Mast
Consult with a marine professional to determine if upgrading to a yacht mast is feasible for your sailboat. It can be a significant investment but can transform your sailing adventures.
Sailboat Mast Steps: Climbing to the Top
Mast steps are handy additions to your mast, allowing easier access to perform maintenance or enjoy panoramic views. Here's how to use them safely.
Using Mast Steps Safely
Always use proper safety equipment when climbing mast steps. Make sure they are securely attached to the mast and regularly inspect them for wear or damage.
The Advantages of Mast Steps
Mast steps provide convenience and accessibility, making sailboat maintenance tasks more manageable. They also offer an elevated vantage point for breathtaking views while at anchor.
Mast Maintenance Tips for Beginners
If you're new to sailboat ownership, these mast maintenance tips will help you get started on the right foot.
Essential Care for First-Time Sailboat Owners
- Establish a regular maintenance schedule.
- Seek advice from experienced sailors.
- Invest in quality cleaning and maintenance products.
Preventing Common Mistakes
Avoid common pitfalls, such as neglecting inspections or using harsh cleaning agents that can damage your mast's finish.
Sailing with a Mast in Top Condition
A well-maintained mast contributes to a safer and more enjoyable sailing experience. It enhances your boat's performance and ensures you can rely on it in various weather conditions.
How a Well-Maintained Mast Improves Performance
A properly maintained mast helps maintain sail shape, reducing drag and improving speed. It also ensures that your rigging remains strong and secure.
Safety Considerations
Never compromise on safety. Regularly inspect your mast, rigging, and all associated components to prevent accidents while at sea.
Sailboat masts are the backbone of any sailing adventure, and understanding their intricacies is crucial for a successful voyage. From choosing the right mast material to proper maintenance and upgrading options, this guide has covered it all. By following these guidelines, you can sail the high seas with confidence, knowing that your mast is in top condition.
So what are you waiting for ? Take a look at our range of charter boats and head to some of our favourite sailing destinations .

The Ultimate Guide: How to Make a Sailboat – A Step-by-Step Tutorial
Alex Morgan

Making a sailboat can be an exciting and rewarding project for those who love the thrill of the open water. Whether you’re an experienced sailor or a beginner, building your own sailboat allows you to customize the design and create a vessel that suits your needs. This guide will take you through the step-by-step process of making a sailboat, from gathering materials and tools to launching and testing the final product.
Introduction to Making a Sailboat
Building a sailboat is a complex and intricate endeavor that requires careful planning, attention to detail, and a love for craftsmanship. In this article, we will explore the various steps involved in making a sailboat, including gathering materials and tools, designing and planning the sailboat, constructing the hull, building and rigging the sail, adding finishing touches, and finally, launching and testing the sailboat.
Gathering Materials and Tools
Before diving into the construction process, it is essential to gather all the necessary materials and tools. We will discuss the essential materials required for building a sailboat, such as wood, fiberglass, epoxy resin, and fasteners. we will explore the various tools needed, including saws, drills, clamps, and measuring instruments. Having the right materials and tools is crucial for a successful sailboat-building project.
Designing and Planning the Sailboat
When it comes to designing a sailboat, there are several factors to consider. We will delve into these considerations, including the type of sailboat, its intended use, and the desired performance characteristics. We will discuss how to create a blueprint or design plan that outlines the specific dimensions, layout, and structural details of the sailboat.
Constructing the Hull
The hull is the foundation of any sailboat, providing buoyancy and stability on the water. We will explore the process of building the framework of the hull, including shaping and assembling the different components. we will discuss the techniques used for planking the hull, such as carvel planking or cold-molded construction.
Building and Rigging the Sail
The sail is a vital component of a sailboat, harnessing the power of the wind to propel the vessel forward. We will discuss the materials required for constructing the sail, including fabric, battens, and hardware. we will cover the steps involved in assembling and attaching the sail to the sailboat, ensuring proper rigging for optimal performance.
Finishing Touches and Final Steps
To add the finishing touch to your sailboat, there are several details to consider. We will explore how to add decorative elements and functional accessories to enhance the overall appearance and functionality of the vessel. we will discuss the steps involved in painting and varnishing the sailboat, protecting it from the elements and giving it a polished finish.
Launching and Testing the Sailboat
After months of hard work and dedication, it’s time to launch your sailboat and test its performance on the water. We will guide you through the necessary preparations before the first launch, including ensuring the boat is properly balanced and rigged. we will discuss the safety precautions to follow when testing the sailboat, ensuring a smooth and enjoyable sailing experience.
By following this comprehensive guide, you will gain the knowledge and confidence to embark on your sailboat-building journey. So, let’s set sail on this exciting adventure of creating your very own sailboat.
Key takeaway:
- Making a sailboat maximizes creativity: Building your own sailboat allows you to express your creativity and create a unique vessel tailored to your preferences.
- Gathering essential materials is crucial: To build a sailboat, you need materials such as wood, epoxy, fiberglass, and marine plywood, which are vital for constructing a sturdy and seaworthy vessel.
- Proper planning ensures a successful build: Designing and planning a sailboat involves considering factors like stability, weight distribution, and sail area to ensure the boat performs well in various conditions.
Gathering materials and tools is crucial when it comes to making a sailboat. Follow these steps:
1. Begin by researching the type and size of sailboat you wish to build. Gather information on the required materials and tools.
2. Create a comprehensive list of all the necessary materials including marine-grade plywood, fiberglass, epoxy resin, screws, and hardware.
3. Make a separate list of all the tools that you will need such as a circular saw, jigsaw, drill, sander, clamps, and measuring tape.
4. Take the time to find reliable suppliers for the materials. Compare prices and quality to find the best options available.
5. Once you have identified the suppliers , go ahead and place orders for all the materials you need. Make sure to order sufficient quantities.
6. If you don’t already have the required tools in your workshop, consider purchasing or borrowing them from someone reliable.
7. It is important to set up a dedicated workspace that provides enough room for you to work comfortably and store both materials and tools.
8. Ensure that your workspace is clean and well-organized. Pay special attention to proper lighting and ventilation.
9. As soon as you receive the materials , inspect them thoroughly for any signs of damage or defects. If you find any issues, contact the supplier immediately.
By following these steps, you will be able to successfully gather all the necessary materials and tools to begin building your sailboat.
What are the Essential Materials for Building a Sailboat?
What are the essential materials for building a sailboat? The necessary materials for constructing a sailboat include high-quality marine-grade plywood for the hull and deck. To reinforce the structure, fiberglass cloth and epoxy resin are employed. As for the assembly, stainless steel hardware is utilized, along with various types of sailcloth for the sails. The rigging is composed of stainless steel mast, boom, and rigging wires . To protect the wooden surfaces, marine-grade paint and varnish are applied. Joint sealing is achieved by utilizing adhesive, sealant, and caulking . Finishing touches are made with bungs, plugs, and filler materials . By using these materials in conjunction with the appropriate tools, one can build a sailboat that is robust and dependable for countless enjoyable hours on the water.
What Tools are Needed for Building a Sailboat?
To successfully build a sailboat, you will require a number of essential tools. Below is a comprehensive list of the necessary tools needed for the construction process:
1. Measuring tools: To accurately measure and mark the boat’s dimensions, you will need a tape measure , ruler , and protractor .
2. Saws: In order to cut materials, both a hand saw and a power saw, such as a jigsaw or circular saw , are indispensable.
3. Drill: A drill with various sizes of drill bits is crucial for creating holes in the boat’s structure and attaching components.
4. Screwdriver: To tighten screws and fasten hardware, you will need both flathead and Phillips head screwdrivers.
5. Clamps: Clamps are necessary to hold components together while they are being glued or screwed.
6. Sanding tools: To achieve smooth surfaces and eliminate imperfections, you will require sandpaper and sanding blocks .
7. Chisels: Chisels are essential for shaping and carving wood for intricate details or joints.
8. Planer: A planer is necessary to level surfaces and reduce the thickness of wooden components.
9. Painting tools: Brushes and rollers are indispensable for the application of paint or varnish, which serves to protect and enhance the sailboat’s appearance.
10. Safety equipment: Make sure to have safety goggles , gloves , and a dust mask to ensure your protection while working.
By utilizing these tools effectively, you will be able to successfully and safely complete your sailboat building project.
When designing and planning the sailboat, it is important to follow these steps:
1. Research different sailboat designs and hull types to gather information and ideas.
2. Determine the size and dimensions of your sailboat based on your needs and the resources available to you.
3. Create a detailed blueprint or design that includes important aspects such as hull shape, rigging, and deck layout.
4. Select materials for the construction of your sailboat based on factors like durability, weight, and cost.
5. Ensure the inclusion of safety features and necessary equipment, such as navigation instruments and life jackets.
6. Calculate the sail area and carefully choose the appropriate sails for optimal performance.
7. Evaluate the stability and balance of the sailboat to ensure safe sailing.
8. It is always helpful to consult experts for advice and guidance throughout the designing and planning process.
To guarantee success, it is crucial to consider your needs, seek expert opinions, and give utmost importance to thorough research, attention to detail, and careful planning.
What Factors to Consider when Designing a Sailboat?
When designing a sailboat, there are several factors to consider for a successful and efficient vessel. These factors include the intended use, hull design, sail plan, structural integrity, and ergonomics and comfort.
Firstly , the intended use of the sailboat must be determined. This involves deciding whether the sailboat will be used for racing, cruising, or both. The intended use will determine the size, shape, and necessary features for optimal performance.
Next , the hull design plays a crucial role in sailing performance. Factors such as stability, speed, and maneuverability should be considered when choosing a design.
The sail plan is another important aspect to take into account. The type and configuration of the sails will depend on the boat size, intended use, and sailing conditions. Factors like ease of handling, sail material, and the number and size of sails should be considered.
Structural integrity is essential for safety and longevity. It is important to consider the materials and construction techniques that can withstand water and wind forces.
Lastly , the sailboat should be designed with ergonomics and comfort in mind. This involves considering factors such as seating arrangements, control access, and storage space.
To ensure the best sailboat design, it is advisable to consult naval architects or experienced sailors for expert advice and guidance. Their knowledge and expertise will help in creating a well-designed and functional vessel.
When designing a sailboat, it is important to consider these factors to ensure a successful and efficient vessel that meets the specific needs of the owner.
How to Create a Blueprint or Design Plan?
When creating a sailboat blueprint or design plan, follow these steps on how to create a blueprint or design plan:
- Research sailboat designs based on sailing conditions and intended use.
- Measure and calculate sailboat dimensions, including length, width, and height.
- Create a detailed sketch, indicating parts like the hull, mast, keel, and rigging.
- Specify durable, lightweight, and cost-effective materials for each part.
- Develop a comprehensive list of materials and resources required, including quantities and specifications.
- Add precise measurements and dimensions to ensure accuracy and alignment.
- Annotate the blueprint with construction notes and instructions, including specific techniques.
To create an effective blueprint or design plan, consult experienced boat designers or naval architects for structural integrity and functionality. Utilize software or online tools for enhanced precision and efficiency. Careful planning and considering all aspects of the sailboat’s design will lead to a successful construction process.
To successfully construct a sailboat hull, it is important to follow these steps:
1. Begin by designing the hull, taking into consideration factors such as size, shape, and the materials that will be used.
2. Gather all the necessary materials for the construction process, including fiberglass, wood, or aluminum, depending on your preference.
3. Prepare the mold if fiberglass is the chosen material. Create a mold that matches the desired shape and apply a release agent to ensure easy removal.
4. Once the mold is prepared, start applying layers of fiberglass sheets and resin smoothly, making sure to avoid any air bubbles.
5. After the fiberglass has cured, carefully remove the hull from the mold and use sandpaper to smooth out any rough edges or imperfections.
6. To strengthen the hull, consider adding reinforcements such as bulkheads or ribs to provide structural support.
7. Install any necessary fittings according to the design, including cleats, ports, and drains.
8. For added protection and to enhance the appearance, apply a suitable coating or paint to the hull.
9. Prior to completing the construction process, it is important to thoroughly inspect the hull for any defects or leaks. Test the sailboat in water to ensure its proper performance.
To ensure a successful sailboat hull construction, it is crucial to plan properly, paying attention to detail, and following safety standards. If needed, consult professional boat builders or utilize resources that offer specific guidance tailored to your project. Happy sailboat construction!
How to Build the Framework of the Hull?
To learn how to build the framework of the hull, follow these step-by-step instructions. First, measure and mark your desired hull length on the building board. Next, cut long, straight pieces of lumber that match the hull length. Place these pieces parallel on the building board, making sure there is equal spacing. Secure the lumber to the building board using clamps or screws. Then, measure and mark the desired hull width on the lumber pieces. Cut shorter pieces of lumber that match the hull width. Attach these shorter pieces perpendicular to the longer ones, using screws or nails. Add any additional shorter pieces needed to complete the framework, ensuring even spacing. It’s important to check the framework for accuracy and make any necessary adjustments. Secure all connections with extra screws or nails for added stability.
Building the framework of the hull is a crucial step in sailboat construction. It provides the necessary structure and shape for stability and functionality in the water. By following proper measurements and securely fastening the lumber together, builders create a strong foundation for the rest of the sailboat. The framework acts as the backbone of the sailboat, allowing it to withstand wind and waves while providing structural support for other components. A sturdy framework ensures a well-built and seaworthy sailboat, enhancing the thrill of sailing.
What Techniques to Use for Planking the Hull?
To plank a sailboat’s hull , it is important to use the following techniques:
– First , prepare the planks by cutting them to the desired dimensions. Make sure they are smooth and free of defects.
– One effective technique is steam bending . Heat the planks in a steam box until they become pliable, and then shape them to fit the curvature of the hull.
– Next , fasten the planks securely to the hull’s framework using screws or nails. Ensure proper spacing and secure penetration.
– To prevent water from entering the hull through the seams, it is crucial to seal them. Apply a waterproof sealant like epoxy or polyurethane.
– After the sealant dries, sand the planks for improved appearance and performance.
Pro Tip: When planking the hull, take precise measurements and cut the planks carefully to achieve a tight fit. Properly securing and sealing the planks will result in a strong and watertight hull for your sailboat.
Building and rigging the sail is a crucial skill in sailing. Throughout history, civilizations like the Egyptians and Phoenicians utilized unconventional materials such as papyrus and animal hides to construct sails. In modern times, sailmaking has advanced using innovative techniques and high-quality materials. Today, the process of building and rigging sails involves precise measurements, intricate designs, and the utilization of high-performance materials. Sailmakers play a critical role in providing sailors with sails that are both durable and efficient, enabling them to harness the power of the wind and navigate through open waters.
To successfully build and rig a sail , follow these steps:
1. Choose the appropriate sail material: Begin by deciding on the type of material you wish to use for your sail, such as Dacron , nylon , or laminate .
2. Measure and cut the sail panels: Use a sharp fabric cutting tool to accurately measure and delineate the dimensions of the sail panels on the chosen material. Then, cut along the marked lines.
3. Assemble the panels: Arrange the sail panels in the desired order and position. Employ a sewing machine to securely stitch the panels together, ensuring that you follow the specified seam allowance.
4. Add reinforcements: Affix reinforcements, like corner patches and reefing points, to the relevant areas of the sail. These reinforcements enhance the sail’s strength and durability.
5. Install the sail hardware: Attach the necessary hardware, such as grommets, luff tape, and battens, to the sail. These components facilitate rigging and effective control of the sail.
6. Rig the sail to the mast and boom: Connect the sail to the sailboat’s mast and boom using suitable connectors, such as hanks or slides, securing the sail firmly in place.
7. Tune the sail: Adjust the sail’s tension by tightening or loosening the halyard and other control lines. This ensures optimal performance and shape during sailing.
What Materials are Required for Constructing the Sail?
To construct a sail for a sailboat, you will need several materials. First, you will need a durable and lightweight sailcloth made from materials such as Dacron or Nylon . This will provide strength and resistance to tearing. Next, you will need high-quality UV-resistant thread to sew the sail together, ensuring it can withstand the elements and maintain its integrity.
To strengthen areas of the sail that experience higher stress, such as corners and reef points, you will need adhesive-backed polyester tapes or webbing. These reinforcements will help keep the sail in good condition during use. You will need grommets or eyelets to create attachment points on the sail for halyards, sheets, and other lines. These can either be made of metal or plastic fittings.
It is important to insert battens into pockets on the sail to provide shape and stability. These thin and flexible strips can be made of fiberglass, carbon fiber, or wood, depending on your preferences. You will need hardware such as shackles, blocks, and cleats to attach and adjust the sail on the sailboat.
When constructing your sail, make sure to choose materials that are suitable for the size and type of sailboat you have, as well as the intended use of the sail. The materials should be durable, resistant to UV damage, and able to withstand the forces and conditions encountered while sailing.
How to Assemble and Attach the Sail to the Sailboat?
To learn how to assemble and attach the sail to the sailboat, follow these steps:
1. Prepare the sail and sail track: Lay out the sail, check for damage/debris, and ensure the sail track on the mast and boom is clear and in good condition.
2. Attach the halyard: Connect the halyard to the head of the sail and hoist it up the mast securely.
3. Attach the luff and tack: Slide the luff (front edge) of the sail into the sail track on the mast. Attach the tack (bottom front corner) of the sail to the fitting on the boat’s bow.
4. Attach the leech and clew: Slide the leech (back edge) of the sail into the sail track on the boom. Attach the clew (bottom back corner) of the sail to the fitting on the boom.
5. Tension the sail: Thoroughly tighten the halyard to remove any wrinkles or flapping in the sail. Ensure the sail is evenly tensioned along its edges.
6. Secure the sheets: Attach the sheets (lines that control the angle of the sail) to the clew and route them back to the cockpit, ensuring they are free from obstructions.
7. Test the sail: Adjust the sheets and the angle of the sail for optimal performance. Ensure the sail is properly trimmed and responding to the wind.
By following these steps, you can successfully assemble and attach the sail to your sailboat. Remember to always prioritize safety and seek guidance from experienced sailors if needed.
When applying the finishing touches to a sailboat, there are important final steps to consider:
1. Apply a final coat of paint or varnish to protect the wood and enhance appearance.
2. Securely install the rudder and tiller for smooth steering.
3. Tighten the attachment of the mast and rigging for optimal sailing performance.
4. Properly install the boom and attach the main sail .
5. Efficiently attach the jib sail to the forestay to capture the wind effectively.
6. Rig the halyards and sheets for easy sail control.
7. Securely mount any additional equipment.
8. Double-check all connections, fastenings, and fittings.
9. Thoroughly inspect the sailboat for any defects or issues.
10. Launch the sailboat and enjoy your completed creation.
How to Add Finishing Details to the Sailboat?
When it comes to adding finishing details to a sailboat, many people wonder how to do it correctly. Fortunately, I can guide you through the process step-by-step. By following these instructions, you will be able to achieve a polished final product that is both beautiful and functional.
Step 1: Sand
To start, you need to sand the entire surface of the sailboat. This will create a smooth texture and prepare it for the varnish or paint that you will be applying later.
Step 2: Clean
After sanding, it is important to clean the surface to remove any dust or debris. You can use a damp cloth for this task. Make sure the surface is completely clean and dry before proceeding.
Step 3: Prime
To protect the sailboat against water damage and create a smooth base, apply marine-grade primer. This step is crucial for the longevity of the finishing details. Allow the primer to dry completely before moving on to the next step.
Step 4: Varnish or Paint
Now comes the fun part – applying the varnish or paint. For a natural wood look, use multiple coats of marine-grade varnish. If you prefer some color and design, opt for marine-grade paint instead. Make sure to apply each coat evenly and allow enough time for drying between coats.
Step 5: Add Hardware
Once the varnish or paint has dried, it’s time to install any necessary hardware on the sailboat. This includes items such as cleats, handles, or hinges. Ensure that they are securely attached and in the correct positions.
Step 6: Detail
To enhance the aesthetic appeal of the sailboat, consider adding some decorative elements. Pinstripes, decals, or other decorative touches can really make a difference. Get creative with this step and add your personal touch to the sailboat.
Step 7: Inspect
Before you launch the sailboat, take the time to thoroughly inspect all the finishing details. Check for security and quality. If any adjustments or touch-ups are needed, make sure to address them before hitting the water.
By following these steps, you will be able to successfully add the finishing details to your sailboat. The end result will be a beautiful and functional watercraft that you can be proud of.
What Steps are Involved in Painting and Varnishing the Sailboat?
The steps involved in painting and varnishing a sailboat are:
- Clean the sailboat’s surface using a mild detergent and water to remove dirt and debris.
- Sand the surface with fine-grit sandpaper to create a smooth base for painting and varnishing.
- Apply a primer coat evenly to create a strong base.
- Let the primer coat dry completely as per instructions.
- Use a brush or roller to apply the desired paint color , starting from the top and working down.
- Allow the paint to dry between coats and apply more coats if needed.
- To varnish the sailboat, apply a thin and even coat in the direction of the wood grain.
- Let the varnish dry between coats and apply more coats for desired shine and protection.
Suggestions for painting and varnishing the sailboat:
- Use high-quality marine-grade paint and varnish for durability and protection against the elements.
- Consider using a marine-grade polyurethane varnish for a glossy finish.
- Take your time and ensure proper preparation and application techniques for a professional result .
- Follow safety precautions such as wearing gloves , goggles , and a mask to protect against fumes.
- Regularly inspect and maintain the painted and varnished surfaces for longevity.
When I launched and tested my newly built sailboat, I felt excitement and anticipation . Launching and testing a sailboat involves important steps to ensure functionality and safety. The calm waters were perfect for my maiden voyage. As I hoisted the sails and caught the wind, I tested the sailboat’s functionality by adjusting their angles to catch the wind. The sailboat glided effortlessly, showcasing the successful launch and testing process. The boat’s responsiveness and stability were remarkable, proving that launching and testing the sailboat properly resulted in optimal performance. I knew that my hard work had paid off. The sailboat performed flawlessly , and I felt proud as I navigated the open waters. It was an exhilarating experience , marking the successful launching and testing of my sailboat and the beginning of many memorable adventures.
How to Prepare the Sailboat for its First Launch?
To prepare the sailboat for its first launch, follow these steps:
- Check the hull: Inspect for damage or cracks. Ensure proper sealing and no leaks.
- Verify essential equipment: Have necessary safety equipment on board, including life jackets, flares, and a first aid kit.
- Secure the rigging: Check the mast, boom, and rigging lines for wear or damage. Tighten and secure them.
- Check the sails: Examine for tears or fraying. Ensure proper attachment to the mast and boom.
- Test the navigation equipment: Ensure proper functioning of the compass, GPS, and other navigational instruments.
- Inspect the engine: Check oil, fuel, and coolant levels. Start the engine to ensure smooth operation.
- Verify the bilge pump: Test to ensure it functions correctly and can remove accumulated water.
- Fuel and water: Ensure sufficient fuel and freshwater on board.
- Inform someone: Share sailing plans, including estimated time of departure and return, with someone onshore.
- Perform a safety briefing: Gather passengers and explain safety equipment location and emergency procedures.
Pro-tip: Before longer trips, it’s recommended to have a practice sail near shore. This will build confidence in handling the sailboat and verify proper functioning.
What Safety Precautions to Follow when Testing the Sailboat?
When testing a sailboat, it is important to follow safety precautions for a successful and safe experience. Here are some steps to consider:
1. Check the weather forecast: Before testing the sailboat, check the weather to avoid severe conditions like high winds or storms.
2. Inspect the sailboat: Thoroughly check the sailboat for any damages or issues with the hull, rigging, and sail.
3. Wear appropriate safety gear: Always wear a life jacket and suitable footwear.
4. Inform someone about your plans: Let someone know your plans, including location and duration, as a safety precaution.
5. Use proper navigation equipment: Have a compass and charts for safe navigation.
6. Start with calm waters: Choose calm and shallow water, especially if you are a beginner, and avoid strong currents or heavy boat traffic.
7. Be cautious of capsize risks: Understand the risk of capsize and practice self-rescue techniques.
8. Be aware of other boats and obstacles: Watch out for other boats, objects, or obstacles in the water to avoid accidents.
9. Follow boating regulations: Familiarize yourself with local regulations and follow them for a safe and legal experience.
10. Stay alert and maintain control: Always stay alert and in control of the boat, adjust to changing weather conditions.
Remember, safety should always be the top priority when testing a sailboat. By following these precautions, you can enjoy a safe and enjoyable sailing experience.
Some Facts About How To Make A Sailboat:
- ✅ Building a wood sailboat takes approximately 100 hours over a span of 3 months. (Source: www.instructables.com)
- ✅ The cost of building a wood sailboat is around $1,000, excluding tools. (Source: www.instructables.com)
- ✅ A wood sailboat requires materials such as oak plywood, brad nails, epoxy resin, etc. (Source: www.instructables.com)
- ✅ An origami paper boat can be made by folding a sheet of paper in a specific pattern. (Source: www.wikihow.com)
- ✅ Aluminum foil can be used instead of paper to make a waterproof origami boat. (Source: www.wikihow.com)
Frequently Asked Questions
1. how long does it take to build a wood sailboat.
Building a wood sailboat typically takes around 100 hours over a span of 3 months.
2. How much does it cost to build a wood sailboat?
The cost of building a wood sailboat is estimated to be around $1,000, excluding tools.
3. What materials are needed to build a wood sailboat?
To build a wood sailboat, you will need boat building plans, oak plywood, pencils, ruler, tape measure, brad nails, epoxy resin, epoxy hardener, silica thickener, wood flour thickener, masking tape, Japanese pull-saw, table saw, router, sanding discs, jigsaw, combination square, drill, wire or zip ties, C-clamps, mixing cups, mixing sticks, gloves, wax paper, fiberglass cloth, plastic spreader, waterproof glue, screws, fasteners, blocks, pad eyes, gudgeon & pintle, patience, and elbow grease.
4. How do you make a paper boat?
To make a paper boat, start by folding an 8 ½ in x 11 in sheet of paper in half. Follow the step-by-step instructions outlined in the reference to create the boat shape.
5. What materials are needed to make a paper boat?
To make a paper boat, you will need a sheet of printer paper or origami paper. Additional materials such as clear tape, waxed paper, or a crayon can be used to reinforce or waterproof the boat.
6. How do you increase the water resistance of a sailboat?
To increase the water resistance of a sailboat, you can use an outdoor craft sealant. Spray the entire boat with the sealant and let it dry before using.
About the author

Leave a Reply Cancel reply
Your email address will not be published. Required fields are marked *
Save my name, email, and website in this browser for the next time I comment.
Latest posts

The history of sailing – from ancient times to modern adventures
History of Sailing Sailing is a time-honored tradition that has evolved over millennia, from its humble beginnings as a means of transportation to a beloved modern-day recreational activity. The history of sailing is a fascinating journey that spans cultures and centuries, rich in innovation and adventure. In this article, we’ll explore the remarkable evolution of…

Sailing Solo: Adventures and Challenges of Single-Handed Sailing
Solo Sailing Sailing has always been a pursuit of freedom, adventure, and self-discovery. While sailing with a crew is a fantastic experience, there’s a unique allure to sailing solo – just you, the wind, and the open sea. Single-handed sailing, as it’s often called, is a journey of self-reliance, resilience, and the ultimate test of…

Sustainable Sailing: Eco-Friendly Practices on the boat
Eco Friendly Sailing Sailing is an exhilarating and timeless way to explore the beauty of the open water, but it’s important to remember that our oceans and environment need our protection. Sustainable sailing, which involves eco-friendly practices and mindful decision-making, allows sailors to enjoy their adventures while minimizing their impact on the environment. In this…
How to Build a Wood Sailboat

Introduction: How to Build a Wood Sailboat

I've been wanting to combine my two favorite hobbies - woodworking and sailing for a long time, so I thought I'd build a boat. It's got classic lines and looks so dazzling in the sunshine that people constantly stop me at the boat ramp to ask me about it. There's something unbelievably rewarding about building something like this from scratch. This is definitely a boat that is much better built than bought . Here's how I did it.
The boat takes about 100 hours to build. I did it over 3 months, working a little bit just about every day and full days when my schedule permitted.
It will take about $1,000 in total to build if you buy everything at full retail cost (not including tools you might need to buy), but you can spread that across the length of the project. For example, you only need to buy one $30 sheet of plywood at a time, take it home, draw out the parts (loft) that fit on just that sheet and cut them out. That will take a couple of hours right there. Some boating supply stores (chandleries) might let you setup an account which might give you a discount if you tell them you're building a boat.
All of the skills needed to build a sailboat can be learned slowly, one step at a time. For example, if you've never fiber-glassed plywood before, just practice on a small piece first to get your confidence up. This was my first boat build, so I did a lot of learn as you go . Not only am I going to show you the right way to successfully build your own sailboat, but I'm going to share with you the mistakes I made along the way to hopefully save you from repeating them.
The end result will be a very attractive little 8 foot long pram, that is easily made out of 4x8 sheets of plywood that is light enough to put in the back of a small pickup truck or roll down to the local lake on the optional dolly. Anything longer would require you to either make a scarf joint (which is a bit tricky) or buy longer sheets of plywood (which is considerably more expensive).
What you will need:
Boat building plans
8 panels of 1/4" oak plywood 4'x8'
Pencil, Sharpie, ruler, tape measure, yard stick, etc.
Long flexible straight edge
Box of 1" brad nails
2 gallons of epoxy resin
1 gallon of epoxy hardener - SLOW
1 quart silica thickener
5 quarts wood flour thickener
1" masking tape
Japanese pull-saw
Table saw (helps, but optional)
Round-over router bit
Flush trim router bit
Palm/random orbital sander
220 sanding discs
Combination square
Drill bit set
Drill bit extension
Basic hand tools
Small diameter wire or zip ties
Wire cutter
12 C-clamps - 3"
Mixing cups, mixing sticks, rubber/nitrile gloves
16' x 60" of 6oz fiberglass cloth
2" plastic spreader
Gallon of waterproof glue
Glue roller
Silicone bronze screws
Stainless steel fasteners
Small blocks
Gudgeon & pintle - dinghy size
Patience - large
Elbow grease - large
For more detailed explanations on each step and more specific info/reviews on the materials and parts used, check out my boat build blog: www.Midnight-Maker.com
Step 1: Cutting Out the Parts...

First, you'll need boat building plans. I purchased some very nice ones from a popular boat building website because I had a specific style in mind to build, a "pram". It's a Norwegian design with lots of buoyancy in the bow and building a pointy boat is a little more difficult. There are a bunch of free boat building plans (search "dinghy") online. Also, I wanted my boat parts to fit in a standard (read cheap) 4'x8' sheet of plywood. It also had to be light enough for me to load/unload/move myself. This boat weighs in at about 70 pounds. When on the custom dolly I built, it's very easy to move from the parking lot to the lake.
Next, you'll need to draw out the parts of the boat full-sized onto the plywood (lofting). I actually did this step on hardboard/masonite because I wanted to make templates of all the parts in case I ever wanted to build another one.
This step requires you to be very meticulous. Carefully transfer the measurements (offsets). They may or may not look correct because it's very non-intuitive to look at curved boat parts that are laying flat. Some parts actually bend the opposite way you think they should. To make the curves, I nailed a bunch of 1" brads into the panel and used a long, flexible straight edge (yard stick, etc.) bent to follow the curve, then I traced the curve with pencil/Sharpie. Once I removed the brads, I had perfectly smooth curves. Keep in mind that with the side panels that are symmetrical to both sides of the boat, only draw out one version and cut two stacked sheets at a time. This ensures the boat will not be lop-sided. Make sure to immobilize the two sheets together with screws outside of the boat parts or use double-sided tape/clamps, etc. to keep the parts registered properly.
Using a Japanese pull-saw allows you to control the cuts very carefully and it can follow the graceful curves. They cut on the pull stroke which means they're very easy to control. Make sure you leave a bit of your cut line, meaning cut just outside the line. This allows you a bit of a safety margin and you can always sand to the line to sweeten it up. This is where the elbow grease really kicks in. It takes hours to cut out the hull panels by hand, but it's worth it. I tried cutting the first part out with the jigsaw and it wandered all over the place and quickly cut inside the line before I knew it. Also, a jig saw blade can lean to one side which could mean two panels might not be the exact same shape. Using hand tools is a classic way to do woodworking and is a very gratifying process. With hand tools, things happen slow enough for you to be in total control, whereas power tools can quickly do unexpected damage. With the understanding that you're building a classic boat, using hand tools wherever possible is part of the philosophy.
The plans I bought were in metric and called for 6mm (1/4") and 9mm (3/8") plywood, but I wanted to make everything out of 1/4" plywood so the thicker parts in the plans were glued together with two layers of 1/4" (so at 1/2" they were a bit thicker than designed). I actually liked this because it made the boat feel sturdier and of course it was cheaper that way. The trade-off was that the boat would be a bit heavier.
For any of the parts that need to be doubled-up/laminated (e.g. the transoms), now is a good time to do that. Make sure you use "waterproof" glue instead of "weatherproof" glue like I did...
Spread a thin layer of glue over one of the "bad" sides (plywood usually has a good side and a bad side, glue bad sides together so good sides show on both outside faces), making sure it's completely covered (I used a special glue roller), then carefully place the other half on top. Align all of the edges together, then clamp them in place. Now put heavy things carefully on top to press the parts together. The glue should be dry in about 6 hours.
NOTE: It's considerably easier and safer to do any woodworking processes to the parts before you assemble the boat. This way, you can safely clamp pieces to the work bench and cut out handle holes, etc. Since my boat is a "lapstrake" design, I had to route a rabbet (groove located on the edge) carefully on the bottom edge of each side panel. This creates a shoulder for the parts to sit on, positively locating them while you're stitching the panels together. Likewise, the grab handles in the transoms are much easier to cut out before putting the boat together.
Also keep in mind that any mistake will be considerably more painful the further you are along in the build. For example, if I biff cutting out the grab handle holes while they're just loose pieces rather than when they're a permanent part of the boat, it's much easier to recover - just make another transom. If you had to patch a hole in the boat, it would be difficult and possibly never look perfect. No pressure...
Step 2: Assembling the Hull...

Once you have the bottom and sides cut out, you can start to "stitch and glue" the hull together. This is a technique used usually for smaller boats to be able to pull the hull form together without the need to build a frame or mold (which can take almost as long and as much wood as the boat itself).
I built a gauge stick to make sure my holes were perfectly spaced at 4" at 1/2" in from the plywood edge. It was 1" wide so either edge was the required 1/2" from the centerline. I worked my way down one side of each of each mated seam and drilled all those holes at once while the panels could lay flat on the bench. Make sure to use a backer block to prevent tear out on the back side, even with such a small drill bit.
With one mating panel drilled with a 1/16" drill bit, hold the mating panel in it's relative position. I used some spare twine to wrangle my panels into the proper orientation as I was marking them. Make a pencil mark where the mating hole should be, remove the pre-drilled panel and drill the second set of holes 1/2" in from the edge. This makes sure there's enough strength to hold the boat together.
The first pass on the stitches is just to get the hull together structurally. You can always go back and make the stitches fancier/tighter and tweak the position of the panels.
The stitches go from the inside out. Cut 6" lengths of wire and bend them into long, narrow U's that are the width of the distance between the holes. Stick the ends through the holes and carefully twist the tails together on the outside of the hull, making sure not to damage the plywood. If you're using zip ties, then the holes you drill will need to be bigger and you'll have to start on the outside, go in, turn around, then back out, then "zip".
Make sure your panels' rabbet shoulders are resting securely on the mating panel and carefully tighten all the stitches. For my boat, once I had two panels stitched to the bottom panel on each side, it was time to attach the transoms (ends). Once all of the exterior parts are stitched together, you should have something that looks like a boat. It will be a little rickety at this stage, but that's okay.
NOTE: In the photos I took of my build, you'll notice that the transom doublers (reinforcers) aren't in place. That was because I was following the instruction manual, but I think that was a mistake, so I highly recommend laminating (gluing) the doublers to the transoms before you stitch the boat together.
Step 3: Reinforcing the Hull Joints...

Now that the hull is stitched together, flip it over upside down. You'll be surprised at how stiff it is, considering how difficult it was to wrangle all those panels into position. Be careful, there's lots of poky wire ends sticking out all over the place.
I used a technique called "tabbing", meaning I made small, structural tabs from thickened epoxy that fit between the stitches, then I removed the stitches and made one long, larger fillet to connect the hull panels together.
Make sure your panels are perfectly aligned and tightened. I used a nipper to lop off most of the tails so they wouldn't get in the way, but that left very sharp spikes.
Make sure your boat is square. Take diagonal measurements from corner to corner, make sure the boat parts are parallel to each other, etc. because if there's a twist in your boat, the next step will make it permanent, which will affect the boat's performance.
Now mix up a batch of epoxy and silica thickener according to the manufacturer's directions (meaning each type of epoxy has a different resin to hardener ratio) until it's between the consistency of thick ketchup, but runnier than peanut butter (make sure to mix the 2 parts of epoxy together first very well before adding a thickener). Too thick and it won't fill the void, too thin and it'll run down inside the boat. Both are bad. I used a small syringe to inject the mix into the V intersection between the panels and checked underneath/inside to see if there were any runs.
Once the epoxy has partially set, use a glove wet with denatured alcohol to smooth out the "tabs" so they fit inside the V groove and don't extend above the intersection between the panels. This will give you good practice for the seams that will show on the finished boat. Be careful of the wire spikes.
Repeat this process for every seam on the hull. Let it cure overnight.
Once the tabs have cured, carefully remove the stitches. If the wire seems to be epoxied permanently to the hull, heat the wire with a lighter. That will soften the epoxy enough to pull the wire out. Be careful not to scorch the boat (you don't want a Viking funeral). Now repeat the thickened epoxy process for each overlap, except this time each seam will need to be one long, smooth joint. Let it cure overnight. This goes a long way in making the boat hull structural.
Step 4: Fiberglassing the Hull...

Now that you've got a permanent hull shape, it's time to make it waterproof and rugged. Fiberglass and resin over plywood is a tried and true Do It Yourself boat building technique which makes it strong and light.
Mask off the bottom panel and roll out your fiberglass cloth. Smooth the cloth out very carefully so as not to snag or tweak the fibers' orientation. Mix up an unthickened batch of epoxy (it will be the consistency of syrup). Starting at the stern, pour a small puddle of epoxy and spread it out nice and thin. You should be able to squeeze most of the epoxy out of the cloth, leaving only saturated cloth with no dry spots (which will appear white) but the weave should still be showing (meaning no extra epoxy is pooling). You should easily be able to see the wood grain through the cloth now.
Let the epoxy partially cure and using a razor, slice the dry fiberglass cloth away on the taped seam. Then remove the masking tape. Let the epoxy cure overnight.
Flip the hull over and mix up a batch of epoxy that is the consistency of peanut butter. I masked off the joint, but this step is optional, but keep in mind that it will be visible if you plan on finishing the interior bright (varnished wood). It's not as critical if you're painting the interior. With a plastic spreader, carefully make a large radius transition (fillet) between the bottom panel and the first side panel (garboard). Remove the masking tape when the epoxy mixture is partially cured and carefully scrape/wipe any unwanted mixture. It's much easier to remove now than having to sand it all off later. At this point, it's also a good time to fillet the transoms to the sides using 3/4" radius tabs between stitches and 1" finished fillets after you've removed the stitches. Let the fillets cure overnight.
Now, repeat the entire fiberglassing process on the inside. Except instead of just doing the bottom panel, make sure both the bottom and the garboard are fiberglassed. This is basically the waterline of the boat. The fillet should allow the fiberglass cloth to smoothly make the bend between boards. Remove the excess cloth when partially cured and let sit overnight. Some people fiberglass up onto the transom at this stage which will make the boat stronger, but that means you have to have already filleted the transoms to the bottom.
Step 5: Installing Interior Parts...

The bulkheads get stitched in place just like the panels. They will make the already stiff (and much heavier boat) completely structurally sound and push/pull the sides into their final shape. Then make 3/4" "tab" fillets between the stitches to lock them in place, remove the stitches and make long, smooth 1" fillets. The smaller fillets will get covered by the larger fillets. I used two different modified plastic spreaders to do this step. Each spreader was cut with a box knife and filed/sanded into its final shape.
While you're doing the previous steps, if you're in a time crunch, go ahead and build the daggerboard trunk. It's made of numerous parts that are pre-coated with a couple layers of unthickened epoxy, then glued together with silica-thickened epoxy. This makes it strong and waterproof as it will be below the waterline so must be completely waterproof.
The daggerboard trunk is the most important part of the boat, especially if you're making a sailboat version (this boat can easily just be used as a rowboat). Not only does it support the center seat (thwart), but it has to transfer all of the force from the sail to the water and if you run the boat aground, it takes all the shock loading from the daggerboard.
The daggerboard gets filleted into place like everything else. Make sure it's perfectly on the centerline of the boat as that will affect its sailing characteristics.
Next, let's make the daggerboard slot in the center thwart. I set up a straight edge with a spiral upcutting router bit. Make sure to enlarge the slots at the end of the center thwart so that it can fit around the fillets of the center bulkhead. Now is the time to ease the edges of the center thwart because you'll be sitting on it a lot, so it needs to be comfortable. Because it's so thin, I only routed the top edge of the center thwart that shows and just hand sanded the edge underneath (it's very problematic to use a round-over bit on the second side of a thin board). Paint all of the thwarts with three coats of unthickened epoxy, especially the undersides. Once the woodworking is done, the thwart can be epoxied into place with peanut butter (or you can jump to cutting the daggerboard slot in the bottom of the hull). Make sure the thwart fits snugly in place. Drop dollops of peanut butter on the top edges of the center bulkhead and daggerboard case and spread it out evenly (make sure none gets inside the slot to interfere with the daggerboard). Firmly seat the thwart (pun intended) into the goop and weight it down. Let it cure overnight.
While you've making sawdust, cut out the mast hole (partner) in the forward thwart by drilling holes in the four corners (for the square mast we're going to make), then cut out the sides, file it smooth, then round over the top edge with the router.
Any time after the bulkhead thwart fillets have cured, you can seal the airtank chambers. Paint the bottom, sides, inside of the bulkhead and transom up to the level where the thwart will be.
Step 6: Rail & Sailboat Parts...

There are several processes in this boat building instructable that can be done concurrently. While you're waiting for the epoxy on one part to cure, you can be doing woodworking or epoxying another part. This step illustrates that point. While you're waiting for the epoxy on the rub rail (outwale) to cure, you can be fabricating the sailboat accessories (e.g. daggerboard, rudder, tiller, spars, etc.).
In order for the outwale to be thick/strong enough to be effective, you'll need to laminate it in two strips on each side. You can't bend a single piece that thick around the curvature of the hull without either breaking the wood or softening it by steaming it which is a complicated process.
Take a strip that's half the final thickness and a little longer than the boat edge (I made mine a bit beefier), mix up some peanut butter with the colloidal silica and carefully spread it on the inside of the strip. Starting at the stern, clamp it in place, perfectly align it with the top edge of the plywood. Now you have a long, springy lever to bend the wood strip along the compound curve. It dips both vertically (shear), and bows out at the widest part of the boat (beam), then back in toward the bow. At least every foot, clamp it as you go, moving forward. More is better. Toward the bow, the strip will get stiffer as it gets shorter. Once clamped in place, scrape/wipe off all the squeeze-out. It's much easier to remove now than after it hardens. Let it sit overnight. You'll have to repeat this three more times, meaning this step takes four days (if you're using "slow" epoxy hardener).
During those four days that you're dealing with the outwale, you can make major progress on the sailboat parts. They're completely separate from the hull. If you're just making a rowboat, then you can skip making these parts.
The daggerboard and rudder are cut out and laminated. Then a bevel is ground onto the leading and trailing edges to make it slice through the water more efficiently. Then they're covered in layers of epoxy. The mast step is assembled. This has to be very strong because all of the force of the sail is transmitted to the boat through the mast step and the mast is a very long lever arm. The rudder cheek plates and tiller also have to be assembled similarly to the daggerboard case.
NOTE: Whenever there's a hole to be drilled into any part of the boat, you must take additional steps to make sure the water doesn't penetrate and damage the wood. The correct procedure is to drill an over-sized hole, completely fill that hole with epoxy (I usually put a piece of masking tape on the back side to act as a dam), then once the epoxy cures, re-drill in the center of the epoxy plug the correct hole size. That makes each hole in the boat possibly a 2 day process, so plan accordingly. You can also use 5 minute epoxy to knock out a bunch of holes quickly, but be careful, they're not kidding. This stuff gets rock hard very quickly and will permanently glue anything touching. This is exactly how you drill the hole for the pivot point for the rudder/cheek plate assembly. If the pin is 1/4", then drill 1/2" hole and fill that with epoxy. Now the 1/4" hole will fit nicely in the center and be completely waterproof.
Since all the parts need several coats of unthickened epoxy and they just about all have holes in them, I hung them up with some twine and painted them on all sides, one layer at a time, for several days. Make sure the rudder doesn't get too thick to fit inside the cheek plates.
Step 7: Making the Spars...

More sailboat parts you can make while waiting for other parts to cure are the spars, the structural parts that support the sail. The mast is another glue up. I used 3 - 1x3's of hemlock. A relatively soft wood, but with a nice tight grain with no knots. A mast would break at a knot, regardless of how strong the wood is. Using the waterproof glue, align the pieces as perfectly as you can then clamp up the assembly and let dry overnight. Then run it through a table saw to get the final dimensions. Use a router and a round-over bit to ease the edges. Cut to length and sand the sharp corners. It should fit easily, but snugly into the forward thwart.
The boom (bottom of sail) is a little more complicated. Cut out the gooseneck (boom pivot point) by using a hole saw first, making sure to clamp it securely to the workbench, then cut out the profile. This gets attached to another piece of 1x3 hemlock, after it's been cut to length and the edges have been rounded over.
The yard (top of sail) is easy. Just cut to length and round over the edges. Drill and fill any holes in the spars at this time. You'll need at least one hole on each end to lash the sail grommets to.
This time, everything gets covered with several coats of varnish, epoxy is not necessary. The varnish protects the wood from water and UV damage.
The reason we had to make at least the mast at this point is because we'll need it in the next step to establish the location of the mast step.
Step 8: Finishing Up the Interior & Exterior...

Once the outwales are successfully attached, trim them flush with the face of the transom(s). While you're at it, use a flush cut saw (with no sawtooth offset to mar the wood) to trim the sides flush with the transom. This will show you how well your injected silica mix worked earlier. Now you're ready to install the mast step.
The mast step must be precisely located on the floor (sole) of the boat to give the mast the proper angle (rake). This is very important because it directly affects the boat's ability to sail upwind. Using your mast, insert it into the forward thwart (partner) and into the mast step. With the mast at a 3° angle (mostly vertical but with a small, yet noticeable and graceful tilt toward the stern of the boat), trace the location of the mast step. Use a combination square to make sure it's perfectly aligned side to side (athwartship). You can now set the mast aside. Drill and fill holes in the bottom of the boat so that you can securely screw the mast step from the outside of the hull. The mast base must also be epoxied to the sole with peanut butter. After it's screwed into place but before the epoxy cures, make sure to test fit the mast again and verify the rake angle is correct. It would be a little messy at this point if you had to tweak it, but at least you wouldn't have to cut it off.
Now comes the most unpleasant part of the whole build. On your hands and knees, make a 1" radius fillet on the underside of every part in the boat. I didn't worry about making these pretty, just structural and water tight (these create the flotation tanks that keep the boat from sinking if you capsize). Let that cure overnight.
Next is the scariest part of the build, making the slot in the hull for the daggerboard. Using a drill bit extension, from the inside of the boat, reach down through the daggerboard case and drill a hole at each end of the slot through the bottom of the boat (make sure to use a backer board). Drill a couple holes in between, then take a jigsaw and connect the dots. This weakens the hull enough so that the router won't tear out any extra wood. Note, this step can easily be done prior to affixing the center thwart. Using a flush trim/laminate router bit, let the bearing run around the inside of the daggerboard case. This will make the hole in the hull perfectly match the slot. This is important because you don't want a shoulder on the inside for the daggerboard to hit and you don't want to damage the waterproof lining of the case. Last, ease the sharp edge of the daggerboard slot with the router and a small radius round-over bit.
The skeg must be cut to fit the curve of the hull (rocker), then using silicone bronze screws, attach it to the hull using the same drill and fill/peanut butter techniques. Make sure to snap a chalk line on the centerline of the boat for reference. Then make a 1" fillet where it meets the hull which will support the skeg and make it strong. The skeg keeps the boat tracking straight in the water. I optionally used some fiberglass cloth to cover the skeg and overlap onto the bottom to make the entire assembly stronger and more waterproof. The skeg will take the brunt of the abuse when launching, beaching, loading and unloading, etc. I also installed a stainless steel rubstrake on the aft end of the skeg with this in mind. In wooden boat building, silicone bronze screws are often used because they won't corrode when encapsulated like stainless steel screws can.
Install the skids parallel to the skeg. These are solid pieces of hardwood because they will also take a lot of abuse when the boat is sitting on shore, protecting the thin hull from rocks, etc. They get installed the same way as the skeg, although it's a little tough to bend the wood along the rocker. Scrape off the excess peanut butter once they're screwed in place.
I also installed the optional outboard motor pad at this point because I plan to use an electric trolling motor on the back to quietly putter around the lake in the evenings to relax with the family after work.
That should be the last parts that go into making the boat!
Step 9: Finishing the Hull...

Now comes the last dash to the finish line. One of the more tedious steps is that you now have to sand the entire boat. I actually built the entire boat inside, but for the sanding stage, I took her outside. Several hours of sanding all of the fillets nice and smooth. Everything will show in the finished product whether you paint the boat or leave it "bright" (unpainted). If you've been careful about cleaning up the peanut butter as you go, you should be able to sand the boat with mostly 220 grit. Be careful not to sand through the thin veneer of the plywood. After the sanding is done (make sure to use a dust mask), vacuum the entire boat and then wipe it down with a tack cloth to remove any dust. I also reversed the hose on the shop vac and used it to blow the sawdust off since I was outside.
Next, you must coat the entire interior and exterior with 3-4 coats of unthickened epoxy. This makes the entire boat waterproof. It will also give you an idea of how beautiful the wood will look when varnished. This is why a lot of boat builders decide to leave their boats bright so the beauty of the wood shows through.
Mix up 1 cup batches of unthickened epoxy and pour out large puddles onto the surface. Taking a foam roller, distribute the epoxy in a smooth coat. Now take a wide foam brush and gently smooth (tip) the rolled out surface. This should remove any lap marks or bubbles. Move along to the next area, making sure to not touch the wet parts. Also, make sure no dust or bugs get on your finish or it'll mean even more sanding later.
Start with the exterior first. It'll be much easier to get good by practicing on the convex surfaces. The interior is more tricky because you want to prevent sags and pooling by only applying very thin coats.
Make sure to check with the manufacturer's directions during this step in case you have to deal with "blushing", a thin layer that can sometimes form on the surface of epoxy when it cures. This could cause your layers to not stick to each other. If your epoxy does blush, it's easy to just wipe the entire boat down with a rag soaked in acetone after each coat has cured. Some people sand between coats of epoxy. This is how you would make an extremely smooth/shiny finish, so if you want your boat to be museum quality, invest the effort. I'm planning on banging my boat around so opted out of an extreme, fancy, mirror finish.
I was originally going to paint the exterior of the hull, which would require priming and painting, but I'm leaving it bright for the time being. The good news is that you can always paint later if you change your mind, but if you paint it and change your mind, it's tough to go back. There aren't a lot of pics of this step, which took a couple of days because there wasn't much visible progress after that first coat went on. At this point, any surface that's not painted should be varnished using the same "roll and tip" method as the epoxy, with the optional sanding between coats. Note that epoxy has no UV resistance, so to keep your boat from getting sunburned, you must either paint or varnish every surface. Giving a boat a "museum quality" paint and/or varnish finish can literally take as long as building the boat.
Step 10: Making the Sail...

Another step you can do while other parts are curing is make the sail. This particular design uses a "lug" sail, a classic looking sail for small boats with wood masts. It increases the sail area (therefore the force generated by the wind) without it having to be as tall as a modern sailboat mast made of aluminum. There is a kit from an online sailmaking company that you can get for a reasonable price. The Dacron cloth panels are all cut out by a CNC machine, so they fit perfectly together. I used a regular, domestic sewing machine, not an industrial one. The only time I had trouble was when sewing through all 7 layers at the reinforcement patches. When I got to those parts, I had to manually push down on the foot of the sewing machine with a flat-bladed screwdriver (minus) to help push the needle through the Dacron. We jokingly call Philips head screwdrivers "plus".
The panels/parts all come labeled. The directions were a bit confusing because they suggest you make sub-assemblies after the fact to make wrangling the large sail easier but they mention it after you've already sewn the large panels together. It's important to understand what parts go together while the panels are still small and more manageable. For example, the batten pockets are tricky enough to build on a single panel, much less the finished sail. Building the sail was about as difficult for me as building the boat, but it was worth it.
The lug sail gets reinforcement patches on all four corners where you attach it to the spars (bend), and there's also a reefing point for when the wind starts to pick up (freshen). Modern sails have three corners (Marconi rig).
I opted for the less expensive white Dacron sail kit, but there's also a classic red (tanbark) colored kit that's $100 more expensive. Before I sewed a single stitch, I carefully traced every part of the sail kit onto painter's tarp poly film so I can always use the templates to build another sail, all I need to do is buy the tanbark cloth.
Step 11: Rigging Your Sailboat...

This seems to be the trickiest part for most people, probably because there are numerous ways it can be successfully rigged, depending on your experience, preferences or criteria. It's confusing because you have to know what the finished setup will look like in your mind while you're staring at a pile of ropes. I chose a setup that allows the most room in the cockpit for a full-sized adult, so the mainsheet is led forward of the skipper's position. This keeps the skipper's attention forward so they're looking where they're going. I have another boat where the mainsheet is behind the skipper and it takes some practice getting used to.
The lines I made up (rope becomes a line when you give it a job description) were the halyard (hauls the sail up), the mainsheet (adjusts the angle of the sail to the wind = trim) and a traveler bridle (where the mainsheet attaches to the boat). I got fancy and spliced all my ends, but you can just as well use a bowline knot.
I installed a cheek block at the top of the mast instead of the large diameter hole in the directions. I wanted the halyard to run as smoothly as possible when setting the sail. Then I installed a pair of cleats at the base of the mast, one for the halyard and one for the downhaul (cunningham). With both of these lines pulling in opposite directions, it locks the sail in place, flat, so it effectivley acts like a wing. The main halyard attaches to the gaff with a snap onto a padeye. This allows easy on/easy off when rigging at the boat ramp. I also used a small loop (parrel) around the mast and through the eye to keep the gaff located close to the mast. I looped the downhaul over the boom and down to the cleat to try to keep the gooseneck from twisting. Note, except for the blocks, just about all of the hardware used on rigging a boat this size can come in stainless steel or brass/bronze, depending on the look you're going for. If you plan on installing oarlocks to row the boat, this decision becomes even more important to the final look of the boat.
For the mainsheet, I made a short bridle between the handles on the transom with a small eye tied in the center. This allows a place for the snap on the end of the mainsheet to attach to. I could've just as easily allowed the snap to slide, which would give the bridle the function of a traveler, but would affect its pointing ability (sail upwind). The mainsheet is then run to a block on the end of the boom, then to another block in the middle of the boom. This leaves the main cockpit area unobstructed with running rigging. Make sure your mainsheet is long enough for your boom to swing forward of 90° to the boat, with enough to still come back to the cockpit for the skipper to control. A stop knot at the end of the mainsheet will keep the mainsheet from getting away from you and give you something to grip.
The rudder pivot hardware (gudgeons and pintles) must be installed perfectly vertical and on the exact centerline of the boat so that she will sail well. Drill and fill the necessary holes for this hardware. Be careful with the spacing. It's designed to be easily installed and uninstalled while underway.
With this particular rigging layout, when under sail, the skipper must constantly keep the mainsheet in hand, which is a good idea anyway for safety reasons (if you get hit by a gust of wind = puff, you won't get blown over = capsize). The tension on the mainsheet is easily manageable for any size skipper. On larger boats, the mainsheet is held by a fiddle block with a cam cleat, which is not necessary for a boat this size. With that being said, a possible future upgrade would be to install a block and a camcleat somewhere on the centerline of the boat so that more advanced sailors wouldn't need to constantly have to oppose the tension on the mainsheet. Of course the trade-off would be the hardware would probably be somewhere you might want to sit.
Another upgrade I figured out after actually taking her sailing would be to rig up a bungee/shock cord system that will hold the daggerboard both in an up and down position. With the current setup, the centerboard is held down by gravity and must be pulled out of the slot when beaching.
Step 12: Go SAILING!

Because I wanted to be able to go sailing by myself if needed, I made a dolly out of 2x4's and large pneumatic tires (which makes the dolly float). The dolly fits securely between the center and aft thwarts when driving out to the lake. The sides on the dolly lock against the skids on the bottom of the boat so it can't twist. Roll the sail up with the spars and wrap it with the main halyard. At the designed length, the mast doesn't fit inside the boat, but it seems a bit long, so some people have cut the mast down enough so that it fits inside the boat.
Out at the lake, unload the boat, slide the dolly underneath and you're ready to roll down to the ramp. At the launch, roll the boat out into the water until it floats off the dolly, toss the dolly off to the side out of everybody else's way. Drop the daggerboard into the slot and install the rudder assembly. Facing into the wind (important), stick the mast into the receiver hole (partner), tie off the downhaul (cunningham) and hoist the sail until the downhaul is tight, then cleat off the main halyard. Reave the mainsheet (run the line through the blocks) and you're ready to go sailing.
I've found that this boat sails very well. The lug sail makes it very easy to sail upwind (weather helm), it's a little more tender for a large adult, more so than a boat with a hard chine, like an El Toro/Optimist but it's a lot more graceful looking. The payload is very reasonable for a boat this size. My wife and son can easily (and safely) go sailing with me and I don't even need anyone's help to get it rigged and launched. All in all, this is one of the best projects I've every built. I hope you too can discover the joy of building your own boat and then take her sailing. Remember, in sailing, the wind is free, but nothing else is...
This is my very first Instructable after many years of referencing this excellent site to build numerous cool projects (you should see my next post). Anyway, I hope you enjoy it and please feel free to ask any questions you may have and I'll do my best to answer them. I'm planning on building a larger boat in the near future so stay tuned...

Participated in the Wood Contest

Participated in the On a Budget Contest
Recommendations

Made with AI - Autodesk Design & Make - Student Contest

Remake It - Autodesk Design & Make - Student Contest

All Things Pi Contest

Sailboat Mast Step: Everything You Need to Know
by Emma Sullivan | Aug 22, 2023 | Sailboat Maintenance

Short answer sailboat mast step:
The sailboat mast step is a structural component located at the base of the mast, designed to support and secure the mast to the deck. It provides stability and distributes the loads generated by the sail rigging.
The Importance of a Sailboat Mast Step: Guide to Understanding the Basics
Title: Navigating the High Seas: Unveiling the Crucial Role of a Sailboat Mast Step – An Insightful Guide to Mastering the Basics
Introduction:
Ah, the majestic allure of sailing! Picture yourself gracefully gliding through crystal clear waters, propelled by the wind’s gentle embrace. However, amidst all this nautical enchantment lies a small yet indispensable component – the sailboat mast step. Often overlooked by novice sailors, this humble support mechanism plays a vital role in ensuring your voyage remains smooth and secure. Embark on this informative journey as we unravel the mysteries surrounding sailboat mast steps and comprehend their profound importance.
1. What is a Sailboat Mast Step?
At first glance, it might be easy to dismiss the mast step as an insignificant element within the grand scheme of sailing machinery; however, nothing could be further from the truth. In essence, a mast step is a framework installed at the bottom end of a sailboat mast that rests atop or attaches to its deck. Functioning as both a base and pivot point for your sail ‘s central support system, it keeps everything correctly aligned while enabling controlled movement during cruising or racing.
2. Stability and Structural Integrity:
Imagine setting off on an adventure across turbulent seas without trust in your vessel’s backbone? The mast step serves precisely this purpose – providing stability and structural integrity to your boat’s entire rigging system. By supporting not only vertical loads but also lateral forces generated by wind pressure against your sails, it ensures optimal weight distribution and prevents any undue stress on critical components such as hulls and decks.
3. Load Distribution:
When hoisting those breathtaking sails aloft into heady winds, you may unwittingly put excessive strain on various areas of your boat’s structure if not mindful of load distribution. Fear not, dear sailor – here comes our protagonist! By effectively transferring rigging tensions into different parts of your vessel while keeping them balanced throughout, the mast step guarantees an even distribution of forces. This not only minimizes the risk of catastrophic failures but also aids in maintaining a steady course through treacherous waters.
4. Sail Performance and Efficiency:
A sailboat can only reach its full offshore potential if all components function harmoniously, embracing a symbiotic relationship between mechanics and craftsmanship. The mast step is instrumental in achieving this synergy by fostering optimized sail performance and efficiency. Through its stable base, it enables your sails to hold their shape accurately while maximizing airflow over their surfaces, thus harnessing wind power to maximize propulsion speed and minimize energy wastage.
5. Ongoing Maintenance and Care:
The importance of regular maintenance cannot be overstated when it comes to ensuring both safety and performance on the open seas . The mast step is no exception, requiring vigilant care to stand the test of time against harsh marine conditions. Regular inspections for cracks, corrosion, or any form of wear should be carried out diligently, allowing you to detect potential issues before they become disasters-in-waiting.
Conclusion:
And so ends our enlightening voyage into the realm of sailboat mast steps – an unsung hero that safeguards your sailing experience with unyielding dedication and grace. While often overlooked by seafaring enthusiasts, comprehending the vital role played by this seemingly mundane apparatus will empower you as a sailor, enhancing not only your understanding but also your overall enjoyment throughout each adventure on high seas. So hoist those sails high, dear mariner – with a firm grasp on the importance of your sailboat’s mast step!
How to Properly Install and Maintain Your Sailboat Mast Step: A Step-by-Step Approach
Title: Sailboat Mast Step Installation and Maintenance: A Comprehensive Step-by-Step Guide
Introduction: Sailing enthusiasts understand the importance of a properly installed and maintained mast step. This crucial component not only supports the mast but also ensures the structural integrity of a sailboat. In this guide, we will walk you through the process of installing and maintaining your sailboat’s mast step with expert precision, highlighting key considerations that warrant attention along the way.
Step 1: Assessing Your Mast Step Needs Before diving into installation or maintenance, it’s crucial to assess your specific requirements. Different types of sailboats may have varying mast step designs, materials, and reinforcement needs. Familiarize yourself with these details by referring to your boat’s manual or consulting with professionals in order to make informed decisions regarding suitable materials, tools, and techniques.
Step 2: Preparation for Installation Once you’ve acquired all necessary materials and tools, begin by carefully inspecting your boat’s hull where the mast step will be placed. Ensure that the surrounding area is solid, free from any weakness or damage that could compromise overall structural stability. If required, reinforce or repair any underlying surfaces before proceeding further.
Step 3: Removing Old Mast Step (If Applicable) In cases where you are replacing an old mast step rather than installing a new one, begin by carefully removing the existing component. Exercise caution during this step to avoid causing any collateral damage to adjacent structures or components. Preserve any reusable hardware and identify areas where re-sealing may be needed later on.
Step 4: Positioning and Alignment Accurate positioning of the new mast step is critical for both performance and longevity purposes. Depending on your boat’s design specifications, consult relevant calculations or manufacturers’ guidelines while placing considerable emphasis on alignment accuracy. Employ laser leveling tools if necessary to ensure perfect verticality in relation to your boat ‘s longitudinal axis.
Step 5: Securing Installation With the mast step in its ideal position, secure it to the boat’s deck or hull using marine-grade fasteners. The type of fasteners required may vary according to boat size and construction materials. Stainless steel or corrosion-resistant alternatives are generally recommended due to their durability and weather resistance properties. Pay attention to torque specifications recommended by the manufacturer to avoid under or over-tightening.
Step 6: Reinforcement Measures To enhance longevity, consider implementing reinforcement measures around your newly installed mast step. This can involve applying an epoxy resin layer or glass fiber reinforcement, depending on your sailboat’s design and construction. These additional measures help distribute stress more evenly, protecting against potential cracks or damage caused by excessive load forces.
Step 7: Waterproofing and Sealant Application One crucial aspect of maintaining your mast step is avoiding water ingress that could lead to internal hull damage, rotting, or corrosion. Prioritize proper waterproofing by applying a high-quality marine sealant generously around all joints between the mast step and the deck/hull interface. Regularly monitor these areas for signs of wear and reapply sealants as necessary.
Conclusion: Installing and maintaining your sailboat’s mast step is an essential task that demands precision and thoroughness. By following this comprehensive guide, you’ll equip yourself with the knowledge necessary to ensure a sturdy foundation for your mast while safeguarding against potential complications caused by improper installation or lackluster maintenance. So go ahead—set sail confidently knowing that every journey is supported by a well-installed and well-maintained mast step!
Frequently Asked Questions about Sailboat Mast Steps: All Your Doubts, Answered!
Are you considering installing mast steps on your sailboat but have some burning questions? Well, fret no more because we are here to answer all those frequently asked questions about sailboat mast steps and put your doubts to rest! So, let’s dive right in and get you on the right track to enhancing your sailing experience.
1. What are mast steps and why do I need them? Mast steps are essentially ladder-like rungs that are attached to the mast of a sailboat . Their primary purpose is to provide easy access for crew members or solo sailors to climb up the mast safely . Whether it’s for maintenance, repairs, or just enjoying an exhilarating view from higher up, having mast steps ensures effortless elevation.
2. Are all mast steps created equal? Not at all! Mast steps come in various designs, materials, and sizes. From traditional wooden rungs to modern aluminum or stainless steel options – there are choices galore. The selection will depend on factors such as boat size , personal preference, durability requirements, and budget constraints.
3. Can I install mast steps myself? Absolutely! With a moderate level of DIY skills and some basic tools like a drill and screws or bolts, you can easily install mast steps yourself. However, it is crucial to follow manufacturer guidelines and ensure they are securely fastened according to load-bearing recommendations.
4. How many mast steps do I need? The number of mast steps required depends on the height of your sailboat’s mast and how often you anticipate needing access up there. A general rule of thumb is that shorter masts may require fewer steps while taller masts may benefit from additional rungs for enhanced safety and convenience.
5. Will installing mast steps weaken my mast? When installed properly following recommended guidelines by reputable manufacturers, the added weight and drilling required for attaching mast steps should not significantly weaken your sailboat ‘s mast structure. However, if you have concerns or own an older vessel, consulting with a marine expert or surveyor can provide peace of mind.
6. Can mast steps be easily removed if needed? Yes, most mast steps are designed to be removable for various reasons such as rigging repairs or sailing in rough weather conditions where additional windage needs reducing. It’s important to consider this aspect when selecting your mast step type and installation method, ensuring they can be easily detached and reinstalled for practicality.
7. Are there any alternatives to traditional mast steps? Indeed! If you’re looking for more flexibility or prefer not to drill holes in your mast, alternative options like Mast Climbers or Mast Ladders are available on the market. These innovative products offer temporary attachment systems that don’t require permanent modifications to your sailboat’s rigging .
8. Can I use mast steps for something other than climbing the mast? Certainly! While their primary purpose is accessing the upper sections of the boat , creative sailors have found various uses for mast steps. They can act as convenient handholds while moving around on deck, hold flags or radar reflectors, support antennas or cameras – imagination is the limit!
So there you have it – a comprehensive collection of frequently asked questions about sailboat mast steps answered in a detailed yet digestible manner. Now armed with knowledge, you can confidently choose the right kind of mast steps for your sailing adventures and set sail towards new heights (literally!).
Troubleshooting Common Issues with Sailboat Mast Steps: Solutions and Tips
Title: Troubleshooting Common Issues with Sailboat Mast Steps: Solutions and Tips
Introduction: As an avid sailor, you know that every component of your sailboat plays a crucial role in its performance. Among these, mast steps often remain underrated but are essential for safe and efficient sailing . However, like any other boat component, mast steps can encounter common issues. In this blog post, we will delve into these issues and provide you with clever solutions and tips to troubleshoot them effectively .
1. Loose or Wobbly Mast Steps: One frustrating issue that sailors commonly face is loose or wobbly mast steps. This problem not only affects stability but also poses a safety risk while climbing up or down the mast. The primary cause behind this issue is wear and tear over time or improper installation techniques.
Solution: To fix loose or wobbly mast steps, start by inspecting their attachment points. If screws are found to be loose due to repeated vibrations from sailing, tighten them securely using appropriate tools. In some cases, you might need to replace worn-out screws with new ones made of stainless steel for enhanced durability. If the issue persists even after tightening the screws, consider adding additional support by installing backing plates beneath the step mounts. These plates distribute weight evenly across a larger surface area and provide extra reinforcement against movement.
2. Corroded Mast Step Hardware: Sailing in saltwater environments exposes your boat’s metal components to corrosion risks over time – mast step hardware being no exception. Saltwater corrosion can weaken bolts and brackets holding your mast steps in place.
Solution: Regular maintenance is key to combating corrosion issues effectively. Periodically inspect all parts of your sailboat ‘s mast steps for signs of rust or deterioration. Clean off any accumulated salt residue using freshwater and apply a protective coating such as marine-grade paint or anti-corrosion spray. Moreover, consider upgrading to stainless steel hardware when replacing corroded parts. Stainless steel’s high resistance to corrosion makes it an excellent choice for withstanding harsh environments.
3. Cracked or Damaged Mast Steps: Harsh weather conditions, accidental impacts, or excessive loads can cause cracks or damage to your mast steps. Such structural issues compromise both functionality and safety, warranting immediate attention and repair.
Solution: Before you attempt repairs, evaluate the extent of damage to determine whether repairing or replacing the mast step is necessary. For minor cracks, reinforce them using marine-grade epoxy or sealant, followed by sanding and re-painting. In cases where the damage is severe, it is recommended to replace the entire mast step assembly. Choose a replacement that matches the specifications of your sailboat’s rigging system for optimal performance.
4. Difficult Accessibility: Some sailboat models may have mast steps positioned in challenging-to-reach areas. In such instances, accessing these steps can become a tedious task during routine maintenance or emergencies.
Solution: To overcome accessibility challenges with mast steps placed in tight spots, consider utilizing specialized equipment like telescopic ladders or portable platforms designed explicitly for sailboat maintenance. These clever tools allow convenient and safe access while minimizing risks of accidents or damages during climbing.
Conclusion: Mast steps are indispensable components that demand regular inspection and troubleshooting due to their exposure to various potential issues . By addressing loose fittings, combating corrosion issues promptly with proper care and upgrading hardware selectively, you will ensure safer climbs up your sailboat’s mast ladder whilst preserving functionality and longevity. Remember that prioritizing routine checks of your mast steps will not only enhance your overall sailing experience but also keep you prepared for enjoyable journeys without unexpected hurdles!
Top Tips for Choosing the Right Sailboat Mast Step for Your Vessel
Top Tips for Choosing the Right Sailboat Mast Step for Your Vessel: A Comprehensive Guide
When it comes to sailboat maintenance, one crucial element that often goes unnoticed is the mast step. The mast step plays a vital role in supporting and distributing the load of the mast, ensuring smooth sailing and preventing damage to your vessel. However, choosing the right sailboat mast step can be a daunting task with numerous options available in the market. To help you navigate through this process, we have gathered some top tips that will assist you in selecting the perfect mast step for your beloved vessel.
1. Assess Your Vessel’s Type and Size The first tip on our list is to thoroughly understand your sailboat ‘s type and size. The appropriate mast step will greatly depend on these factors as different types of sailboats require specific design and construction features. For example, a small racing dinghy might need a simple aluminum plate with minimal mounting requirements, while a larger cruising yacht may necessitate a more robust and durable stainless steel or composite construction.
2. Consider Material Strength and Durability Once you have identified your sailboat’s type, consider the materials used in constructing the mast step. Various materials like stainless steel, aluminum, or composites offer differing levels of strength and durability. Stainless steel is highly resilient against corrosion but can be heavier than other alternatives like aluminum or carbon fiber composites. Strike a balance between strength, weight sensitivity, and resistance to ensure longevity without adding unnecessary weight to your vessel.
3. Evaluate Load Capacity Understanding the load capacity required for your mast step is essential when making an informed decision. Depending on your sailboat’s rigging system and intended use (racing or cruising), different loads are applied onto the step at various angles while under both static (moored) and dynamic (sailing) conditions. Consult technical references or seek advice from professionals to ascertain accurate load calculations based on your vessel’s size and intended usage, ensuring that your chosen mast step accommodates these demands.
4. Consider Ease of Installation and Maintenance When it comes to choosing the right sailboat mast step, remember to consider the installation process and ongoing maintenance requirements. Opt for a mast step that can be easily installed or replaced without extensive modifications or costly alterations to your vessel’s structure. Similarly, look for options that require minimal maintenance while still providing sufficient structural integrity and longevity. A little extra time invested in selecting a low-maintenance option will save you valuable hours on-board, allowing more time for sailing adventures .
5. Seek Quality Craftsmanship and Reputation Never underestimate the importance of quality craftsmanship when it comes to selecting a sailboat mast step. Products backed by reputable manufacturers with proven track records are more likely to offer superior durability and strength compared to lower-quality alternatives. Brands known for their attention to detail, adherence to industry standards, and use of high-quality materials should be prioritized during your search.
6. Consult Other Sailors and Experts Don’t hesitate to tap into the knowledge base of fellow sailors or seek guidance from professionals in boatyards or yacht clubs during the selection process. Fellow sailing enthusiasts may have valuable insights or recommendations based on their own experiences with various mast steps—learning from their successes (or failures) can go a long way in helping narrow down your choices.
By carefully considering these top tips for choosing the right sailboat mast step, you can ensure that your vessel remains structurally sound while enjoying smooth sailing adventures for years to come. So invest your time wisely in making this decision—the perfect choice awaits!
Expert Advice on Upgrading or Repairing your Sailboat’s Mast Step: Dos and Don’ts
Welcome all sailing enthusiasts! Today, we are delving into the intricate world of mast steps – those vital components that hold your sailboat ‘s mast securely in place. Whether you’re planning to upgrade or repair your mast step, it is crucial to understand the dos and don’ts associated with this task. So, without further ado, let’s dive into some expert advice on enhancing or fixing your precious sailboat’s mast step!
The importance of a sturdy and well-maintained mast step cannot be overstated. This tiny yet powerful component acts as the foundation for your entire rigging system, ensuring that your mast remains upright and efficient during all your nautical adventures. Let’s begin with some essential dos when it comes to dealing with your sailboat’s mast step.
DO: Regularly Inspect Your Mast Step Periodic inspections allow you to identify potential issues early on and prevent any major malfunctions down the line. Look out for signs of corrosion, rust, cracks, or any other form of damage that might compromise the integrity of the mast step. Remember: prevention is always better than cure!
DO: Prioritize Upgrading if Necessary If regular inspections uncover significant wear and tear or structural weaknesses in your current mast step, consider upgrading to a more robust and durable model. Investing in high-quality materials like stainless steel or aluminum can significantly enhance longevity and resilience – ensuring a smoother sailing experience for years to come.
DO: Seek Professional Advice Professional guidance should never be underestimated when it comes to critical repairs or upgrades involving the mast step. Consult an experienced marine technician who can assess the state of your mast step accurately, offer tailored recommendations, and guide you through any necessary modifications seamlessly.
DO: Maintain Proper Alignment Inspecting alignment between the base of the mast and the corresponding slot or pocket in the boat’s deck is key to avoiding unnecessary stress on both components . Misalignment can lead to excessive forces exerted on the mast step, potentially resulting in damage or failure. Regular realignment ensures optimal load distribution and keeps your sailboat sailing smoothly.
Now that we’ve covered some essential dos, let’s navigate towards the don’ts – those pitfalls it’s best to avoid when dealing with your sailboat’s mast step.
DON’T: Neglect Maintenance Ignoring the maintenance needs of your mast step is a recipe for disaster. Saltwater exposure, high winds, and general wear and tear can all take their toll on this small yet critically important component. Devoting time to cleaning, lubricating, and inspecting your mast step will pay dividends in terms of longevity and reliability.
DON’T: Rush Repairs A hasty approach to repairing a damaged or malfunctioning mast step can have dire consequences. Take the time to thoroughly assess the problem before proceeding with any repairs; rushing may lead to temporary fixes that ultimately prove inadequate or worsen the issue .
DON’T: Cut Corners on Material Quality Selecting subpar materials for repairing or upgrading your mast step is an invitation for trouble. Inferior components are more likely to succumb to corrosion and fatigue quickly – compromising both safety and performance. Always choose high-grade materials that match the specific requirements of your boat ‘s rigging system.
DON’T: Attempt Complex Repairs Without Proper Expertise While DIY enthusiasm is commendable in many areas of sailing maintenance, complex repairs involving the mast step should be left in capable hands. Novice attempts without proper expertise can inadvertently cause more harm than good. Consulting professionals ensures sound solutions and prevents unnecessary headaches along the way.
So there you have it – expert advice on upgrading or repairing your sailboat’s mast step summed up with professional wit! By following these dos and avoiding these don’ts, you’ll be well-prepared to enhance the reliability and longevity of this crucial component of your beloved seafaring vessel. Smooth sailing awaits you!
Recent Posts

- Sailboat Gear and Equipment
- Sailboat Lifestyle
- Sailboat Maintenance
- Sailboat Racing
- Sailboat Tips and Tricks
- Sailboat Types
- Sailing Adventures
- Sailing Destinations
- Sailing Safety
- Sailing Techniques
How to build a mast ladder by yourself to climb solo to the top of the mast
Greetings sailors,
Today we are going to see how to make a mast ladder to be able to comfortably climb the mast of our boats for about 50 euros and saving us more than 800.
This will even allow you to climb comfortably and quickly alone.
Climbing the mast of our sailboats is a necessity that we can have with certain frequency and that is not without difficulty.
Either to check the rigging, do maintenance of the wind equipment, antennas, and other instruments that rest on the top of it, or simply to install a new gadget that arises from the ideas that we propose in this blog, having the possibility to climb the mast comfortably is something very positive.
There are multiple methods to get on it, especially with the help of another person.
The most common: that they hoist you with the main halyard as if they were hoisting the sail, but it is still hard work for you, and for the person, you have committed to help you.

When it comes to climbing without help, the options are more limited and almost all of them involve using climbing techniques to climb with blockers through one of the halyards, even more arduous work if possible.
But obviously there are some very comfortable techniques that are usually the most used by sailors who live in their own sailboats, such as, for example, putting steps to the mast.
Either they are fixed, made with aluminum sheet and riveted along the mast, or folding riveted all over the mast (many holes have to be made) and at a very significant cost (+ 25 euros per step). Even both methods have their aesthetic problems, weakening the pole with so many holes and multiplying the possibility of damaging a halyard that has a tendency to get stuck in them.
What we are going to do is something intermediate between these options, we are going to build a ladder that we will raise as if it were the mainsail, we will tighten it so that it remains well attached to the mast and that will allow us to climb comfortably both with assistance and in solitary. But always securing us by an additional means. This is very important: w hen climbing the mast we must never rely solely on a single method or anchor point.
So let’s get to it ..
For this project we will need to acquire a series of material that will require an investment of about 50 euros for a ladder of just over 12 meters long, taking into account that a ladder of the same length already made costs over 400 euros, it will be a very economical project …
A roll of good quality sewing thread that is suitable for use in a sewing machine, in my case I have bought this and I use it a lot in all kinds of repairs on the boat:

You have it available on amazon https://amzn.to/3tHI2FN
A roll of polypropylene strap 25mm wide and 50 meters long, like the one used in backpack straps, which will be the basis of our scale. I bought this for 15 euros here on amazon :
https://amzn.to/2LqCqy8
And finally to make the steps we are going to use a 20mm thick round aluminum tube. 20mm is the ideal thickness, below this thickness it can be bend with your weight (I say this from experience with the 15mm one), so I would recommend at least 20mm.
In our case, we bought 8 meters to make 24 33cm steps for our 12m scale in a DIY store, and we spent about 27 euros. The tube should not be difficult to find at any DIY store, you went to buy it at bricomart.
https://www.bricomart.es/tubo-redondo-aluminio-anodizado-20-x-1-mm-1-m.html?___store=default
Apart from the material itself that you will need to make the ladder, you must have some skills and tools, mainly: metal saw, drill, drill bits, some sewing needles, a sewing machine and the ability to use it.
Do not be scared with the sewing machine if you do not already have it. Having a sewing machine, if you have a boat, will save you a lot of money and for this mission the knowledge you will need is very little, because you only have to make very long straight seams.
I bought a very cheap sewing machine on Amazon ( https://amzn.to/3cNUBJj ) for less than 50 euros and I am learning with it. I have done this project and some other repairs on the boat .. They also say that the LIDL sewing machine works very well, ..
Well, let’s get to work, the time has come to start.
The first thing we will do is fold the strap in half and sew the two halves together with two seams along the entire tape. This is where you will quickly acquire skill with the sewing machine. You can see the process in detail in the video of this post.
The objective of these two seams is to make the strap twice as thick and at the same time have the opportunity to insert the steps between the two already sewn straps.
In order to determine in which position each of the steps will go, we will fold the strap in half again and there we will mark the position of the first step, 60 centimeters from the fold, and the rest of the steps, which will be 40 cm , these being the marks that we have to make by measuring on the folded strap (so we will mark both halves at the same time).

Once we have the strap ready, we are going to prepare the steps. From the aluminum tube that we have bought, we will cut smaller pieces, 33 cm, so from each meter of tube, we can take 3 steps.
Once the steps are cut, we are going to make a hole for each one on each side, which will help us to better sew them to the straps and prevent them from moving transversely.
And once we have everything prepared, it’s time to sew the steps. The operation is going to be very simple. In the position that we have marked on the tapes for each step, we will open the seam that we made by machine at that point a little, enough to be able to insert the corresponding end of the step between the tapes, and then, by hand, we will sew over and below the step (at least three passes below and two above), using the hole to pass from one side to the other, with which we will be able to fix the steps in their position.
We will repeat the operation for each end of the step and in the same way for each step, checking that the alignment is correct (if you marked the tapes correctly, the alignment will be adequate).

So, with patience, and while we watch something on television (I had time to watch two movies on Netflix while sewing the steps), we will have our scale finished.
The detail of sewing the fold of the upper end of the scale is very important, so that it does not slip if we step on one end or another of the steps.

So after a lot of effort you will have something like this:

And finally it’s time to go up
It is very important not to rely solely on the ladder .. it is very dangerous .. whenever you climb the mast you have to be secured to at least two different systems ..
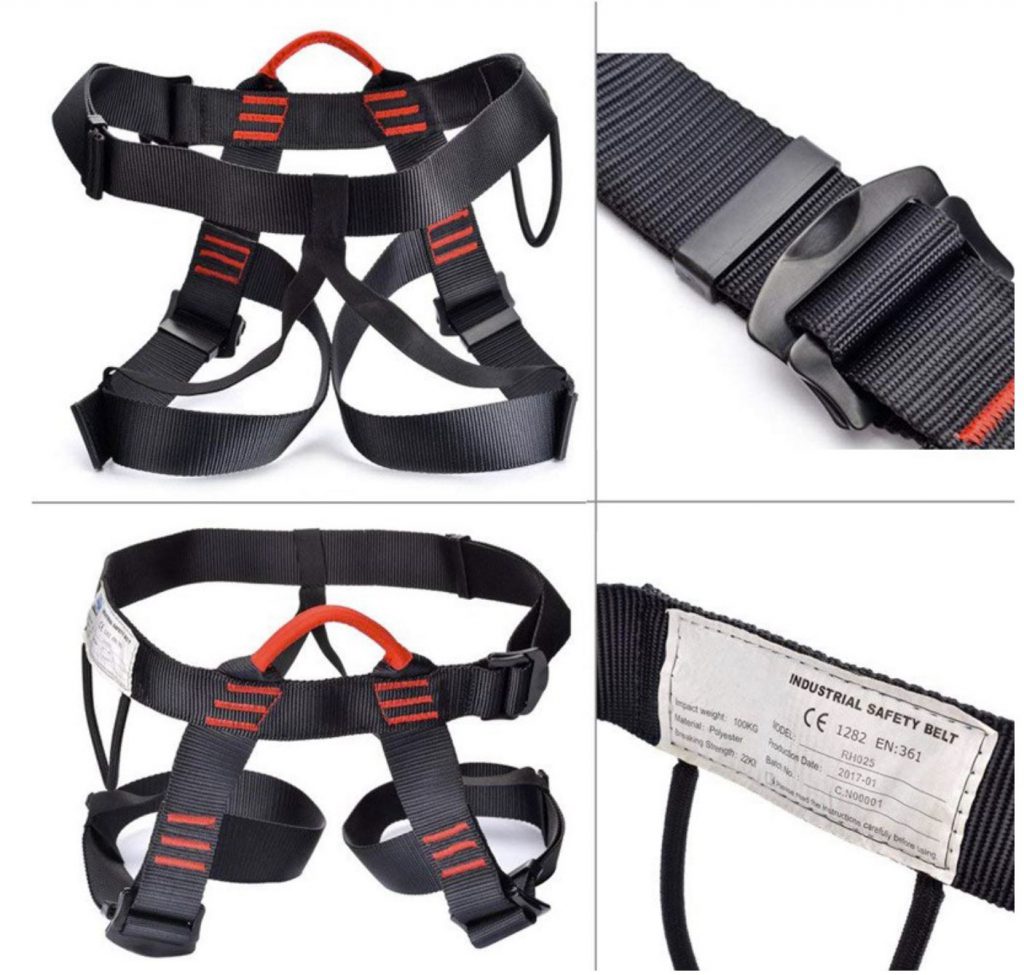
So take a climbing harness or similar and with a blocker or with a Prusik knot, secure yourself to the other halyard while you go up, or if you have help … tie yourself to the halyard and have a friend assure you from the corresponding winch ( in the video you have more details on how to do it ).
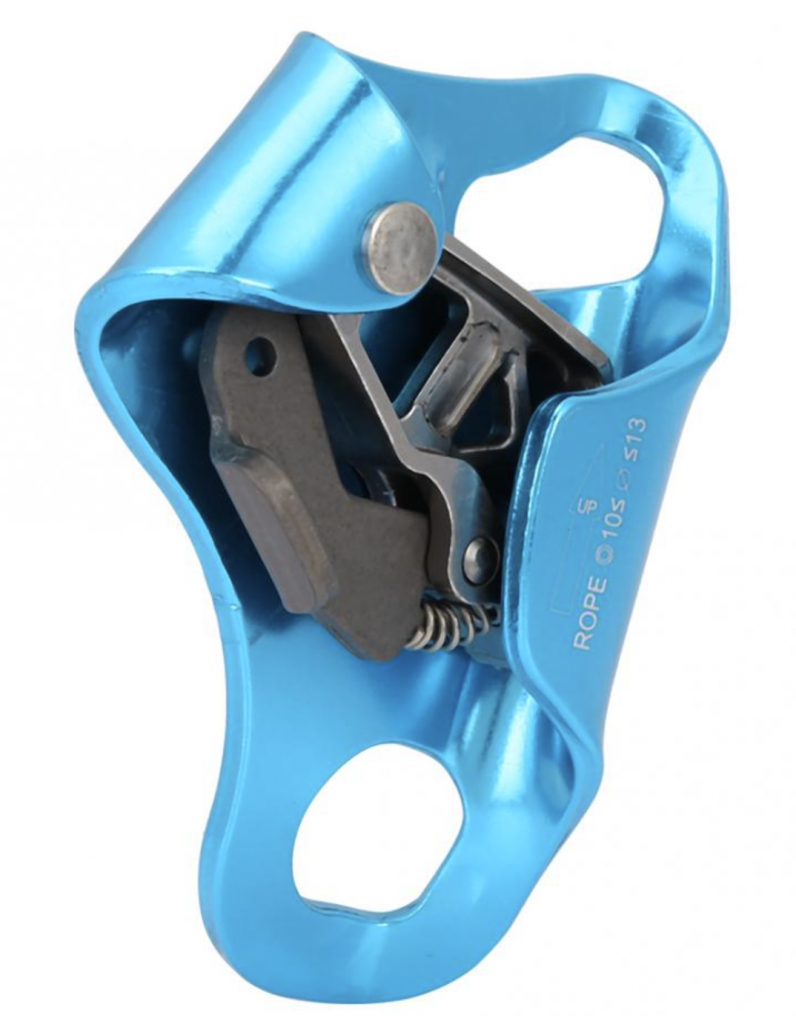
As for self-belay … a blocker is an instrument that only runs in one direction on the rope, the low-cost version of it is a Prusik knot … It can be easily moved by hand, but if you hang onto it, it blocks in front of the rope preventing you from falling.
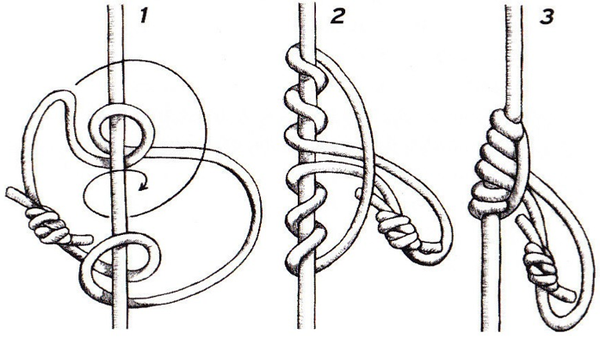
For the climb you can also put a strap around the mast secured to your harness to ensure that you do not separate too much from it or the ladder.
The descent is a bit more complicated by self-belaying, but you can use a climbing eight or another type of brake and rappelling techniques to be sure or the same Prusik knot, lowering it with your hand as you go down.
But seriously … do not skimp on making sure you are safe … always secure you at least two points and if you can three, then better.
Conclusions
The scale is magnificent to climb: with your hands around the mast and the blocker can climb just alone without any problem … the worst thing is the possibility that it will separate from the mast if you hang on it so it is very important to tension well the lower end of the same so that it always works in tension and remains close to the mast … or better yet, secure it to the mast while climbing or through the mainsail skates, putting a skate every four steps, or some ropes through the steps below the crosspieces, something like this:
In that case, we will hoist it like the mainsail and it will stay well attached to the mast all the time, although to hoist it you have to remove the mainsail from the rail, which makes it a bit messier.
As for its construction … Well, once I have finished it, I see it as having been worth it … but at least 5 hours of work await you ahead, so if you are not very skilled and you can afford it, you can also consider buying one already made ..
Of course, prepare to pay around 900 euros, for something you can do yourself for 50.
Kinlevenmarine makes a fabulous one, as well as very expensive .. https://kinlevenmarine.com/shop/yacht-mast-ladder/ but there is no denying that she looks fabulous.
I am very happy with the work I have done and I am sure that I will put it to good use … and surely you too if you follow my channel and start putting more inventions on the masthead of your boat …
IMAGES
VIDEO
COMMENTS
In part twenty of this series on how to build a wooden Snipe class sailboat I show how I make a wooden mast from scratch. I mill blanks from left over cypres...
Building this New York 32 mast as was done originally requires hollowing out the thick forward and after staves in order to lighten their weight. So, once again using the mast plan, we made templates for the mast's inside shape at each section. The Spar Bench. The first step in building the mast is to construct a spar bench.
Using a hand plane or cabinet scraper, remove any excess glue. Joint and square one set of adjacent faces, then square the stock with a thickness planer. Cut to length. Your stock should now be 2.5" x 2.5" x 15.'. Tapering. If you are making a mast, you will want to taper the pole.
Structural Considerations. A mast/spar needs both strength and stiffness and be able to resist fatigue. Sometimes these characteristics can be conflicting. Strength or resistance to breaking in wood involves its elasticity which allows the wood to bend to absorb stresses. Whereas stiffness is the resistance to bending.
An instructional video on how to build a sturdy, affordable, wooden sailboat mast.
1 YEAR SUBSCRIPTION (6 ISSUES) PRINT $39.95. DIGITAL $28.00. PRINT+DIGITAL $42.95. Subscribe. I have developed a "new" mast construction method for use on light- to moderate-displacement sailboats having a Marconi rig, and for motorsailers. I put "new" in quotes because I am sure it has been thought of before now.
Here are the steps to follow when installing the cabin: Build the cabin on a flat surface using marine-grade plywood. Cut the cabin to fit the deck and hull and sand the edges to ensure a tight fit. Apply a layer of epoxy to the cabin and deck joint to seal it. Secure the cabin to the deck using screws or bolts.
Building a Sailboat Mast. Over the last two weekends, I helped my brother in law make a mast for his Barnegat Bay Sneakbox, a beautiful little wooden boat, built in 1922, in Barnegat, NJ. The original mast is in fine shape as is the rigging, but it has to be taken out of the hole to move the boat on a trailer, a tough job for a couple of people.
Sailboat masts are the unsung heroes of the sailing world, silently supporting the sails and ensuring a smooth journey across the open waters. Whether you're a seasoned sailor or a novice, understanding the intricacies of sailboat masts is essential for a safe and enjoyable voyage. In this comprehensive guide, we will delve into the world of ...
Using traditional boat-building techniques make the mast. The 8 pieces have previously been joined. Now shape and finish the mast.I have since made a quick...
A sailboat mast is a vertical pole or spar that supports the sails of a sailboat. It provides structural stability and allows for adjustment of the sail position to effectively harness wind power. Typically made of aluminum or carbon fiber, mast design varies based on boat size, sailing conditions, and intended use.
What material is commonly used to build sailboat masts? Answer: Sailboat masts are typically constructed using either aluminum or carbon fiber. Aluminum masts offer excellent durability, affordability, and ease of maintenance. On the other hand, carbon fiber masts provide superior strength-to-weight ratios, resulting in increased speed and ...
And many like to make a model of the real boat they are going to build. Here are the steps: Buy a dowel. Plane the dowel into a taper. Sand it. Tape off the top part that you want painted white. (The top is sometimes painted white so at night it can be seen.) Take black enamel paint thinned down and rub it on the mast.
When building a wooden sailboat, it is important to pay attention to every step, including the installation of the cabin and interior features. To install these features, follow the following steps: 1. First, measure and cut the materials for the cabin walls, floor, and ceiling. 2.
Short answer sailboat masts: Sailboat masts are vertical structures that support the sails on a sailboat. Typically made of aluminum, wood, or carbon fiber, masts vary in length and design depending on the type and size of the boat. They play a crucial role in providing stability and transferring wind energy to propel the sailboat
In this episode, we build a wooden 'A' frame, to use as a basic crane to remove our mast.We also take the opportunity to remove some of the old ugly, sagging...
Let the primer coat dry completely as per instructions. Use a brush or roller to apply the desired paint color, starting from the top and working down. Allow the paint to dry between coats and apply more coats if needed. To varnish the sailboat, apply a thin and even coat in the direction of the wood grain.
Step 1: Cutting Out the Parts... First, you'll need boat building plans. I purchased some very nice ones from a popular boat building website because I had a specific style in mind to build, a "pram". It's a Norwegian design with lots of buoyancy in the bow and building a pointy boat is a little more difficult.
Short answer sailboat mast step: The sailboat mast step is a structural component located at the base of the mast, designed to support and secure the mast to the deck. It provides stability and distributes the loads generated by the sail rigging. The Importance of a Sailboat Mast Step: Guide to Understanding the BasicsTitle: Navigating.
Video Instruction on how to build your own Carbon Mast for a Sailing Dinghy. These methods are not guaranteed, used them at your own risk. ©Daryl Wilkinson
The first thing we will do is fold the strap in half and sew the two halves together with two seams along the entire tape. This is where you will quickly acquire skill with the sewing machine. You can see the process in detail in the video of this post. Sewing one of the sides.
I needed a better way to hold the mast initially at a higher angle while raising the mast on my O'day 25 sailboat, when it is on the trailer. So I designed t...
Main Sail Furler System DIYFinally figured out how to make a big enough mast base bearing.Check out the entire build from start to finish https://youtu.be/ff...