- PRO Courses Guides New Tech Help Pro Expert Videos About wikiHow Pro Upgrade Sign In
- EDIT Edit this Article
- EXPLORE Tech Help Pro About Us Random Article Quizzes Request a New Article Community Dashboard This Or That Game Popular Categories Arts and Entertainment Artwork Books Movies Computers and Electronics Computers Phone Skills Technology Hacks Health Men's Health Mental Health Women's Health Relationships Dating Love Relationship Issues Hobbies and Crafts Crafts Drawing Games Education & Communication Communication Skills Personal Development Studying Personal Care and Style Fashion Hair Care Personal Hygiene Youth Personal Care School Stuff Dating All Categories Arts and Entertainment Finance and Business Home and Garden Relationship Quizzes Cars & Other Vehicles Food and Entertaining Personal Care and Style Sports and Fitness Computers and Electronics Health Pets and Animals Travel Education & Communication Hobbies and Crafts Philosophy and Religion Work World Family Life Holidays and Traditions Relationships Youth
- Browse Articles
- Learn Something New
- Quizzes Hot
- This Or That Game New
- Train Your Brain
- Explore More
- Support wikiHow
- About wikiHow
- Log in / Sign up
- Cars & Other Vehicles

How to Sail a Boat
Last Updated: May 13, 2022 Approved
This article was co-authored by Nitzan Levy . Captain Nitzan Levy is a Sailor, Social Entrepreneur, and the Founder of Sailors NYC, a recreational sailors’ club based in Jersey City, New Jersey that specializes in cruising boats and a variety of community programs. Capt. Levy has over 20 years of sailing experience and has sailed in many places around the world including: the Atlantic Ocean, the Mediterranean Sea, The Caribbean, and the Indian Ocean. Capt. Levy is a U.S. Coast Guard Licensed Master of vessels up to 50 Tons with Auxiliary Sail and Assistance Towing Endorsements. Capt. Levy is also a NauticEd Level V Captain Rank Chief Instructor, an American National Standards Assessor, an SLC instructor, an ASA (American Sailing Association) Certified Instructor Bareboat Chartering, and an Israeli licensed skipper on Boats for International Voyages. There are 9 references cited in this article, which can be found at the bottom of the page. wikiHow marks an article as reader-approved once it receives enough positive feedback. This article received 25 testimonials and 92% of readers who voted found it helpful, earning it our reader-approved status. This article has been viewed 958,362 times.
For centuries, the sea has captured the spirits of sailors and adventurers all over the world. In his poem "Sea Fever", John Masefield claimed that all he needed was "a tall ship and a star to steer her by" to feel complete. Breaking into the sailing world can be challenging, but this article will help guide you through the ebb and flood of the nautical world. As a note, this article will help get you started, but it cannot be overstated that before you begin, have an experienced sailor show you the standing and running rigging on your boat and their functions before you venture out on the water on your own.
Gaining a Basic Knowledge of Sailing

- Block: This is the nautical term for a pulley.
- Boom: The horizontal support for the foot of the mainsail which extends aft of the mast. This is what you want to watch out for when changing directions in a sailboat. It can give you quite a wallop on the head if it hits you.
- Bow: This is what the front of the boat is called.
- Centerboard: This is a (usually fiberglass) plate that pivots from the bottom of the keel in some boats and is used to balance the boat when under sail.
- Cleat: Cleats are what lines (or ropes) get fastened to when they need to be kept tight.
- Halyard: Lines that raise or lower the sails. (Along with the sheets, aka running rigging.)
- Hull: The hull is the body of the boat and consists of everything below the deck.
- Jib: This is the sail at the bow of the boat. The jib helps propel the boat forward.
- Genoa: A foresail which is larger than a jib.
- Keel: The keel is what prevents a boat from sliding sideways ("making leeway") in whatever way the wind is blowing and stabilizes the boat.
- Line: Lines are ropes. They are everywhere on boats. There is only one "rope" on a sailboat, the bolt rope which runs along the foot of the mainsail.
- Mainsail: As the name implies, this is the mainsail of the boat. It is the sail attached to the back of the mast.
- Mast: The mast is a large, vertical pole that holds the sails up. Some boats have more than one mast.
- Painter: This is a line positioned at the front of small boats. It is used to tie the boat to a dock or another boat.
- Rudder: The rudder is how the boat is steered. It is movable so that when you turn the wheel or tiller, the rudder directs the boat in the direction you would like the boat to go.
- Sheets: The lines that control the sails. (aka running rigging.)
- Spinnaker: The usually brightly colored sail used when sailing downwind or across the wind.
- Stays and Shrouds: Some wires make sure the mast stays upright, even in very heavy winds. (aka standing rigging.)
- Stern: This is the term for the back of the boat.
- Tiller: The tiller is a stick attached to the rudder and is used to control the rudder.
- Transom: This is what we would call the butt of the boat. It is the back part of the boat that is perpendicular to its centerline.
- Wheel: The wheel works the rudder, steering the boat.
- Winch: Winches help tighten the sheets and halyards. When these lines are wrapped around a winch (in a clockwise direction), a sailor can turn the winch with a winch handle, providing mechanical advantage which makes it easier to bring in the lines.

- Sloop : Sloops are the most common type of sailboat (when you think of a sailboat this is probably the one you picture in your mind.) It has a single mast and is rigged up with a jib in the front and a mainsail attached to the back of the mast. They can range in size and are ideal for sailing upwind.
- Catboat : A Catboat has a mast set up near the front of the boat and is a single-sail boat. They are small (or large, for that matter) and easily operated by one or two people.
- Cutter : Cutters have one mast with two sails in the front and a mainsail on the back of the mast. These boats are meant for small crews or groups of people and can be handled relatively easily.
- Ketch : A Ketch has two masts, with the second mast called the mizzen mast. The mizzen is shorter than the mainmast and is in front of the rudder.
- Yawl : Yawls are similar to ketches with the difference being that their mizzen masts are located behind the rudder. The reason for this placement is that the mizzen on yawls is for keeping balance, rather than for moving the boat forward.
- Schooner : Schooners are large sailboats with two or more masts. The mast in the back of the boat is either taller or equal in height to the mast at the front of the ship. Schooners have been used to commercially fish, transport goods and as warships.

- Port: When you are facing the bow (the front of the boat) the side to your left is the port side.
- Starboard: Starboard is the right side of the boat when facing the bow.
- Windward: As the name might imply, windward is the direction from which the wind is blowing, upwind.
- Leeward: This is also called ‘Lee’. This is the direction to which the wind is blowing, downwind.
- Tacking: Tacking is when you turn the bow of the boat through the wind so that the wind switches from one side of the boat to the other. This is when you most need to be mindful of the boom, as the boom will swing from one side of the boat to the other when you tack (you don’t want to be in its way when it does that.)
- Gybing (Jibing): This is the opposite of tacking, which means that it is when you turn the stern (or back) of the boat through the wind so that wind shifts to the other side of the boat. This is a more dangerous maneuver in a strong breeze than tacking since the boat's sails are always fully powered by the wind, and may react violently to the change in the orientation of the boat to the wind. Care must be exercised to control the boom during this maneuver as serious injury is a possibility if the boom travels across the cockpit uncontrolled.
- Luffing: This is when the sails begin to flap and lose drive caused by steering the boat into wind or easing (loosening) sheets.

Preparing The Boat

- Check the lines ( running rigging ) that raise and control the sails ( halyards and sheets respectively). Make sure that they are separated, not wrapped around each other or fouled on anything else, and that they all have a figure-eight knot or other stopper knot on the free ( bitter ) end so they cannot pull through the mast or sheaves.
- Pull all lines out of their cleats and off their winches. There should be nothing binding any line; all should be free to move and be clear at this point.
- If you have a topping lift—a small line that holds the back of the boom up and out of the way when the sail isn't in use—let it out until the boom sags downward freely, then re-tie or re-cleat it. Watch out for the boom; it's just swinging around at this point; it will cause a painful "clunk" if it happens to hit you or your crew. The boom will return to its normal, horizontal position when you hoist the mainsail completely.
- If so equipped, be sure that the tiller is properly attached to and controls the rudder. Your sailboat is now prepared for you to hoist the sails!

- If your boat doesn't have a windex, tie a couple of nine-inch pieces of old cassette tape, VHS tape, or oiled yarn to the shrouds—the rigging cables that hold up the mast. Place them on each side, about four feet up from the sides of the boat. These will show you from which direction the wind is blowing, although some sailors find cassette tape to be just too sensitive for this purpose.

- If your boat has a motor, use the motor to keep the boat pointed into the wind while you hoist sail.
- Here's a handy tip: if the water is not deep at your dock, or if you have no side pier, walk the boat out away from the dock and anchor it into the sand, and the boat will automatically point itself into the direction of the wind!
Hoisting The Sails

- There will be a small line ( outhaul ) attaching the rear corner of the mainsail ( clew ) to the end of the boom. Pull it so the foot of the main is taut, and cleat. This helps the mainsail have a smooth shape for the air flowing over it.
- Hoist the mainsail by pulling down on its halyard until it stops. It will be flapping around ( luffing ) like crazy, but that's OK for a short period of time. (Excessive luffing will drastically reduce the life and durability of the sail).
- The leading edge of the sail ( luff ) must be tight enough to remove folds, but not so tight as to create vertical creases in the sail.
- There will be a cleat in the vicinity of the halyard where it comes down from the top of the mast. Cleat the halyard. Using the jib halyard, raise the front sail ( jib , genoa or simply the headsail ), and cleat the halyard off. Both sails will be luffing freely now. Sails are always raised mainsail first, then the jib, because it's easier to point the boat into the wind using the main.

- Turn the boat to the left ( port ) or right ( starboard ) so it's about 90 degrees off the wind. This is known as a beam reach .
- Pull on the main sheet ( trimming ) until the sail is around 45 degrees away from straight back ( aft ). This is a safe place for the main while you trim the jib.
- You will start moving and tilting ( heeling ) away from the wind. A heel of more than 20 degrees usually indicates that you're being overpowered. Releasing the mainsheet momentarily ( breaking the main ) will lessen the amount of heel, and you will return to a more comfortable sailing angle of 10 to 15 degrees.

- The jib will form a curve or pocket; trim the sail until the front edge just stops luffing. Keep your hand on the tiller (or helm ) and stay on course!

- If you or the wind hasn't changed direction, this is the most efficient place to set the sails. If anything changes, you have to adjust them in response.
- You have just entered the world of the sailor, and you will have to learn to do many things at once, or suffer the consequences.
Sailing Your Boat

- When the wind is at your back and side ( aft quarter ), it's called a broad reach . This is the most efficient point of sail as both sails are full of wind and pushing the boat at full force.
- When the wind is at your back, you are running with the wind . This is not as efficient as reaching, because air moving over the sail generates lift and more force than just the wind pushing the boat.
- When running with the wind, you can pull the jib over to the other side of the boat where it will fill. This is called wing-on-wing , and you have to maintain a steady hand on the tiller to keep this sail configuration. Some boats have a "whisker pole" which attaches to the front of the mast and the clew of the jib which makes the jib much easier to control and keep full of wind. Be sure to be vigilant of obstacles and other vessels, as having both sails in front of you blocks a significant portion of your view.
- Be careful —when the boat is running, the sails will be way off to the side, and because the wind is basically behind you the boom can change sides suddenly ( jibe or gybe ), coming across the cockpit with quite a bit of force.
- If you have a wind direction indicator at the top of your mast, do not sail downwind (run) so that the wind indicator points toward the mainsail. If it does, you are sailing with the boom on the windward side ( sailing by the lee ) and are at high risk of an accidental jibe. When this happens the boom can hit you with enough force to knock you unconscious and out of the boat ( overboard ).
- It's a good practice to rig a preventer (a line from the boom to the toe rail or any available cleat) to limit the travel of the boom across the cockpit in case of an accidental gybe.

- On most sailboats this will be about 45 degrees from the wind direction.
- When you've gone as far as you can on this tack, turn the boat through the wind (or changing direction by tacking ), releasing the jib sheet out of its cleat or off the winch drum as the front of the boat ( bow ) turns through the wind.
- The main and boom will come across the boat. The mainsail will self-set on the other side, but you will have to quickly pull in the jib sheet on the now downwind side to its cleat or winch, while steering the boat so the mainsail fills and begins to draw again.
- If you do this correctly, the boat won't slow down much and you will be sailing to windward in the other direction. If you're too slow tightening the jibsheet again and the boat bears off the wind too much, don't panic. The boat will be pushed sideways a little until it gains speed.
- Another scenario would be to fail to put the bow of your boat through the wind quickly enough and the boat comes to a complete stop. This is known as being in irons , which is embarrassing, but every sailor has experienced it, whether or not they'll admit it is another story. Being in irons is easily remedied: when the boat is blown backwards you will be able to steer, and as the bow is pushed off the wind you will achieve an appropriate angle to the wind to sail.
- Point the tiller in the direction you wish to go and tighten the jib sheet to windward, ( backwinding the sail ). The wind will push the bow through the wind. Once you've completed your tack, release the sheet from the winch on the windward side and pull in the sheet to leeward and you'll be on your way again.
- Because speed is so easily lost when tacking, you'll want to perform this maneuver as smoothly and quickly as possible. Keep tacking back and forth until you get to your destination.

- Reefing almost always needs to be done before you think you need to!
- It's also a good idea to practice capsize procedures on a calm day too. Knowing how to right your boat is a necessary skill.

Storing the Sails

Community Q&A
Comprehension Quiz
- Try learning to determine the wind direction using your ears. Let the wind blow onto your back, then slowly turn your head left to right and back until you feel it "equalize" over your ears. Once you find that point, you now know the wind direction, and using this method, you can understand the wind more without having to use your eyes. [7] X Research source Thanks Helpful 2 Not Helpful 0
- Know how to read clouds and the weather they may bring. [8] X Research source Thanks Helpful 2 Not Helpful 2
- If something bad happens—too much wind, man overboard, etc.—remember that you can bring the whole thing to a halt simply by pulling all three sheets out of their cleats or off their winches. The boat will (mostly) stop. Thanks Helpful 2 Not Helpful 0
- Going overboard is a serious matter, especially if you are alone. Cold water, currents, and other boats all can account for serious dangers, and if the sails are up, the boat will take off much faster than you might expect. Additionally, many boats float so high on the water ( freeboard ) that it is difficult to climb in or haul people in without assistance. When sailing at night, always wear a shoulder-mounted flashlight and strobe emergency signaling device, which makes it much easier for a SAR (Search And Rescue) crew to spot you in the water. Thanks Helpful 36 Not Helpful 4
- In sailing, your very life may depend on doing things before they need to be done, when they first cross your mind. If you wait until it needs to be done, it may be too late or very difficult. Follow your instincts. Thanks Helpful 30 Not Helpful 5
- Remember the old maxim "It's better to be on the dock, wishing you were on the lake, than to be on the lake, wishing you were on the dock". Don't let enthusiasm overcome your good judgement on a day you should not go out. The apparent wind while tied alongside at the dock may be very different out on the water. Many novices (and experienced sailors, for that matter) get into trouble venturing out when there is too much wind to sail safely. Thanks Helpful 4 Not Helpful 0
- It is highly recommended that you at least have working knowledge of the nomenclature of the boat and have done some reading of in-depth material before attempting this sport yourself. Some highly recommended reads are: The Complete Idiot's Guide to Sailing , Sailing for Dummies , and Sailing the Annapolis Way by Captain Ernie Barta. Thanks Helpful 2 Not Helpful 0
- Know how how to use VHF radio to make a Mayday call from a Marine Vessel . In an emergency, it is usually the quickest way to summon help. Cell phones may be used, but VHF will be able to contact a nearby vessel much more quickly should you need assistance or be able to render same. [9] X Research source Thanks Helpful 1 Not Helpful 0
Things You'll Need
- A life vest (Personal Flotation Device) is mandatory on all boats for all passengers. (A pealess whistle attached to the PFD is an excellent idea!) You should wear one at all times. If you have children with you, they should wear one even when you are at the dock.
- Every vessel, regardless of length is required to have a certain amount of safety gear aboard. This ranges from an anchor with sufficient rode, flares, and other equipment as may be mandated by the Government. These regulations are for your safety and should be adhered to.
You Might Also Like

- ↑ http://www.lovesailing.net/sailing-theory/sailing-basics/parts-of-a-boat/parts-of-a-boat.php
- ↑ https://www.boats.com/resources/sailing-101-sailboat-types-rigs-and-definitions/
- ↑ http://www.discoverboating.com/resources/article.aspx?id=243
- ↑ https://www.uscgboating.org/images/486.PDF
- ↑ https://www.cruisingworld.com/learn-to-sail-101#page-2
- ↑ https://www.discoverboating.com/resources/how-does-a-boat-sail-upwind
- ↑ https://www.dummies.com/sports/sailing/finding-the-winds-direction/
- ↑ https://weather.com/news/news/read-clouds-meteorologist-20130826
- ↑ https://www.boatus.org/marine-communications/basics/
About This Article

To sail a boat, start by performing a detailed visual check of the cables and ropes that support the mast. Next, determine the wind direction by referring to the wind direction indicator at the top of the mast, then point the boat into the wind. Secure the bottom front of the mainsail and jib to the shackles on the boom and bow of the boat, then trim the jib sheets and mainsail before letting out the main sheet! For tips on monitoring wind indicators, read on! Did this summary help you? Yes No
- Send fan mail to authors
Reader Success Stories
Sep 13, 2017
Did this article help you?
Tobias Tanti
Dec 25, 2020
Nov 19, 2017
Mar 30, 2016
Nov 22, 2016

Featured Articles

Trending Articles

Watch Articles

- Terms of Use
- Privacy Policy
- Do Not Sell or Share My Info
- Not Selling Info
Get all the best how-tos!
Sign up for wikiHow's weekly email newsletter
- Find A School
- Certifications
- North U Sail Trim
- Inside Sailing with Peter Isler
- Docking Made Easy
- Study Quizzes
- Bite-sized Lessons
- Fun Quizzes
- Sailing Challenge

The Anatomy of a Boat
By: Zeke Quezada, ASA Equipment , Learn To Sail , Sailboats
Do You Know the Parts of a Boat
Learning to sail is not just about feeling the wind in your sails. You also become familiar with the vessel that will be part of your new lifelong adventure. A sailboat can seem daunting with all its moving parts, but it is quite simple.
I recently learned the term Keel Hauling, and I was a bit shocked at not knowing the reference. When you sail, you take on an entirely new language of words, sayings, and jargon. A few of us sailors even embrace the same Jimmy Buffet songs as part of our perennial sailing playlist. (that is another story for a different time)
My wife, who has sailed for over 20 years, is competent under most conditions at sail and knows her way around our vessel, but I was surprised that she didn’t know some of the simple terms that we sailors use daily. There are some fundamental terms that all sailors learn as they begin their sailing career and the rest of the information follows along as you spend more time on the water.
When you embark on a sailing education in ASA 101 Basic Keelboat Sailing, you learn about the anatomy of a boat. These are part of the fundamentals of sailing. While these few terms are interchangeable among boats, they certainly are not the only terms you’ll learn, but they are the beginning of a new language when you become an ASA certified sailor.

This is a keelboat. It is different from a dinghy in that it is larger than 20 feet and has a keel. Keelboats start at around 20 feet with no upper limit in length. A 200-foot megayacht is considered a keelboat.
Sailboat Terminology

Dinghy – A small sailboat usually under 20 feet long and open for most of its length.

Keel – A fixed appendage on the bottom of the hull that provides sideways resistance needed to counter the force of the wind on the sails. The keel also carries ballast , usually iron or lead, the weight of which counteracts the force of the wind that causes a sailboat to heel , or lean over.
Hull – The watertight structural shell of a boat.
Bow – The forward part of a boat
Stern – The aft part of the boat.
Transom – The more or less flat surface that closes the hull at the stern
Rudder – The sailboat is steered by a fin-shaped appendage attached beneath the boat toward the stern which can be rotated to change the angle at which the water strikes it. Water must flow past the rudder in order fo rit to work so it will not turn the boat while at rest.
The rudder is controlled by a wheel or a tiller at the helm of the boat. The person steering the boat is the helmsman .
Cockpit – The area of the boat, usually recessed into the deck , from which the boat is steered and sailed.
Deck – The generally horizontal surface that encloses the top of the hull.
Companionway – The entrance from the cockpit or deck to the cabin.
Stanchion – A metal post that supports lifelines .
Lifeline – A wire supported on stanchions around the perimeter of the deck to prevent crew from falling overboard.
Pulpit – A guardrail at the bow or stern of a boat to which (usually) the lifelines are connected.
Learning to Sail
- ASA 101: What You’ll Learn ASA 101 is your introduction to Basic Keelboat Sailboat and is your key to a lifetime of sailing.
- How To Sail Sailing a boat is part art and part skill but few activities offer such a variety of pleasures as sailing. Something special occurs when you cast off the lines and leave your cares at the dock.
- 7 Tips For The Beginning Sailor There are the obvious things you need when you go sailing, sunscreen, a hat, a windbreaker, non-skid shoes, and wind. However, what do you really need to be ready to head out on the water?
- How To Learn To Sail You won’t have to buy a boat or learn a new language or buy a new wardrobe to get a taste for sailing. You can dictate how much you want to experience.
- Learning To Sail Is Just The Beginning Sailing means different things to different people. At ASA we understand that learning to sail is just the beginning of a relationship with a lifestyle that is infectious. Where will sailing take you? We have a few ideas but how you view sailing is the most important.
- What Is Your Role on a Boat? What type of sailor are you and what role do you take on the boat? Your ASA sailing education will prepare you to be a skipper on a sailing vessel and with that comes the responsibility of keeping your crew safe and ensuring the safety of the vessel you are sailing.
Related Posts:
")
- Learn To Sail
- Mobile Apps
- Online Courses
- Upcoming Courses
- Sailor Resources
- ASA Log Book
- Bite Sized Lessons
- Knots Made Easy
- Catamaran Challenge
- Sailing Vacations
- Sailing Cruises
- Charter Resources
- International Proficiency Certificate
- Find A Charter
- All Articles
- Sailing Tips
- Sailing Terms
- Destinations
- Environmental
- Initiatives
- Instructor Resources
- Become An Instructor
- Become An ASA School
- Member / Instructor Login
- Affiliate Login
My Cruiser Life Magazine
Illustrated Guide to Sailboat Parts [Updated 2023]
The lingo of sailing is baffling to many newcomers. While the actual sailing is pretty easy, it’s hard to wrap your mind around the bookwork when it seems like every little thing on a boat goes by its own nautical term.
Here are a few names for parts of a sailboat that you might not have thought about before. For even more nautical word play, check out our complete guide to sailing terms .

Parts of Sailboat Hulls
The boat’s hull is its main body. Most are made of fiberglass, but there are a few aluminum sailboat models out there too. Wood is more traditional but more difficult to maintain than these modern alternatives. Sailboat hulls are displacement hulls, which means they sit low in the water and move relatively slowly. The hull’s job is to displace water, so you stay afloat!
Bow The forward “pointy end” of the boat.
Stern The rear end of the boat.
Transom If the stern of a boat has a flat section, it is called the transom. (I wrote about it in detail here: What Is the Transom on a Boat )
Canoe Stern or Double-Ender Some boats lack a transom; instead, their stern comes to a point like a bow. This is a “double ender” or a canoe stern.
Port and Starboard Sides Port is the left side, and starboard is the right side.
Freeboard This is the height of the sides of the boat above the water.
Deck The upper portion of the boat that you walk on.
Sheer Sheer is the curve of the deck when viewed from the side. Some boats have none, and some boats have a lot.
Cabin Coach Roof Most sailboats have a raised coach roof on top of the cabin area.
Bottom of a Sailboat – Keels and Things
There are tons of parts on a sailboat that you only ever see if it’s out of the water. Boats are hauled out at boatyards by giant cranes, or a special machine called a travel lift .
Keel The boat’s keel is the underwater feature that counters the effects of wind pressure on the sails. It keeps the boat from tipping over, but it also keeps the boat going in a straight line as it moves through the water. If a boat has no keel, the wind will push it downwind.
A keel is heavy–it is weighted with thousands of pounds of ballast (usually lead). So when someone refers to a “keelboat,” they mean that it is a big boat with a weighted keel built for cruising. The built-in weight of a keel keeps the boat from capsizing. Also, the water flow over the curved surface of the keel helps the boat sail into the wind.
Smaller boats with centerboards or daggerboards are on the opposite end of the spectrum from keelboats. These aren’t weighted and could tip over (capsize) in the wrong conditions.
Types of Keels
Full Keel A classic and time-tested design, full keel boats are favorites among passage-making and ocean-crossing cruisers. They’re stable and comfortable at sea and very safe. However, they have a reputation for being slow compared to more modern designs.
Modified Full Keel The modification is a cut-away forefoot. That means it looks like a full keel, but there isn’t as much keel up near the bow. This reduces the underwater “wetted surface area” and makes the design a little bit faster while preserving the other good things about full keel designs.
Fin Keel The fin keel looks like a shark’s fin pointed downward. Some are narrow and very deep, while others are longer and shallow. Fin keels are bolted to the bottom of an otherwise flat-looking hull design. The fin has a foil shape that creates a lifting force as water flows over it. In addition to its ballasted weight, this opposes the sails and leeway. Most modern sailboats have some version of a fin keel.
Bulb Keel The ballast should be placed as low as possible to lower the boat’s center of gravity. The bulb keel is a fin keel with a lead bulb added to the bottom. The bulb has an efficient shape, making it more efficient than just the fin alone.
Wing Keel Like a bulb, a wing keel works by adding more weight and hydrodynamic force to the bottom of the keel. As a result, the wings look like a little airplane mounted on the bottom of a fin keel.
Swing Keel A swing keel is a fin that pivots up and into the boat, meaning that you can have a very shallow draft when you are docking or anchoring but also a very deep draft when you are sailing in open waters. This heavy keel requires a powerful and complicated electric or hydraulic-electric system.
Lifting Keel A lifting keel is similar to a swing keel, only the keel lifts up into the hull vertically.
Bilge Keels A bilge keel boat has two fin keels mounted at 45-degree angles below the hull. The advantage is that the boat can “dry out.” This makes them very popular in harbors around England, where the massive tidal range means that the harbor is only mud for half the day.
Centerboard Centerboards look like swing keels, but the “keel” part is just a board. It isn’t weighted with lead or iron, so it doesn’t change the ballast of the boat any. They are often found on smaller sailboats like sailing dinghies, but there are also large cruising boats that have full keels or long-fin keels with centerboards, too.
Daggerboard A daggerboard is like a centerboard, only it doesn’t swing. Instead, it goes straight up and down like a dagger into its sheath. They’re not only common on very small sailing dinghies but also large cruising catamarans.
Canting Keel Canting keels are some of the latest technology items in racing, so they aren’t found on cruising boats yet. They move from side to side, allowing the crew to precisely control the forces made by the keel.
Types of Rudders – What Steers a Sailboat
As with keels, you’ll see various types of rudders on sailboats. The rudder is one of the most critical parts of a sailboat’s equipment, so the differences in rudders are mostly about how protected it is from damage.
Rudder The rudder is the thing that steers the sailboat. It’s mounted on the back of the boat, sometimes looking a bit like a second keel. When the operator turns the steering wheel or tiller, it moves the rudder one way or the other. That, in turn, turns the yacht’s bow left or right.
Transom-Hung Rudder The most basic type of rudder is hung on the transom. It’s usually controlled with a tiller instead of a wheel. You can see a transom-hung rudder above the water.
Keel-Mounted Rudder On a full keel boat, the rudder will be mounted on the back edge of the keel. This protects it completely from damage since anything the boat might hit will hit the keel first.
Skeg-Mounted Rudder The rudder might be mounted to a skeg if a boat has a fin keel. A skeg is a small fixed surface that holds the rudder and supports it. In the case of a full skeg, it also protects the rudder as a full keel would.
Spade Rudder Spade rudders have no skeg, so the entire underwater surface moves when you turn the wheel. Most modern yachts have spade rudders because they are incredibly effective. They are easily damaged, however, which is why some offshore sailors still prefer skeg-hung rudders.
Bottom of Sail Boat – Running Gear
Running gear is the generic name given to all equipment under the boat that connects to the engine and moves the boat under power. It consists of the propeller, prop shaft, and supports.
Propeller Also called the prop or screw, the prop is what converts the engine power into thrust. The water flow over its blades creates a pushing force that moves the boat. Since the sailboat doesn’t use the propeller when it is sailing, sailboats often have folding or feathering props that stop moving.
Prop Shaft The metal shaft that connects the engine to the propeller is called the prop shaft.
Cutlass Bearing Where the prop shaft exits the hull, a rubber cutlass bearing keeps it centered and rotating freely.
Saildrive A saildrive is a common arrangement on modern sailboats that uses a vertical drive leg with the propeller. The saildrive installs on the back of the engine and includes the transmission. It’s like the lower unit of an outboard motor, but you cannot raise it out of the water.
Up Top – Types of Sailboat Designs
Aft Cockpit The “classic” design of the modern sailboat, if there is such a thing, is called the aft cockpit. This layout has the cockpit in the rear-most section of the hull, behind the cabin.
Center Cockpit The center cockpit sailboat has the cockpit closer to the mast. That leaves a lot of space in the rear of the hull for a huge stateroom. This design means that the cockpit will be closer to the boat’s center, making handling easier. But it is also higher, making more windage and motion at sea.
Pilot House A pilot house sailboat has a second helm inside a protected area. These are popular in colder climates, where the pilot house provides a warm place to steer the boat from. The rear cockpit is usually smaller than a typical aft cockpit, but it’s still where the sail handling occurs. A pilot house has a raised level, so the salon typically surrounds the interior helm to utilize that space and visibility when not underway.
Deck Salon Like a pilot house, a deck salon has big windows and better visibility than a typical sailboat cabin. But it lacks a true interior helm. Many, however, have nav stations with forward visibility and autopilot controls, making it a comfortable place to sit and keep watch during a passage.
Flush Deck Most sailboats have a raised coach roof where the interior cabin is. But some designers make their decks flush with the sides of the boat, making a wide open deck that is easy to move around on.

On Deck Sailboat Components – Sailboat Front
The deck of a sailboat is all about safety at sea. Most modern cruising boats are rigged such that there are few things you might need to go “out on deck” or “go forward” for. Instead, these things are rigged back to the cockpit, so you can stay safe and dry while doing your thing.
Since the wet pitching deck of a sailboat at sea is tricky, many of the things you’ll find there are safety-related.
Handholds Places to grab should be located all over the boat, so there’s never a risk of not having something to hold onto to stabilize yourself.
Lifelines Lifelines run the perimeter of the boat and provide a last-ditch safety device. You can grab them, and they should be high enough that they’ll keep you from going overboard.
Stantions The stands that lifelines attach to.
Bow Pulpit The solid rail around the front of the boat provides a safe handhold and a starting point for the lifelines.
Stern Pushpit The same, but on the stern of the boat.
Bulwarks The raised edges of the deck on the sides so that you can’t slip overboard on accident.
No-Skid Decks In areas where people will be walking, the deck is treated with a special product to make the deck “no-skid.” That way, it isn’t slippery, even when wet.
Harness Sailing harnesses are designed to clip onto the boat and keep a sailor onboard even if the boat takes a huge wave or the sailor slips. The harness is the staple of offshore safety.
Jack Lines Jack lines are temporary lines secured on the deck where sailors can attach their harnesses.
Safety Rails Many boats also have extra rails and handholds located in spots where sailors might work on deck, like around the base of the mast.
At the bow of the sailboat, you’ll find her ground tackle.
Bowsprit The bowsprit is the spar that extends from the deck forward of the bow. They’re used on sailboats to gain more sail area since getting the sail farther forward means you can fit a bigger sail. Some have just a spar, while others have a bow platform that is part of the deck.
Ground Tackle The generic word for the anchor, chain, and all the equipment needed to use it.
Anchor The anchor is “the hook” that digs into the seabed and keeps the boat in the same place. Anchors are safety devices since they allow you to stop in shallow water. But they also provide access to areas with no marinas since you can anchor offshore and go in on your dinghy.
Windlass A winch that pulls up the anchor and chain. They can be manual, with a handle, or electric, with a button.
Anchor Rode The generic name for the anchor line. It can be a chain or rope.
Snubber A short length of rope that attaches to the chain to secure it to the boat.
Cleat A horn-shaped piece of deck hardware used to secure a line or rope.
Dorade A large vent opening on the deck of a boat which is designed to let air in but not water.
Hatch Hatches are upward-facing windows that you can open to increase ventilation in the cabin.
Locker A generic term for a cabinet or compartment on a boat.
Going Aloft – Basic Boat Parts of a Sailing Rig
The rig of a boat is the mast and all of its associated parts. If you’re wondering about the many different kinds of rigs that are out there, check out our rundown on sailing terms . There you’ll find definitions for boats with just one mast or multiple masts, like sloop rig and what a boat with two sails in front might be called. It’s a cutter, if you’re wondering.
Spar A generic name for a mast, boom, or any other long pole used to hold a sail. It can be wood or metal or vertical or horizontal.
Mast A vertical spar upon which a sail is hoisted.
Boom A horizontal pole that holds a sail and gives it shape.
Standing Rigging The wires or rope that holds the mast upright.
Stay Standing rigging that goes fore to aft. The head stay runs from the masthead to the bow, and the backstay runs from the masthead to the stern.
Shroud Standing rigging that goes to the sides of the boat. From the masthead to each side runs a cap shroud. Some masts also have intermediate and lower shrouds.
Running Rigging All lines that are used for sail handling are called running rigging.
Halyard A halyard hoists a sail to the top. Each halyard is named for the sail it hoists, i.e., main halyard, jib halyard, spinnaker halyard.
Sheet The sheet controls the sail. If you ease the sheet, the sail is loosened. If you winch the sheet in, it is tightened. Like all running rigging, each sheet is named for the sail it controls, i.e., main sheet, jib sheet, etc.
Traveler If a sail has a boom, the traveler can be used to adjust it from side to side. The sheet is attached to the traveler. Most main sail travelers are located near or in the cockpit.
Gooseneck Fitting The articulating attachment that holds a boom on a mast.
Topping Lift A line that holds the rear end of a boom up. It runs from the masthead to the boom.
Vang A control line pulls the boom down and puts pressure on the sail to keep it flatter. Large boats may have hydraulic or solid vangs.
Blocks The rest of the world would call this a pulley, but sailors call it a block.
Fairleads Deck organizers that keep the lines tidy and running in the direction they should go on deck.
Furler Wraps the sail around the stay so that it doesn’t not have to be raised and lowered each time. Instead, you pull on the sheet and the sail unrolls or “unfurls.”
On Deck – Back of Sailboat
On most boats, the cockpit is located at the back.
Cockpit The main operations center and party central on a sailboat. This is where the skipper sits at the helm, and the linesmen control the sheets.
Coaming The cockpit is protected from waves and splashes by the coaming, the tall walls that enclose it. It also makes the cockpit safe since you are unlikely to get swept overboard from here.
Lazarette The main storage locker in the cockpit.
Helm The station where the skipper steers the boat from.
Tiller If a boat doesn’t have a wheel, it will have a tiller. A tiller is just a handle connected to the rudder, and the skipper pushes or pulls it to steer. Even if a boat has a wheel, it probably has an emergency tiller in case the steering system breaks.
Winch Winches provide a mechanical advantage to make it easier to haul in lines. In the cockpit, all the sheets have winches.
Rope Clutch A clutch locks a rope in place so it can be taken off a winch, even when loaded.
Jammer A jammer does the same as a clutch, but it’s a simpler device found on smaller boats.
Weathervane Steering A weathervane is used to steer the boat like an autopilot but uses wind direction and mechanical linkages. As a result, they use no power and never complain about their workload. They mount on the stern of the boat and are controlled by simple lines to the cockpit. Windvanes are often referred to by their brand name, i.e., Monitor or Hydrovane
Davits Arms on the back of the boat that lift the dinghy or tender.
Swim Platform A flat area on the transom that allows you easy access in and out of the water. A standard feature on newer boats but not on older ones that just had long swim ladders.
Catamaran Sailboat Parts Explained
For the most part, the components of a catamaran share the same terms and labels that they would on a monohull. Cats often have a few extra features with other names, however.
Hulls A catamaran is made with two hulls connected together. Each hull has an interior, just like a monohull sailboat does. The cabins and heads are usually located in the hulls, and sometimes the galley is also down below.
Owner’s Version A catamaran layout that is made for private owners. Usually, one hull will be dedicated to the owner’s stateroom with a private door, a huge head with a walk-in shower, and a large berth.
Charter Version It has more staterooms and heads than an owner’s version does. Usually, a charter cat has at least two staterooms and heads in each hull.
Bridge Deck The deck connects the two hulls, which usually has the salon and cockpit. If the design is “galley up,” the galley will be on the bridgedeck with the salon.
Cockpit Just like on a monohull, the cockpit is the operations center. But catamarans have huge cockpits, and there is usually a large outdoor dining table and entertainment area as well.
Forward Cockpit Some designs have lounge seating forward of the salon on the bridgedeck.
Flybridge Some designs have the main helm mounted on top of the salon on an upper level. It’s almost the catamaran equivalent of a center cockpit.
Trampolines Forward of the salon, the bridge deck stops, and a trampoline connects the hulls over the water. This is a great place to hang out, but it’s an integral safety feature for a catamaran. The trampolines allow any water to immediately drain away, not weighing the boat down on the bow. This prevents a pitchpole when a boat capsizes by tipping forward into the water.
Cross Beam and Dolphin Striker Since there is no center bow to mount the head stay and foresail, catamarans use a cross beam that connects the hull. A piece of rigging keeps this in place, and it’s called the dolphin striker. No dolphins were hurt in the rigging of these boats, however.
Anchor Bridle Instead of a single snubber line on the anchor, catamarans use a wide bridle that connects each hull bow to the anchor line.
Parts of a Sail Boat FAQs
What are parts of a sailboat called.
Sailing is a challenging hobby, and one reason it’s so difficult for beginners is because every part of a sailboat has its own name. From each wire and rope to every piece of deck hardware, a beginner must learn the basics before they can even start.
What is the front part of a sailboat called?
The front part of a sailboat is called the bow. Many boats also have a spar extending forward of the hull, called the bowsprit.
What are the 5 basic parts of every sailboat?
Every sailboat has at least these five parts, but most boats have many more. Hull Keel Rudder Rigging Sails

Matt has been boating around Florida for over 25 years in everything from small powerboats to large cruising catamarans. He currently lives aboard a 38-foot Cabo Rico sailboat with his wife Lucy and adventure dog Chelsea. Together, they cruise between winters in The Bahamas and summers in the Chesapeake Bay.
Leave a comment
Your email address will not be published. Required fields are marked *
Save my name, email, and website in this browser for the next time I comment.
A Beginner's Guide to Sailing a Sailboat
Key Information for Beginners and Sailors
There are many ways to learn to sail:
- You can just jump in a boat with a friend and try to learn from experience
- You can sign up for a formal course at a sailing school
- You can buy or borrow a small sailboat and do it all on your own
No matter which way works best for you, it helps to understand the boat and what's involved in sailing first before you're out on the water, where suddenly you might get into trouble.
The Basic Steps of Sailing
Sailing involves both specific knowledge and skills. The following are the basic steps of learning to sail- as much as you can learn while not actually on a boat. You don't have to follow this order; skip ahead if you already know some of the basics. If you're mostly new to sailing, you might want to proceed through these steps like chapters in a manual.
- Understand Basic Sailing Terms. To get into sailing, you have to understand the words that are used to talk about the sailboat and the skills used to sail. Start here with a review of basic sailing terms. Don't worry about memorizing everything as many of these terms and concepts will become clearer as you read on about how to do it.
- Learn the Parts of the Boat. Before you go on the boat, it's helpful to know the words used in different parts of the boat. Even if you have an instructor, he or she won't say "Grab that rope over there and pull it," but instead will say "Haul in the jib sheet!" Review the basic boat terms you'll need to know.
- Start an Online Course. Now you're ready to learn more about what all those parts of the boat are used for. Here you can start an online learn-to-sail course by learning more about the parts of the boat along with a lot of photos, so you'll see what to do.
- Rig the Boat. Read to go sailing now? Hold it a minute- you have to rig the boat first by putting on sails and making other preparations. Here again are a lot of photos of what to do on a typical small sailboat used by beginners.
- Review Basic Sailing Techniques. OK, now you have the boat ready- so what do you do now to make it go? Manage the sails to go in the direction you want by learning basic sailing techniques.
- Discover How to Maneuver. Sailing in a set direction is reasonably easy, but eventually, you'll have to change direction. That often involves tacking and gybing. Take a moment to learn what's involved in these critical maneuvers.
- Recover From a Capsize. Now you've got the basics down. But did anyone ever tell you that small sailboats often tip over if the wind is gusting? Be prepared and carefully see how to recover from a capsize .
- Dock or Anchor the Boat. Now you're out there sailing and you've got the boat under control. Learn how to go faster, dock or anchor the boat and use some of the equipment you've ignored so far. Take a look at some of these additional sailing skills.
- Practice Tying Knots. For thousands of years, sailors have used times where it is cold or raining by doing things like tying knots. Knots are important on a sailboat and you will need to learn at least some basic sailing knots to sail at all.
- Sail Safely. At this point, plus practice on the water, you're good to go. However, it's good to remember that water is a dangerous place. Learn the basics about sailing safety. Staying safe makes it easier to keep having fun out there.
Learn How to Sail a Small Sailboat
West Wight Potter 19 Sailboat Review
Learn the Parts of a Sailboat and How to Communicate Them
The Best Sailing Books and Magazines
Heavy Weather Sailing
15 Outdoor Skills to Master This Year, With Expert Tips and Tricks
How to Rig Your Small Sailboat and Prepare to Sail
The 12 Best Inflatable Stand-Up Paddleboards of 2024, Tested and Reviewed
How to Plan a Caribbean Vacation
RVing 101 Guide: Water Heaters
A Beginner's Guide to Rock Climbing
The Best Fly Fishing Gear of 2024 for a Complete Kit, Tested and Reviewed
The Best Staycation in Every State
Tips for Teaching Kids to Waterski
How to Jump on a Wakeboard
Celestyal Cruises - Greece and Turkey Ports of Call
How a Sail Works: Basic Aerodynamics

The more you learn about how a sail works, the more you start to really appreciate the fundamental structure and design used for all sailboats.
It can be truly fascinating that many years ago, adventurers sailed the oceans and seas with what we consider now to be basic aerodynamic and hydrodynamic theory.
When I first heard the words “aerodynamic and hydrodynamic theory” when being introduced to how a sail works in its most fundamental form, I was a bit intimidated.
“Do I need to take a physics 101 course?” However, it turns out it can be explained in very intuitive ways that anyone with a touch of curiosity can learn.
Wherever possible, I’ll include not only intuitive descriptions of the basic aerodynamics of how a sail works, but I’ll also include images to illustrate these points.
There are a lot of fascinating facts to learn, so let’s get to it!
Basic Aerodynamic Theory and Sailing
Combining the world of aerodynamics and sailing is a natural move thanks to the combination of wind and sail.
We all know that sailboats get their forward motion from wind energy, so it’s no wonder a little bit of understanding of aerodynamics is in order. Aerodynamics is a field of study focused on the motion of air when it interacts with a solid object.
The most common image that comes to mind is wind on an airplane or a car in a wind tunnel. As a matter of fact, the sail on a sailboat acts a bit like a wing under specific points of sail as does the keel underneath a sailboat.
People have been using the fundamentals of aerodynamics to sail around the globe for thousands of years.
The ancient Greeks are known to have had at least an intuitive understanding of it an extremely long time ago. However, it wasn’t truly laid out as science until Sir Isaac Newton came along in 1726 with his theory of air resistance.
Fundamental Forces
One of the most important facets to understand when learning about how a sail works under the magnifying glass of aerodynamics is understanding the forces at play.
There are four fundamental forces involved in the combination of aerodynamics and a sailboat and those include the lift, drag, thrust, and weight.

From the image above, you can see these forces at play on an airfoil, which is just like a wing on an airplane or similar to the many types of sails on a sailboat. They all have an important role to play in how a sail works when out on the water with a bit of wind about, but the two main aerodynamic forces are lift and drag.
Before we jump into how lift and drag work, let’s take a quick look at thrust and weight since understanding these will give us a better view of the aerodynamics of a sailboat.
As you can imagine, weight is a pretty straight forward force since it’s simply how heavy an object is.
The weight of a sailboat makes a huge difference in how it’s able to accelerate when a more powerful wind kicks in as well as when changing directions while tacking or jibing.
It’s also the opposing force to lift, which is where the keel comes in mighty handy. More on that later.
The thrust force is a reactionary force as it’s the main result of the combination of all the other forces. This is the force that helps propel a sailboat forward while in the water, which is essentially the acceleration of a sailboat cutting through the water.
Combine this forward acceleration with the weight of sailboat and you get Newton’s famous second law of motion F=ma.
Drag and Lift
Now for the more interesting aerodynamic forces at play when looking at how a sail works. As I mentioned before, lift and drag are the two main aerodynamic forces involved in this scientific dance between wind and sail.
Just like the image shows, they are perpendicular forces that play crucial roles in getting a sailboat moving along.

If you were to combine the lift and drag force together, you would end up with a force that’s directly trying to tip your sailboat.
What the sail is essentially doing is breaking up the force of the wind into two components that serve different purposes. This decomposition of forces is what makes a sailboat a sailboat.
The drag force is the force parallel to the sail, which is essentially the force that’s altering the direction of the wind and pushing the sailboat sideways.
The reason drag is occurring in the first place is based on the positioning of the sail to the wind. Since we want our sail to catch the wind, it’s only natural this force will be produced.
The lift force is the force perpendicular to the sail and provides the energy that’s pointed fore the sailboat. Since the lift force is pointing forward, we want to ensure our sailboat is able to use as much of that force to produce forward propulsion.
This is exactly the energy our sailboat needs to get moving, so figuring out how to eliminate any other force that impedes it is essential.
Combining the lift and drag forces produces a very strong force that’s exactly perpendicular to the hull of a sailboat.
As you might have already experienced while out on a sailing adventure, the sailboat heels (tips) when the wind starts moving, which is exactly this strong perpendicular force produced by the lift and drag.
Now, you may be wondering “Why doesn’t the sailboat get pushed in this new direction due to this new force?” Well, if we only had the hull and sail to work with while out on the water, we’d definitely be out of luck.
There’s no question we’d just be pushed to the side and never move forward. However, sailboats have a special trick up their sleeves that help transform that energy to a force pointing forward.
Hydrodynamics: The Role of the Keel
An essential part of any monohull sailboat is a keel, which is the long, heavy object that protrudes from the hull and down to the seabed. Keels can come in many types , but they all serve the same purpose regardless of their shape and size.
Hydrodynamics, or fluid dynamics, is similar to aerodynamics in the sense that it describes the flow of fluids and is often used as a way to model how liquids in motion interact with solid objects.
As a matter of fact, one of the most famous math problems that have yet to be solved is exactly addressing this interaction, which is called the Navier-Stokes equations. If you can solve this math problem, the Clay Mathematics Institute will award you with $1 million!
There are a couple of reasons why a sailboat has a keel . A keel converts sideways force on the sailboat by the wind into forward motion and it provides ballast (i.e., keeps the sailboat from tipping).
By canceling out the perpendicular force on the sailboat originally caused by the wind hitting the sail, the only significant leftover force produces forward motion.
We talked about how the sideways force makes the sailboat tip to the side. Well, the keep is made out to be a wing-like object that can not only effectively cut through the water below, but also provide enough surface area to resist being moved.
For example, if you stick your hand in water and keep it stiff while moving it back and forth in the direction of your palm, your hand is producing a lot of resistance to the water.

This resisting force by the keel contributes to eliminating that perpendicular force that’s trying to tip the sailboat as hard as it can.
The wind hitting the sail and thus producing that sideways force is being pushed back by this big, heavy object in the water. Since that big, heavy object isn’t easy to push around, a lot of that energy gets canceled out.
When the energy perpendicular to the sailboat is effectively canceled out, the only remaining force is the remnants of the lift force. And since the lift force was pointing parallel to the sailboat as well as the hull, there’s only one way to go: forward!
Once the forward motion starts to occur, the keel starts to act like a wing and helps to stabilize the sailboat as the speed increases.
This is when the keel is able to resist the perpendicular force even more, resulting in the sailboat evening out.
This is exactly why once you pick up a bit of speed after experiencing a gust, your sailboat will tend to flatten instead of stay tipped over so heavily.
Heeling Over
When you’re on a sailboat and you experience the feeling of the sailboat tipping to either the port or starboard side, that’s called heeling .
As your sailboat catches the wind in its sail and works with the keel to produce forward motion, that heeling over will be reduced due to the wing-like nature of the keel.
The combination of the perpendicular force of the wind on the sail and the opposing force by the keel results in these forces canceling out.
However, the keel isn’t able to overpower the force by the wind absolutely which results in the sailboat traveling forward with a little tilt, or heel, to it.
Ideally, you want your sailboat to heel as little as possible because this allows your sailboat to cut through the water easier and to transfer more energy forward.
This is why you see sailboat racing crews leaning on the side of their sailboat that’s heeled over the most. They’re trying to help the keel by adding even more force against the perpendicular wind force.
By leveling out the sailboat, you’ll be able to move through the water far more efficiently. This means that any work in correcting the heeling of your sailboat beyond the work of the keel needs to be done by you and your crew.
Apart from the racing crews that lean intensely on one side of the sailboat, there are other ways to do this as well.
One way to prevent your sailboat from heeling over is to simply move your crew from one side of the sailboat to the other. Just like racing sailors, you’re helping out the keel resist the perpendicular force without having to do any intense harness gymnastics.
A great way to properly keep your sailboat from heeling over is to adjust the sails on your sailboat. Sure, it’s fun to sail around with a little heel because it adds a bit of action to the day, but if you need to contain that action a bit all you need to do is ease out the sails.
By easing out the sails, you’re reducing the surface area of the sail acting on the wind and thus reducing the perpendicular wind force. Be sure to ease it out carefully though so as to avoid luffing.
Another great way to reduce heeling on your sailboat is to reef your sails. By reefing your sails, you’re again reducing the surface area of the sails acting on the wind.
However, in this case the reduction of surface area doesn’t require altering your current point of sail and instead simply remove surface area altogether.
When the winds are high and mighty, and they don’t appear to be letting up, reefing your sails is always a smart move.
How an Airplane Wing Works
We talked a lot about how a sail is a wing-like object, but I always find it important to be able to understand one concept in a number of different ways.
Probably the most common example’s of how aerodynamics works is with wings on an airplane. If you can understand how a sail works as well as a wing on an airplane, you’ll be in a small minority of people who truly understand the basic aerodynamic theory.
As I mentioned before, sails on a sailboat are similar to wings on an airplane. When wind streams across a wing, some air travels above the wing and some below.
The air that travels above the wing travels a longer distance, which means it has to travel at a higher velocity than the air below resulting in a lower pressure environment.
On the other hand, the air that passes below the wing doesn’t have to travel as far as the air on top of the wing, so the air can travel at a lower velocity than the air above resulting in a higher pressure environment.

Now, it’s a fact that high-pressure systems always move toward low-pressure systems since this is a transfer of energy from a higher potential to a lower potential.
Think of what happens when you open the bathroom door after taking a hot shower. All that hot air escapes into a cooler environment as fast as possible.
Due to the shape of a wing on an airplane, a pressure differential is created and results in the high pressure wanting to move to the lower pressure.
This resulting pressure dynamic forces the wing to move upward causing whatever else is attached to it to rise up as well. This is how airplanes are able to produce lift and raise themselves off the ground.
Now if you look at this in the eyes of a sailboat, the sail is acting in a similar way. Wind is streaming across the sail head on resulting in some air going on the port side and the starboard side of the sail.
Whichever side of the sail is puffed out will require the air to travel a bit farther than the interior part of the sail.
This is actually where there’s a slight difference between a wing and a sail since both sides of the sail are equal in length.
However, all of the air on the interior doesn’t have to travel the same distance as all of the air on the exterior, which results in the pressure differential we see with wings.
Final Thoughts
We got pretty technical here today, but I hope it was helpful in deepening your understanding of how a sail works as well as how a keel works when it comes to basic aerodynamic and hydrodynamic theory.
Having this knowledge is helpful when adjusting your sails and being conscious of the power of the wind on your sailboat.
With a better fundamental background in how a sailboat operates and how their interconnected parts work together in terms of basic aerodynamics and hydrodynamics, you’re definitely better fit for cruising out on the water.
Get the very best sailing stuff straight to your inbox
Nomadic sailing.
At Nomadic Sailing, we're all about helping the community learn all there is to know about sailing. From learning how to sail to popular and lesser-known destinations to essential sailing gear and more.
Quick Links
Business address.
1200 Fourth Street #1141 Key West, FL 33040 United States
Copyright © 2024 Nomadic Sailing. All rights reserved. Nomadic Sailing is a participant in the Amazon Services LLC Associates Program, an affiliate advertising program designed to provide a means to earn fees by linking to Amazon.com and affiliated sites.
Points of Sail Diagram: A Visual Guide to Sailing Positions
by Emma Sullivan | Jul 16, 2023 | Sailboat Racing
Short answer points of sail diagram:
A points of sail diagram illustrates the different angles at which a sailing boat can interact with the wind. It typically presents five main positions – close-hauled, beam reach, broad reach, running, and an illustration of how these angles relate to the wind direction. These diagrams assist sailors in understanding sail trim and optimal boat performance.
Understanding the Points of Sail Diagram: A Step-by-Step Guide
If you’re new to the world of sailing, understanding the points of sail diagram is essential knowledge. It serves as a compass for sailors, helping them navigate their way through different wind conditions and efficiently maneuver their boats. In this step-by-step guide, we will dive deep into what the points of sail diagram mean and how they can be used to your advantage on the water.
1. Introduction: The Importance of Understanding Points of Sail Sailing is all about harnessing the power of the wind to propel your boat forward. To do this effectively, you need to understand how your sails interact with the wind from different directions. The points of sail diagram provides a visual representation of these angles, serving as a valuable tool to help you optimize your speed and direction while sailing.
2. Breaking down the Diagram The points of sail diagram typically features eight distinct sections or “points” that represent different angles at which the boat can sail in relation to the wind direction. At one extreme is upwind sailing or close-hauled sailing (pointing directly into the wind), followed by various angles such as close reach, beam reach, broad reach, running downwind, and finally dead downwind (with the wind directly behind). Each point on the diagram represents an angle with respect to true or apparent wind.
3. Close-Hauled Sailing: Challenging but Efficient Close-hauled sailing is when you’re pointing directly into the wind or slightly off it. This is considered one of the most challenging points on the diagram but yields excellent efficiency if sailed correctly. Your sails will be trimmed in tightly, allowing them to capture as much energy from head-on winds as possible without stalling.
4. Reaching: Finding Your Sweet Spot When you start moving away from close-hauled sailing, you’ll enter other points called reaches—close reach, beam reach, and broad reach—that offer differing angles between your boat’s bow and the wind direction. Reaching is like finding a sweet spot on the points of sail spectrum, wherein boat speed and maneuverability are maximized. Depending on the angle, you may need to adjust your sail trim and weight distribution to optimize performance.
5. Downwind: Embracing the Wind’s Power As you move farther down the points of sail diagram, you’ll reach running downwind and dead downwind (also known as sailing by the lee). These points have their unique challenges but also immense rewards. Running with the wind directly behind can provide exhilarating speed, but it requires careful handling of your sails due to possible accidental jibing. By understanding these points, you can trim your sails for optimal performance while maintaining control.
6. Practical Applications: Utilizing Points of Sail Diagram to Your Advantage Understanding the points of sail diagram is not only about theory—it has practical implications too. By analyzing factors such as wind strength, sea state, and desired course, you can determine which point on the diagram is most suitable for reaching your destination efficiently. Adjusting your sails accordingly and making slight alterations in your heading based on wind shifts will help you maintain higher speeds and reduce unnecessary zig-zagging.
7. Improving Sailboat Racing Skills with Points of Sail For sailors who engage in competitive racing, comprehending the points of sail diagram becomes even more fundamental to success on the racecourse. Understanding how your boat performs in different angles relative to other boats allows for strategic decision-making during mark roundings and tactical maneuvers throughout a race.
In conclusion, mastering the points of sail diagram is a crucial skill for any sailor looking to improve their efficiency and navigate smoothly through various wind conditions. Whether you’re a novice sailor or an experienced racer, understanding this visual representation will undoubtedly enhance your ability to harness the power of wind effectively while enjoying what sailing has to offer. Happy sailing!
How to Interpret the Points of Sail Diagram: A Beginner’s FAQ
Title: Exploring the Points of Sail Diagram: A Beginner’s Comprehensive Guide
Introduction: Sailing, with its timeless appeal and serene beauty, has captivated human beings for centuries. It offers an exhilarating way to navigate through vast water bodies using the power of the wind. However, fully understanding the various “points of sail” is crucial for any novice sailor looking to embark on this extraordinary adventure. In this blog post, we aim to demystify the Points of Sail diagram by providing a comprehensive FAQ-style guide that encompasses all necessary details and navigational techniques one needs to grasp before setting sail.
1. What is the Points of Sail Diagram? At its core, the Points of Sail diagram presents a visual representation of all possible angles at which a sailing vessel can harness wind power effectively. It illustrates how a boat’s sails interact with the wind relative to its course and helps sailors determine the most optimal technique for achieving their desired speed and direction.
2. Understanding the Wind Directions: The first step in interpreting this diagram involves understanding four fundamental wind directions:
a) Dead Ahead (Close Hauled): The wind direction aligned directly forward from your boat. b) In Irons: Sailing too closely into the wind, causing your sails to luff or flap irregularly. c) Beam Reach: The wind blowing perpendicular to your vessel’s side. d) Running Before or Downwind: The wind coming from behind your boat.
3. Determining Apparent Wind: Apparent Wind refers to how the actual windspeed and direction impact a boat as it moves through water. Depending on factors such as boat speed and angle relative to true wind, apparent wind may differ slightly from real-world measurements.
4. Identifying Sail Positions and Pointing Angles: The diagram demonstrates six key points where you can position your sails based on their interaction with apparent wind:
a) Close Hauled (AKA Beating or Cracking Off): Sailing as closely into the wind as possible. b) Close Reach: Sailing at an angle just off the wind direction. c) Beam Reach: Sailing perpendicular to the wind, with sails fully open and untrimmed. d) Broad Reach: Sailing slightly downwind while maintaining good speed and stability. e) Running (Downwind Run): Sail positioned for maximum acceleration from a tailwind. f) Wing-and-Wing: A technique used when sailing directly downwind or running, where two sails are set on opposite sides of the boat.
5. Optimal Courses: By understanding which points of sail are best suited for different wind angles, you can plot optimal courses that minimize tacking maneuvers, maintain efficient speeds, and maximize your overall sailing experience.
Conclusion: Mastering the Points of Sail diagram is like unveiling the secrets of the sea—a necessary step on a sailor’s journey towards complete control in harnessing wind power and navigating through vast waterways. With this comprehensive guide, beginners can now confidently interpret and apply the principles illustrated by this invaluable diagram. Enjoy your time exploring these uncharted waters while experiencing the thrill only true sailors understand!
Demystifying the Points of Sail Diagram: Essential Concepts Explained
Title: Demystifying the Points of Sail Diagram: Unlocking Essential Concepts
Introduction:
Sailing, though often seen as an exhilarating and graceful sport, can be quite enigmatic for novices. Aspiring sailors often encounter a perplexing diagram called “The Points of Sail.” While its purpose is evident to seasoned sailors, deciphering this visual aid can leave newcomers scratching their heads. If you find yourself in this group, fear not! We are here to unpack this enigma and provide you with a comprehensive understanding of the essential concepts behind the points of sail diagram.
1. Unveiling the Hidden Navigation Tool:
At first glance, the points of sail diagram might seem like a cluster of incomprehensible arrows and sectors. Yet, beneath its arcane appearance lies one of sailing’s most crucial navigation tools—an instrument that reveals how a sailboat interacts with wind directions in different scenarios.
2. Direction Influences Sailing Efficiency:
To understand the points of sail fully, it is vital to grasp that wind direction plays an influential role in determining sailing efficiency. For instance, trying to sail directly upwind not only becomes challenging but may even render your conquest impossible due to physics constraints.
3. The Big Picture: Dividing Wind Directions:
Divided into eight main divisions delimited by arbitrary angles (known as sectors), the points of sail diagram delineates various wind directions relative to a sailboat’s bow – from dead ahead (wind coming directly towards) through all possible headings until reaching dead astern (wind coming directly from behind).
4. Zones Destined for Thrilling Speed:
Among these sectors lie three significant zones that provide optimal conditions for maximizing speed and efficient navigation—close-hauled (or close to the wind), beam reach, and broad reach zones.
a) Close-Hauled Zone: Taking you closest to sailing against the wind, known as pointing close-hauled or beating into the eye of zephyr, this sector is ideal for gaining height without any side drift.
b) Beam Reach Zone: With wind coming from a ninety-degree angle to the boat, this zone enables smooth sailing with impressive speeds. Be prepared to experience a quick rhythm and exceptional lateral movement.
c) Broad Reach Zone: As you venture away from the close-hauled zone, the wind angle increases further until it reaches your vessel at an acute rearward angle within the broad reach zone. Brace yourself for exhilarating surges of speed combined with rejuvenating breezes brushing against your face.
5. Tacking and Jibing Essentials:
While familiarizing yourself with the points of sail diagram, it is essential to grasp two fundamental maneuvers – tacking and jibing. Tacking involves turning your boat’s bow through the wind while crossing into another close-hauled sector, allowing you to change direction efficiently. Conversely, jibing entails swinging your stern through the wind, facilitating shifts from one broad reach or run sector to another.
6. The Pleasures and Challenges of Dead Zones:
Filling in the gaps between those three key zones lie three areas aptly named dead zones (no-sail sectors). These sectors encompass scenarios where the sailboat struggles due to inadequate winds in relation to its direction—irresistible challenges that demand remarkable skill and patience from sailors determined to conquer them.
Conclusion:
Admittedly, unraveling the intricacies behind a seemingly complicated diagram like “The Points of Sail” might appear daunting at first. However, understanding these essential concepts is crucial for aspiring sailors seeking smooth navigation across varying wind directions. By embracing the intricacies delineated in this blog post, we hope that you embark on your sailing adventure equipped with newfound confidence and knowledge—a blend essential for taking full advantage of every possible point of sail on your nautical journey!
Mastering Sailboat Navigation: Unveiling the Power of the Points of Sail Diagram
Sailboat navigation is an ancient art that mariners have entrusted their lives to for centuries. From early explorers to modern-day sailors, understanding the ins and outs of navigating a sailboat is crucial for a successful voyage. One powerful tool that has stood the test of time is the Points of Sail Diagram – a clever representation that unlocks the true potential of sailing.
The sailboat’s points of sail diagram depicts six different angles at which a boat can effectively sail in relation to the wind. These angles are named: close-hauled, close reach, beam reach, broad reach, running, and dead downwind. Each point represents a unique combination of sail trim and wind direction that not only affects speed but also determines your ability to reach your intended destination.
Let’s dive into each point and uncover the secrets they hold!
1. Close-hauled: This point showcases utmost efficiency against an upwind or beating course. By steering as close to the wind as possible, sailors can maximize their velocity made good (VMG) towards their desired location. However, it requires precise trimming and constant adjustments to keep sails full without stalling them.
2. Close Reach: When you ease slightly from close-hauled, you enter this versatile point. It allows for increased speed by harnessing more lift from airflow across sails while maintaining efficiency upwind. The close reach can be your go-to when trying to make headway towards a target upwind.
3. Beam Reach: Here lies sheer exhilaration! Your sails fill with maximum power perpendicular to the wind direction, propelling you comfortably at good speed across open water. The enticing balance between stable sailing conditions and thrilling progression makes this point ideal for leisurely cruises or having some fun with friends out on the water.
4. Broad Reach: As you continue turning away from directly perpendicular windward orientation, the sailboat starts moving closer to running downwind. The broad reach showcases both elegance and excitement as your boat gracefully glides through the water with exhilarating speed. It’s a sweet spot where veteran sailors masterfully handle their craft, sticking harmoniously between swiftness and control.
5. Running: Picture this: You’re on a sailboat racing downwind, feeling the wind in your hair, spray in your face, and that pure adrenaline rush! Welcome to the running point—where boats effortlessly surf along waves propelled by nothing but nature’s breath. While it might appear simple, maintaining optimal control while maximizing speed requires subtle adjustments like using weight distribution or trimming sails strategically.
6. Dead Downwind: To complete our journey across the points of sail diagram, we find ourselves at dead downwind – sailing directly away from the wind. In this position, you’ll witness simplicity at its finest as you let nature do most of the work. However, an experienced sailor knows that even in simplicity lies a challenge; staying perfectly aligned without accidental gybing or losing momentum demands focus and skill.
Understanding these points of sail unlocks infinite possibilities for sailors worldwide. Whether you’re competing in regattas striving for ultimate performance or embarking on leisurely journeys exploring vast blue horizons – mastery over these angles is essential.
So next time you step aboard a sailboat, take a moment to appreciate the power behind each diagram point and let it guide you towards sailing excellence and unforgettable nautical adventures!
Navigating Your Way with a Points of Sail Diagram: A Comprehensive Breakdown
Navigating your way through the vast sea or ocean can be an exhilarating yet complex task. Sailors and boating enthusiasts face a multitude of challenges, from changing wind conditions to varying water depths. To add to this complexity, sailors must also have a thorough understanding of the points of sail diagram, which acts as a compass in guiding them towards their destination.
The points of sail diagram is designed to help sailors determine the most efficient angle for their sailboat’s sails in relation to the wind direction. It provides a visual representation of how a sailboat should maneuver depending on the wind’s course. By understanding this diagram, sailors are able to make precise adjustments and harness the power of the wind effectively.
Let’s delve into each section of this comprehensive breakdown to truly comprehend the significance and functionality of this crucial sailing tool:
1. The No-Sail Zone: At one extreme end of the points of sail diagram lies the no-sail zone. This area signifies when your boat is directly facing into the wind, with sails unable to generate any driving force. Sailors must avoid this zone since it offers little to no forward movement and can lead to frustratingly slow progress.
2. Close Hauled: Moving slightly away from the no-sail zone, we encounter close-hauled sailing position where you’re almost pointing directly into the wind but not completely. Here, your sails are trimmed in tight, maximizing their efficiency by capturing as much air as possible while maintaining forward propulsion. This position is ideal for sailing upwind or against the wind’s direction.
3. Beam Reach: Continuing along our journey around the points of sail diagram, we find ourselves at beam reach – where your boat is positioned perpendicular (90 degrees) to the wind direction. Your sails are set accordingly so that they can capture maximum lateral pressure from sideways winds. This point offers a perfect balance between speed and control while ensuring swift progress at right angles to the prevailing winds.
4. Broad Reach: As we venture further around the diagram, our sails start to move away from the boat’s centerline. In this broad reach position, your sails capture the wind from behind as you sail across it. The boat is neither pointing directly downwind nor cutting through at a right angle but lies somewhere in between. At this point, sailing maneuvers become more challenging, requiring careful adjustments to maintain stability and prevent accidental gybing (when the boom swings excessively due to wind changes).
5. Running Downwind: Finally, we arrive at the last section of the points of sail diagram – running downwind or sailing directly away from the wind’s direction. This position poses its unique challenges since you must avoid unintentional jibing while keeping your sails filled with air by controlling their shape using various techniques like goosewinging or using a spinnaker sail.
Understanding and mastering these various positions on the points of sail diagram grants sailors an extraordinary level of control over their vessel. By ensuring sails are appropriately trimmed and positioned according to wind direction, sailors can maximize speed, efficiency, and overall maneuverability.
In conclusion, navigating your way with a points of sail diagram acts as a comprehensive compass for every sailor out on the open waters. It provides clear visual guidance on how to optimize your sails’ performance while adapting to changing wind conditions. By embracing this tool with professional knowledge and clever adjustments, sailors can confidently navigate any course set before them – making their time on water not only efficient but also exhilaratingly enjoyable.
Fine-Tuning Your Sailing Skills: Utilizing the Points of Sail Diagram for Optimal Efficiency
Fine-tuning your sailing skills is essential if you want to become an efficient and savvy sailor. As with any sport or activity, practice makes perfect, but it is equally important to understand the fundamental concepts that drive sailing. One such concept that every sailor should be familiar with is the points of sail diagram – a powerful tool that can greatly enhance your efficiency on the water.
The points of sail diagram visually represents the different angles at which your boat can sail in relation to the wind direction. It not only helps you navigate through various wind conditions but also allows you to make informed decisions regarding sail trim and course selection. By fully understanding and utilizing this diagram, you can optimize your efficiency on the water and get the most out of your sailing experience.
So, let’s delve into each point of sail and explore how they can contribute to enhanced sailing proficiency:
1. Close-Hauled: This is when your boat sails as close as possible towards the wind without allowing it to stall or luff. It requires precise trimming of both mainsail and jib, ensuring maximum power while keeping the sails flat. Mastering close-hauled sailing gives you excellent upwind performance and enables you to maintain a steady course against opposing current or rough sea conditions.
2. Beam Reach: At this point of sail, your boat forms a 90-degree angle with respect to the wind direction. With both sails trimmed appropriately, you achieve optimal balance between speed and maneuverability while enjoying relatively smooth sailing conditions. Beam reaching provides an opportunity to harness significant velocity without sacrificing stability.
3. Broad Reach: As you start turning away from a beam reach towards a downwind course, you enter into this point of sail category known as broad reach. The trick here lies in adjusting your sails for maximum power delivery while avoiding unintentional gybes (when your boom swings suddenly across). By leveraging wind shifts effectively, broad reaching becomes thrilling yet controlled navigation technique suited for covering long distances efficiently.
4. Running: This is sailing directly downwind, with the wind blowing into the back of your sails. It requires strategic sail setup to catch every ounce of available wind and maintain a stable course without any accidental broaches (when your boat swerves uncontrollably). Knowing how to handle running conditions empowers you to hold steady in pursuit of top speeds or calmly navigate through tight areas crowded with other boats.
By actively incorporating these points of sail into your sailing repertoire, you can easily adapt to changing wind conditions and make informed decisions on sail trim, course selection, and even tactical maneuvers while racing competitively. Whether you’re an experienced sailor looking for that competitive edge or just starting your sailing journey, mastering the points of sail diagram will undoubtedly improve your efficiency on the water.
However, keep in mind that each boat type performs uniquely under different points of sail and mastering their nuances requires practice and experience. Nevertheless, armed with the knowledge provided by the points of sail diagram and some time spent honing your skills on the water, you’ll soon find yourself navigating effortlessly with style, confidence, and optimal efficiency – leaving any novice sailors enviously wondering how you make it all look so easy! So embrace this powerful tool as it unlocks a world where sailing becomes not only a hobby but also an art form – blending science with intuition and exhilaration with precision. Bon voyage!
Recent Posts

- Sailboat Gear and Equipment
- Sailboat Lifestyle
- Sailboat Maintenance
- Sailboat Racing
- Sailboat Tips and Tricks
- Sailboat Types
- Sailing Adventures
- Sailing Destinations
- Sailing Safety
- Sailing Techniques
No products in the cart.
Sailing Ellidah is supported by our readers. Buying through our links may earn us an affiliate commission at no extra cost to you.
The Running Rigging On A Sailboat Explained
The running rigging on a sailboat consists of all the lines used to hoist, lower, and control the sails and sailing equipment. These lines usually have different colors and patterns to easily identify their function and location on the vessel.
Looking at the spaghetti of lines with different colors and patterns might get your head spinning. But don’t worry, it is actually pretty simple. Each line on a sailboat has a function, and you’ll often find labels describing them in the cockpit and on the mast.
In this guide, I’ll walk you through the functions of every component of the running rigging. We’ll also look at the hardware we use to operate it and get up to speed on some of the terminology.
The difference between standing rigging and running rigging
Sometimes things can get confusing as some of our nautical terms are used for multiple items depending on the context. Let me clarify just briefly:
The rig or rigging on a sailboat is a common term for two parts, the standing , and the running rigging.
- The standing rigging consists of wires supporting the mast on a sailboat and reinforcing the spars from the force of the sails when sailing. Check out my guide on standing rigging here!
- The running rigging consists of the halyards, sheets, and lines we use to hoist, lower, operate and control the sails on a sailboat which we will explore in this guide.
The components of the running rigging
Knowing the running rigging is an essential part of sailing, whether you are sailing a cruising boat or crewing on a large yacht. Different types of sailing vessels have different amounts of running rigging.
For example, a sloop rig has fewer lines than a ketch, which has multiple masts and requires a separate halyard, outhaul, and sheet for its mizzen sail. Similarly, a cutter rig needs another halyard and extra sheets for its additional headsail.
You can dive deeper and read more about Sloop rigs, Ketch Rigs, Cutter rigs, and many others here .
Take a look at this sailboat rigging diagram:
Lines are a type of rope with a smooth surface that works well on winches found on sailboats. They come in various styles and sizes and have different stretch capabilities.
Dyneema and other synthetic fibers have ultra-high tensile strength and low stretch. These high-performance lines last a long time, and I highly recommend them as a cruiser using them for my halyards.
A halyard is a line used to raise and lower the sail. It runs from the head of the sail to the masthead through a block and continues down to the deck. Running the halyard back to the cockpit is common, but many prefer to leave it on the mast.
Fun fact: Old traditional sailboats sometimes used a stainless steel wire attached to the head of the sail instead of a line!
Jib, Genoa, and Staysail Halyards
The halyard for the headsail is run through a block in front of the masthead. If your boat has a staysail, it needs a separate halyard. These lines are primarily untouched on vessels with a furling system except when you pack the sail away or back up. Commonly referred to as the jib halyard.
Spinnaker Halyard
A spinnaker halyard is basically the same as the main halyard but used to hoist and lower the spinnaker, gennaker, or parasailor.
The spinnaker halyard is also excellent for climbing up the front of the mast, hoisting the dinghy on deck, lifting the outboard, and many other things.
A sheet is a line you use to control and trim a sail to the angle of the wind . The mainsheet controls the angle of the mainsail and is attached between the boom and the mainsheet traveler . The two headsail sheets are connected to the sail’s clew (lower aft corner) and run back to each side of the cockpit.
These are control lines used to adjust the angle and tension of the sail. It is also the line used to unfurl a headsail on a furling system. Depending on what sail you are referring to, this can be the Genoa sheet , the Jib sheet , the Gennaker sheet , etc.
The outhaul is a line attached to the clew of the mainsail and used to adjust the foot tension. It works runs from the mainsail clew to the end of the boom and back to the mast. In many cases, back to the cockpit. On a boat with in-mast furling , this is the line you use to pull the sail out of the mast.
Topping lift
The topping lift is a line attached to the boom’s end and runs through the masthead and down to the deck or cockpit. It lifts and holds the boom and functions well as a spare main halyard. Some types of sailboat rigging don’t use a topping lift for their boom but a boom vang instead. Others have both!
Topping lifts can also be used to lift other spars.
A downhaul is a line used to lower with and typically used to haul the mainsail down when reefing and lowering the spinnaker and whisker poles. The downhaul can also control the tack of an asymmetrical spinnaker, gennaker, or parasailor.
Tweaker and Barber Haul
A tweaker is a line, often elastic, attached to the sheet of a headsail and used to fine-tune the tension on the sheet.
Barber haul
A barber haul is a line attached to a headsail’s sheet to adjust the sheeting angle to the wind. It is often used to pull the clew further toward the center or outboard than the cars allow.
Boom Preventer
A boom preventer is a line attached to the boom’s end when sailing off the wind. Its function is to hold the spar in place and prevent it from swinging wildly.
If the boat were to get an accidental gybe, it could cause serious damage to the rigging or even harm people on board. It is important for the rigger to be cautious when setting up the boom preventer.
Running Backstay
Running backstays is similar to a normal backstay but uses a line instead of a hydraulic tensioner. Some rigs have additional check stays or runners as well.
Bonus tip: Reefing
The term reefing is used when reducing the effective sailing area exposed to the wind of a given sail. Headsails are usually reefed by partially furling them in, and they often have marks for what we refer to as 1st, 2nd, and 3rd reefs.
The mainsail is reefed similarly with an in-mast furling or in-boom furling system.
On a traditional mast, we use a system called slab reefing. The system has reefing lines running through the boom to reinforced points on the luff and leech, allowing you to pull the sail down to the boom and effectively reduce the sail area.
Having at least two reefing points in the mainsail is normal, but most cruising sailboats have 3. The 3rd is used for the heaviest conditions, giving you only a tiny bit of sail area exposed to the wind.
You want to reef your sails before the wind increases to a point where your boat gets overpowered.
It is essential to practice your reefing technique . You will find yourself in situations with rapidly increasing winds where you need to reduce your sails quickly.
Rule of thumb: If you think setting a reef might be a good idea, do it.
Shaking a reef is the term used when we sail with a reefed sail and want to increase the sail area back to full.
Hardware used for sail handling and the running rigging
Furling system.
Most sailboats have their headsail on a furling system. A furling system is a tube that runs along the forestay from the bottom furler drum to the masthead swivel.
This system allows you to roll the headsail around the forestay, making furling the sail in and out accessible. It is also convenient when reefing the sail when the wind picks up, as you can easily do this from the safety of the cockpit. These furling systems come in manual versions and electric versions.
In-mast furling
In-mast furling is a system that rolls the mainsail in and out of the mast. To unfurl the mainsail, we use the outhaul .
In-boom furling
In-boom furling is a system that rolls the mainsail in and out of the boom. This system has been costly and has mostly been seen on big yachts earlier. They are becoming more affordable and common on smaller boats, though. To unfurl this setup, we use the main halyard.
A Stack pack is also called a Lazy Bag or Lazy Pack. It is a bag with a zip attached to the boom where the mainsail is stored when unused. It protects the mainsail from UV rays from the sun and weather elements. It is a very nice and tidy way to store the mainsail and reefing lines if you don’t have in-mast or in-boom furling.
Lazy Jacks is a system of lines running from the stack pack to the mast. The Lazy Jacks guide the mainsail up and down from the Stack Pack and prevent it from falling down on the deck. It is also possible to rig Lazy Jacks without a Stack Pack.
A block is a pulley with a sheave wheel. Blocks are used to change the direction of a pull on a line or rope and give a mechanical advantage. They have many uses, especially onboard sailboats.
A winch is a metal drum that gives you a mechanical advantage to control and tighten lines. These can be operated by turning a rope around it and pulling manually or by a winch handle to get more force. Most modern winches are self-tailing, which means they lock the line on so you can winch the line without holding on to it. Some boats even have electrical winches operated by a button.
Mainsheet Traveler
The mainsheet traveler is a horizontal track that the mainsheet is attached to through a series of blocks. The traveler enables you to adjust and lock the boom at an angle and also plays a critical part in trimming the mainsail.
Most cruising sailboats have their traveler attached to the top of the coachroof in front of the spray hood. A racing boat typically has the traveler in the cockpit near the helm to give the helmsman better control over the mainsheet.
The cars are basically a pulley or block attached to a track on the port and starboard deck that your headsail sheets run through. Cars are used to control the angle of the sheet between the clew and the deck. The cars are handy when you trim the sail to set the right balance of tension between the foot and leech, depending on your point of sail.
The jammer is used to lock a line in place. Most sailboats use these for locking the halyards, mainsheet, outhaul, reef lines, traveler lines, boom vang lines, etc. You can pull or winch a line through a closed jammer, but it won’t run away if you let go of it unless you open the lock.
As I explained earlier, it is normal to have most or all of the lines led back to the cockpit, and they are usually run through a series of jammers.
The jammers are often labeled with the name of the line it locks, which makes it easier to remember which line goes where.
Spinnaker Pole
A spinnaker pole is a spar used to wing out a headsail when sailing off the wind, particularly the spinnaker. The spinnaker pole should have the same length as the distance between the mast and the forestay measured along the deck. We use a fore and aft guy and the pole’s topping lift to rig a pole correctly.
The rigging varies depending on the layout of the boat, but it usually looks like this:
- One line runs from the bow to the end of the pole.
- An aft line runs from near the stern to the end of the pole.
- A topping lift is used to raise and lower the pole.
Whisker Pole
A whisker pole is similar to the spinnaker pole and is rigged similarly. It is typically built lighter and attached to a track on the mast. These can be found in fixed lengths or adjustable lengths. Ideally, the length should be the same as the foot of the headsail you intend to pole out.
Boom Vang/Rod Kicker
The Boom Vang has a few different names. Rod-kicker, kicking strap, or kicker. It is used to tension the boom downwards. When you are sailing downwind and have the boom far out, the mainsheet won’t pull the boom down as much as inboard, and you can then use the vang to adjust the twist and shape of the mainsail.
Mooring line
A mooring line is a traditional rope lead through a fairlead to the vessel’s cleat and a mooring buoy, key, or pontoon.
Final words
Congratulations! By now, you should have a much better understanding of how the running rig on a sailboat functions. We’ve covered the different lines, their purpose, and the hardware used to operate them. I hope you’ve enjoyed this guide and learned something new.
Now it’s time to take what you’ve learned and put it into practice by getting out on the water, setting sail, and getting hands-on experience with the lines.
Or you can continue to my following guide and learn more about the different types of sails .
Sharing is caring!
Skipper, Electrician and ROV Pilot
Robin is the founder and owner of Sailing Ellidah and has been living on his sailboat since 2019. He is currently on a journey to sail around the world and is passionate about writing his story and helpful content to inspire others who share his interest in sailing.
Leave a Reply Cancel reply
Your email address will not be published. Required fields are marked *
How Do Sails Actually Work: Full Beginners Guide
The sails are your boat's primary driving force. Your boat is designed to sail , and with good wind it will be faster and more comfortable than using the engine. Engines on sailboats are called "auxiliary" for a reason, almost every sailor hates to use them once they get the hang of sailing. But it won't happen if you don't learn to trim the sails, and to trim them you have to understand them.
But how does a bunch of cloth - your sails - get so much motive power and force? How do sails actually work?
The short answer is that upwind sails generate lift which acts against forces on the keel in the water to pull the boat forward, and downwind sails capture as much wind force as they can to push the boat downwind.

On this page:
How sailing requires some math, understanding the physics of sailing, putting math and physics together under sail, why is it easier to sail downward, applying your knowledge of sails.
But the detailed answer for sailing upwind is more complex, so come join us for a deep dive into the reason sailboats work and can sail up, down, and across the wind. It's going to get a little into math and a little physics, but we'll keep it on a practical level where you can get the concepts with little hard stuff. And downwind sails are much easier to explain.

To understand sails and sailing, understand the forces which apply to a boat and how they combine to make forward motion. To represent forces, motion, and velocity, we need to use vectors .
We'll do our best to keep this simple, and you will not need a calculator. The important takeaway is how we add forces together to figure a net force or motion .
What is a Vector?
A vector is a number with both a magnitude (a number or size) and a direction. Traveling at 60 miles per hour down the highway is a speed—the car's speed is 60 mph no matter where it’s headed. It has no direction component. But traveling west at 60 mph is a velocity , which is a speed and a direction (west).
You represent the speed easily with a number: "60." But how do you show its velocity headed west? Just as easily, with a vector.
Draw a six-inch line running east/west, then put an arrow on the west end. If we set our scale to one inch = 10mph, then we have our scalar measurement (6") and our orientation - west, or 270°. This arrow is the velocity vector of a car moving at 60mph headed west.
You can represent anything with an orientation and a scalar measurement this way. Whether it's the force and direction a pool cue applies to a ball, the force a hammerhead puts on a nail or the speed and direction of the wind, you can show it with vectors.
Calculating the sailing vector (with pictures)
So what is the point of drawing arrows to describe things? If we can describe forces with vectors, then we can add and subtract the vectors to see how the forces add and subtract, too.
Adding vectors is simple. To add two vectors, put the arrow end of the first vector at the beginning of the second vector. Then, with a straight edge, draw a line from the start of the first vector to the end of the second and put an arrow on the end where it meets the second vector. That new line you just drew is the sum of the vectors.
That's all there is to it. But what does it mean? Let's do a couple of thought exercises to show how it works.
Picture a bicyclist riding north along a road at 20 mph with no wind. The bicyclist feels a 20 mph north wind in her face, right? You can draw that as a line 20 units long pointing directly at the rider's face. The exact units on paper don't matter. That they're consistent is all that counts, so "one square of graph paper = one unit" and "one unit equals one mph" is just fine.
Now picture a 10 mph north wind from straight in front of the rider. What does it feel like to the rider?
That 10 mph wind is added to the 20 mph wind, and it feels like the rider is moving into a 30mph wind. You don't need vectors to see this, it's simple math, and you know how this feels. Just like you know a 10 mph south wind from straight behind the rider will make the total wind feel like just 10 mph.
But what about if there's a 10 mph wind from the east - 90 degrees from the rider's right? What does the wind force feel like in her face now?
- Draw your 20-unit north wind line in the rider's face.
- From the end of the first line, draw a 10-unit east wind.
- With a straightedge, draw a line from the beginning of the north wind vector to the arrow on the east wind vector.
- That line is what the rider feels in her face from the combined wind of her motion on the bike and the 10 mph east wind.
- You can measure the exact angle of the new vector with a protractor or compass and measure the length in units to get the wind strength. You'd get a wind that felt like 22.4 mph from 26.6° to the rider’s right.

Vector A, the north wind (0°) 20 mph long, and B is the east wind (90°) at 10 mph
The line is drawn to add them together.

The new vector for the wind force.

To explore this further, check out the tool used to make these graphics , where you can create your own vectors and add them together. Just remember it's made by mathematicians, not sailors, so North (0°) is to the right instead of up!
Applying vectors when sailing
You don't need to understand how to measure vectors or even do the math to get all the numbers. All you need to understand is how to add the forces together with the arrows.
Lay them head-to-tail and draw the new line. And that's enough for you to see how the combined forces will look without using a calculator.
Vectors are an important part of understanding sailing. When you learn to navigate, you'll use vectors to calculate the current set and drift or the course to a waypoint (though they won't call it that!). From our examples, you see how they apply to understand apparent wind. You don't need to draw lines on paper all the time, but understanding how forces, currents, and wind affect each other will make you a better sailor.
Now that we know how to measure and add forces, we can talk about the forces on a boat that create upwind motion. There are a few basic physics principles that describe and explain these forces and how they apply to a sailboat. If you never took physics back in the day (or you remember as well as most of us do years later...) don't sweat. We'll keep it relatable.
What is the Bernoulli Effect?
Standing near a chimney, you can feel flue drafts that suck the heat right out of the room if you leave it open, or see them suck smoke up the chimney. And if you've ever flown, did you ever look out the window at what the wing was doing during the flight? Ever wonder how the wings get that big jet plane off the ground?
The answer lies in the work of Daniel Bernoulli, an 18th-century Swiss mathematician. Bernoulli's Principle states that a moving fluid is associated with a decrease in static pressure. The faster the flow, the lower the pressure near it.
At lower speeds, the air is effectively fluid, and the same rules apply. So wind moving over a chimney opening creates a low-pressure spot at the top of the chimney, which draws air up the chimney even when there is no fire. On a windy day, this force is powerful enough to rattle the flue cover when it's closed.
How the sail generates lift
How does this get a plane in the air? And by extension, how does it get power to a sail? Because the same principle applies and upwind sails are very similar to airplane wings.
An airplane wing is a curved surface. As air flows over a curved surface, the air on the outside of the curve has a longer path to travel than air on the inside before it meets again at the back of the wing. Both sides of the wing are moving through the air at the same speed, so the air over the top of the curve must move faster than the air on the bottom.
The faster a fluid moves, the lower the pressure. So the faster air on top of the wing has lower pressure than the bottom, which leads to a lifting force from the higher pressure under the wing. The curve of a wing causes the lifting force towards the top of the wing. The same thing applies to upwind sails - the curve in the sail generates "lift" towards the outside of the sail.
If you want to feel this yourself, the next time you're a passenger in a car, roll down the window and put your hand. Flatten your hand with your palm down parallel to the ground. Then, slowly curve your hand and feel the lifting force!
How the sailor controls lift
If you've watched the wing while a plane takes off or lands, you've seen the pilot adjusting the flaps and the overall shape of the wing. A modern plane wing changes shape from a low-flat profile to a shorter, thicker shape. This different shape changes the amount of lift the wing gives, and the thicker shape has more lift, which helps at takeoff and landing.
The pilot is trimming the wing like a sailor trims a sail.
In a curved surface like an airplane wing (or sail), the chord is the curve's height. The fuller the curve, the longer the chord. And the faster the wind has to travel over the outside to meet the inside wind, which leads to more lift. But it also creates more drag, so once a plane is off the ground and getting closer to cruising speed, the pilot flattens out the wing to reduce drag for higher speed.
For airplanes, this makes taking off and landing easier since the plane can get off the ground and land at lower speeds. For sails, it gives more power for acceleration from low speed or through waves and chop.
What is Newton's Third Law of Motion?
"For every action, there's an equal and opposite reaction."
If you push against a wall, the wall pushes back with the same force. If it didn't, the wall would fall over. A rocket blasts hot gasses from burning fuel out of the bottom, and the rocket moves forward from the reaction force. A car's tires push against the road, the road pushes back, and the car moves forward.
When wind hits a boat's sails, it will either flop over and capsize or skitter sideways through the water unless it has a keel or other appendage under the water . A mono-hulled boat without a keel, centerboard, daggerboard, or other underwater stabilizers can not sail upwind.
So the keel acts as a counterpoise to the forces on the sails to keep the boat upright, but it also pushes against the water. This pushing against the water and the sails is an action, and there's an equal and opposite reaction. This force works against the sail lift to move the boat.
Sailing upwind, you've got a combination of lifting force from the sails, reactive force from the keel against the water, and other forces, like friction and drag from the water. These forces have their own vector arrows.
For simplicity, we will ignore friction and drag, since they're the only forces pushing against the boat in one direction as it moves through the water. While they increase with speed, we can assume the other forces are large enough to overcome them. And you don't want to make me explain adding four or five vectors together at once...
Friction and drag are very important to boat performance. We've simplified them out of the equation to make the force diagrams clearer. Faster boats have less drag from hull form and smooth bottoms, but all the drag and friction vectors point straight back against the boat's forward motion so they only slow the boat down, not change its direction.
In the diagram below, you can see vectors for the lifting force from the sails and the side force of the keep pushing against the water.
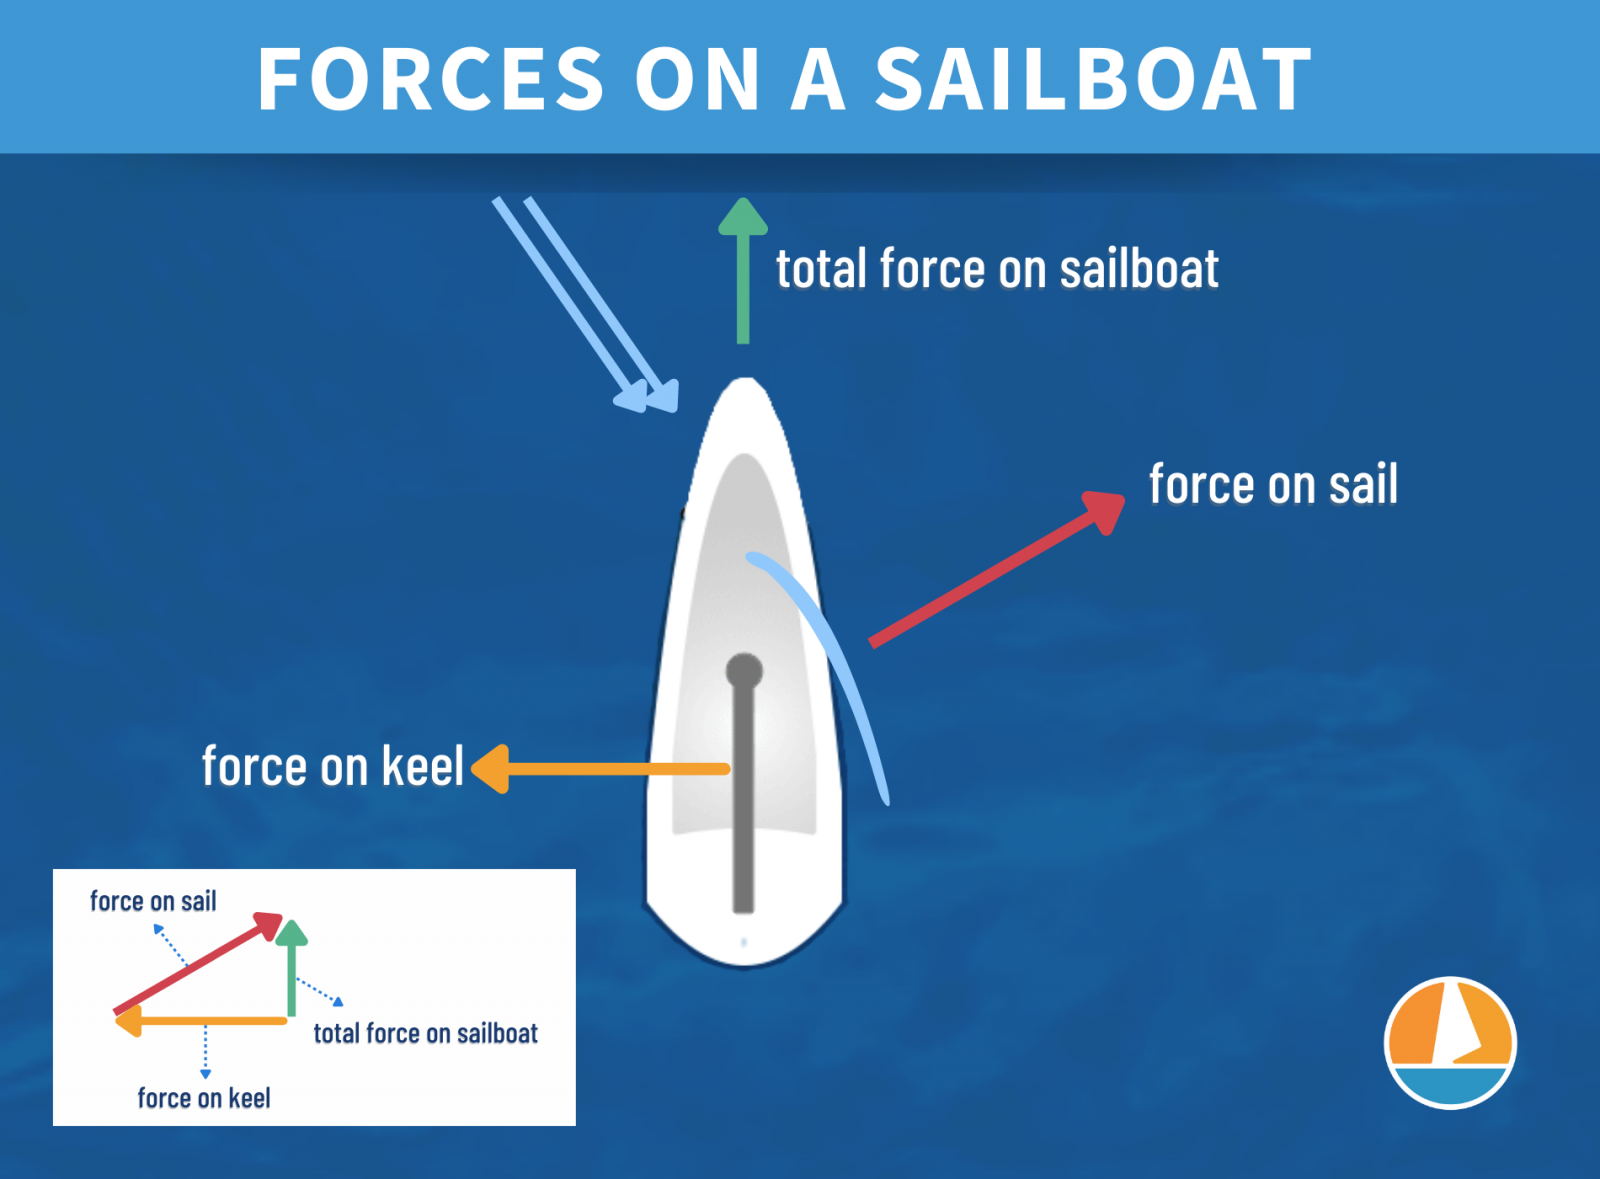
Now, add them.
You don't have to do it on paper, as long as you can see that those vectors, when added together, result in a vector that nets a forward motion of the hull through the water. There's your answer.
Any yacht designer will tell you there's much more to getting the correct forward vector. And this is true. The shape of the hull, the smoothness of the bottom, and a few other factors will affect the final forward forces on the boat.
But at its core, the lift vector from the sails added to the keel vector ends up in the boat being pulled forward.
What makes a boat sail downwind is much simpler than the mashup of force vectors we had to work through for upwind sailing. It's quite simple really - the sails fill with wind and pull on the boat to push/drag it downwind.
When you're not going against the wind, the physics is a lot simpler.
Not that you can't look more closely at the forces involved to maximize your speeds and find the best way to sail downwind. But we're not asking how to trim for speed, we're asking how the boat moves. And heading downwind, your full sails catch as much wind as possible to put as much propulsive force onto the hull as possible.
If you've gotten this far, you may wonder "now what?" The next step is to apply that knowledge to sail your boat. Now that you know you can change sail shapes for speed and power and why that works, check out our complete guide to trimming sails so you can trim better and sail faster.
Leave a comment
Own your first boat within a year on any budget.
A sailboat doesn't have to be expensive if you know what you're doing. If you want to learn how to make your sailing dream reality within a year, leave your email and I'll send you free updates . I don't like spam - I will only send helpful content.
Ready to Own Your First Boat?
Just tell us the best email address to send your tips to:

A Guide to the Different Parts of a Sailboat

Table of Contents
When you use Boatsetter, you have the opportunity to choose from a myriad of different sailboat rentals from all over the United States and beyond . A sailboat is a perfect way to relax on the water, either on a solo adventure or on an excursion with friends and family.
When you rent a sailboat with Boatsetter, you will have the option to book a captained sailboat to enjoy your day out on the water or book bareboat to hone your sailing skills. Either way, you may be interested in the intricacies of a sailboat and its different parts. If this sounds like you, you have come to the right place. In this article, we go in-depth about the different parts of a sailboat so that you can be more knowledgeable about whatever boat you may choose and come away from reading this feeling more confident about the whole sailing experience.
A basic sailboat is composed of at least 12 parts: the hull , the keel , the rudder , the mast, the mainsail, the boom, the kicking strap (boom vang), the topping lift, the jib, the spinnaker, the genoa, the backstay, and the forestay. Read all the way through for the definition of each sailboat part and to know how they work.
Explore sailboats for rent near you or wherever you want to go

In short, the hull is the watertight body of the ship or boat. There are different types of hulls that a sailboat may have, and these different hulls will often affect the speed and stability of the boat.
Displacement Hulls
Most sailboats have displacement hulls , like round bottom hulls, which move through the water by pushing water aside and are designed to cut through the water with very little propulsion. The reason these are called displacement hulls is that if you lower the boat into the water, some of the water moves out of the way to adjust for the boat, and if you could weigh the displayed water, you would find that it equals the weight of the boat, and that weight is the boat’s displacement. One thing to know about displacement hulls is that boats with these hulls are usually limited to slower speeds.
Planing Hull
Another type of hull is a planing hull. These hulls are designed to rise and glide on top of the water when enough power is supplied. When there is not enough power behind the boat, these boats often act as displacement hulls, such as when a boat is at rest. However, they climb to the surface of the water as they begin to move faster. Unlike the round bottom displacement hulls, these planing hulls will often have flat or v-shaped bottoms. These are very common with motor-driven water vessels, such as pontoon boats, but they can also be found on smaller sailboats which allow them to glide quickly over the water.
Finally, sailboats can differ depending on the number of hulls that they have. There are three options: monohulls (one hull), catamarans (two hulls), and trimarans (three hulls).
Monohulls , which have only a single hull, will usually be the typical round bottom displacement hull or occasionally the flat bottomed or v-shaped planning hull. Catamarans have two hulls with a deck or a trampoline in between, with the extra hulls providing increased stability. Finally, trimarans have three hulls — a main hull in the middle and two side hulls used for stability. These trimarans have gained popularity because of their excellent stability and ability to go at high speeds.
When evaluating a sailboat , it is important to pay attention to the type of hull that the boat has because the type of hull a sailboat has can drastically change the sailing experience, especially when it comes to stability and speed.

All sailboats have a keel, a flat blade sticking down into the water from the sailboat’s hull bottom. It has several functions: it provides counterbalance, life, controls sideways movement, holds the boat’s ballast , and helps prevent the boat from capsizing. When a boat leans from one side to the other, the keel and its ballast counteract the movement and prevent the boat from completely tipping over.
As with hulls, there are a number of different types of keels, though the two most common types of keels on recreational sailboats are the full keel or the fin keel. A full keel is larger than a fin keel and is much more stable. The full keel is generally half or more of the length of the sailboat. However, it is much slower than the fin keel. A fin keel, which is smaller than the full keel, offers less water resistance and therefore affords higher speeds.
A more recent feature on sailboats is the “winged keel,” which is short and shallow but carries a lot of weight in two “wings” that run sideways from the keel’s main part. Another more recent invention in sailing is the concept of the canting keels, which are designed to move the weight at the bottom of the sailboat to the upwind side. This invention allows the boat to carry more sails.
The Rudder

A rudder is the primary control surface used to steer a sailboat. A rudder is a vertical blade that is either attached to the flat surface of the boat’s stern (the back of the boat) or under the boat. The rudder works by deflecting water flow. When the person steering the boat turns the rudder, the water strikes it with increased force on one side and decreased force on the other, turning the boat in the direction of lower pressure.
On most smaller sailboats, the helmsman — the person steering the boat — uses a “ tiller ” to turn the rudder. The “tiller” is a stick made of wood or some type of metal attached to the top of the rudder. However, larger boats will generally use a wheel to steer the rudder since it provides greater leverage for turning the rudder, necessary for larger boats’ weight and water resistance.

The mast of a sailboat is a tall vertical pole that supports the sails. Larger ships often have multiple masts. The different types of masts are as follows:
(1) The Foremast — This is the first mast near the bow (front) of the boat, and it is the mast that is before the mainmast.
(2) The Mainmast — This is the tallest mast, usually located near the ship’s center.
(3) The Mizzen mast — This is the third mast closest to the stern (back), immediately in the back of the mainmast. It is always shorter than the mainmast and is typically shorter than the foremast.
The Main Sail

The mainsail is the principal sail on a sailboat, and it is set on the backside of the mainmast. It is the main source that propels the boat windward.

A boom is a spar (a pole made of wood or some other type of lightweight metal) along the bottom of a fore-and-aft rigged sail, which greatly improves the control of the angle and the shape of the sail, making it an indispensable tool for the navigation of the boat by controlling the sailes. The boom’s primary action is to keep the foot (bottom) of the sail flatter when the sail angle is away from the centerline of the sailboat.
The Kicking Strap (Boom Vang)
The boom vang is the line or piston system on a sailboat used to exert a downward force on the boom, enabling one to control the sail’s shape. The vang typically runs from the base of the mast to a point about a third of the way out the boom. It holds the boom down, enabling it to flatten the mainsail.
The Topping Lift
The topping lift is a line that is a part of the rigging on a sailboat, which applies an upward force on a spar (a pole) or a boom. Topping lifts are also used to hold a boom up when it’s sail is lowered. This line runs from the free end of the boom forward to the top of the mast. The line may run over a block at the top of the mast and down the deck to allow it to be adjusted.

A jib is a triangular staysail set ahead of the foremost mast of a sailboat. Its tack is fixed to the bowsprit, the bow, or the deck between the bowsprit and the foremost mast. Jibs and spinnakers are the two main types of headsails on modern boats.
The Spinnaker

A spinnaker is a type of sail designed specifically for sailing off the wind from a reaching downwind course. The spinnaker fills up with wind and balloons out in front of the sailboat when it is deployed. This maneuver is called “flying.” The spinnaker is constructed of very lightweight material, such a nylon fabric and on many sailing vessels, it is very brightly colored.
Another name for the spinnaker is the “chute” because it often resembles a parachute, both in the material it is constructed from and its appearance when it is full of wind.
People often use the term genoa and jib as if they were the same thing, but there is a marked difference between these two types of sails. A job is no larger than a foretriangle, the triangular area formed by the mast, the deck or bowsprit, and the forestay. On the other hand, a genoa is larger than the jib, with part of the sail going past the mast and overlapping the mainsail. These two sails, however, serve very similar purposes.
The Backstay

The backstay is a standing rigging that runs from the mast to the transom (the vertical section at the back of the boat), counteracting the forestay and the jib. The backstay is an important sail trip, control and directly affects the mainsail’s shape and the headsail.
There are two general categories of backstays:
1) A permanent backstay is attached to the top of the mast and may or may not be readily adjustable.
2) A running backstay is attached about two-thirds up the mast and sometimes at multiple locations along the mast. Most modern sailboats will have a permanent backstay, and some will have permanent backstays combined with a running backstay.
The Forestay

A forestay is a piece of standing rigging that keeps the mast from falling backward. It is attached at the very top of the mast, or at certain points near the top of the mast, with the other end of the forestay being attached to the bow (the front of the boat). Often a sail, such as a jib or a genoa, is attached to the forestay.
A forestay might be made from stainless steel wire, stainless steel rod or carbon rod, or galvanized wire or natural fibers.
Parts of a sail
Sails are vital for sailboats, made up of complex parts that improve performance and maneuverability. In this section, we’ll take a closer look at the different parts of that make up the sails.
Luff – The luff is a vertical sail part that maintains its shape and generates lift by interacting with the wind. It attaches securely with a bolt rope or luff tape for easy hoisting.
Leech – The leech controls air flow and reduces turbulence. Battens or leech lines are used to maintain shape and prevent fluttering.
Foot – The foot of a sail connects the luff and leech at the bottom edge. It helps define the sail’s shape and area. The outhaul is used to adjust its tension and shape.
Head – The sail’s head is where the luff and leech meet. It has a reinforced section for attaching the halyard to raise the sail.
Battens -The b attens are placed horizontally in sail pockets to maintain shape and optimize performance in varying wind conditions. They provide structural support from luff to leech.
Telltales – Sailors use telltales to adjust sail trim and ensure optimal performance.
Clew – The clew is important for shaping the sail and connecting the sheet, which regulates the angle and tension, producing energy. It’s located at the lower back corner of the sail.
Sailing is a favorite pastime for millions of Americans across the country. For some, there is nothing better than gliding across the water propelled by nothing more than the natural force of the wind alone. For both experienced and non-experienced sailors alike, Boatsetter is the perfect place to get your ideal sailboat rental from the mouthwatering Florida keys to the crystal blue waters of the Caribbean .
Smaller sailing boats are perfect for a single day out on the water, either by yourself or with friends and family. In comparison, larger sailing boats and sailing yachts can allow you days of luxury on longer excursions full of adventure and luxury.
Whatever your sailing dreams are, it is always good to know, for both the experienced sailor and the novice, all about the sailboat’s different parts. In this article, we learned all about the boat’s hull, the keel, the rudder, the mast, the mainsail, the boom, the kicking strap (boom vang), the topping lift, the jib, the spinnaker, the genoa, the backstay, and the forestay, which make up the basic parts of any sailboat you might find yourself on.
About us
Boatsetter is the go-to app for boat rentals and on-water experiences. Whatever the adventure, we’ve got a boat for that—Set sail , start the party , go yachting , make your trophy catch , and hone your watersports skills! Download the Boatsetter app ( App Store | Google Play ). Make sure to follow @boatsetter on Instagram, and tag us in all your boat day pictures for the chance to be featured.
Rent. List. Share—Only at Boatsetter
Boatsetter empowers people to explore with confidence by showing them a world of possibility on the water. Rent a boat, list your boat, or become a Boatsetter captain today.
Browse by experience

Explore articles

Need a hand? Introducing boat managers

7 Lakes in Oregon Perfect for Boating

Boating in Naples, FL: Everything You Need to Know

10 Best Boats Under $20,000
- Weekly Newsletter
California's Boating & Fishing News

Sailing 101: The Anatomy of the Sailboat
Ahoy sailors, welcome to the first article in a new series set on giving you a complete guide to the world of sailing. The Log will be compiling sailing information from experts so you will be well-versed in sailing in no time.
SOUTHERN CALIF.— There are many ways to learn to sail. You can jump in the boat with a friend and learn from experience, you can sign up for formal lessons, or if you can get your hands on a boat, you can try and teach yourself. No matter which method you prefer, it’s necessary to understand the boat and what it can do out on the water before you dive into your education.
The Basics of a Sailboat
Before setting sail, there is much you need to know. Gaining a basic knowledge of the boat’s anatomy will help the new sailor familiarize themselves with where and how the boat operates. Knowing the different parts of the sailboat is important for both safety and being able to sail your boat as flawlessly as possible.
- Block: This is the nautical term for a pulley.
- Boom: The horizontal support for the foot of the mainsail extends aft of the mast. Aft is the rear of the ship, at the direction of the ship’s stern. This is what you want to watch out for when changing directions in a sailboat. It can give you quite a bump on the head if it hits you.
- Bow: This is what the front of the boat is called.
- Centerboard: This is a (usually fiberglass) plate that pivots from the bottom of the keel (a flat blade sticking down into the water from the bottom of the sailboat) in some boats and balances the vessel when under sail.
- Cleat: Cleats are what lines (or ropes) get fastened to when they need to be kept tight.
- Halyard: Lines that raise or lower the sails. (Along with the sheets, aka running rigging.)
- Hull: The hull is the boat’s body and consists of everything below the deck.
- Jib: This is the sail at the bow of the boat. The jib helps propel the boat forward.
- Genoa: A foresail that is larger than a jib.
- Keel: The keel is what prevents a boat from sliding sideways (“making leeway”) in whatever way the wind is blowing and stabilizes the boat.
- Line: Lines are ropes. They are everywhere on boats. There is only one “rope” on a sailboat, the bolt rope that runs along the mainsail’s foot.
- Mainsail: It’s all in the name; this is the boat’s mainsail. It is the sail attached to the back of the mast.
- Mast: The mast is a large, vertical pole that holds the sails up. Some boats have more than one mast.
- Painter: This is a line positioned at the front of small boats. It is used to tie the boat to a dock or another boat.
- Rudder: The rudder is how the boat is steered. It is movable so that when you turn the wheel or tiller, the rudder directs the boat in the direction you would like to go.
- Sheets: The lines that control the sails, (also known as running rigging.)
- Spinnaker: The usually brightly colored sail used when sailing downwind or across the wind.
- Stays and Shrouds: Some wires ensure the mast stays upright, even in hefty winds, (also known as standing rigging.)
- Stern: The back of the boat.
- Tiller: The tiller is a stick attached to the rudder and controls the rudder.
- Transom: This can also be called the butt of the boat. It is the back part of the boat perpendicular to its centerline.
- Wheel: The wheel works the rudder, steering the boat.
- Winch: Winches help tighten the sheets and halyards. When these lines are wrapped around a winch (in a clockwise direction), a sailor can turn the winch with a winch handle, providing mechanical advantage, which makes it easier to bring in the lines.
Study these terms and distinguish where they are located on the boat. Retain that knowledge while the Log prepares for the next lesson in Sailing 101.
- ← Blips on the Radar: Southern California oil spill
- Fast Facts: Red Light, Green Light →
One thought on “ Sailing 101: The Anatomy of the Sailboat ”

The timing of your article Sailing 101 turns out to be perfect for myself as I set a new course and plan to learn how to sail. After a lifetime of boating starting on the northeast coast and now in southern California, I have been fortunate to enjoy various types of power boats including trawlers. Now that my wife is done with boating I needed to find something to keep me on the water and stay young. Why not sailing? After a yearlong search for the “right boat” I commissioned the build of a 16′ Sandpiper Catsailboat built by Marshall Marine Corp, in Maine. With the boats ultra-wide beam of 7′ I felt it would offer the greatest stability for a beginner and its great classic looks add to its appeal. I look forward to following your article and learn as much as possible. Thank you
Comments Cancel reply
Your email address will not be published. Required fields are marked *
Your Thoughts are Appreciated
Save my name, email, and website in this browser for the next time I comment.
- Types of Sailboats
- Parts of a Sailboat
- Cruising Boats
- Small Sailboats
- Design Basics
- Sailboats under 30'
- Sailboats 30'-35
- Sailboats 35'-40'
- Sailboats 40'-45'
- Sailboats 45'-50'
- Sailboats 50'-55'
- Sailboats over 55'
- Masts & Spars
- Knots, Bends & Hitches
- The 12v Energy Equation
- Electronics & Instrumentation
- Build Your Own Boat
- Buying a Used Boat
- Choosing Accessories
- Living on a Boat
- Cruising Offshore
- Sailing in the Caribbean
- Anchoring Skills
- Sailing Authors & Their Writings
- Mary's Journal
- Nautical Terms
- Cruising Sailboats for Sale
- List your Boat for Sale Here!
- Used Sailing Equipment for Sale
- Sell Your Unwanted Gear
- Sailing eBooks: Download them here!
- Your Sailboats
- Your Sailing Stories
- Your Fishing Stories
- Advertising
- What's New?
- Chartering a Sailboat
The Parts of a Sailboat (of which there are a great many!)
Some parts of a sailboat are very small and cheap, but are far from insignificant. Take the humble clevis pin for example; find one of these on the foredeck and you've cause to be concerned for the security of your rig!
If we were going to discuss all the parts of a sailboat here, it would be a very long article indeed - but relax, that's not going to happen.
Let's make a start with...
The Parts of a Sailboat Above Deck

Dacron is the usual choice of sailcloth for cruisers although laminated sails are becoming more common, and moulded sails are the first choice for racing sailors.
Read more about sails...
The Rigging
The standing rigging , generally made up in 1x19 stainless-steel wire, supports the mast.
The forestay and backstay secure the mast in the fore-and-aft plane, and the shrouds secure it athwartships.
The ends of the stays and shrouds are secured to the structural elements of the hull via chainplates.

The running rigging is the collective name for the lines (halyards, sheets, topping lifts, uphauls, downhauls etc) that control the sails. Their working ends are attached either directly to the sails or, in the case of the headsail, to the boom.
Read more about sailboat rigging...
These are the rigid struts, generally fabricated in alloy, wood or carbon fibre whose job it is to deploy the sails. For example:
- The spinnaker pole;
- The whisker pole;
- The bowsprit;
- The boomkin.
Read more about sailboat masts...
The Cockpit

Like many cruising boats, the Ted Brewer designed Whitby 42 ketch pictured above has a centre-cockpit, which allows for the provision of a sumptuous aft-cabin below. Nevertheless, aft-cockpit boats have a great following with seasoned cruisers too. So what the aft versus centre-cockpit pro's and con's?
Tillers and Wheels
Smaller boats tend to be tiller-steered while larger ones, as in the image above, have wheels. Tillers are attached directly to the rudder stock; wheels are located remotely and operate the tiller through chain or hydraulic linkage.
Each approach has their devotees, but what are the arguments for and against?
The Parts of a Sailboat Below the Waterline
Keels & rudders.

Keels provide three key attributes in varying amounts depending on their design : directional stability, ballast, and lift to windward.
Rudders provide steerage and a small contribution towards lift to windward. They are either:
- Outboard or inboard rudders, which can be
- Unbalanced, balanced or semi-balanced, and be
- Keel-hung, skeg-hung, transom-hung or spade rudders.
Rudder types are discussed here...

Driven by the boat's diesel engine, the propeller allows good progress to be made when the wind is not cooperating.
Under sail though the propeller is redundant and the fixed blades provide nothing but unwanted drag. This is greatly reduced if the blades can fold aft in a clamshell arrangement or feather in self-alignment with the water flow.
Sailboat propellers are either 2 or 3-bladed - and you can read more about them here...
Below Decks

There's no 'standard' layout for the below-decks accommodation on a sailboat, although the one shown above is a popular choice.
Some layouts work well for offshore sailing whereas others are much less suitable - here's why some succeed where others fail...
Recent Articles
'Natalya', a Jeanneau Sun Odyssey 54DS for Sale
Mar 17, 24 04:07 PM
'Wahoo', a Hunter Passage 42 for Sale
Mar 17, 24 08:13 AM
Used Sailing Equipment For Sale
Feb 28, 24 05:58 AM
Here's where to:
- Find Used Sailboats for Sale...
- Find Used Sailing Gear for Sale...
- List your Sailboat for Sale...
- List your Used Sailing Gear...
- Sign-up for our newsletter, 'The Sailboat Cruiser' ...
- Identify this month's Mystery Boat...
Our eBooks...

A few of our Most Popular Pages...

Copyright © 2024 Dick McClary Sailboat-Cruising.com
How To Sail a Small Sailboat

Last Updated by
Jacob Collier
August 30, 2022
Sailing is a skill that takes time and practice to learn and perfect. Learning how to sail a small sailboat requires onshore and offshore activities.
Sailing heavily depends on the wind, and setting the sails right is a crucial sailing element. If you do not adjust the sails according to the wind, your boat will not move and, in worst cases, may even capsize.
Sailing is a skill that gets better with practice. There are several factors that you need to understand when sailing. These include the wind direction, how to turn and steer the boat, adjusting the sails, and finally, how to slow down and come to a stop.
Many novice sailors find handling the sailboat a daunting task. You have to take care of so many controls, including the tiller, the sails, and the centerboard.
Experienced sailors believe that new sailors should avoid taking their sailboats into open waters until they have gotten the hang of the water and the sailboat. Sailboats have tall sails, which make them prone to capsizing. Inexperienced sailors should either take courses on sailing or learn by going out with a friend before they head on their solo adventures.
Table of contents
How To Sail a Small Sailboat
Before heading out on your next boating adventure, you need to consider several factors. As the wind powers your boat, the first thing you need to understand is how wind strength and direction affect your boat. You will also need to learn how to handle the tiller. If you have been driving any road vehicle, you may not be surprised to see a vast difference between how a car and a boat handle.
Understanding Wind Direction
Wind plays a crucial role in how fast and the direction in which your sailboat will move. It is impossible to sail into a headwind. But you can sail around 45 degrees to headwind.
- When sailing 45 degrees to the oncoming wind, this is known in sailor jargon as the boat is close-hauled.
- When you are sailing with the wind coming from either side or almost 90 degrees to the boat, it is known for the boat to be on a beam reach.
- When you are sailing at a wide-angle in the direction of the wind. For instance, say that you need to head north, and the wind is coming from North East, the boat is called to be on a broad reach.
- If you are lucky and have the wind in the direction you are heading, your boat is known to be running.
Positioning Your Boat
It is crucial to be aware of the position of your sailboat in relation to the wind direction. This allows you to adjust the sails and balance the weight in your boat. For beginners, you can tie small wind vanes, which can be simple yarn strands on the boat to let you know where the wind is coming from.
What Affects Wind Direction
As you sail through the wind, your boat will also alter the wind direction. Since the boat has a giant sail, it creates its own wind as the boat moves forward. This wind is known as apparent wind. For instance, your boat is moving on a beam reach, where the true wind is coming from the side of the boat.
As you move through the wind, your boat makes its own apparent wind. The true and apparent winds combine, causing the wind direction to change. This can lead your boat to be on a close haul rather than on a beam reach. What matters, in the end, is how much resulting wind there is in your sails and the direction it is coming from.
Getting Ready To Sail
The best method to start sailing is to take the boat on from a point such as an anchor line or a mooring buoy. The wind will push the boat backward and out into the open waters as you get into the boat and set the sails up.
Moving stern first is acceptable when being pushed out of the marina, but this is not the direction in which we will want to continue sailing. You will have to turn the boat around so that wind is pushing the boat bow first.
Turning To Set Direction
As you come out of the marina, you will need to adjust your sails to change direction. Remember, boats require time to respond and need patience above all else.
The first step is to push the boom out of both sides of the boat. This will cause the wind to blow against the sail's back and not past its sides, causing the boat to rotate. As you pull in the sail and set its direction, the boat will begin to correct its course. Once you are in the right direction, you can tighten the mainsail and be well on your way.
Starting From A Beach Or A Dock
Starting from a beach or an enclosed dock can be quite challenging. If the wind pushes the boat sideways into the dock, it is next to impossible to sail out of the dock. In such a scenario, it would be best if you could walk your boat like a pet to the dock's end and attempt to turn it around to face the wind. You can then follow the procedure described above to allow the boat to come out of the marina.
Your boat will not move if the sails are not taut. As soon as you tighten the sails, the wind will move the boat, and you can then set the direction to your preference.
Steering The Boat
Now that you have set the direction and are moving in the correct direction, you will need to maintain direction and be able to steer the boat through the water. Before you begin to steer the sailboat, you must ensure that you are sitting in the direction opposite the sail. This is usually the direction from which the wind is blowing.
When the wind blows against the sails, it can cause your boat to tilt in their direction. Your body weight will counter the tilting effect and keep the boat level.
Using The Tiller
The sailboat is equipped with a rudder. As your boat picks up speed, you can use the rudder to steer the boat. A little tiller usually controls the rudder. The tiller takes some time to get used to. The reason for this is that it works in opposite directions. For instance, if you want to make the boat turn right (towards the starboard side), you will have to push the tiller to the left (towards the port side) and vice versa.
The rudder is hinged in line with the tiller. When you move the tiller in one direction, it moves the rudder. For instance, the rudder will extend towards the starboard side if you push the tiller to the port side. The water flowing will push against the rudder, and the resistance from the rudder will rotate the boat towards the starboard side .
The tiller can be tricky to use. Ensure that you make minor adjustments to the tiller until you get used to how it moves your boat.
Handling The Sails
There is one rule that you must remember when positioning your sails. If you are sailing towards the wind, you will have to pull in the sails more. Similarly, if you are on a broad reach and sailing in the direction of the wind, you will have to extend the sails more.
When the sails are extended and you are on a broad reach, you will notice that the boat tilts to the side the sails are on. You must seat yourself so that you counter the tilting effect.
Sail Trimming
No, you don't need a pair of scissors for this. A sail comprises multiple sheets, and adjusting these sheets is known as trimming the sail. Your goal with trimming the sail is to give the sail the best possible shape to make maximum use of the wind.
Mainsail Trimming
When trimming the mainsail, you will have to make sure that it is tight enough so that the sail's leading edge is not flapping or shaking. At the same time, you have to ensure that it is not too tight, causing the wind to blow against only one side of the sail. This can cause the boat to tilt to one side.
Leaving the edge loose means you will lose efficiency. The wind energy will be used to flap the sail instead of pushing your boat forward. This unwarranted movement of the sail is known as luffing, which can significantly reduce the boat's efficiency.
Adjusting The Mainsheet
One method to trim the mainsail is to let the mainsheet out until the mainsail starts to luff. Then slowly pull in the sheet, and stop as soon as the sail stops luffing.
If the sail is too tight, you will be able to judge by its appearance. The sail will have no slack and will look perfect. The only way to correct the tightness is to loosen it until it starts to luff, then tighten it gradually, and stop as soon as the luff is gone.
Trimming The Jib
Adjusting the jib also follows the same procedure as the sail. The goal is to loosen the sail until it starts to luff and then tighten it back up until there is no luffing. Like the mainsail, the appearance of the job will have a lot to say about its tightness.
Some sailboats have streamers on the leading edge of the jib, which depict airflow direction over it. When the sail is in the correct trim setting, the streamers will blow straight and on both sides around the sail.
Another factor to consider when adjusting the jib is the space between the mainsail and the jib. The gap, known as the slot, has to be the same from front and back. This ensures that wind flows smoothly between the sails, making the setup efficient. If either is too tight or loose, the slot will obstruct the wind flow, causing turbulence and slowing the boat down.
Turning The Boat
The most crucial part of sailing is always being aware of the wind direction. This becomes even more important when you are planning to turn the boat. If you are careless while making the turn and accidentally turn the wrong way, you may capsize the boat .
There are three common types of turns that you can make with sailboats.
Sailing Close Hauled
If the wind is coming at you head-on from either side, and you are close hauled, check for the direction of the wind. If it is blowing from the starboard side, turn the boat towards the right so that you point your bow into the wind. Continue turning until the wind is now coming to your port side. This technique is called tacking, which involves turning into the wind.
Sailing Broad Reach
If the wind is coming from either side or slightly behind you, you can turn so that the stern of your boat becomes head-on with the wind. For instance, if the wind is coming from the starboard side, you will turn left to make sure the wind hits the stern. This technique is known as jibing, and it allows you to make the turn downwind.
No Wind Crossing
This technique can be used if you want to make small turns. Say you are sailing close-hauled with wind flowing from your port side. You turn left, and now the wind is approaching from the side, and you begin to sail broad reach. The wind remains on your starboard side, but the direction has changed.
How To Position The Sails
For the initial two types of turns, where you will be crossing the wind with your stern or bow, the sails will have to be crossed over to the opposing side. You will also need to change your seating location to make sure you sit opposite the sails.
Since crossing the wind requires a lot of work, most sailors prefer to turn without crossing the wind. All you need to do is make small trimmings to the sail to keep you going in the right direction for this type of turn. With experience, you will be able to adjust the sails during your turn.
Remember, the closer the wind direction is to your bow, the more you will need to pull in the sails. The closer the wind direction is to your stern, the more you want your sails to be open. While turning, it would be best to keep one hand on the mainsail if you need to adjust its direction to prevent your boat from being blown in random directions.
The Centerboard
You will notice a thin and long blade of metal or fiberglass hanging from the boat's center and into the water. This component is called the centerboard, and it helps resist the sideways movement of the boat. You can raise or lower the centerboard at your discretion.
When you are sailing, the wind comes from either the left or right of the boat. If the wind is strong enough, it can push the boat to one side. Lowering the centerboard will cause it to act as a keel and prevent the boat from veering off in the wind direction.
When you are sailing along with the wind, you will have the wind coming from the rear of the boat, and it will have little influence from either side. In such a scenario, you will not need the centerboard. Raising the centerboard will reduce the drag, allowing you to sail faster.
As a beginner, it is recommended to keep the centerboard down. Who knows when it may save you? You don't have to be too concerned about it, as you have more important things such as the sail to worry about.
Slowing Down and Stopping
When it comes to sailing, speed is thrilling. Going fast is fun, but in a sailboat, speed is an achievement. The only thing more important than going fast is knowing how to slow down, such as when coming to a stop or avoiding an obstacle along the way.
Theoretically, to slow down, you have to do the opposite of what you would do if you wanted to speed up. This means that you will want to ensure that any wind that falls on your sails gets wasted or "spilled."
The best way to do this is to let out and loosen the sails until they begin to luff. If you need to slow down faster, you can loosen them further until they start to flap. If you plan to come to a stop, you can let the sails flap continuously.
However, if you are heading downwind or running, the mainsail should not be pushed out. Instead, you can pull it in as much as possible so the sail will not collect any wind. With no wind in the sails, your boat will slow down.
The simplest way to stop the boat is to turn it towards the wind. This will ensure maximum resistance and bring the boat to a halt.
Related Articles
What Are Small Sailboats Called?
10 Best Small Sailboats (Under 20 Feet)
Are Small Sailboats or Big Sailboats Faster?
Born into a family of sailing enthusiasts, words like “ballast” and “jibing” were often a part of dinner conversations. These days Jacob sails a Hallberg-Rassy 44, having covered almost 6000 NM. While he’s made several voyages, his favorite one is the trip from California to Hawaii as it was his first fully independent voyage.
by this author
How to Sail
Most Recent

What Does "Sailing By The Lee" Mean?
Daniel Wade
October 3, 2023

The Best Sailing Schools And Programs: Reviews & Ratings
September 26, 2023
Important Legal Info
Lifeofsailing.com is a participant in the Amazon Services LLC Associates Program, an affiliate advertising program designed to provide a means for sites to earn advertising fees by advertising and linking to Amazon. This site also participates in other affiliate programs and is compensated for referring traffic and business to these companies.
Similar Posts

How To Choose The Right Sailing Instructor
August 16, 2023

How To Sail From California To Tahiti
July 4, 2023

How To Tow A Skier Behind A Boat
May 24, 2023
Popular Posts

Best Liveaboard Catamaran Sailboats
December 28, 2023

Can a Novice Sail Around the World?
Elizabeth O'Malley
June 15, 2022

4 Best Electric Outboard Motors

How Long Did It Take The Vikings To Sail To England?

10 Best Sailboat Brands (And Why)
December 20, 2023

7 Best Places To Liveaboard A Sailboat
Get the best sailing content.
Top Rated Posts
Lifeofsailing.com is a participant in the Amazon Services LLC Associates Program, an affiliate advertising program designed to provide a means for sites to earn advertising fees by advertising and linking to Amazon. This site also participates in other affiliate programs and is compensated for referring traffic and business to these companies. (866) 342-SAIL
© 2024 Life of Sailing Email: [email protected] Address: 11816 Inwood Rd #3024 Dallas, TX 75244 Disclaimer Privacy Policy

Basic Sailing Terminology: Sailboat Parts Explained
Sailing is a timeless activity that has captivated the hearts of adventurous souls for centuries. But, let’s face it, for beginners, sailing can be as intimidating as trying to navigate through a dark, labyrinthine maze with a blindfold on. The vast array of sailing terminology, sailboat parts and jargon can seem like a foreign language that only the most experienced seafarers can comprehend.
Fear not, intrepid sailor, for this comprehensive guide on basic sailing terminology for beginners will help you navigate the choppy waters of sailing jargon with ease. From learning the difference between the bow and stern to mastering the intricacies of sail trim, this article will equip you with all the knowledge you need to confidently take to the seas. So hoist the mainsail, batten down the hatches, and let’s set sail on this exciting journey of discovery!
Parts of a Sailboat
Before you can begin your sailing adventure, it’s important to familiarize yourself with the different parts of a sailboat. From the sleek bow to the sturdy keel, each component plays a vital role in keeping your vessel afloat and propelling you forward through the waves.

- Hull The main body of the boat that sits in the water and provides buoyancy and stability.
- Bow The front of the boat that meets the water and helps to determine its direction.
- Stern The rear of the boat where the rudder and motor are located.
- Deck The flat surface of the boat that you stand on, which can include various features such as seating, storage compartments, and hatches.
- Cockpit The recessed area of the deck where the skipper and crew sit or stand while sailing, which allows for easy access to the sail controls and provides protection from the wind and waves.
- Keel The long, fin-shaped structure beneath the waterline that helps to keep the boat stable and upright.
- Rudder The flat, vertical surface located at the stern of the boat that is used to steer and control the direction of the boat.
- Tiller or wheel The mechanism used to steer the boat, either in the form of a tiller (a handle attached to the rudder) or a wheel (similar to the steering wheel of a car).
- Mast The tall, vertical pole that supports the sails and allows you to catch the wind and move through the water.
- Boom The horizontal pole extending off the bottom of the mast that holds the bottom edge of the mainsail.
- Mainsail The large, triangular-shaped sail attached to the mast and boom that captures the wind’s power to propel the boat forward.
- Jib The smaller, triangular-shaped sail attached to the bow that helps to steer the boat and balance the force of the mainsail.
- Rigging The network of ropes and cables that hold the mast and sails in place and help control their movement.
Sail Terminology
Understanding the terminology associated with sails is critical to becoming a successful sailor. Here are 12 of the most important sail terms you should know, along with brief explanations for each:

- Luff The forward edge of a sail that is attached to the mast, allowing you to adjust the sail’s shape and angle to catch more wind.
- Leech The aft edge of a sail that is attached to the boom, which helps to control the sail’s shape and release the wind as needed.
- Foot The lower edge of a sail that is attached to the boom, which helps to control the sail’s shape and power.
- Head The top of a sail that is attached to the mast and controls the sail’s overall shape and angle.
- Battens The long, thin strips inserted into the pockets of a sail to help maintain its shape and stiffness.
- Clew The bottom corner of a sail that is attached to the boom or sheet, which helps to control the sail’s shape and power.
- Tack The bottom forward corner of a sail that is attached to the boat or a line, which helps to control the sail’s shape and power.
- Sail Area The total area of a sail, which is measured in square feet or meters.
- Sail Draft The curve or depth of a sail, which affects its performance and power.
- Sail Shape The overall form and contour of a sail, which is critical for catching the wind effectively.
- Reefing The process of reducing the sail area by partially lowering or folding the sail, which can be necessary in strong winds or heavy seas.
- Furling The process of rolling or folding a sail to reduce its size or stow it away, which is often used when entering or leaving port or in rough conditions.
Wind Direction and Sail Positioning
Understanding wind direction and sail positioning is crucial for successful sailing. Here are the key terms you need to know:
Types of Wind

- Apparent Wind The wind that is felt on the boat, which is a combination of the true wind and the wind generated by the boat’s movement.
- True Wind The actual direction and strength of the wind.
Points of Sail
You can find a detailed explanation of the points of sail here

- Close-Hauled Sailing as close to the wind as possible, with the sail set at a sharp angle to the boat.
- Beam Reach Sailing perpendicular to the wind, with the sail set at a right angle to the boat.
- Broad Reach Sailing with the wind at a diagonal angle behind the boat, with the sail angled away from the boat.
- Running Sailing directly downwind, with the sail on one side of the boat.
Other Terms

- Windward The side of the boat that is facing the wind.
- Leeward The side of the boat that is sheltered from the wind.
- Sail Trim Adjusting the sail and rigging to maximize the power and efficiency of the sailboat.
Navigation Terminology
Navigating a sailboat requires an understanding of a variety of nautical terms. Here are some of the most important terms you should know:
- Starboard Side The right side of a boat
- Port Side The left side of a boat
- Compass A device used for determining the boat’s heading or direction.
- Bearing The direction from the boat to a specific point on land or water.
- Chart A map or nautical publication that displays water depths, navigational aids, and other important information for safe navigation.
- Latitude The angular distance between the equator and a point on the earth’s surface, measured in degrees, minutes, and seconds.
- Longitude The angular distance between the prime meridian and a point on the earth’s surface, measured in degrees, minutes, and seconds.
- Course The direction in which the boat is traveling.
- Plotting The process of marking a course on a chart or map.
- Waypoint A specific point on a navigational chart or map that serves as a reference point for plotting a course.

- Tacking This maneuver involves turning the bow of the boat through the wind in order to change direction. To tack , the sailor will turn the helm towards the wind until the sails begin to luff, then quickly steer the boat in the opposite direction while adjusting the sails to catch the wind on the new tack.
- Jibing This maneuver is similar to tacking, but involves turning the stern of the boat through the wind. To jibe, the sailor will steer the boat downwind until the sails begin to luff, then quickly turn the stern of the boat in the opposite direction while adjusting the sails to catch the wind on the new tack.
- Heading up This maneuver involves turning the boat closer to the wind in order to sail upwind. To head up, the sailor will turn the helm towards the wind while simultaneously trimming the sails in to maintain speed and prevent the boat from stalling.
- Falling off This maneuver involves turning the boat away from the wind in order to sail downwind. To fall off, the sailor will steer the helm away from the wind while simultaneously easing the sails out to catch more wind and accelerate the boat.
- Docking This maneuver involves bringing the boat alongside a dock or other fixed object in order to moor or disembark. To dock, the sailor will typically approach the dock at a slow speed while using lines and fenders to control the boat’s position and prevent damage.
Knots and Lines
Learning the right knots and lines to use is essential for any sailor. Here are some of the most important knots and lines to know:

- Bowline This is a versatile knot used for many purposes, including attaching a line to a fixed object, such as a mooring or cleat.
- Square Knot A simple knot used to join two lines of the same diameter.
- Clove Hitch A quick and easy knot for attaching a line to a post or piling.
- Figure-Eight Knot A knot used to stop the end of a line from unraveling.
- Cleat Hitch A knot used to secure a line to a cleat.
- Sheet Bend A knot used to join two lines of different diameters.

- Main Halyard A line used to raise the mainsail.
- Jib Sheet A line used to control the angle of the jib.
- Mainsheet A line used to control the angle of the mainsail.
- Jib Furling Line A line used to furl the jib.
Sailing Safety
- Personal Flotation Devices (PFDs) These are the life jackets or vests that you must wear when on board to ensure your safety. Choose a PFD that fits you properly and is appropriate for your body weight.
- Tethers and Harnesses These are designed to keep you attached to the boat and prevent you from falling overboard. Make sure to clip yourself onto the boat when you’re on deck or going up to the mast.
- Man Overboard ( MOB ) Drill This is a critical safety procedure to practice with your crew. Learn how to quickly identify and recover someone who has fallen overboard.
- Emergency Position Indicating Radio Beacon (EPIRB) An EPIRB sends a distress signal and your location to rescue services in an emergency. Make sure it’s properly registered and in good working condition.
- Navigational Lights Ensure your boat has the required navigational lights and know how to use them properly. These lights help other boats see you in low-light conditions.
Remember that safety is always the top priority when sailing, and it’s essential to take it seriously.

Sailing Terminology Conclusion
As we come to the end of our sailing terminology crash course, it’s important to remember that the world of sailing is vast and varied. Learning even the basics can be a daunting task, but with practice and perseverance, you’ll be able to hoist your sails and set a course for adventure.
Whether you’re a seasoned sailor or just starting out, understanding the terminology is crucial to ensure a safe and enjoyable voyage. From the parts of the boat to the knots and lines, each aspect plays a significant role in the overall sailing experience.
So, as you prepare to embark on your next sailing adventure, keep in mind the importance of safety, navigation, and proper etiquette on the water. And remember, when all else fails, just hoist the Jolly Roger and hope for the best! (Just kidding, don’t actually do that.) Happy sailing!
What is the difference between apparent wind and true wind?
Apparent wind is the wind felt by the sailor on the boat, while true wind is the wind direction and speed relative to the ground.
What are the points of sail?
The points of sail are the directions that a sailboat can travel in relation to the wind. They include upwind, close-hauled, beam reach, broad reach, and downwind.
What does it mean to be “on a reach”?
Being “on a reach” means sailing with the wind coming from the side of the boat, at a perpendicular angle to the boat’s direction.
What is tacking?
Tacking is the maneuver used to turn the boat’s bow through the wind, allowing the boat to change direction while still sailing upwind.
What is jibing?
Jibing is the maneuver used to turn the boat’s stern through the wind, allowing the boat to change direction while sailing downwind.
What is the difference between windward and leeward?
Windward is the side of the boat that is facing into the wind, while leeward is the side of the boat that is sheltered from the wind.
What is a boom vang?
A boom vang is a line used to control the position of the boom, which helps control the shape and position of the sail.
What is a cleat?
A cleat is a device used to secure a line to the boat, allowing the sailor to adjust the tension of the line without having to hold onto it constantly.
What is a winch?
A winch is a mechanical device used to control lines and adjust sails. It typically consists of a drum and handle that can be turned to wind or unwind a line.
Similar Posts

Advantages of Catamaran Sailboat Charter
A catamaran sailboat charter is an exciting way to explore the beauty of the sea. Whether you are an experienced sailor or a first-timer, booking a catamaran sailboat charter has a lot of advantages that you can enjoy. In this article, we will discuss the advantages of booking a catamaran sailboat charter, so that you…

What is a Sloop? Definition, Types and History
A sloop is a type of sailboat that has a single mast and a fore-and-aft rig. Sloops are a type of sailboat that has been around for centuries. They are known for their versatility and ease of handling, making them popular among sailors of all skill levels. Sloops have a single mast and a fore-and-aft…

Types of Sails: A Comprehensive Guide
In the enchanting world of sailboat dynamics, where the dance between wind and water takes center stage, the significance of sails cannot be overstated. Like the wings of a bird, these meticulously crafted sails unfurl to catch the slightest whisper of breeze, converting it into a powerful forward thrust that carries us through the vast…

9 Essential GPS Navigation Tips for Sailing
Sailing is an exhilarating experience that offers an escape from the hustle and bustle of everyday life. However, navigating the open water can be challenging, especially when it comes to staying on course and avoiding potential hazards. That’s where GPS navigation comes in. GPS technology has revolutionized sailing, making it easier and safer than ever…

How Does a Marine Toilet Work?
Have you ever wondered how a marine toilet works? If you’re planning to embark on a boating adventure or just curious about the mechanism of a marine toilet, this article is for you. Marine toilets work similarly to the ones on land with a bowl, a seat, and a flushing mechanism that uses water. However,…

How Much Does Biofouling Slows Down your Boat?
Are you wondering how much biofouling can impact the performance of your sailboat? The amount of how much biofouling slows down a sailboat depends on various factors, such as the type of boat, its size, and the severity of the biofouling. On average, a sailboat with a heavily fouled hull can experience a reduction in…

The Ultimate Guide: How to Make a Sailboat – A Step-by-Step Tutorial
Alex Morgan
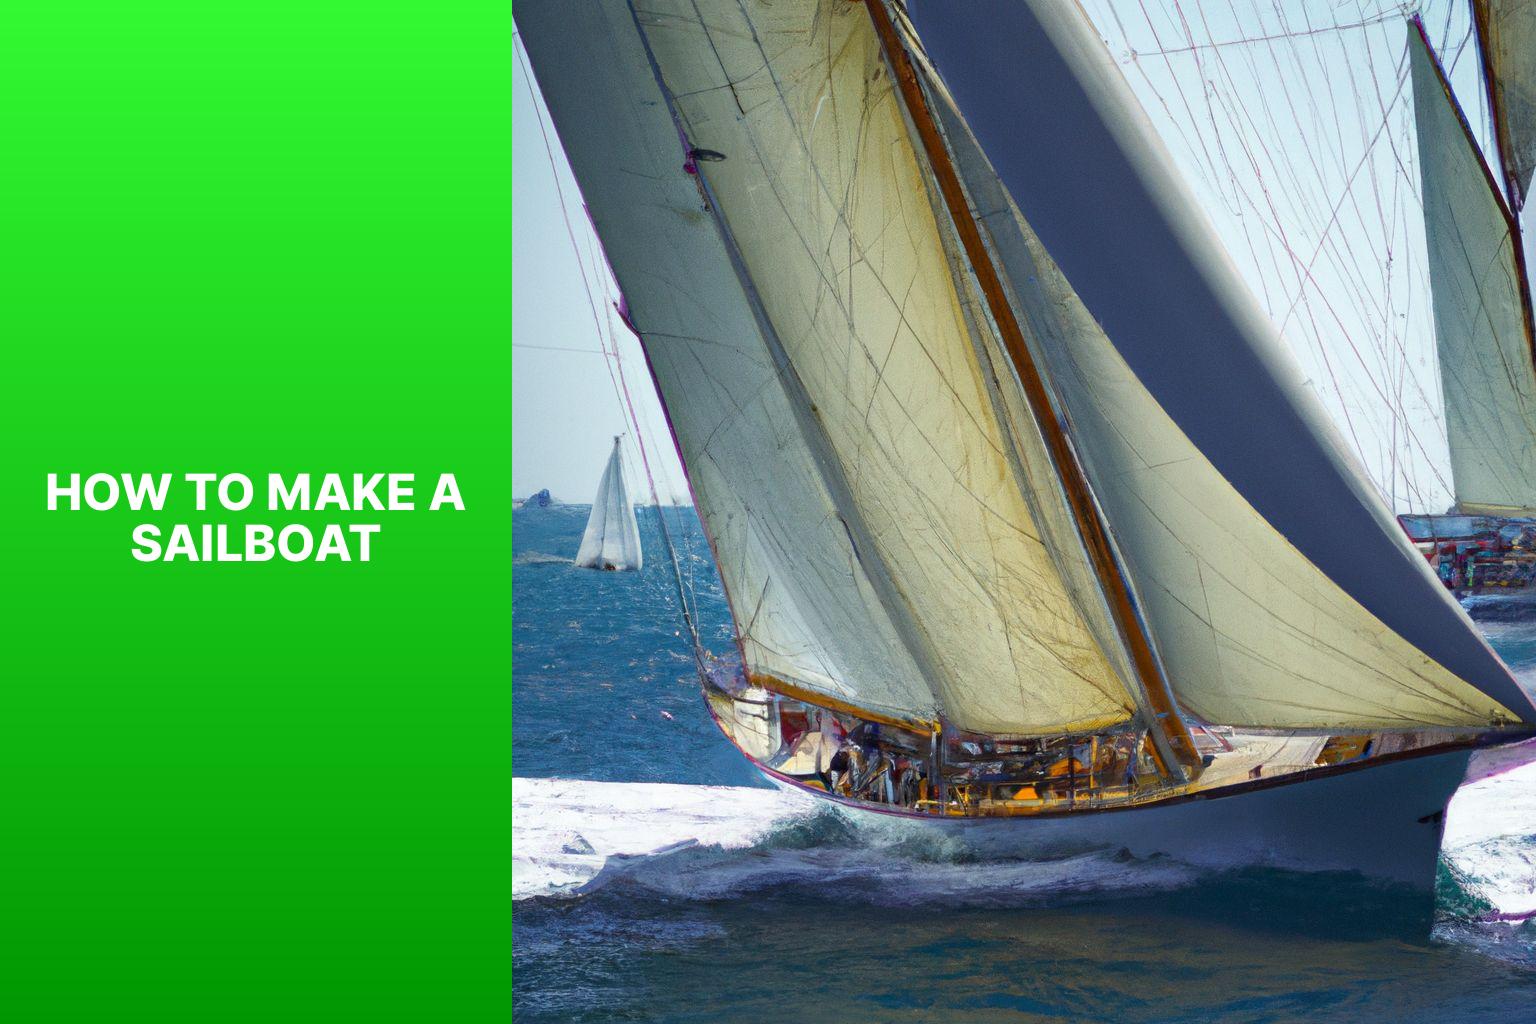
Making a sailboat can be an exciting and rewarding project for those who love the thrill of the open water. Whether you’re an experienced sailor or a beginner, building your own sailboat allows you to customize the design and create a vessel that suits your needs. This guide will take you through the step-by-step process of making a sailboat, from gathering materials and tools to launching and testing the final product.
Introduction to Making a Sailboat
Building a sailboat is a complex and intricate endeavor that requires careful planning, attention to detail, and a love for craftsmanship. In this article, we will explore the various steps involved in making a sailboat, including gathering materials and tools, designing and planning the sailboat, constructing the hull, building and rigging the sail, adding finishing touches, and finally, launching and testing the sailboat.
Gathering Materials and Tools
Before diving into the construction process, it is essential to gather all the necessary materials and tools. We will discuss the essential materials required for building a sailboat, such as wood, fiberglass, epoxy resin, and fasteners. we will explore the various tools needed, including saws, drills, clamps, and measuring instruments. Having the right materials and tools is crucial for a successful sailboat-building project.
Designing and Planning the Sailboat
When it comes to designing a sailboat, there are several factors to consider. We will delve into these considerations, including the type of sailboat, its intended use, and the desired performance characteristics. We will discuss how to create a blueprint or design plan that outlines the specific dimensions, layout, and structural details of the sailboat.
Constructing the Hull
The hull is the foundation of any sailboat, providing buoyancy and stability on the water. We will explore the process of building the framework of the hull, including shaping and assembling the different components. we will discuss the techniques used for planking the hull, such as carvel planking or cold-molded construction.
Building and Rigging the Sail
The sail is a vital component of a sailboat, harnessing the power of the wind to propel the vessel forward. We will discuss the materials required for constructing the sail, including fabric, battens, and hardware. we will cover the steps involved in assembling and attaching the sail to the sailboat, ensuring proper rigging for optimal performance.
Finishing Touches and Final Steps
To add the finishing touch to your sailboat, there are several details to consider. We will explore how to add decorative elements and functional accessories to enhance the overall appearance and functionality of the vessel. we will discuss the steps involved in painting and varnishing the sailboat, protecting it from the elements and giving it a polished finish.
Launching and Testing the Sailboat
After months of hard work and dedication, it’s time to launch your sailboat and test its performance on the water. We will guide you through the necessary preparations before the first launch, including ensuring the boat is properly balanced and rigged. we will discuss the safety precautions to follow when testing the sailboat, ensuring a smooth and enjoyable sailing experience.
By following this comprehensive guide, you will gain the knowledge and confidence to embark on your sailboat-building journey. So, let’s set sail on this exciting adventure of creating your very own sailboat.
Key takeaway:
- Making a sailboat maximizes creativity: Building your own sailboat allows you to express your creativity and create a unique vessel tailored to your preferences.
- Gathering essential materials is crucial: To build a sailboat, you need materials such as wood, epoxy, fiberglass, and marine plywood, which are vital for constructing a sturdy and seaworthy vessel.
- Proper planning ensures a successful build: Designing and planning a sailboat involves considering factors like stability, weight distribution, and sail area to ensure the boat performs well in various conditions.
Gathering materials and tools is crucial when it comes to making a sailboat. Follow these steps:
1. Begin by researching the type and size of sailboat you wish to build. Gather information on the required materials and tools.
2. Create a comprehensive list of all the necessary materials including marine-grade plywood, fiberglass, epoxy resin, screws, and hardware.
3. Make a separate list of all the tools that you will need such as a circular saw, jigsaw, drill, sander, clamps, and measuring tape.
4. Take the time to find reliable suppliers for the materials. Compare prices and quality to find the best options available.
5. Once you have identified the suppliers , go ahead and place orders for all the materials you need. Make sure to order sufficient quantities.
6. If you don’t already have the required tools in your workshop, consider purchasing or borrowing them from someone reliable.
7. It is important to set up a dedicated workspace that provides enough room for you to work comfortably and store both materials and tools.
8. Ensure that your workspace is clean and well-organized. Pay special attention to proper lighting and ventilation.
9. As soon as you receive the materials , inspect them thoroughly for any signs of damage or defects. If you find any issues, contact the supplier immediately.
By following these steps, you will be able to successfully gather all the necessary materials and tools to begin building your sailboat.
What are the Essential Materials for Building a Sailboat?
What are the essential materials for building a sailboat? The necessary materials for constructing a sailboat include high-quality marine-grade plywood for the hull and deck. To reinforce the structure, fiberglass cloth and epoxy resin are employed. As for the assembly, stainless steel hardware is utilized, along with various types of sailcloth for the sails. The rigging is composed of stainless steel mast, boom, and rigging wires . To protect the wooden surfaces, marine-grade paint and varnish are applied. Joint sealing is achieved by utilizing adhesive, sealant, and caulking . Finishing touches are made with bungs, plugs, and filler materials . By using these materials in conjunction with the appropriate tools, one can build a sailboat that is robust and dependable for countless enjoyable hours on the water.
What Tools are Needed for Building a Sailboat?
To successfully build a sailboat, you will require a number of essential tools. Below is a comprehensive list of the necessary tools needed for the construction process:
1. Measuring tools: To accurately measure and mark the boat’s dimensions, you will need a tape measure , ruler , and protractor .
2. Saws: In order to cut materials, both a hand saw and a power saw, such as a jigsaw or circular saw , are indispensable.
3. Drill: A drill with various sizes of drill bits is crucial for creating holes in the boat’s structure and attaching components.
4. Screwdriver: To tighten screws and fasten hardware, you will need both flathead and Phillips head screwdrivers.
5. Clamps: Clamps are necessary to hold components together while they are being glued or screwed.
6. Sanding tools: To achieve smooth surfaces and eliminate imperfections, you will require sandpaper and sanding blocks .
7. Chisels: Chisels are essential for shaping and carving wood for intricate details or joints.
8. Planer: A planer is necessary to level surfaces and reduce the thickness of wooden components.
9. Painting tools: Brushes and rollers are indispensable for the application of paint or varnish, which serves to protect and enhance the sailboat’s appearance.
10. Safety equipment: Make sure to have safety goggles , gloves , and a dust mask to ensure your protection while working.
By utilizing these tools effectively, you will be able to successfully and safely complete your sailboat building project.
When designing and planning the sailboat, it is important to follow these steps:
1. Research different sailboat designs and hull types to gather information and ideas.
2. Determine the size and dimensions of your sailboat based on your needs and the resources available to you.
3. Create a detailed blueprint or design that includes important aspects such as hull shape, rigging, and deck layout.
4. Select materials for the construction of your sailboat based on factors like durability, weight, and cost.
5. Ensure the inclusion of safety features and necessary equipment, such as navigation instruments and life jackets.
6. Calculate the sail area and carefully choose the appropriate sails for optimal performance.
7. Evaluate the stability and balance of the sailboat to ensure safe sailing.
8. It is always helpful to consult experts for advice and guidance throughout the designing and planning process.
To guarantee success, it is crucial to consider your needs, seek expert opinions, and give utmost importance to thorough research, attention to detail, and careful planning.
What Factors to Consider when Designing a Sailboat?
When designing a sailboat, there are several factors to consider for a successful and efficient vessel. These factors include the intended use, hull design, sail plan, structural integrity, and ergonomics and comfort.
Firstly , the intended use of the sailboat must be determined. This involves deciding whether the sailboat will be used for racing, cruising, or both. The intended use will determine the size, shape, and necessary features for optimal performance.
Next , the hull design plays a crucial role in sailing performance. Factors such as stability, speed, and maneuverability should be considered when choosing a design.
The sail plan is another important aspect to take into account. The type and configuration of the sails will depend on the boat size, intended use, and sailing conditions. Factors like ease of handling, sail material, and the number and size of sails should be considered.
Structural integrity is essential for safety and longevity. It is important to consider the materials and construction techniques that can withstand water and wind forces.
Lastly , the sailboat should be designed with ergonomics and comfort in mind. This involves considering factors such as seating arrangements, control access, and storage space.
To ensure the best sailboat design, it is advisable to consult naval architects or experienced sailors for expert advice and guidance. Their knowledge and expertise will help in creating a well-designed and functional vessel.
When designing a sailboat, it is important to consider these factors to ensure a successful and efficient vessel that meets the specific needs of the owner.
How to Create a Blueprint or Design Plan?
When creating a sailboat blueprint or design plan, follow these steps on how to create a blueprint or design plan:
- Research sailboat designs based on sailing conditions and intended use.
- Measure and calculate sailboat dimensions, including length, width, and height.
- Create a detailed sketch, indicating parts like the hull, mast, keel, and rigging.
- Specify durable, lightweight, and cost-effective materials for each part.
- Develop a comprehensive list of materials and resources required, including quantities and specifications.
- Add precise measurements and dimensions to ensure accuracy and alignment.
- Annotate the blueprint with construction notes and instructions, including specific techniques.
To create an effective blueprint or design plan, consult experienced boat designers or naval architects for structural integrity and functionality. Utilize software or online tools for enhanced precision and efficiency. Careful planning and considering all aspects of the sailboat’s design will lead to a successful construction process.
To successfully construct a sailboat hull, it is important to follow these steps:
1. Begin by designing the hull, taking into consideration factors such as size, shape, and the materials that will be used.
2. Gather all the necessary materials for the construction process, including fiberglass, wood, or aluminum, depending on your preference.
3. Prepare the mold if fiberglass is the chosen material. Create a mold that matches the desired shape and apply a release agent to ensure easy removal.
4. Once the mold is prepared, start applying layers of fiberglass sheets and resin smoothly, making sure to avoid any air bubbles.
5. After the fiberglass has cured, carefully remove the hull from the mold and use sandpaper to smooth out any rough edges or imperfections.
6. To strengthen the hull, consider adding reinforcements such as bulkheads or ribs to provide structural support.
7. Install any necessary fittings according to the design, including cleats, ports, and drains.
8. For added protection and to enhance the appearance, apply a suitable coating or paint to the hull.
9. Prior to completing the construction process, it is important to thoroughly inspect the hull for any defects or leaks. Test the sailboat in water to ensure its proper performance.
To ensure a successful sailboat hull construction, it is crucial to plan properly, paying attention to detail, and following safety standards. If needed, consult professional boat builders or utilize resources that offer specific guidance tailored to your project. Happy sailboat construction!
How to Build the Framework of the Hull?
To learn how to build the framework of the hull, follow these step-by-step instructions. First, measure and mark your desired hull length on the building board. Next, cut long, straight pieces of lumber that match the hull length. Place these pieces parallel on the building board, making sure there is equal spacing. Secure the lumber to the building board using clamps or screws. Then, measure and mark the desired hull width on the lumber pieces. Cut shorter pieces of lumber that match the hull width. Attach these shorter pieces perpendicular to the longer ones, using screws or nails. Add any additional shorter pieces needed to complete the framework, ensuring even spacing. It’s important to check the framework for accuracy and make any necessary adjustments. Secure all connections with extra screws or nails for added stability.
Building the framework of the hull is a crucial step in sailboat construction. It provides the necessary structure and shape for stability and functionality in the water. By following proper measurements and securely fastening the lumber together, builders create a strong foundation for the rest of the sailboat. The framework acts as the backbone of the sailboat, allowing it to withstand wind and waves while providing structural support for other components. A sturdy framework ensures a well-built and seaworthy sailboat, enhancing the thrill of sailing.
What Techniques to Use for Planking the Hull?
To plank a sailboat’s hull , it is important to use the following techniques:
– First , prepare the planks by cutting them to the desired dimensions. Make sure they are smooth and free of defects.
– One effective technique is steam bending . Heat the planks in a steam box until they become pliable, and then shape them to fit the curvature of the hull.
– Next , fasten the planks securely to the hull’s framework using screws or nails. Ensure proper spacing and secure penetration.
– To prevent water from entering the hull through the seams, it is crucial to seal them. Apply a waterproof sealant like epoxy or polyurethane.
– After the sealant dries, sand the planks for improved appearance and performance.
Pro Tip: When planking the hull, take precise measurements and cut the planks carefully to achieve a tight fit. Properly securing and sealing the planks will result in a strong and watertight hull for your sailboat.
Building and rigging the sail is a crucial skill in sailing. Throughout history, civilizations like the Egyptians and Phoenicians utilized unconventional materials such as papyrus and animal hides to construct sails. In modern times, sailmaking has advanced using innovative techniques and high-quality materials. Today, the process of building and rigging sails involves precise measurements, intricate designs, and the utilization of high-performance materials. Sailmakers play a critical role in providing sailors with sails that are both durable and efficient, enabling them to harness the power of the wind and navigate through open waters.
To successfully build and rig a sail , follow these steps:
1. Choose the appropriate sail material: Begin by deciding on the type of material you wish to use for your sail, such as Dacron , nylon , or laminate .
2. Measure and cut the sail panels: Use a sharp fabric cutting tool to accurately measure and delineate the dimensions of the sail panels on the chosen material. Then, cut along the marked lines.
3. Assemble the panels: Arrange the sail panels in the desired order and position. Employ a sewing machine to securely stitch the panels together, ensuring that you follow the specified seam allowance.
4. Add reinforcements: Affix reinforcements, like corner patches and reefing points, to the relevant areas of the sail. These reinforcements enhance the sail’s strength and durability.
5. Install the sail hardware: Attach the necessary hardware, such as grommets, luff tape, and battens, to the sail. These components facilitate rigging and effective control of the sail.
6. Rig the sail to the mast and boom: Connect the sail to the sailboat’s mast and boom using suitable connectors, such as hanks or slides, securing the sail firmly in place.
7. Tune the sail: Adjust the sail’s tension by tightening or loosening the halyard and other control lines. This ensures optimal performance and shape during sailing.
What Materials are Required for Constructing the Sail?
To construct a sail for a sailboat, you will need several materials. First, you will need a durable and lightweight sailcloth made from materials such as Dacron or Nylon . This will provide strength and resistance to tearing. Next, you will need high-quality UV-resistant thread to sew the sail together, ensuring it can withstand the elements and maintain its integrity.
To strengthen areas of the sail that experience higher stress, such as corners and reef points, you will need adhesive-backed polyester tapes or webbing. These reinforcements will help keep the sail in good condition during use. You will need grommets or eyelets to create attachment points on the sail for halyards, sheets, and other lines. These can either be made of metal or plastic fittings.
It is important to insert battens into pockets on the sail to provide shape and stability. These thin and flexible strips can be made of fiberglass, carbon fiber, or wood, depending on your preferences. You will need hardware such as shackles, blocks, and cleats to attach and adjust the sail on the sailboat.
When constructing your sail, make sure to choose materials that are suitable for the size and type of sailboat you have, as well as the intended use of the sail. The materials should be durable, resistant to UV damage, and able to withstand the forces and conditions encountered while sailing.
How to Assemble and Attach the Sail to the Sailboat?
To learn how to assemble and attach the sail to the sailboat, follow these steps:
1. Prepare the sail and sail track: Lay out the sail, check for damage/debris, and ensure the sail track on the mast and boom is clear and in good condition.
2. Attach the halyard: Connect the halyard to the head of the sail and hoist it up the mast securely.
3. Attach the luff and tack: Slide the luff (front edge) of the sail into the sail track on the mast. Attach the tack (bottom front corner) of the sail to the fitting on the boat’s bow.
4. Attach the leech and clew: Slide the leech (back edge) of the sail into the sail track on the boom. Attach the clew (bottom back corner) of the sail to the fitting on the boom.
5. Tension the sail: Thoroughly tighten the halyard to remove any wrinkles or flapping in the sail. Ensure the sail is evenly tensioned along its edges.
6. Secure the sheets: Attach the sheets (lines that control the angle of the sail) to the clew and route them back to the cockpit, ensuring they are free from obstructions.
7. Test the sail: Adjust the sheets and the angle of the sail for optimal performance. Ensure the sail is properly trimmed and responding to the wind.
By following these steps, you can successfully assemble and attach the sail to your sailboat. Remember to always prioritize safety and seek guidance from experienced sailors if needed.
When applying the finishing touches to a sailboat, there are important final steps to consider:
1. Apply a final coat of paint or varnish to protect the wood and enhance appearance.
2. Securely install the rudder and tiller for smooth steering.
3. Tighten the attachment of the mast and rigging for optimal sailing performance.
4. Properly install the boom and attach the main sail .
5. Efficiently attach the jib sail to the forestay to capture the wind effectively.
6. Rig the halyards and sheets for easy sail control.
7. Securely mount any additional equipment.
8. Double-check all connections, fastenings, and fittings.
9. Thoroughly inspect the sailboat for any defects or issues.
10. Launch the sailboat and enjoy your completed creation.
How to Add Finishing Details to the Sailboat?
When it comes to adding finishing details to a sailboat, many people wonder how to do it correctly. Fortunately, I can guide you through the process step-by-step. By following these instructions, you will be able to achieve a polished final product that is both beautiful and functional.
Step 1: Sand
To start, you need to sand the entire surface of the sailboat. This will create a smooth texture and prepare it for the varnish or paint that you will be applying later.
Step 2: Clean
After sanding, it is important to clean the surface to remove any dust or debris. You can use a damp cloth for this task. Make sure the surface is completely clean and dry before proceeding.
Step 3: Prime
To protect the sailboat against water damage and create a smooth base, apply marine-grade primer. This step is crucial for the longevity of the finishing details. Allow the primer to dry completely before moving on to the next step.
Step 4: Varnish or Paint
Now comes the fun part – applying the varnish or paint. For a natural wood look, use multiple coats of marine-grade varnish. If you prefer some color and design, opt for marine-grade paint instead. Make sure to apply each coat evenly and allow enough time for drying between coats.
Step 5: Add Hardware
Once the varnish or paint has dried, it’s time to install any necessary hardware on the sailboat. This includes items such as cleats, handles, or hinges. Ensure that they are securely attached and in the correct positions.
Step 6: Detail
To enhance the aesthetic appeal of the sailboat, consider adding some decorative elements. Pinstripes, decals, or other decorative touches can really make a difference. Get creative with this step and add your personal touch to the sailboat.
Step 7: Inspect
Before you launch the sailboat, take the time to thoroughly inspect all the finishing details. Check for security and quality. If any adjustments or touch-ups are needed, make sure to address them before hitting the water.
By following these steps, you will be able to successfully add the finishing details to your sailboat. The end result will be a beautiful and functional watercraft that you can be proud of.
What Steps are Involved in Painting and Varnishing the Sailboat?
The steps involved in painting and varnishing a sailboat are:
- Clean the sailboat’s surface using a mild detergent and water to remove dirt and debris.
- Sand the surface with fine-grit sandpaper to create a smooth base for painting and varnishing.
- Apply a primer coat evenly to create a strong base.
- Let the primer coat dry completely as per instructions.
- Use a brush or roller to apply the desired paint color , starting from the top and working down.
- Allow the paint to dry between coats and apply more coats if needed.
- To varnish the sailboat, apply a thin and even coat in the direction of the wood grain.
- Let the varnish dry between coats and apply more coats for desired shine and protection.
Suggestions for painting and varnishing the sailboat:
- Use high-quality marine-grade paint and varnish for durability and protection against the elements.
- Consider using a marine-grade polyurethane varnish for a glossy finish.
- Take your time and ensure proper preparation and application techniques for a professional result .
- Follow safety precautions such as wearing gloves , goggles , and a mask to protect against fumes.
- Regularly inspect and maintain the painted and varnished surfaces for longevity.
When I launched and tested my newly built sailboat, I felt excitement and anticipation . Launching and testing a sailboat involves important steps to ensure functionality and safety. The calm waters were perfect for my maiden voyage. As I hoisted the sails and caught the wind, I tested the sailboat’s functionality by adjusting their angles to catch the wind. The sailboat glided effortlessly, showcasing the successful launch and testing process. The boat’s responsiveness and stability were remarkable, proving that launching and testing the sailboat properly resulted in optimal performance. I knew that my hard work had paid off. The sailboat performed flawlessly , and I felt proud as I navigated the open waters. It was an exhilarating experience , marking the successful launching and testing of my sailboat and the beginning of many memorable adventures.
How to Prepare the Sailboat for its First Launch?
To prepare the sailboat for its first launch, follow these steps:
- Check the hull: Inspect for damage or cracks. Ensure proper sealing and no leaks.
- Verify essential equipment: Have necessary safety equipment on board, including life jackets, flares, and a first aid kit.
- Secure the rigging: Check the mast, boom, and rigging lines for wear or damage. Tighten and secure them.
- Check the sails: Examine for tears or fraying. Ensure proper attachment to the mast and boom.
- Test the navigation equipment: Ensure proper functioning of the compass, GPS, and other navigational instruments.
- Inspect the engine: Check oil, fuel, and coolant levels. Start the engine to ensure smooth operation.
- Verify the bilge pump: Test to ensure it functions correctly and can remove accumulated water.
- Fuel and water: Ensure sufficient fuel and freshwater on board.
- Inform someone: Share sailing plans, including estimated time of departure and return, with someone onshore.
- Perform a safety briefing: Gather passengers and explain safety equipment location and emergency procedures.
Pro-tip: Before longer trips, it’s recommended to have a practice sail near shore. This will build confidence in handling the sailboat and verify proper functioning.
What Safety Precautions to Follow when Testing the Sailboat?
When testing a sailboat, it is important to follow safety precautions for a successful and safe experience. Here are some steps to consider:
1. Check the weather forecast: Before testing the sailboat, check the weather to avoid severe conditions like high winds or storms.
2. Inspect the sailboat: Thoroughly check the sailboat for any damages or issues with the hull, rigging, and sail.
3. Wear appropriate safety gear: Always wear a life jacket and suitable footwear.
4. Inform someone about your plans: Let someone know your plans, including location and duration, as a safety precaution.
5. Use proper navigation equipment: Have a compass and charts for safe navigation.
6. Start with calm waters: Choose calm and shallow water, especially if you are a beginner, and avoid strong currents or heavy boat traffic.
7. Be cautious of capsize risks: Understand the risk of capsize and practice self-rescue techniques.
8. Be aware of other boats and obstacles: Watch out for other boats, objects, or obstacles in the water to avoid accidents.
9. Follow boating regulations: Familiarize yourself with local regulations and follow them for a safe and legal experience.
10. Stay alert and maintain control: Always stay alert and in control of the boat, adjust to changing weather conditions.
Remember, safety should always be the top priority when testing a sailboat. By following these precautions, you can enjoy a safe and enjoyable sailing experience.
Some Facts About How To Make A Sailboat:
- ✅ Building a wood sailboat takes approximately 100 hours over a span of 3 months. (Source: www.instructables.com)
- ✅ The cost of building a wood sailboat is around $1,000, excluding tools. (Source: www.instructables.com)
- ✅ A wood sailboat requires materials such as oak plywood, brad nails, epoxy resin, etc. (Source: www.instructables.com)
- ✅ An origami paper boat can be made by folding a sheet of paper in a specific pattern. (Source: www.wikihow.com)
- ✅ Aluminum foil can be used instead of paper to make a waterproof origami boat. (Source: www.wikihow.com)
Frequently Asked Questions
1. how long does it take to build a wood sailboat.
Building a wood sailboat typically takes around 100 hours over a span of 3 months.
2. How much does it cost to build a wood sailboat?
The cost of building a wood sailboat is estimated to be around $1,000, excluding tools.
3. What materials are needed to build a wood sailboat?
To build a wood sailboat, you will need boat building plans, oak plywood, pencils, ruler, tape measure, brad nails, epoxy resin, epoxy hardener, silica thickener, wood flour thickener, masking tape, Japanese pull-saw, table saw, router, sanding discs, jigsaw, combination square, drill, wire or zip ties, C-clamps, mixing cups, mixing sticks, gloves, wax paper, fiberglass cloth, plastic spreader, waterproof glue, screws, fasteners, blocks, pad eyes, gudgeon & pintle, patience, and elbow grease.
4. How do you make a paper boat?
To make a paper boat, start by folding an 8 ½ in x 11 in sheet of paper in half. Follow the step-by-step instructions outlined in the reference to create the boat shape.
5. What materials are needed to make a paper boat?
To make a paper boat, you will need a sheet of printer paper or origami paper. Additional materials such as clear tape, waxed paper, or a crayon can be used to reinforce or waterproof the boat.
6. How do you increase the water resistance of a sailboat?
To increase the water resistance of a sailboat, you can use an outdoor craft sealant. Spray the entire boat with the sealant and let it dry before using.
About the author

Leave a Reply Cancel reply
Your email address will not be published. Required fields are marked *
Save my name, email, and website in this browser for the next time I comment.
Latest posts

The history of sailing – from ancient times to modern adventures
History of Sailing Sailing is a time-honored tradition that has evolved over millennia, from its humble beginnings as a means of transportation to a beloved modern-day recreational activity. The history of sailing is a fascinating journey that spans cultures and centuries, rich in innovation and adventure. In this article, we’ll explore the remarkable evolution of…

Sailing Solo: Adventures and Challenges of Single-Handed Sailing
Solo Sailing Sailing has always been a pursuit of freedom, adventure, and self-discovery. While sailing with a crew is a fantastic experience, there’s a unique allure to sailing solo – just you, the wind, and the open sea. Single-handed sailing, as it’s often called, is a journey of self-reliance, resilience, and the ultimate test of…

Sustainable Sailing: Eco-Friendly Practices on the boat
Eco Friendly Sailing Sailing is an exhilarating and timeless way to explore the beauty of the open water, but it’s important to remember that our oceans and environment need our protection. Sustainable sailing, which involves eco-friendly practices and mindful decision-making, allows sailors to enjoy their adventures while minimizing their impact on the environment. In this…
- Members Forum
- Log In / Create Account
Tacking and Gybing Made Easy
by Harbor Sailboats | Mar 19, 2020 | Blog | 0 comments

Tacking and gybing a sailboat is among one of the first lessons we teach in our basic sailing course . That said, new sailors tend to make small errors that cause the maneuvers to be difficult and possibly unsafe. Here, we will remind you of a few simple steps and techniques to increase your boat handling skills while also keeping the crew and the boat safe.
Tacking- Turning the boat so that the bow passes through the wind
A sailboat can only sail roughly 45 degrees below the true wind direction. So, in order to sail to a destination that’s inside the “no sail zone”, we must tack the boat 90 degrees at a time in order to reach that destination. During this maneuver the helmsman will slowly turn the boat through the wind while the crew will release the working jib sheet and trim on the new working sheet.
One of the biggest mistakes we see on the water is the helmsman turning the boat too fast leading to more difficult crew work and overturning of the boat. By turning the boat slower, the crew will have more time to trim the jib and the helmsman is less likely to overturn and end up on a beam reach.
Your rate of turn should start slow, speed up as you pass through the wind, and decrease as you fall off onto close hauled. If you can hear your rudder dragging through the water and see turbulent water, you’re likely turning too fast. By turning slower, you’re also allowing the crew more time to bring on the new working sheet prior to the boat reaching close hauled and the sail “powering up.”
Tacking slower will increase your boat speed coming out of the tack and make the maneuver a lot easier on your crew!
Gybing- Turning the boat so that the stern passes through the wind
Theoretically, a boat can sail directly downwind but it’s not very efficient on most boats and can be dangerous due to accidental gybes. Instead, we like to sail on a broad reach (roughly 140-degree true wind angle) and gybe across to another broad reach. Just like tacking, turning slow will make gybing safer and easier for everyone involved.
During a gybe, your sails will always have pressure in them because you are not passing through the “no sail zone”. This means you need to trim your mainsail to center line (or close to it) prior to starting your turn. This will reduce the amount of room the boom can move across the cockpit as you turn the stern though the wind. The jib can remain in its current trim as long as a crew member is ready to release the sheet and trim on the new one as the stern passes the wind.
Once the main has been trimmed in, the helmsman can start the turn and level out once they approach the new broad reach. The mainsail trimmer needs to ease the mainsheet once the stern has passed through the wind and the jib trimmer will do the same with the new jib sheet.
The biggest tip here is to turn the boat slower when tacking and gybing.
Try it out on your next charter and let us know if you feel a difference in performance and comfort!
Submit a Comment Cancel reply
You must be logged in to post a comment.
Latest Blog Posts
- Sailing Lessons in San Diego
- Water in the Bilge
- Bow Standing
- Gear then Steer
- 2024 Club Flotilla- BVI’s
IMAGES
VIDEO
COMMENTS
The hull is what most people would consider 'the boat'. It's the part that provides buoyancy and carries everything else: sails, masts, rigging, and so on. Without the hull, there would be no boat. The hull can be divided into different parts: deck, keel, cabin, waterline, bilge, bow, stern, rudder, and many more.
The headstay is a crucial part of your boat's standing rigging system. It is the cable or rod that connects the top of the mast (the masthead) to the bow of the boat. The headstay helps maintain the mast's stability and provides a support structure for the jib. The tension in your headstay plays a significant role in the jib's sail shape.
Hull - The main structure. Keel - The fin under the boat. Rudder - To steer the boat. Mast and Rigging - Supporting the sails. Boom - Supporting the mainsail. Sails - The canvas used to harness the energy of the wind. The starboard and port side of the boat. Windward and Leeward. Basic parts of a sailboat.
A sailboat diagram is a visual representation illustrating the various parts and components of a sailboat, including the types of sails, rigging, mast, keel, hull, and other elements. It provides an overview of how these components work together to navigate and catch wind for propulsion.
New to sailing? We created this comprehensive basic sailing video series just for you! We know how difficult it is to find solid answers to your questions re...
1. Attach the sails. Secure the bottom front ( tack) of the mainsail and jib to their respective shackles on the boom and the bow of the boat. There will be a small line ( outhaul) attaching the rear corner of the mainsail ( clew) to the end of the boom. Pull it so the foot of the main is taut, and cleat.
Starting with the basics, the diagram depicts eight points of sailing: In Irons, Close Hauled, Beam Reach, Broad Reach, Running Downwind, Dead Run, By The Wind, and Beating. Each point represents a different angle at which a boat can sail relative to the direction of the wind. Let's begin with "In Irons" - this humorous term refers to ...
Hull - The watertight structural shell of a boat. Bow - The forward part of a boat. Stern - The aft part of the boat. Transom - The more or less flat surface that closes the hull at the stern. Rudder - The sailboat is steered by a fin-shaped appendage attached beneath the boat toward the stern which can be rotated to change the angle ...
Up Top - Types of Sailboat Designs. Aft Cockpit The "classic" design of the modern sailboat, if there is such a thing, is called the aft cockpit. This layout has the cockpit in the rear-most section of the hull, behind the cabin. Center Cockpit The center cockpit sailboat has the cockpit closer to the mast. That leaves a lot of space in the rear of the hull for a huge stateroom.
Take a look at some of these additional sailing skills. Practice Tying Knots. For thousands of years, sailors have used times where it is cold or raining by doing things like tying knots. Knots are important on a sailboat and you will need to learn at least some basic sailing knots to sail at all. Sail Safely.
One of the most important facets to understand when learning about how a sail works under the magnifying glass of aerodynamics is understanding the forces at play. There are four fundamental forces involved in the combination of aerodynamics and a sailboat and those include the lift, drag, thrust, and weight.
Mastering Sailboat Navigation: Unveiling the Power of the Points of Sail Diagram. Sailboat navigation is an ancient art that mariners have entrusted their lives to for centuries. From early explorers to modern-day sailors, understanding the ins and outs of navigating a sailboat is crucial for a successful voyage. One powerful tool that has ...
Take a look at this sailboat rigging diagram: Sailboat rigging diagram Lines. Lines are a type of rope with a smooth surface that works well on winches found on sailboats. They come in various styles and sizes and have different stretch capabilities. Dyneema and other synthetic fibers have ultra-high tensile strength and low stretch.
Faster boats have less drag from hull form and smooth bottoms, but all the drag and friction vectors point straight back against the boat's forward motion so they only slow the boat down, not change its direction. In the diagram below, you can see vectors for the lifting force from the sails and the side force of the keep pushing against the water.
To guarantee a smooth sailing experience, follow these steps: 1. Carefully inspect the hull of the sailboat for any damage or cracks. Be sure to check the seams and joints thoroughly. 2. Take the time to check the rigging, including the mast, shrouds, stays, and halyards, for signs of wear, fraying, or corrosion. 3.
A basic sailboat is composed of at least 12 parts: the hull, the keel, the rudder, the mast, the mainsail, the boom, the kicking strap (boom vang), the topping lift, the jib, the spinnaker, the genoa, the backstay, and the forestay. Read all the way through for the definition of each sailboat part and to know how they work.
Line: Lines are ropes. They are everywhere on boats. There is only one "rope" on a sailboat, the bolt rope that runs along the mainsail's foot. Mainsail: It's all in the name; this is the boat's mainsail. It is the sail attached to the back of the mast. Mast: The mast is a large, vertical pole that holds the sails up.
The mainsail is responsible for taking the major part of the wind. Headsail: A sail that is forward of the mast, toward the front of the boat. The jib and spinnaker are the two main types of headsails on a modern sailboat. Boom: A horizontal rod at the bottom of the mainsail that functions as support for the sail. The boom is attached to the mast.
Driven by the boat's diesel engine, the propeller allows good progress to be made when the wind is not cooperating.. Under sail though the propeller is redundant and the fixed blades provide nothing but unwanted drag. This is greatly reduced if the blades can fold aft in a clamshell arrangement or feather in self-alignment with the water flow.
Sailing Close Hauled. If the wind is coming at you head-on from either side, and you are close hauled, check for the direction of the wind. If it is blowing from the starboard side, turn the boat towards the right so that you point your bow into the wind. Continue turning until the wind is now coming to your port side.
Close-Hauled. Sailing as close to the wind as possible, with the sail set at a sharp angle to the boat. Beam Reach. Sailing perpendicular to the wind, with the sail set at a right angle to the boat. Broad Reach. Sailing with the wind at a diagonal angle behind the boat, with the sail angled away from the boat. Running.
Let the primer coat dry completely as per instructions. Use a brush or roller to apply the desired paint color, starting from the top and working down. Allow the paint to dry between coats and apply more coats if needed. To varnish the sailboat, apply a thin and even coat in the direction of the wood grain.
Tacking- Turning the boat so that the bow passes through the wind. A sailboat can only sail roughly 45 degrees below the true wind direction. So, in order to sail to a destination that's inside the "no sail zone", we must tack the boat 90 degrees at a time in order to reach that destination. During this maneuver the helmsman will slowly ...